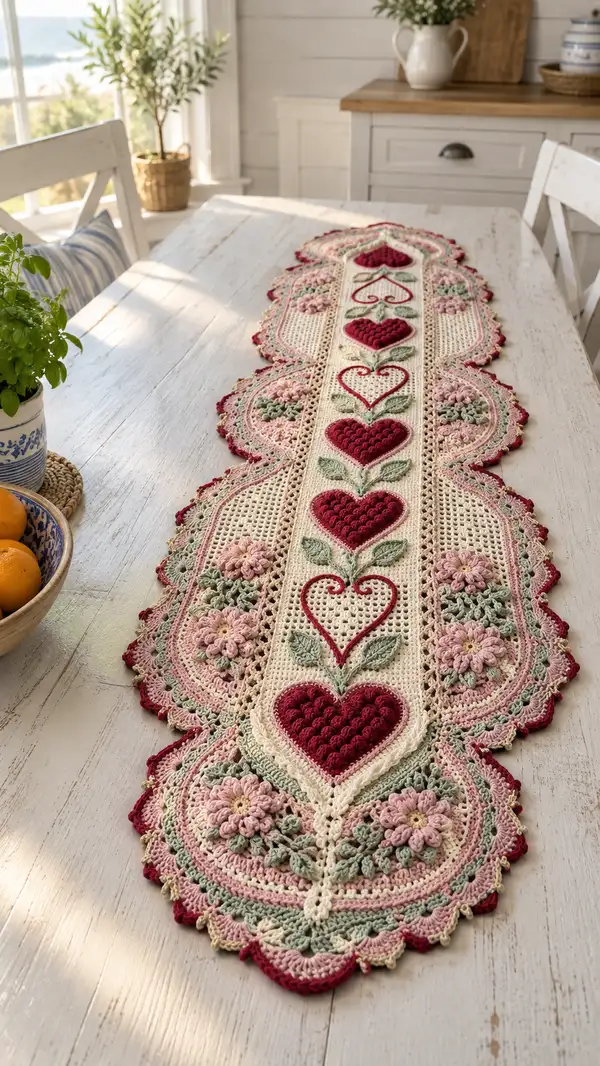
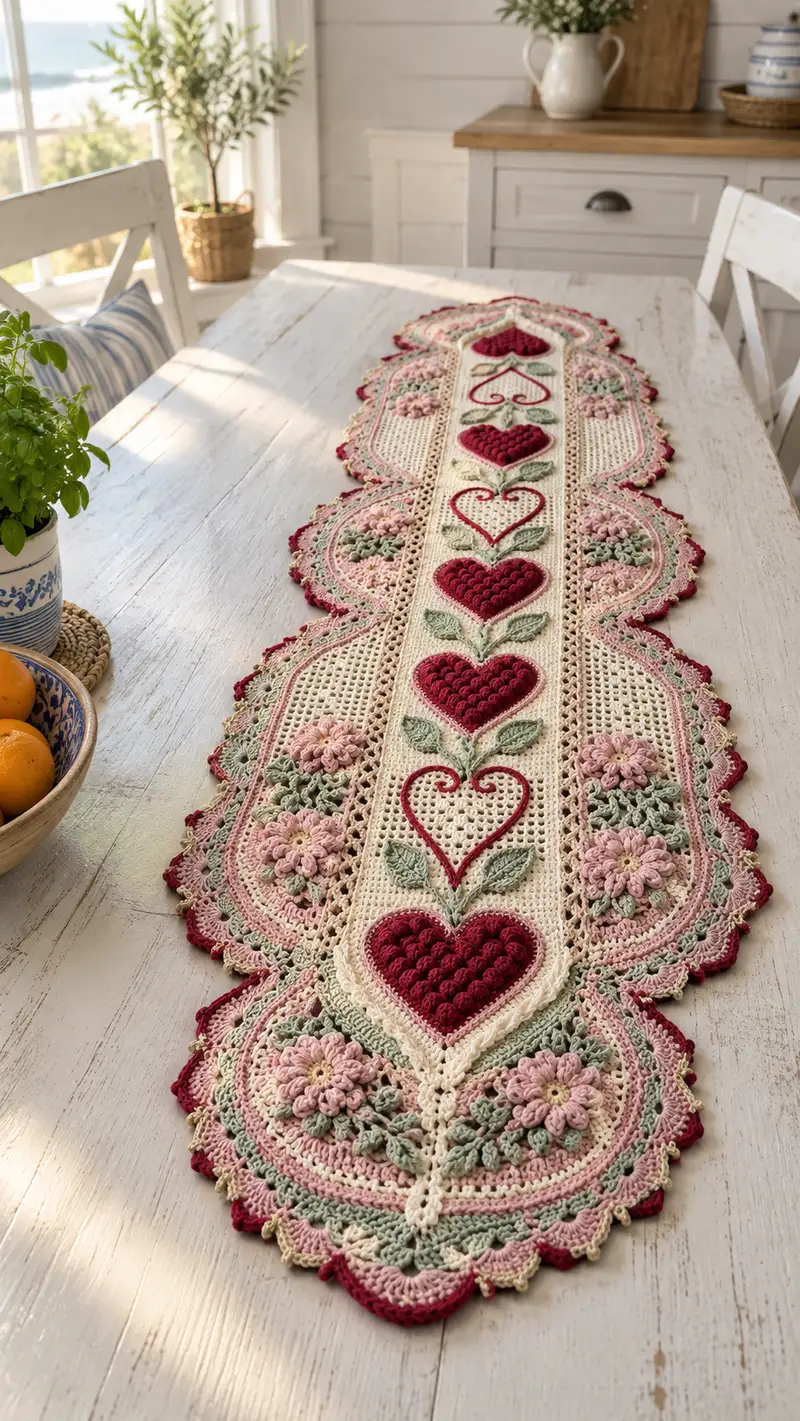
A romantic, vintage-inspired crochet table runner featuring raised puff-heart appliques, layered floral medallions and a scalloped lace border. Soft cream, dusty rose, sage and deep berry tones create a delicate palette. The runner is built from a central mesh panel with repeated decorative motifs joined into an elegant elongated oval silhouette. This pattern uses textured stitches, appliques and a multi-round edging to give a heirloom feel perfect for special occasions or everyday charm.
Progress Tracker
0% Complete
— Pattern Overview :
Info :
This runner is constructed from a central mesh strip worked in joined rounds with symmetrical medallion motifs crocheted separately and joined to the central panel as you progress. Key components: central mesh strip, five raised heart appliques with vine stems and leaves, eight floral medallion motifs (four per side), small leaf appliques, and a multi-round scalloped border. Work in the round for continuity and to create a seamless runner. Use stitch markers at the start of every joined round and pin motifs before joining.
— Gauge & Finished Size :
Info :
Gauge with 3.5mm hook: 18 dc = 10 cm in a simple swatch. Finished runner as shown measures approximately 34 cm (13.5 in) wide at widest scallop points and approx 140-150 cm (55-59 in) long. Adjust yarn weight and hook to change the final size. Blocking will open lace and set edges.
— Central Mesh Panel :
Round 1 :
Ch 42, join with sl st to form a ring being careful not to twist (42 ch foundation)
Round 2 :
Ch3 (counts as dc), 1 dc in each ch around, join with sl st to top of ch3 (42 dc)
Round 3 :
Ch1, 1 sc in same st, *ch3, skip next dc, sc in next dc; rep from * around, join with sl st to first sc (42 sc placement points, 21 ch3 spaces)
Round 4 :
Ch3, 1 dc in same sc, *into each ch3 space: (2 dc, ch1, 2 dc), sc into next sc; rep from * around, join (counts vary: 21 shell groups, 21 sc)
Info :
These first rounds establish the mesh and shell rhythm that will remain consistent as the central spine on which hearts and vines are placed. Keep tension even and count shells every repeat to avoid drifting.
Round 5 :
Ch1, sc in next dc, *ch5, sk next shell (3 dc,ch1,2dc) entirely, sc in next dc; rep from * around, join (21 ch5 spaces)
Round 6 :
Ch3, dc in same st, *into each ch5 space: (3 dc, ch1, 3 dc), sc into next sc; rep from * around, join (21 large shell groups)
Round 7 :
Ch1, sc in each dc across shells until next ch-space, *ch7, sc into top of next shell; rep from * around, join (21 ch7 spaces)
Round 8 :
Ch3, 1 dc in same st, * (4 dc, ch1, 4 dc) into ch7 space, sc into next sc; rep around, join (21 larger shell groups)
Info :
At this stage the central panel is stable. We will keep the mesh but add vertical columns for vine embroidery and to provide precise heart placement. Use stitch markers to mark the central column of shells where hearts will sit (every 5th shell along length near center).
Round 9 :
Ch1, sc in each dc and sc across maintaining shell structure; where marked center shell occurs, replace sc with ch3, sl st to indicate vertical placement (this is a marker technique, overall stitch count remains consistent)
Round 10-16 :
Repeat Round 8 and Round 9 sequence: work two rounds of shells then one even sc round to maintain height. Maintain 21 shell groups per round; overall circumference and counts remain consistent for shaping (shells remain constant)
Info :
After Round 16 the central panel should measure approximately the length needed between the first and last heart positions. Use a measuring tape and place temporary markers for where each heart applique will be joined (five centers evenly spaced). Pin placement marks carefully: first at the center of runner, then two above and two below each spaced equally.
Round 17 :
Ch1, sc evenly around for a tidy base; at positions designated for heart joins, replace sc with ch5 loops that will be used to join the heart later (these loops act as anchors), complete round and join (maintain stitch rhythm, still 21 shell anchors)
Round 18-24 :
Work 7 rounds: Ch3, dc in each st maintaining shell and sc structure; keep the central shell count consistent. This builds the height between heart anchors and prepares attachment rows for side medallions. Join after each round. (maintain counts)
Info :
If you prefer to work the central panel longer before attaching motifs, continue alternating shell rounds and even sc rounds in the established pattern until the panel reaches desired length. The sample runner uses 24 rounds before medallion attachment.
— Raised Heart Appliques (Make 5) :
Info :
These hearts are made as separate appliques using puff/bobble stitches to create a raised texture. Use deep berry color. Each heart will be worked flat and then edged and joined to the central panel by stitching through the ch5 anchor loops from Round 17.
Round 1 :
With berry, ch10, join with sl st to form a small ring (10 ch foundation)
Round 2 :
Ch1, sc in each ch around (10 sc), join (10)
Round 3 :
Ch2 (counts as hdc), hdc in next st, 2 hdc in each st across to end to increase evenly, join (20 hdc)
Round 4 :
Ch1, sc in next 2 sts, *(puff) into next st, sc in next st; rep across 10 puff placements total; join (keep 20 base stitches referenced; puff clusters provide rise)
Info :
Puff stitch: yarn over, insert hook into indicated stitch, pull up loop (repeat 3 times for 4 loops on hook total), yarn over and pull through all loops, ch1 to close puff. For a plumper heart I use 4-loop puffs; test on scrap.
Round 5 :
Ch2, work 1 hdc around each puff cluster and base st to start shaping the lobes: hdc across until you reach the top center, at center increase: (hdc, inc hdc, hdc) in same st to create a point; continue hdc around to create symmetrical top lobes; join (approx 24 hdc, exact counts: careful matching left/right)
Round 6 :
Ch1, sc in each st around, when you reach each lobe tip work (sc, inc, sc) to round the curves; join (approx 28 sc)
Round 7 :
Ch2, hdc around adding one increase at the center bottom to form the heart point: locate bottom center stitch and work (hdc, inc) to create depth; join (approx 30 hdc)
Round 8 :
Ch1, sc in each st; place 6 evenly-spaced puffs across the front by making puff stitches on the next round through the front loops only so they remain raised; join (sc count approx 30)
Info :
To create the clustered bobble texture on the heart face, work puffs into front loops only of the sc round. Space puffs in vertical columns: 3 columns of 2 puffs each forming the heart shape. Keep the back flat for easy joining.
Round 9 :
Ch1, sc across; work a tight round of sc to finish edge, then sl st around to tidy; fasten off leaving long tail for sewing. Final stitch count will approximate 30 sc across the heart perimeter.
Info :
Block each heart lightly to shape. Position the heart over the ch5 anchor loop on the central panel and sew through base and anchor loops with matching yarn using whip stitch, pulling heart slightly forward so the puff face is prominent. Repeat for five hearts spaced evenly along center.
— Vine & Leaves (Embroidered & Applique Leaves) :
Info :
Leaves are worked in sage and are small flat appliques sewn along the vine between hearts. Each leaf uses 8-10 rounds to shape with slightly raised vein detail. You will make 10 leaf pairs (20 leaves) total for symmetry, plus a few spare pieces for placement options.
Round 2 :
With sage, ch8, sc in 2nd ch from hook and next 5, 3 sc in last ch; working on opposite side of chain sc in next 5 sts, 2 sc in last ch (shape complete), join and sl st to first sc (14 sc total for leaf foundation)
Round 3 :
Ch1, sc in next 4 sts, hdc, 2 dc in next 2 sts (tip), hdc, sc in next 4 sts, sc2tog across base to tidy; join (approx 14 sts but shaped)
Round 4 :
Ch1, sc around in FLO to create a slight curl up the edge; on the top center work a small surface slip stitch vein: using contrasting sage shade, make 3 long surface sl st down center for raised vein effect; fasten off and leave tail for sewing.
Info :
Sew two leaves symmetrically under each heart using the leaf tails to anchor into central panel stitches. Embroider a vein on top of each leaf using surface slip stitch or single strand of yarn pulled through a yarn needle to create the swirling vine connecting hearts.
— Floral Medallions (Make 8, 4 per side) :
Round 1 :
With dusty rose, make a magic ring, ch2 (counts as hdc), work 12 hdc into ring, pull tight and join with sl st (12 hdc)
Round 2 :
Ch1, 2 sc in each hdc around, join (24 sc)
Round 3 :
Ch3, *into next st: (tr, ch1, tr), sl st into next st; rep from * around to create 12 petal bases, join (12 petals)
Round 4 :
Switch to pale yellow/canary for centers: make a small tuft. Ch1, sc in each petal base around, then in each ch1 space work (sc, ch2, sc) to make tiny picot petal tips; join; fasten off center color leaving tail to weave in (24 small picots)
Round 5 :
Return to dusty rose, attach to back of petals, ch3, work 7 double puff clusters spaced in a ring around the existing petals: (yarn over insert, pull up loop repeat 3 times for 4 loops on hook, yarn over and pull through all loops, ch1) in each designated loop space; join (7 puff clusters)
Info :
Puff cluster formation creates a fuller, rose-like center. Lightly stuff the back of the center with a pinch of fiberfill if you want a domed look; anchor stuffing with a few stitches through the back to maintain shape before finishing the round.
Round 6 :
Ch1, sc around the base of the puffs to tidy, then work an outer round of shell petals in cream: into each sc around work (2 dc, ch2, 2 dc) to form scalloped outer petals; join (7 larger shells)
Round 7 :
Ch1, sc in each st; in FLO of this round, pick up sage yarn and work surface sl st leaves around the medallion: for each leaf position make (sc, hdc, dc, hdc, sc) using FLO only to create subtle shaped leaves that sit flat on medallion outer band; join and fasten off sage leaving tail for joining (approx 8 leaves)
Info :
Block each medallion gently to open the petals. When joining medallions to the central panel, align the medallion center with the adjacent shell rows so the medallion arch sits flush with the central mesh. Each side contains four medallions spaced evenly between scalloped edges.
Round 8 :
Attach medallions to central panel by whip stitching through the outer shell and into the mesh panel shells. Use matching cream yarn for invisible joins; reinforce points where medallion meets central shell with extra passes for durability.
— Joining Motifs & Shaping the Runner Sides :
Info :
Before joining, lay central panel flat and place medallions on both sides, checking symmetry. Pin medallions so that their inner edge aligns with the central shell rows. Also position hearts and leaves along the central spine using previously left tails and anchor loops. Join medallions to the central panel using whip stitch through the picot or outer shell edges; do not pull too tight.
Round 2 :
With cream, work a joined round all around the assembled runner to create a uniform join base: Ch1, sc evenly around entire perimeter, working 3 sc into each deep scallop valley, 1 sc into narrow spaces; aim for an even stitch count that smooths joins (estimate 400-420 sc around assembled shape depending on spacing)
Info :
Take time here to ensure corners and medallion arcs are held flat. The first join round evens out differences and establishes a foundation for the decorative scalloped border.
— Base Border Rounds (Establishing Edge) :
Round 1 :
Ch3 (counts as dc), dc in next 2 sc, *sk 1 sc, (dc,ch1,dc) in next sc, dc in next 3 sc; rep around; join (this creates repeating arches for scallop foundation; stitch totals vary with runner size)
Round 2 :
Ch1, sc in each dc and ch1 space around to tidy the border and reduce gaps; where arches meet work (sc, picot, sc) to mark scallop peaks; join
Round 3 :
Change to dusty rose. Ch3, (2 dc) in next sc, *into arch space: (5 dc), sl st into base between arches to form raised ridge, rep around; join (this builds the layered scallop depth)
Info :
Color changes here create the layered effect seen in the sample runner. Carry color inside if you plan more inner layers, or fasten off neatly and weave in ends for separate color bands. Use stitch markers to identify every 4th scallop to keep the repeat regular.
Round 4 :
Ch1, sc in each dc around, working 3 sc into each 5-dc group at peaks to round them; join
Round 5 :
Change to cream. Ch3, dc into each sc around to build a small ridge, then sl st into top of dusty rose scallops to anchor; join
Info :
At this point measure the scallop repeats. The sample runner uses an outer band of deep berry after a few layering rounds to accent the scallop tips. Plan to make two more layered rounds: a decorative petal round in sage and a final berry picot tip round for contrast.
— Decorative Scallop Layers :
Round 1 :
With sage, into each scallop peak work: ch1, sc, hdc, dc, hdc, sc (a layered petal); join around to make a petal row over the dusty rose base
Round 2 :
Ch1, sc around in cream, working sl st into base of each sage petal to flatten and secure; join
Round 3 :
Change to berry. Ch1, sc in next st, *ch3, sl st into third loop to make a picot cluster, sc in next 4 sts; rep around forming berry eyelets at each scallop tip; join
Info :
Keep the picots small and consistent to echo the photo's delicate points. Picot: ch3, sl st into first ch to form a tiny loop; keep tension neat so picots lie flat when blocked.
Round 4 :
Ch1, sc around completing final tidy round; if needed work a final slip-stitch round to compress bulk and create a neat edge; fasten off and weave in ends.
— Final Embroidery & Surface Detail :
Info :
Use contrasting berry yarn to embroider the thin heart outlines and vine curls between hearts. Using a tapestry needle, follow the central chain spaces to create the stylized heart outlines (a continuous surface chain using stem stitch or surface sl st). For the vine swirls, use long surface sl sts and secure every few stitches to the base to prevent snagging.
Round 2 :
Embroider the stitched heart outline around each puff heart: with berry yarn, come up at the inner heart base and use a simple chain of surface sl st to outline the heart twice for definition; fasten and weave in behind the panel.
Round 3 :
Add light seed stitch in pale yellow to the center of each flower medallion for bright contrast: with a single strand, tack 5-7 small sl st into the center tuft to mimic a button center.
Info :
Take care to hide tails on the back of the runner. If you will launder the runner, secure embroidery ends with a small dab of fabric glue or an extra pass of stitches through an inconspicuous area for durability.
— Blocking & Finishing :
Info :
Blocking is essential to reveal the lace and scallop details. Wet-block the entire runner to shape the scalloped edges: pin outer scallops to the blocking mat at equal distances, stretch gently to even length, and allow to dry. Light steam-blocking may be used if your yarn fibers allow (test first). Trim any stray fibers and weave in ends close to the work.
Round 2 :
Final inspection: check medallion joins for gaps; reinforce with a hidden whip stitch if needed. Ensure hearts remain forward-facing and puff stitches are fluffed; press lightly from the back if needed (use towel and warm iron on low, if fiber allows).
Completing this table runner is a wonderfully satisfying journey — each puffed heart, layered petal and scalloped edge builds a timeless, romantic centerpiece you can be proud of. The mix of texture and color makes it a standout on any table and a cherished handmade heirloom. Take your time, enjoy the assembly and don’t forget to block for that finished polished look. 🧶🌸💖