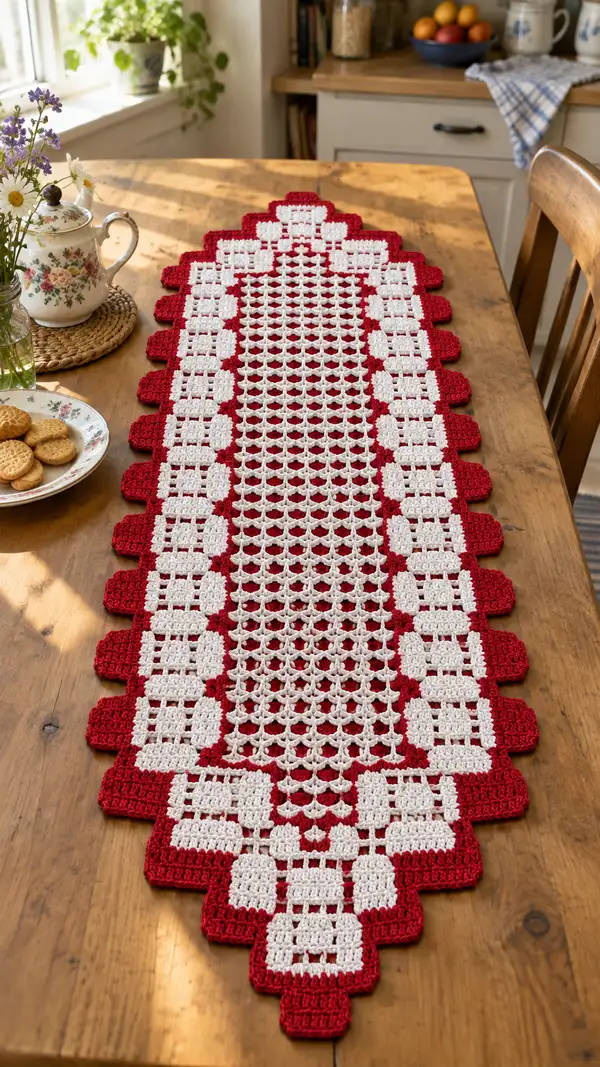
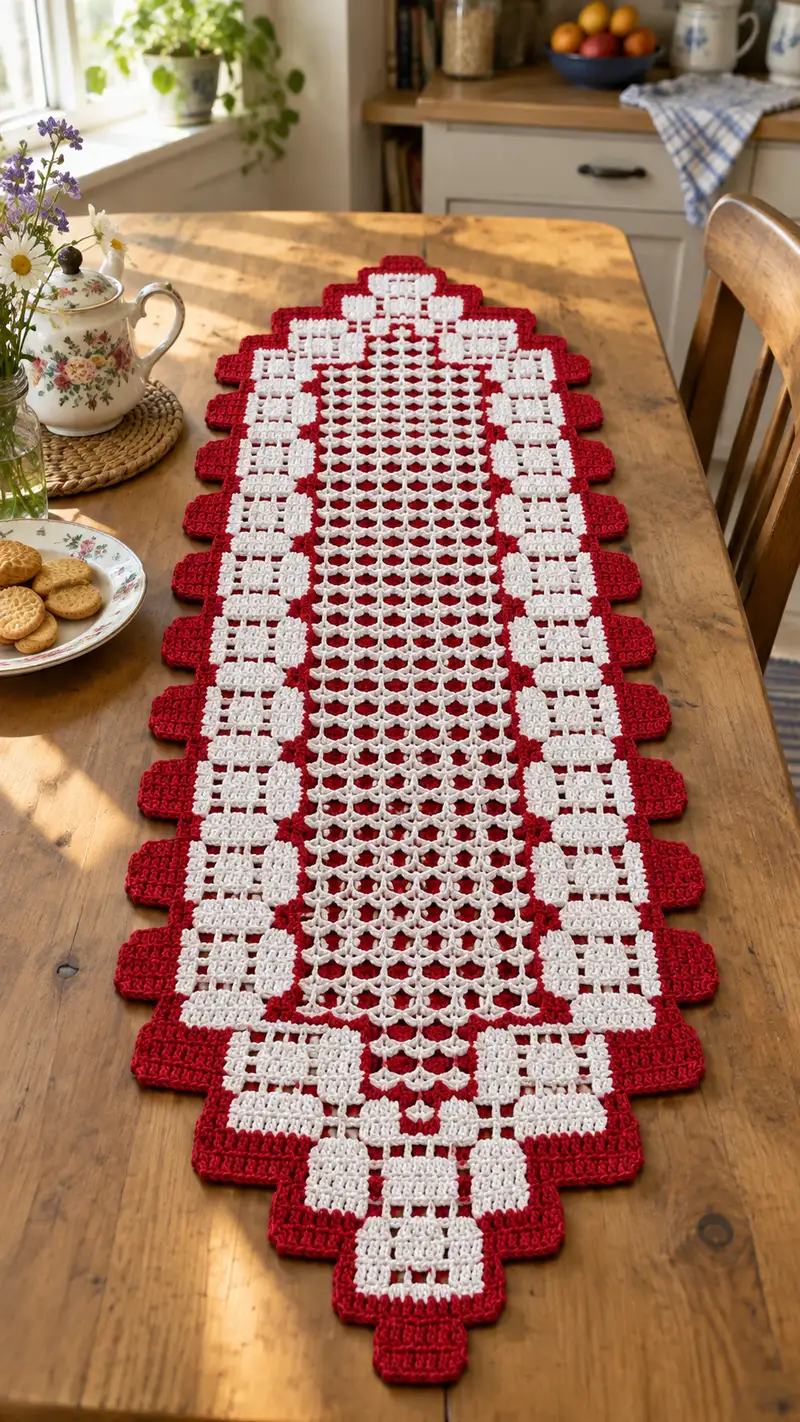
This vintage-inspired table runner features a crisp white filet center framed by a rich red scalloped border. The long, pointed-oval shape, repeating square motifs, and open lattice center create an elegant, old-fashioned centerpiece perfect for a dining table or sideboard. Worked in sturdy worsted-weight cotton, the runner lies flat and shows off neat colorwork and textured tabs along the edges.
Progress Tracker
0% Complete
— Notes & Gauge :
Info :
This runner is worked flat in a rectangular filet-and-lattice center, then turned and finished with a multi-round border forming the tabs and pointed ends. Gauge is not critical, but for reference: after blocking 10cm (4") of lattice center = approx 10 dc blocks across in worsted cotton using a 4.0mm hook. Work loosely enough for an open mesh but tightly enough that the runner lies flat.
Info :
Terms: 'round' is used here to describe each horizontal working row whether you turn or work all around. Center panel is worked first in white as a long strip/oval; border rounds use red and are worked in joined rounds around the panel to create the shaped edge.
— Foundation & Center Mesh (White) :
Round 1 :
Foundation chain 121 ch (this creates 60 filet mesh spaces across plus end turning chains). Turn. (121 ch)
Info :
The foundation chain number is designed to give a generous center panel width of approx 16-18cm depending on yarn and tension. Count chains carefully; foundation must be an odd number to center motifs.
Round 2 :
In 5th ch from hook (counts as dc and ch2 space), dc, *ch2, sk 2 ch, dc in next ch; rep from * across to last ch, ending with dc in last ch. (This forms dc/ch2 lattice foundation across 60 ch2 spaces)
Round 3 :
Ch3 (counts as dc), turn. Dc in same st, *ch2, sk next ch2 sp, dc in next dc; rep from * across finishing with dc in top of turning ch. (60 dc, 60 ch2 spaces)
Info :
The center lattice is worked as alternating rows of dcs separated by ch2 spaces. These create the open net seen in the photo. Keep counts consistent; each row has 60 ch2 mesh spaces across at this stage.
Round 4 :
Ch3, turn. Dc in same st, *ch2, dc in next dc; rep across, end dc in turning ch. (60 ch2 spaces)
Rounds 5-20 :
Repeat Round 4 for a total of 16 rows (Rows 4-19 inclusive) to build the lattice center until you have 18 rows of lattice total including Round 3. Maintain 60 ch2 spaces across on each row. (consistent lattice height)
Info :
At this point your lattice center should be about one third of the final runner length. If you want a longer runner, continue working additional lattice repeats in multiples of 1 row pairs to keep symmetry.
Round 21 :
Change to a filet-squared motif section now: Ch1, turn. Sc in first dc, *ch3, sk next ch2 sp, sc in next dc; rep across; end sc in top of turning ch. This sets up the start of the filled/empty square pattern. (60 ch3 spaces)
Info :
The filet squares are worked as blocks of 3 dc (a filled square) separated by ch spaces for empty squares. From here we'll convert lattice to classic filet squares to create the checkerboard squares visible alongside the red border.
Round 22 :
Ch3 (counts as dc), turn. Dc in same st, *dc in next sc, ch1, sk next ch3 loop, dc in next sc, dc in next sc; rep across. (This forms intermittent rows of double crochets framing future squares)
Round 23 :
Ch1, turn. Sc in first dc, *ch3, sc across next two dc (creates a small solid block), ch3, sc into the center of next two st group; rep across. This begins the 5-row repeat for each square motif along the side columns. (pattern foundations set)
Rounds 24-35 :
Work established 5-row filet motif repeat across the width forming column of alternating filled (solid) and open (ch3) squares. Specifically: Row A: sc with ch3 spaces across; Row B: dc framing; Row C: sc across to build blocks; Row D: dc framing; Row E: sc with ch1 transitions. Repeat this 5-row block 3 times to stack squares vertically along length. (maintain counts)
Info :
Use stitch markers at the boundaries where the filet motif meets the central lattice to ensure the motifs align and keep symmetry on both sides of the runner center. The white squares next to the border are built now and will later be outlined in red.
Round 36 :
Return to lattice center repeats: Ch3, turn. Dc in same st, *ch2, dc in next dc; rep across for 8 rows to create the long central net. (60 ch2 spaces)
Rounds 37-48 :
Repeat Round 36 for 12 additional rows (total lattice rows between the filet bands), keeping the center open and matching counts left to right. This creates the long, airy middle panel seen in the photograph. (60 ch2 spaces)
Info :
Work evenly and check edges regularly. The sides where the filet blocks are will be matched later with the border shaping; ensure your last chest of lattice aligns with the square motif rows by counting repeats.
Round 49 :
Begin mirror of earlier filet motif toward the opposite end. Work the same 5-row filet motif repeat across the width that you used from Rounds 22-35, but reverse the vertical order so the design mirrors the starting end. (Symmetry important)
Rounds 50-60 :
Repeat the same 5-row motif sequence three times to build the mirrored column of squares on the opposing end of the lattice. (ensures top and bottom motifs mirror exactly)
Info :
At the end of Round 60 your center panel is complete: a long lattice middle framed by stacked filet square bands on both sides leaving you ready to start the red border and shaped tabs. Fasten off white yarn, weave in ends but leave a 10-15cm tail at transition points where red will be joined.
— Joining Border Base (Preparing to Work Red Border) :
Round 61 :
Join red yarn at a corner where a filet block meets the lattice at one short end. Join with a sl st, ch1, sc evenly across the last row of white along the short end's top edge placing 1 sc in each dc and 3 sc across each ch3 space to create a neat base. Work to opposite side. (approx 60-64 sc)
Info :
We will now work rounds in red all around the runner to form the shaped tabs and pointed ends. Work first round snug to the white edge to secure it. Keep your tension even and place a stitch marker at the midpoint of long edges to help create symmetrical tabs.
Round 62 :
Ch2 (counts as hdc), turn. Hdc in each sc across short end edge, 1 hdc in each sc across long edges until you reach the opposite short end; work 3 hdc in last st to round the corner. (This begins forming a firm base edge for tab shaping)
Round 63 :
Ch3 (counts as dc), turn. Dc in each st around, placing 3 dc in corner stitches to create slight rounding. Work evenly across entire perimeter. (perimeter dc count depends on previous sc count; maintain even spacing)
Info :
From here the red border will be shaped with a combination of small rectangular tabs along both long sides and larger stepped segments at the short ends to create the pointed oval shape. Tabs are made as extensions of the border by working extra rows in tab sections while the rest of the border remains at base height.
— Shaping Long-Edge Tabs (Red) :
Round 64 :
Identify tab placement: Mark stitch positions along each long edge every 10 dc (you will create 12 tabs per long side using our perimeter - adjust spacing for your counts). At the first tab marker: ch1, sc in next 10 sts to form tab base, turn work to build tab separately while continuing to join base at other sections with sc.
Round 65 :
Work Tab A (first tab): Ch1, turn, hdc in each of 10 sts across (10 hdc). Fasten off tab leaving tail. Move to next base area, sc across neutrally until next tab marker and repeat. (Tab width 10 sts)
Info :
Each tab is constructed as a small rectangle extending from the base border. Tabs should be worked identically on both long edges and mirrored. Do not join tabs to each other across the top - they remain separate and will be connected with further rounds to form scalloped steps.
Rounds 66-70 :
Repeat the tab-building sequence across the long edge: at each marker work 4 rows total in hdc across 10 sts (Row1 hdc, Row2 hdc, Row3 hdc, Row4 sc for crisp top); between tabs maintain sc/hdc in base for continuity. (Each tab = 4 rows x 10 sts)
Info :
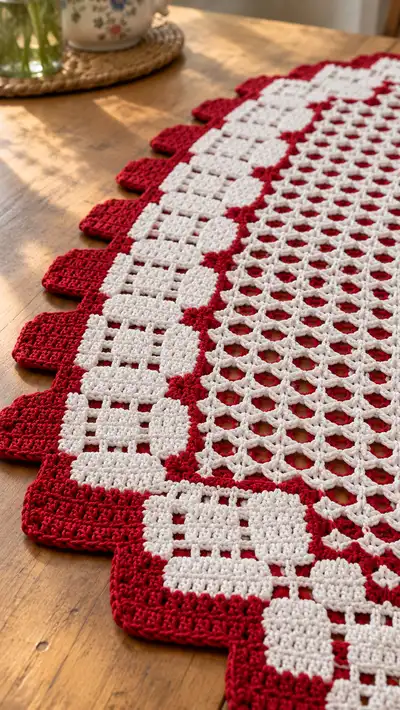
Use stitch markers to ensure tabs on both sides align. The small rectangular tabs visible in the close-up photo are about 10 sts wide and three to four rows tall - this produces the chunky scalloped look.
Round 71 :
With all tabs built along both long edges (12 tabs per side), work a continuous round of sc around the entire runner length to join tab tops and create a uniform top edge. Work 3 sc in corner corners to shape. (perimeter sc)
Info :
This round ties the tab tops into a neat border; do not fasten off. Now we will create the stepped block details adjacent to the filet squares using alternating double crochet blocks that echo the white squares framed in red.
— Creating Contrast Square Frames in Border (Red Framing White Blocks) :
Round 72 :
From the base sc round, identify the vertical columns where the white filet squares sit adjacent to the border. Work: *ch3, sk 2 sc, dc3 in next sc group (forming a filled red block), ch3, sk 2 sc, sc in next sc; rep along long edges to frame the white squares into red squares. (creates red framed squares alternating with open spaces)
Round 73 :
Ch3, turn. Dc3 in each red block created, ch3 spaces replaced with dc sets for a more solid outline and to step the border shape outward. Where open spaces exist, work 3 dc into the sc to maintain continuity. (border thickening)
Info :
The red framing rounds should closely follow the position of the white squares so each white block appears inset into the red border. Check alignment by laying the runner flat and adjusting with extra sc if needed.
Round 74 :
Repeat Round 73 once more to build a two-row red frame around the square motifs. This will create the pronounced red squares seen in the photograph. (two-row frame complete)
Info :
After the frame rows are complete, the outermost edge of the runner should look like a serrated stepped profile - these steps will be rounded and scalloped in subsequent rounds to create the pointed ends and the soft tabs between squares.
— Shaping Short Ends into Pointed Steps (Red) :
Round 75 :
Work special stepped increases at each short end to create the pointed triangular profile. At short end center: ch3, dc3 in next sc, dc3 in next sc, turn and work additional rows building outward with dc clusters decreasing the number of sc between clusters until a pointed tip is formed. (center stepped cluster created)
Round 76 :
Work 6 rows total in dc clusters across the short end, decreasing by one cluster each side per row to create a tapered point. End with a single small tab at the very tip worked in sc rows (3-4 sc rows). Fasten off and weave ends. Repeat identical shaping at opposite short end for symmetry. (pointed end complete)
Info :
The pointed ends in the photo show a stepped, blocky point softened by additional finishing rounds. Keep counts mirror-imaged on both ends for a uniform, elongated oval shape.
— Final Edge Rounds & Crisp Scallop (Red) :
Round 77 :
Join red at any perimeter sc. Ch1, sc in each stitch around including around tab tops and the stepped corners, placing 3 sc in each corner st. Keep counts even and do not over-tighten. (perimeter sc)
Round 78 :
Ch2, turn. *2 hdc in next st, sk next st, sc in next st; rep from * around to create a small textured scallop between tabs. Where you encounter top edges of tabs, work additional 2 hdc clusters to round them. (scallop foundation)
Info :
This textured scallop softens the sockets of the rectangular tabs and creates the rounded look visible in the photos. Work loosely in these rounds to allow the scallops to lie flat without curling.
Round 79 :
Ch1, turn. Sc in each st around. At the outermost edge of each tab work additional 3 sc to slightly square-off the tips for a finished edge. (final perimeter sc)
Round 80 :
Final finishing round: Sl st into next st to smooth transitions, fasten off leaving a 20cm tail, weave in thoroughly. Block carefully by pinning to desired shape and misting or wet-blocking. Let dry completely before use.
Info :
Blocking is essential to get the lattice open and the red scallops to lay flat. Pin each tab and the short-end points to hold shape while drying. A light spray of starch will create a crisp heirloom finish if desired.
— Optional Decorative White Edging Rework :
Round 81 :
If you prefer a narrower white inner outline between the lattice and red border, rejoin white at the inner border seam and work a reverse single crochet or crab stitch (reverse sc) around the inside edge to create a neat white ridge. Work 1 round only. Fasten off and weave ends. (optional)
Info :
This optional white ridge gives an extra shadow line between the open lattice and the red frame just like the subtle white outline that appears in the original photo. Use a smaller 3.5mm hook if you want a tighter decorative ridge.
— Detailed Stitch Count Notes & Repeat Summary :
Info :
Center lattice: 60 ch2 spaces across maintained for all lattice rows. Filet columns: build full motifs in 5-row repeats; each 5-row block produces one stacked square unit. Tabs: long-edge tabs approx 10 sts wide x 4 rows high, spaced evenly every 10-12 stitches across each side. Short-end points: built from stepped dc clusters over center 11-15 sc depending on your exact counts; taper by removing clusters outward each successive row.
Info :
When counts differ due to tension, adjust tab spacing or the number of long-edge tabs to maintain symmetry: for example if your foundation yields 64 sc perimeter instead of 60, create tabs every 11 sc instead of 10 to maintain even spacing for 12 tabs per side.
— Blocking & Care :
Info :
Wet block on a flat surface, pinning all scallops and tab corners. Use rustproof pins and allow to dry fully. Launder gently by hand or machine on a delicate cold cycle inside a mesh bag; reshape and reblock while damp. Avoid bleach to protect cotton colors.
This vintage-inspired runner blends open latticework with bold contrast and textured tabs to create a striking centerpiece. With a little patience and careful blocking you'll finish a heirloom-quality table accent that looks store-bought. Enjoy the rhythmic build of filet and lattice sections—it's relaxing and rewarding to see the pattern emerge. 🧶 Pin it as a seasonal centerpiece or handmade gift and savor the finishing details! ✨