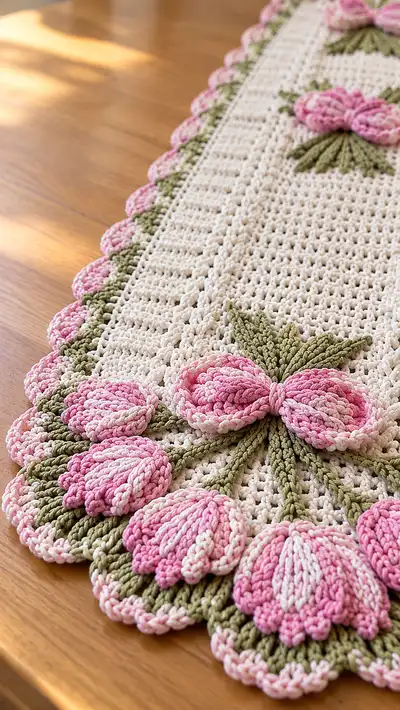
A long, elegant table runner with raised tulip bouquets and a scalloped floral border. Worked in soft cream with olive green stems and pink variegated petals, this runner combines lacy stitches and textured 3D petals for a vintage-inspired look. Perfect for dining tables, sideboards, or as a centerpiece to brighten a room.
Progress Tracker
0% Complete
— Materials & Gauge :
Info :
Use worsted weight cotton for a crisp, vintage look that blocks well. Gauge is not critical for design but approximate tension: 16 sts x 10 rows = 4 in in dc pattern using 4.0mm hook. Finished runner as written measures approximately 14" (35 cm) wide x 42" (107 cm) long before blocking. Adjust foundation chain and motif spacing to change size.
— Notes Before You Begin :
Info :
All rounds listed as 'Round' are actually rows worked flat with turning chains unless noted otherwise. When instructions show counts, they refer to stitch counts across the row. Use a stitch marker at the first stitch of each row to track. We will work a rectangular main panel, then create 6 tulip flower petals clusters (3 bouquets), leaves and stems, then sew them in place and work an attached border.
— Main Panel Foundation :
Round 1 :
Chain 101 (this is the foundation chain for a 14" wide runner). Turning chain counts as 1 dc throughout unless otherwise noted.
Round 2 :
Row 1: Dc in 4th ch from hook (counts as first dc + ch-2 corner), dc in each chain across to last 3 chains: [2 dc in next ch, ch 2, 2 dc in last ch] for a squared end. (101 dc across in body area, with corner spaces at ends)
Round 3 :
Row 2: Ch 2 (counts as first dc), turn. Dc in BLO in each st to end (101 dc). This creates a subtle ridge at the beginning of the runner.
Round 4 :
Row 3: Ch 2, turn. Dc across (101 dc). Place stitch marker at first dc of this row and move up each row to keep track of row starts.
Info :
These first rows establish a firm edge. Work the corner cluster (2 dc, ch2, 2 dc) at each end of short rows to keep ends squared if you prefer square ends. If you want rounded ends, skip the corner cluster and work continuous rows with turning chains only.
— Main Panel: Textured Body Rows (Rows 4-63) :
Round 5 :
Row 4: Ch 2, turn. *Dc in next 4 sts, V-stitch (dc, ch1, dc) in next st* repeat across to last 4 sts, dc in last 4 sts. (101 sts across including ch-1 spaces count as gaps)
Round 6 :
Row 5: Ch 2, turn. Dc across working into dc and into ch-1 spaces: dc in each dc and (dc, ch1, dc) in each ch-1 space to maintain the V-stitch repeat. (101)
Round 7 :
Row 6: Ch 2, turn. Dc in BLO across (101). This creates subtle horizontal ridges and stabilizes the V-stitch columns.
Round 8 :
Row 7: Ch 2, turn. Dc across, working V-sts in established ch-1 spaces (101).
Info :
Work an even number of these textured repeats to achieve central panel height. We will work 56 rows of this alternating pattern to create length and visual rhythm. Keep tension consistent and use stitch markers at each third of the row to help with even placement of future motif attachments.
Round 9-14 :
Rows 8-13: Repeat Rows 5-8 for a total of 6 repeats. (Each row maintains 101 stitch positions: count includes dc and V-stitch spaces.)
Round 15 :
Row 14: Ch 2, turn. Dc in BLO across (101).
Round 16-21 :
Rows 15-20: Repeat Rows 5-10 (V-stitch and BLO dc alternation). Keep notes of which row numbers form the centers for motif placement: the three bouquet centers will be placed across rows 20-26, 34-40 and 48-54 (measured from the start of body after initial setup). These row reference numbers assume you count Rows 1-? as above.
Info :
Mark the center line of the runner by folding lengthwise and placing a pin or marker—this will help align the tulip bouquets. Also mark the horizontal rows designated above to anchor bouquet stems and motif centers.
Round 22-33 :
Rows 21-32: Continue the established repeat of V-stitch rows and BLO dc rows. Work evenly without increases or decreases. (Each row maintains the same stitch framework approximating 101 stitch positions.)
Round 34-39 :
Rows 33-38: Prepare for first floral bouquet by leaving small loops of yarn on the right-side rows where petals will attach. Mark the exact stitches for the stems: center bouquet sits at stitch 51 (center stitch), left and right tulip placement around centers will be at +/- 6-8 stitches from center. (101)
Info :
When inserting motifs later we will tack them down. At this stage simply maintain the body rows and ensure blocking will be possible to flatten the panel for attachment. Keep ends long for sewing the border later.
Round 40-63 :
Rows 39-62: Repeat V-stitch and BLO dc alternating pattern until the main panel reaches desired length with three evenly spaced bouquet anchor points at the row numbers called out earlier. End after Row 62 with a BLO dc row. Total main body rows including setup equals 62 rows for a balanced length. (101 positions across each row)
— Tulip Motif: Petal Unit (Make 18 petals for 6 tulips) :
Round 1 :
Using variegated pink yarn. Make a magic loop. Ch 2 (counts as first hdc), 7 hdc into loop, pull tight and sl st to first hdc to close (8 hdc). (8)
Round 2 :
Ch 1, turn. (Inc around) 8 inc (16). Work evenly around to create a small disc base for petal shape. (16)
Round 3 :
Ch 1, turn. *Sc in next st, hdc in next st* around to create a slightly raised background. (16)
Round 4 :
Ch 2, turn. Work 3 tr into same st, sk 1, sl st into next st, sk 1, [3 tr into next st, sl st into next] across to form 4 elongated lobes on the disc base. End with sl st into first st. This forms the petal backbone. (4 clusters)
Info :
These elongated clusters give the petal a roomy canvas. Keep tension slightly loose on treble clusters so petals can be shaped. Use a yarn needle for final shaping of the petal curve if needed.
Round 5 :
Switch to working rows around the perimeter to form the tulip 'cup'. Ch 1, work (sc, hdc, 2 dc, hdc, sc) into the top of each 3-tr cluster to create fuller petals (repeat for each of 4 clusters). Join with sl st. This rounds the edge and builds height. (Perimeter increases add texture but count remains proportional to cluster points)
Round 6 :
Ch 1, turn. Work 1 sc in each st around working loosely and leaving the final sl st open for joining to center bouquet. (Count variable—maintain consistent coverage around petal)
Round 7 :
Ch 1, turn. Using BLO sc around the inner ring to create a raised ridge where petals will fold inward when attached. (This gives depth to the tulip cup)
Round 8 :
Ch 1, shape the petal edge by working a shell: [sc, hdc, 3 dc, hdc, sc] into each petal top to form a soft scallop. Repeat for each petal top. Finish with sl st and fasten off leaving a long tail for sewing. Make 18 petals to create six 3-petal tulips. (18 petal units total)
Info :
Three petals form a tulip head. When sewing petals together, overlap centers and stitch through the inner ridge to secure a cupped petal profile. Keep tails long for easier assembly.
— Tulip Motif: Tulip Assembly (Make 6 tulips) :
Round 1 :
Arrange three petals with inner ridge facing up and slightly overlapping at ends. Using yarn needle and same pink yarn, stitch through the inner rings of all three petals about 6 times in a star pattern to hold them centered. Pull gently to form a cupped tulip head. Fasten and secure ends. (Create 6 floral heads)
Round 2 :
With olive green yarn, chain 20 to create a stem length (approx. 6-7" depending on tension). Sl st at base center of tulip back to anchor. Make 3 stems per bouquet fanning out from the central anchor point. Allow stems to be long loops that will be stitched down to the panel.
Round 3 :
Create a small green base behind each tulip head for leaves: Make 1 chain 12, turn and work back along chain in hdc, dc, hdc, sc to create a tapered leaf. Fasten off leaving tail for sewing. Make 2 leaves per tulip head (12 leaves total for 6 tulips).
Info :
Each bouquet on the runner is composed of 3 tulip heads arranged in a fan. For three bouquets you will make six tulips in two mirrored arrangements (3 at each end and 3 in the center or as pictured: one bouquet near each end and one in center). Alternatively make six tulips and arrange as three bouquets of two if you prefer a different look.
— Leaf Unit: Long Leaf / Stem Detailing (Make 18 stems + 12 medium leaves) :
Round 1 :
Using olive green yarn. Ch 40 for long stem piece. Row 1: Sc in 2nd ch from hook and across (39 sc). Fasten off leaving tail for sewing. Make 18 of these long running stem chains—these will be folded and anchored to the panel to form the radial stems for each bouquet.
Round 2 :
For the small tapered leaf: ch 14, sc in 2nd ch from hook to end (13 sc), then turn and work back along the opposite side into the ch-1 spaces: hdc, dc, hdc to shape the leaf. Fasten off leaving tail for sewing. Make 12 medium leaves as previously stated to tuck under tulip heads.
Info :
To Achieve the look in the photo the stems are slightly twisted and anchored into the main panel with whip stitches so they lay flat and radiate from the center of each bouquet. Use matching green thread to sew stems in a neat radial pattern—six stems per bouquet fanning out under the petals.
— Attaching Tulips & Stems to Main Panel :
Round 1 :
Block the main panel slightly so it is flat. Mark bouquet anchor points: measure lengthwise and mark 3 equal spaces: approx Rows 20-26, Rows 34-40, Rows 48-54. At each bouquet location, mark the center stitch (st 51 across). These are anchor spots for the center of three-fan bouquets.
Round 2 :
Lay the tulip head flat above the marked anchor point with stems pointing towards the runner edge. Using the long tail from each tulip head, sew through the main panel at the marked row and stitch down securing the center and then stitch along the base of each petal to ensure petals are snug. Repeat for all 6 tulips (3 x bouquets of 3 petals).
Round 3 :
Attach long green stems: Place the long ch-40 stem pieces fanning from the center under each set of three tulips—arrange 6 stems per bouquet. Using whip stitch and matching green yarn sew along the stem center every 6-8 stitches to hold the stem down flat to the panel. Tuck medium leaves under the petal bases and sew leaves down with small invisible stitches at leaf base and tip to hold shape.
Info :
Take care to space stems evenly so petals sit naturally. Pin each stem in place with T-pins or sewing pins before stitching to verify spacing. Use small running stitches and a yarn needle to make a tidy attachment; bury tails inside the panel rows and weave ends back into the fabric.
— Border: Foundation Round (Green Anchor) :
Round 1 :
Join olive green yarn at a corner on the right side of the runner. Ch 1, sc evenly along long side edge working 2 sc into each end corner to keep edges square. Work sc around entire perimeter of the panel until you return to the starting point. Keep stitch count even along long sides: you will approximate 100 sc per long side depending on tension. Fasten off and weave in ends. This green anchor creates a solid base for scallops.
Info :
To keep counts consistent, place a marker every 10 sc as you work the border and adjust by adding or skipping small numbers of sc tucked into corner clusters to align scallops across both sides.
— Border: Scallop Row (Light Pink) :
Round 1 :
Join light pink yarn in any green sc along long side. *Ch 1, skip 2 sc, work shell in next sc: (5 dc) in same sc, skip 2 sc, sc in next sc* Repeat across the long side to create scallops. At corners work an expanded shell: (7 dc) into corner sc to make a rounded turning scallop. Continue scallops around entire perimeter. Adjust spacing so scallops number evenly along the edge—aim for one scallop per 6 main panel stitches. Fasten off and weave in ends. (Number of scallops depends on perimeter length—approx 16-18 per long side in this piece.)
Info :
Shells create the pretty pink scallops you see in the photo. Work shells loosely to allow them to puff slightly and create a lacy border. If your scallops appear too large or small, change to 3.5mm hook for border or adjust dc counts per shell.
— Border: Petal Edge (Variegated Pink Tulip Petal Caps) :
Round 1 :
Work variegated pink yarn along the edge of the scalloped row. Into each shell, attach 3 small petal caps to form the layered look: in each shell work [sc, ch3, 3 hdc in loop created, ch3, sc] to build a compact petal-shaped cap. Repeat for each scallop around the perimeter, working 2-3 caps into each corner cluster to create denser clusters at ends of runner. Fasten off and weave ends.
Info :
This second pink layer produces the look of two-tone pink edging seen in the photos. Work each petal cap slightly overlapping the scallop edge so the variegated pink shows against the green anchor. Stitch caps down securely with small whipstitches through the shell base.
— Border: Final Unifying Round (Cream Tie-in) :
Round 1 :
Using cream yarn, slip stitch loosely through the troughs between scallops, and finish with single crochet in each space to create a neat outline. Optionally add a small picot at the top of each scallop: *sc in next st, ch3, sl st into first ch (picot), sc in next st* across scallop peaks to add delicate points. Fasten off and weave in all ends thoroughly. This ties border back to main panel color and creates the soft outline visible in the photo.
Info :
The final cream round camouflages changes of color and gives a finished look. If your picots are too pointy, make ch2 picots instead of ch3 for a smaller curve.
— Optional Decorative Raised Rows on Panel Edges :
Round 1 :
For the raised rib effect bordering the central panel (seen as vertical rope-like rows), use cream yarn and work 2 rows of front post double crochet (FPdc) along lines 6 sts in from each long edge. Row A: Ch 2, turn, *FPdc around next dc, dc across next 8 sts*, repeat across. Row B: Ch 2, turn, repeat FPdc rows to make a raised rope. This frames the panel and helps anchor border shells visually.
Info :
Work these front post rows before attaching motifs so they read clearly when motifs are sewn down. Use them to mark visual columns and add structure when blocking.
— Finishing Touches and Blocking :
Round 1 :
Weave in all ends at least 3-4" into the fabric. Spritz the runner lightly with water and pin to blocking board to shape scallops and flatten the panel. Let dry completely (overnight if possible) to help edges set and motifs adhere neatly. Hand-press if needed with a cool iron and a pressing cloth—avoid direct heat on cotton to prevent shine marks.
Round 2 :
Inspect attachment points and add reinforcing stitches where motifs meet the border and panel. Ensure petals are lying as desired and that stems are secure and not loose on the wrong side. Trim excess yarn tails closely after weaving.
Info :
Light blocking will give the runner a professional finish and help the scalloped edges open. Cotton responds well to steam blocking as long as it is done gently; always use a pressing cloth.
— Care Instructions :
Info :
Hand wash in cool water with mild detergent and lay flat to dry to preserve shape and softness. Avoid tumble drying to maintain scallop edges and petal shape. If necessary, gently re-block while still damp.
Completing this runner is such a satisfying project—soft cream panels balanced with cheerful pink tulips and fresh olive stems. Each scallop and petal adds character and charm, creating a centerpiece you will love to display. The modular assembly lets you adjust bouquet placement or add more motifs to suit your table length. Enjoy the calming rhythm of repetitive stitches and the joyful surprise of the floral final touches! 🧶🌷