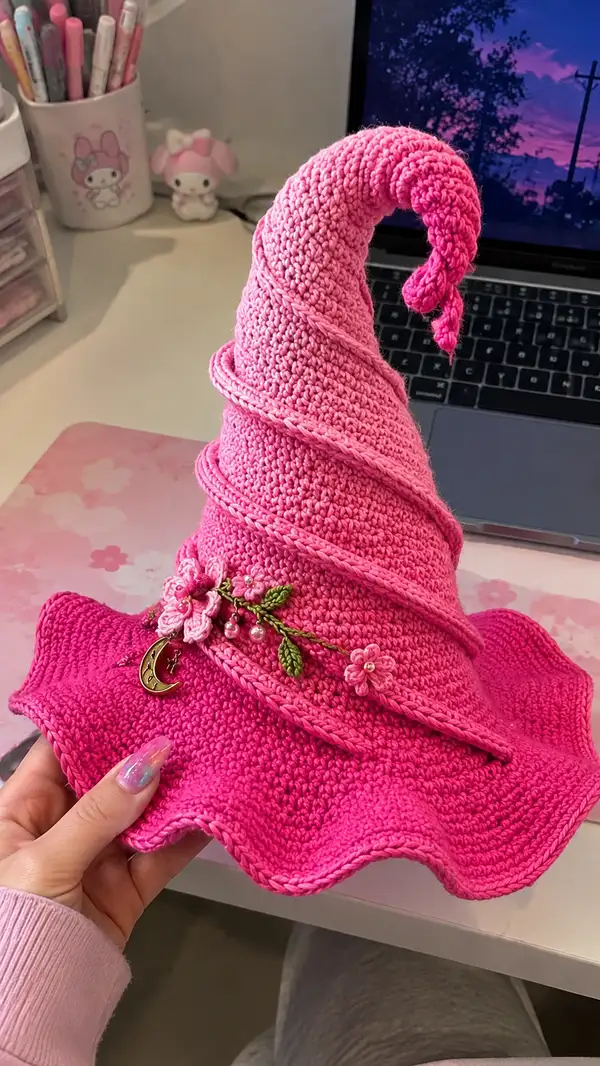
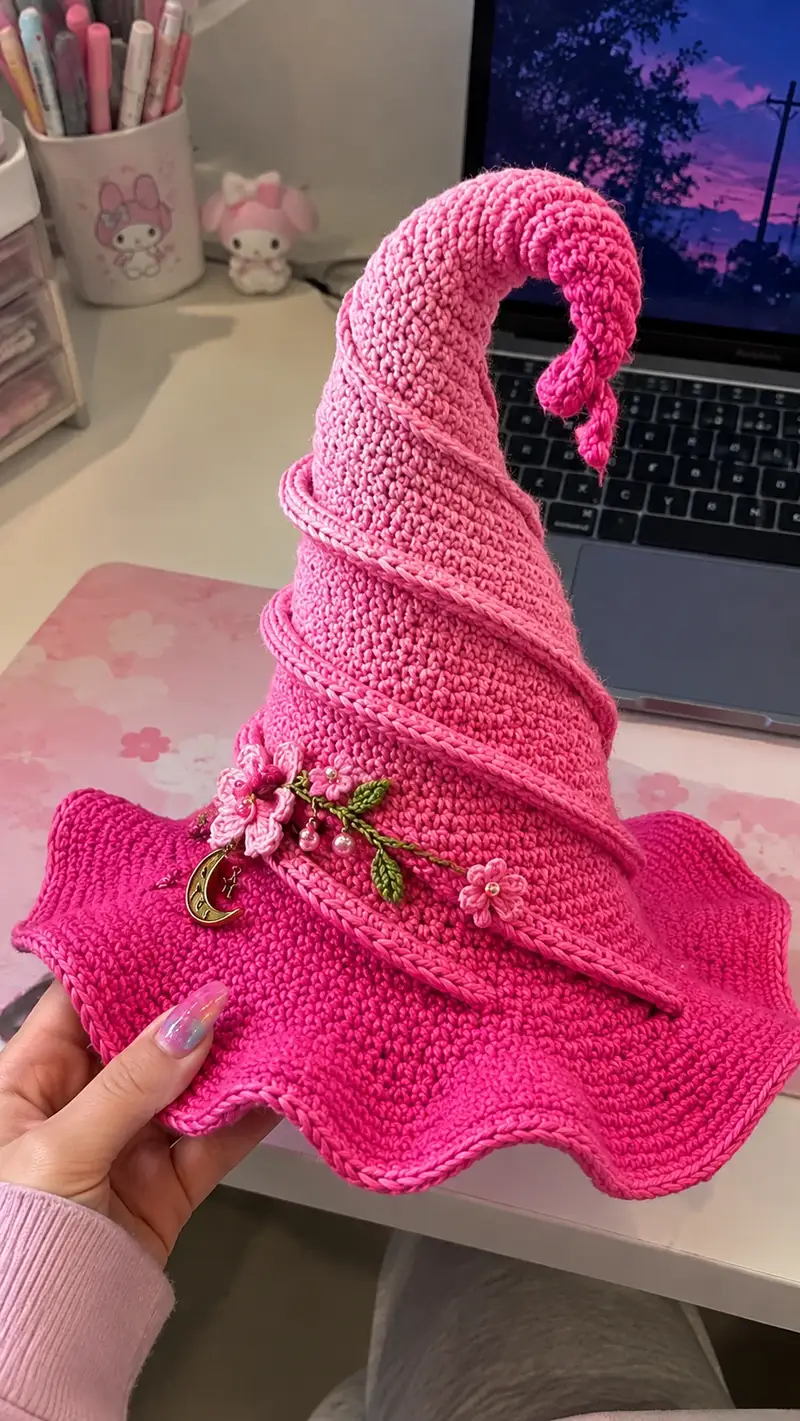
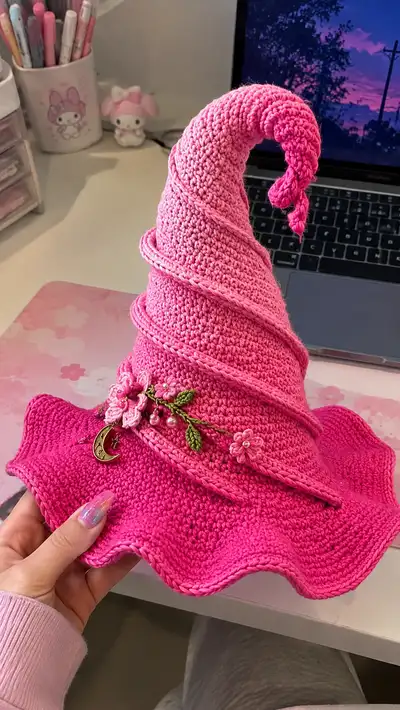
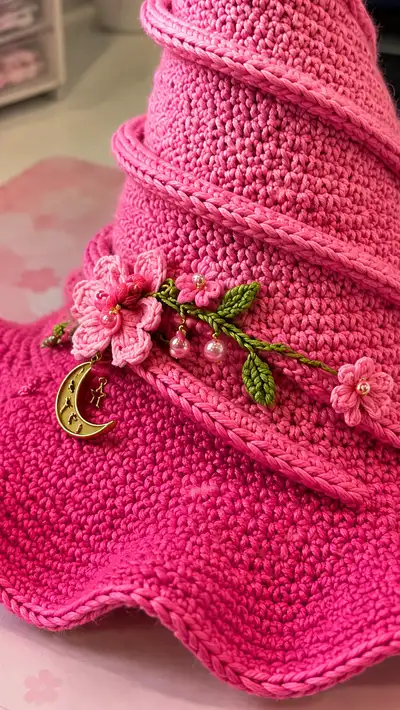
A tall, whimsical witch-style hat crocheted in vibrant pinks with a dramatic wavy brim and a curled, twisted spire. The hat features a wrapped rope spiral, delicate floral applique accents with pearl beads, and a dangling moon charm. Designed to sit snugly on the head while keeping its sculpted shape, this playful accessory makes a perfect gift or statement piece.
Progress Tracker
0% Complete
— Crown (base of cone) :
Round 1 :
6 sc in magic ring (6)
Round 3 :
(1 sc, 1 inc) x 6 (18)
Round 4 :
(2 sc, 1 inc) x 6 (24)
Round 5 :
(3 sc, 1 inc) x 6 (30)
Info :
Use the darker pink for the lower crown rounds to reflect the visual gradient. Keep tension even; this section forms the lower cone that later transitions into the brim and tall spire.
Round 6 :
(4 sc, 1 inc) x 6 (36)
Round 7 :
(5 sc, 1 inc) x 6 (42)
Round 8 :
(6 sc, 1 inc) x 6 (48)
Round 9 :
(7 sc, 1 inc) x 6 (54)
Round 10 :
(8 sc, 1 inc) x 6 (60)
Info :
At the end of round 10 you should have 60 stitches — this will be the circumference at the junction where the brim attaches. If you want a smaller hat, reduce rounds of increases to reach 54 instead.
Round 11-14 :
1 sc in each st (60)
Info :
Work even to build height. Keep the same shade of darker pink for at least two even rounds so the gradient transition looks gradual when you switch colors later.
Round 15 :
Change to lighter pink yarn in last yarn over for a seamless join. 1 sc in each st (60)
Round 16-20 :
1 sc in each st (60)
Info :
These rounds build the middle portion of the cone. If you are aiming for a very tall spire, add more even rounds here. Carry the unused darker yarn inside if you want a reversible or double-sided appearance.
Round 21 :
(8 sc, 1 dec) x 6 (54)
Round 22 :
(7 sc, 1 dec) x 6 (48)
Info :
Begin shaping the upper cone so it will transition smoothly into the spire. Start stuffing a small amount into the base of the cone only if you are planning to add fiberfill into the curled tip later; most of the hat remains unfilled for a wearable, flexible structure.
Round 23 :
(6 sc, 1 dec) x 6 (42)
Round 24 :
(5 sc, 1 dec) x 6 (36)
Round 25-28 :
1 sc in each st (36)
Info :
These even rounds form a narrower neck where the spire will begin. Count carefully — the next section (spire) uses this foundation of 36 sts. If your math differs, adjust decreases proportionally so the spire base stays even around the crown.
— Spire (tall point and curl) :
Round 1 :
1 sc in each st (36)
Round 2-4 :
1 sc in each st (36)
Info :
These even rounds extend the spire. The lighter pink should dominate here. Work a total of 6-10 even rounds depending on how tall you want the hat before beginning decreases.
Round 5 :
(4 sc, 1 dec) x 6 (30)
Round 6-8 :
1 sc in each st (30)
Round 9 :
(3 sc, 1 dec) x 6 (24)
Info :
:
Decrease gradually to gently taper the spire while maintaining a soft cone. Keep rounds even between decreases to create a smooth slope. If you want a dramatic twist later, keep more even rounds now for length.
Round 10 :
1 sc in each st (24)
Round 11 :
(2 sc, 1 dec) x 6 (18)
Round 12-14 :
1 sc in each st (18)
Round 15 :
(1 sc, 1 dec) x 6 (12)
Info :
At 12 stitches the spire is narrow but still round enough to transition into the curled tip. This is a good place to decide how tight you want the curl: more even rounds now make a longer uncurled section, fewer make a short, tighter curl.
Round 16-19 :
1 sc in each st (12)
Round 20 :
(1 sc, 1 dec) x 4, 1 sc x 4 (8)
Round 21 :
1 sc in each st (8)
Info :
If you plan to insert a thin wire for a poseable curl, cut the wire to the desired length now, tape the ends, and plan to insert it after you've crocheted a tube long enough to hold it (around rounds 22-30 of the spire curl). Wrap an extra round of slip stitches around the wire for protection.
Round 22 :
(1 sc, 1 inc) x 4 (12) - begin to form a rounded tip tube for curling
Round 23-26 :
1 sc in each st (12)
Round 27 :
(2 sc, 1 inc) x 4 (16)
Info :
We deliberately increase slightly to form a short padded tube; this makes the tip hold a soft curl when stuffed lightly, or wrap around the inserted wire to create a sculpted bend. Start inserting tiny bits of stuffing as you make the tube if you want a fuller curl.
Round 28-30 :
1 sc in each st (16)
Round 31 :
(3 sc, 1 inc) x 4 (20)
Round 32-35 :
1 sc in each st (20)
Info :
Now we'll create the long narrow tube used to sculpt the spiral tip. Work 6-10 more rounds even (20 sts) for a longer, elegant curl or shorten for a stubby curl. Add a little stuffing every 3-4 rounds to avoid lumps.
Round 36 :
(4 sc, 1 inc) x 4 (24)
Round 37-40 :
1 sc in each st (24)
Round 41 :
BLO: 1 sc in each st BLO (24) to create a soft ridge for the outer edge of the curl
Info :
To form the spiral, after round 40 fold the tube gently and either insert a length of thin floral wire taped at edges or gently force the tube around your finger to form the curl. If using wire, insert it now through the center of the tube and sew a few securing stitches to lock it in place; if not using wire, add more stuffing and shape by hand.
Round 42 :
(2 sc, 1 dec) x 6 (18) - begin closing the very tip if desired
Round 43 :
(1 sc, 1 dec) x 6 (12)
Info :
Fasten off leaving a long tail for sewing the tip to itself or to the inside of the spiral. Weave tail inside and close with a yarn needle. This completes the spire curl; position it as you wish and anchor securely to the crown with a few hidden stitches.
— Brim (ruffled, wavy wide brim) :
Round 1 :
Join yarn to the last stitch at base of crown (60 sts). 1 sc in each st around (60)
Info :
Join darker pink yarn if you want the brim to read slightly darker. Make sure join is tidy; the brim should flare steadily. Use stitch markers every 12 sts to help keep track of increases later.
Round 2 :
(4 sc, 1 inc) x 12 (72)
Round 3 :
1 sc in each st (72)
Round 4 :
(5 sc, 1 inc) x 12 (84)
Round 5 :
1 sc in each st (84)
Info :
The brim is formed by repeated rounds of increases every few rounds. These selective increases make the brim flare into a ruffle rather than a flat circle. Adjust numbers if you want a wider or narrower brim; the math below assumes a medium-wide, floppy brim.
Round 6 :
(6 sc, 1 inc) x 12 (96)
Round 7 :
1 sc in each st (96)
Round 8 :
(7 sc, 1 inc) x 12 (108)
Round 9 :
1 sc in each st (108)
Info :
At about 108 sts the brim has respectable width. If you prefer a dramatically ruffled brim like the photo, continue increases to 120-132 sts. If you want a subtler flare stop around 96-100 sts.
Round 10 :
(8 sc, 1 inc) x 12 (120)
Round 11-12 :
1 sc in each st (120)
Round 13 :
(9 sc, 1 inc) x 12 (132)
Info :
We now begin the shaping rounds that produce the wave. The typical approach uses rounds where you alternate larger increases and a finishing round worked in BLO to create a distinctive rolled ridge along the brim edge.
Round 14 :
1 sc in each st (132)
Round 15 :
1 sc in each st BLO (132) - creates a subtle ridge for the brim's underside
Round 16 :
(3 sc, 1 inc, 2 sc, 1 inc) x 18 (162)
Round 17 :
1 sc in each st (162)
Info :
Round 16 increases more aggressively in alternating sequences to encourage a ruffled, undulating edge. If you notice too much bulk, reduce increase frequency. Always keep increases distributed evenly around the round.
Round 18 :
(4 sc, 1 inc) x 27 (189)
Round 19 :
1 sc in each st (189)
Round 20 :
BLO 1 sc in each st BLO (189) - this locks the previous round creating a neat fold-line
Info :
Try the brim on a hat block or over a bowl of similar circumference to check drape. The large increase rounds will create a lively wave. If you want a smoother brim, stop increases earlier and work 3-5 more even rounds of sc.
Round 21 :
(5 sc, 1 inc) x 31 + (4 sc) (220) - adjust to even out to the nearest stitch count
Round 22 :
1 sc in each st (220)
Round 23 :
Switch to a final decorative edging: *sc, hdc, dc in next st, skip 1* repeat around to form a soft scallop (approx 220 sculpted stitches)
Info :
Scalloped edging can be substituted with a single round of slip stitch around the edge for a flatter finish. The photo shows a pronounced wavy brim with a neatly defined rolled edge; the BLO rounds and alternating increases help achieve this look.
Round 24 :
Fasten off and weave in ends. Block the brim into the desired wave shape: steam gently and shape the waves with pins over a rounded surface, allow to cool and dry.
— Wrapped Rope Spiral (decorative trim) :
Info :
The rope seen wrapped around the crown is a tubular cord made by crocheting a long narrow strip and stitching it into a rope, or by crocheting a chain and working slip stitches back along it to make it rounded. Make a cord about 120-160cm long depending on how many wraps you want; here we make a 140cm cord for three wraps.
Round 1 :
Ch 160 (or desired length). Sl st into 2nd ch from hook and sl st in each ch back to start to create a tight, rope-like chain. Fasten off leaving long tail for sewing (160 ch, approx 80 sl st back)
Round 2 :
Alternative tubular cord: Work 6 sc into magic ring, do not join, continue working 6 sc in continuous spiral until you have a tube approximately 140cm long (6 sts around)
Info :
The slipped-chain method yields a flat twisted rope look as in the photo. The six-stitch tube yields a more substantial braided tube. Choose the method that best matches your visual preference. Use the lighter pink if you want the rope to stand out slightly.
Round 3 :
With rope finished, set it around the crown, twisting and wrapping to form the spiral path you like. Pin to secure placement. Sew rope to the crown at 4-6 anchor points with a yarn needle using matching yarn. Leave some slack to allow the rope to read as raised decorative trim.
— Flower Appliques (make 3 large, 2 small) :
Large Flower - Round 1 :
mr, ch 1, 8 sc in mr, pull tight and join (8)
Round 2 :
*ch 3, dc in same st, ch 3, sl st in next st* repeat around to form 4 petals. Fasten off (4 petals)
Round 3 :
Using contrasting pink, embroider a small knot in the center and sew a pearl bead. For fuller layered petals, add a second layer: around each petal base, sc 6 forming a small fan, then ch 2 and sl st to base to anchor.
Info :
The flowers in the photo show multi-layer petals with a small bead center. Use 3-petal layered approach or create 5 small petals by working ch 4 picot petals if you prefer more delicate blooms.
Small Flower - Round 1 :
mr, ch 1, 5 sc in mr, sl st to close (5)
Round 2 :
*ch 2, 2 dc in same st, ch 2, sl st in next st* repeat around to form 5 small petals. Fasten off and sew bead center (5 petals)
Info :
Make 3 large and 2 small flowers. Pin them into place on the brim junction, grouping them so they cascade slightly towards the brim edge as in the reference photo.
— Leaves and Beaded Buds :
Leaf - Round 1 :
Ch 6, sc in 2nd ch from hook, hdc in next, dc in next, hdc in next, sc in last. Turn, work same on other side into the unworked chain edge to create a pointed leaf. Fasten off (approx 10-12 sts wide)
Info :
Use green yarn and make 4-6 leaves of different sizes. Use short whip stitches along the midline to create veins if desired. Leaves are sewn so they tuck under flower bases and sometimes extend slightly outward for a natural look.
Beaded Buds :
Ch 6, insert pearl bead onto a 6mm pin or thin thread and position at third chain from hook, sl st to secure bead into position. Fasten off leaving a tail to sew bead cluster under the flower. Make 3-5 bud clusters and attach with blush-colored thread.
Info :
Secure small bead clusters with a knot and add a drop of fabric glue if using metal charms to prevent movement. Position buds so they hang elegantly beneath the flower cluster as in the photo.
— Small Decorative Chain and Moon Charm :
Round 1 :
Using a short length of thin cord or metallic thread, add a small chain of ch 6-10 with a jump ring to attach the moon charm. Sew the other end discreetly under the flower cluster so it dangles at the brim edge.
Info :
If your charm has a large jump ring, sew through the ring with yarn to anchor it, and also secure the ring to the underside of the brim so the charm hangs naturally.
— Final Finishing Touches :
Info :
Before final sewing, pin all decorative elements in place and photograph or view from several angles to ensure balanced placement. Once satisfied, use small blind stitches to secure flowers, leaves, rope and charm to the hat. Weave in all ends and trim close.
Round 1 :
Optional surface stitch: embroidery a few small French knots or chain-stitched vines to help integrate flowers and leaves into the crown. Use embroidery floss for delicate lines.
Info :
Blocking the hat gently with steam and shaping the brim into soft waves will make the final piece look polished. If you used a wire for the curl, ensure ends are taped and buried securely between rounds then trim and seal with a final knot and glue if necessary.
This whimsical pink witch hat blends structural shaping with playful, feminine details to create a standout wearable piece. Working the tall spire, ruffled brim and delicate appliques is both meditative and rewarding, and every step invites customization. Add your own color choices, charms or beadwork for a truly personal magical touch — perfect as a gift or festival accessory. 🧶🌙✨