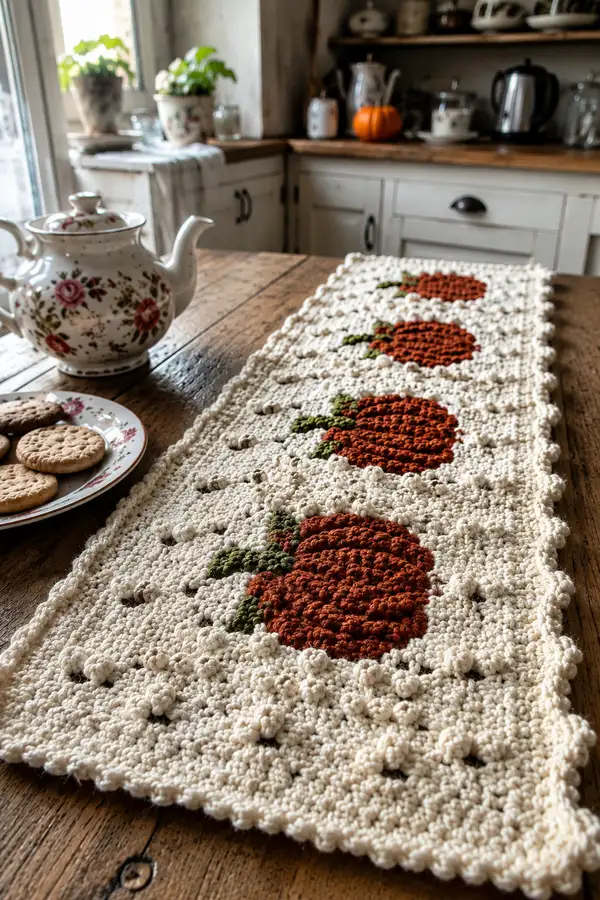
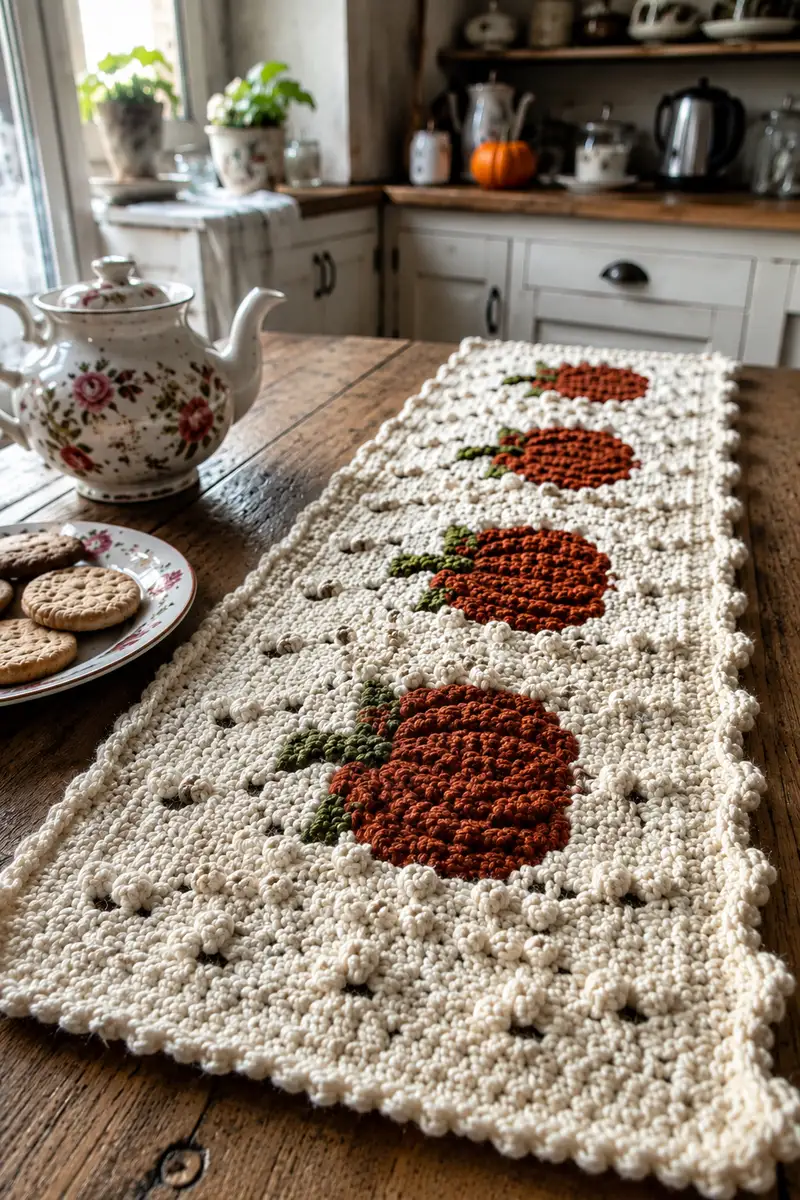
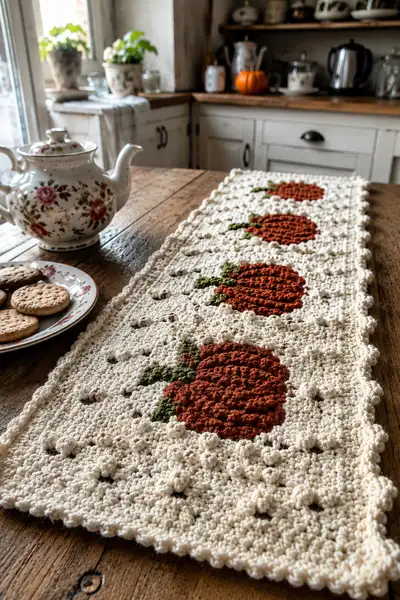
A cozy farmhouse-style table runner worked in a soft cream ground with rich rust pumpkin motifs and olive leaves. The design mixes textured bobble clusters, raised pumpkin rounds and a scalloped bobble edge for a vintage handmade look. Perfect for autumn decor, this runner lays flat on a wooden table and brings warm seasonal charm to a dining or console table.
Progress Tracker
0% Complete
— Gauge and Finished Size :
Info :
Gauge: 16 sc x 18 rows = 4 in (10 cm) in single crochet using 4.0 mm hook and worsted weight yarn. Finished runner in photos measures approximately 32 in (82 cm) long by 8.5 in (22 cm) wide. Gauge affects final size; adjust hook to match.
— Special Stitches and Notes :
Info :
Bobble (bb): Yarn over, insert hook, pull up loop (3 loops on hook), yarn over, insert hook in same st, pull up loop (5 loops), yarn over, insert hook in same st, pull up loop (7 loops), yarn over and pull through all loops on hook, ch1 to close bobble and secure. Each bobble counts as 1 stitch in the stitch count below.
Info :
Texture Cluster (for pumpkin raised rows): Work 3 dc cluster: yo, insert, pull up loop, yo pull through 2, leave rem, repeat twice more in same st leaving last loop each time, yo pull through all loops, ch1. Counts as 1 stitch. Use these clusters to build rounded pumpkin ribs.
Info :
Color Changes: Use tapestry crochet technique, carrying unused color loosely across WS. Twist colors at the join to avoid holes. Fasten off only at ends when required; whenever working an isolated color block you may fasten off and weave ends later.
— Foundation and Layout :
Info :
This runner is worked in rows across a continuous cream ground. Three rust pumpkins are placed equidistant across the runner: each pumpkin occupies a horizontal panel of 18 rows and vertical width of 22 stitches. Between pumpkins there are 6 rows of plain cream with bobbles creating a dotted grid. The border is worked after the main panel is complete.
— Main Panel (Work in Rows) :
Row 1 :
Foundation chain 121. (This gives a base width that matches motif placement and edge stitches.)
Row 2 :
Ch1, turn, 1 sc in 2nd ch from hook and in each ch across. (120)
Row 3 :
Ch1, turn, 1 sc in each st across. (120)
Row 4 :
Ch1, turn, 1 sc in each st across. (120)
Info :
Work rows 2-4 tightly—these establish a dense ground for bobbles and motifs. Place a stitch marker at the center stitch (st 60) to help align the first pumpkin center at Row 10 later.
Row 5 :
Ch1, turn, 1 sc in each st across. (120)
Row 6 :
Ch1, turn, 1 sc in each st across. (120)
Row 7 :
Ch1, turn, 1 sc in each st across. (120)
Info :
Placement :
Decide pumpkin centers at rows: Center Pumpkin 1 at Row 10, Pumpkin 2 at Row 36, Pumpkin 3 at Row 62. Mark these rows with sticky notes or safety pins on RS to know where to start the pumpkin color block shaping.
Row 8 :
Ch1, turn, 1 sc in each st across. (120)
Row 9 :
Ch1, turn, 1 sc in each st across. (120)
Row 10 - Pumpkin Row Start :
Ch1, turn, begin tapestry colorwork for Pumpkin 1: Work 1 sc in cream for first 49 sts, change to rust and work 22 sc, change to cream and work remaining 49 sc. (120)
Info :
Ensure you twist yarns at each color change to avoid holes. The pumpkin block is 22 sts wide centered on stitch 60 (11 sts either side). Carry the unused cream behind the rust section across the 22 sts if you prefer fewer ends.
Row 11 :
Ch1, turn, 1 sc in each st across following color placement: cream 49, rust 22, cream 49. (120)
Row 12 :
Ch1, turn, 1 sc in each st across. (120)
Row 13 :
Ch1, turn, 1 sc in each st across. (120)
Info :
Rows 10-13 establish the flat pumpkin background. We will now build texture on the pumpkin using front post cluster rows and bobbles inside the rust block to create depth.
Row 14 :
Ch1, turn. Working across, 1 sc in cream across first 49 sts. For the rust section (22 sts) work 1 sc in each st but replace every 3rd sc with a 3-dc cluster (see Special Stitches) to begin ribbing: (sc, sc, cluster) repeat across 22 sts ending with sc as needed. Finish with 49 sc in cream. (120)
Row 15 :
Ch1, turn, 1 sc in each st across, maintain color blocks. (120)
Row 16 :
Ch1, turn. Repeat Row 14 pattern of clusters across the rust 22 sts, stagger clusters so they sit between previous clusters to form ridges. (120)
Info :
Staggering clusters creates a rounded ribbed look for the pumpkin. If your clusters compress more than expected, slow your tension or use a slightly larger hook for cluster rows only, then switch back to main hook.
Row 17 :
Ch1, turn, 1 sc in each st across. (120)
Row 18 :
Ch1, turn, 1 sc in cream 49, rust 22 work 1 bb (bobble) in every 4th stitch across to produce raised round texture, cream 49. If needed, where spacing doesn't divide evenly, shift bb placement slightly to center the pattern. (120)
Info :
Bobble row gives a round puff for pumpkin center. Each bobble counts as 1 st. Place them evenly within the rust block — aim for 5-6 bobbles across depending on your stitch width for a full pumpkin look.
Row 19 :
Ch1, turn, 1 sc in each st across. (120)
Row 20 :
Ch1, turn. Work same color block placement; across rust 22 sts work short clusters at the edges to taper slightly: (cluster, sc, sc) across, finish cream. (120)
Row 21 :
Ch1, turn, 1 sc in each st across. (120)
Info :
We will add leaves and stem across Row 22 and 23 using olive and dark brown. Prepare small lengths of green to work isolated stitches; fasten off after each leaf if preferred or carry the green behind the work.
Row 22 :
Ch1, turn. Work 1 sc in cream across first 45 sts, change to olive and work 3 sc (leaf base) then 3 sc in rust block (these will rest on top edge of pumpkin) then change to dark brown for a 2-stem cluster (2 sc), change back to cream for remaining sts. (120)
Row 23 :
Ch1, turn, 1 sc in each st across, blending olive leaf stitches into the fabric (weave in ends later). (120)
Info :
Repeat the pumpkin shaping and texture sequence for the remaining two pumpkins. The second pumpkin starts at Row 36 and the third at Row 62. Use the same sequence of rows 10-23 relative to each pumpkin center row to make identical motifs. Place stitch markers at the beginning of each motif's Row 10 to keep alignment.
Rows 24-35 :
Ch1, turn, 1 sc in each st across for 12 rows to create separation between Pumpkin 1 and Pumpkin 2. Insert occasional bb stitches in cream (every 10 sts) to match the dotted grid: work 1 bb every 10th st across in two of these rows (for a subtle dotted texture). (120 each row)
Row 36 - Pumpkin 2 Start :
Repeat Rows 10-23 pattern for Pumpkin 2 centered on stitch 60. (Follow exact color and texture steps as for Pumpkin 1.)
Info :
When repeating Pumpkin 2, check that the rust section aligns with Pumpkin 1 so visual rhythm remains consistent. Use the same color cut lengths and carry technique to reduce ends.
Rows 48-59 :
Ch1, turn, 1 sc in each st across for 12 rows to separate Pumpkin 2 and Pumpkin 3. Repeat dotted bobble accents in 2 rows as before. (120 each row)
Row 62 - Pumpkin 3 Start :
Repeat Rows 10-23 pattern for Pumpkin 3 centered on stitch 60. (Follow exact color and texture steps as for Pumpkins 1 and 2.)
Rows 74-80 :
Ch1, turn, 1 sc in each st across for 7 rows to finish panel top edge. (120 each row)
Info :
Work these last rows tightly and even. Fasten off and weave in all ends from color changes, or leave long tails if you plan to surface embroider or reinforce pumpkin ribs later.
— Pumpkin Motif Detail (Optional Separate Small Panel Method) :
Info :
If you prefer to crochet each pumpkin as a small oval panel and join to the cream ground, follow this pumpkin panel worked in rows then seam into a cut-out in main panel. This method gives more sculpted pumpkins. Panel width: 22 sts. Panel height: 18 rows.
Round/Row 1 :
Ch 24, 1 sc in 2nd ch from hook and in next 20 ch, 3 sc in last ch, continue working on opposite side of foundation chain: 1 sc in next 20 ch, 2 sc in final ch (to round) — total 52 sts forming an oval base.
Row 2 :
Ch1, turn, 1 sc in each st around (52)
Row 3 :
Ch1, turn, (4 sc, inc) x 8 (60)
Row 4 :
1 sc around in each st (60)
Row 5 :
Change to rust if not already. Work (5 sc, cluster) x 8 spaced evenly across the oval to create 8 subtle ribs (68)
Row 6 :
1 sc around in each st, use bb every 6 sts to create round texture (68)
Row 7 :
(6 sc, cluster) x 8 (76)
Row 8 :
1 sc around then 1 row of bb spaced across the center to create a puff (76)
Row 9 :
(6 sc, dec) x 8 (68)
Row 11 :
(5 sc, dec) x 8 (60)
Row 13 :
(4 sc, dec) x 8 (52)
Row 15 :
(3 sc, dec) x 8 (44)
Row 17 :
(2 sc, dec) x 8 (36)
Row 18 :
1 sc around (36). Fasten off leaving tail for sewing into main panel. Lightly stuff if you want more rounded pumpkins — keep stuffing minimal so panel remains flat enough to seam.
Info :
Sew these oval pumpkin panels into cut-outs in the cream panel using whip stitch, ensuring edges align and bobbles on the main panel nestle around pumpkin perimeter for a neat finish.
— Leaves and Stem (Make 3 sets per pumpkin) :
Leaf 1 Round 1 :
With olive, ch 6, sc in 2nd ch from hook, hdc, dc, hdc, sc across. Fasten off. (5 stitches)
Leaf 1 Round 2 :
Join at base of first leaf stitch in main panel with sl st and work 1 sc around leaf perimeter if you want raised leaves. Fasten off. Repeat for a second smaller leaf (ch 5) and a tiny leaf (ch 4) to create layered foliage.
Info :
Sew leaves so they slightly overlap the top of each pumpkin. Use a darker green for depth if desired and tack leaves down at 2-3 stitches to keep them flat. Use small invisible stitches on RS for neat attachment.
— Scattered Bobble Grid (Background Texture) :
Row A :
Work one row across entire panel with a single bb every 10th stitch: Ch1 turn, 1 sc in each st across except work bb in sts 10, 20, 30, 40, 50, 60, 70, 80, 90, 100, 110. (120)
Info :
Repeat these dotted bobble rows every 12 rows across the runner to create the visually pleasing dotted grid seen. Make sure the bobbles offset between alternating rows to create a diamond-like dotted layout.
— Border and Scalloped Bobble Edge :
Info :
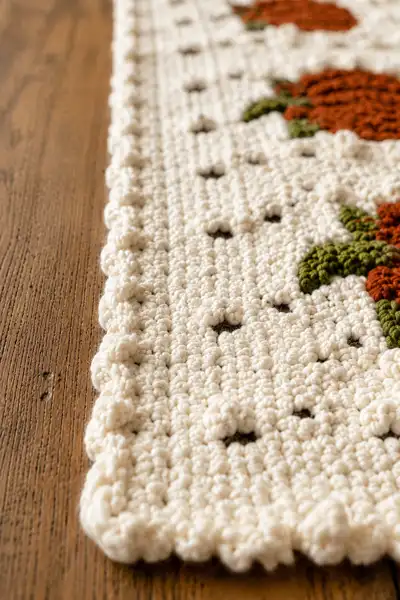
After main panel is complete and ends woven, work border around entire rectangle. The border uses rows of sc then a scalloped bobble edge worked in the round along the short ends and long sides for a ribbed, scalloped finish. Work RS facing out.
Border Round 1 :
Join cream at any corner with sl st, ch1, work 1 sc evenly around edge working 3 sc in each corner stitch to maintain square corners. Place 1 sc in each row edge st (count the 120 top/bottom) and 1 sc in each end row along sides. End with sl st to first sc. (Perimeter stitch count will equal length of edges + ends, maintain even spacing.)
Border Round 2 :
Ch1, 1 sc in each st around. (Even perimeter)
Border Round 3 :
Ch1, *skip 1 st, 5 sc in next st (shell), skip 1 st, 1 sc in next 2 sts; rep from * around. This begins scalloped look. Sl st to join.
Info :
Adjust shell spacing to achieve 12-14 shells along the short sides and evenly spaced shells along the long edges. Mark corner shells to ensure symmetry.
Border Round 4 :
Ch1, working into center stitch of each shell work 1 bb (bobble) then sl st in next sc between shells. Continue around so each shell center is topped with a bobble for the raised scallop look. Sl st to join.
Border Round 5 :
Ch1, 1 sc around to tidy edges and cover join tails. Fasten off and weave in ends. If desired work a final slip stitch picot around the edge: *sl st, ch3, sl st into same stitch* around for tiny decorative points between bobbles.
Info :
For a chunkier scallop, work the shells in 7 sc rather than 5 sc and add additional bobble rows as needed to match the photo's dense scallop.
— Finishing Details and Embroidery :
Info :
Use small amount of dark brown yarn to embroider subtle vertical ribs on pumpkins if you want a more defined segmented look — using a yarn needle, couch thin strands or surface chain stitch along cluster rows. Tie off and weave ends securely on WS.
Info :
Block runner gently: Pin to measured dimensions on flat surface using pins and a light steam from a distance. Do not press steam directly onto bobbles to avoid flattening them; steam from above to relax stitches and even the border.
Info :
Weave in all ends on WS. When weaving in ends from colorwork, follow the path of the yarn floats and catch the carried strands to secure them invisibly. Trim excess close to work.
— Alternate Construction Notes :
Info :
If you prefer to avoid tapestry carrying, crochet the entire cream panel first and then surface crochet the pumpkin shapes using raised clusters and bobbles in rust color. This method allows re-positioning but requires more surface stitching time.
Info :
To scale the runner longer or shorter, repeat the middle plain separator rows between pumpkins in multiples of 6 rows. To add a fourth pumpkin, add 26 rows of separation and repeat the motif sequence — ensure the final border remains symmetrical.
Info :
For a denser look similar to the photo, work with a 4.0 mm hook and slightly heavier worsted yarn; for a softer drape choose a 4.5 mm hook but maintain bobble tension to preserve definition.
This cream farmhouse runner with rust pumpkins and bobble edging makes a beautiful seasonal statement for your table. Working the textured clusters and bobbles is soothing and the modular pumpkin sections are satisfying to complete. The finished piece invites touch and brings warm autumn charm to your home — a lovely handmade heirloom or gift. 🧶🍁✨