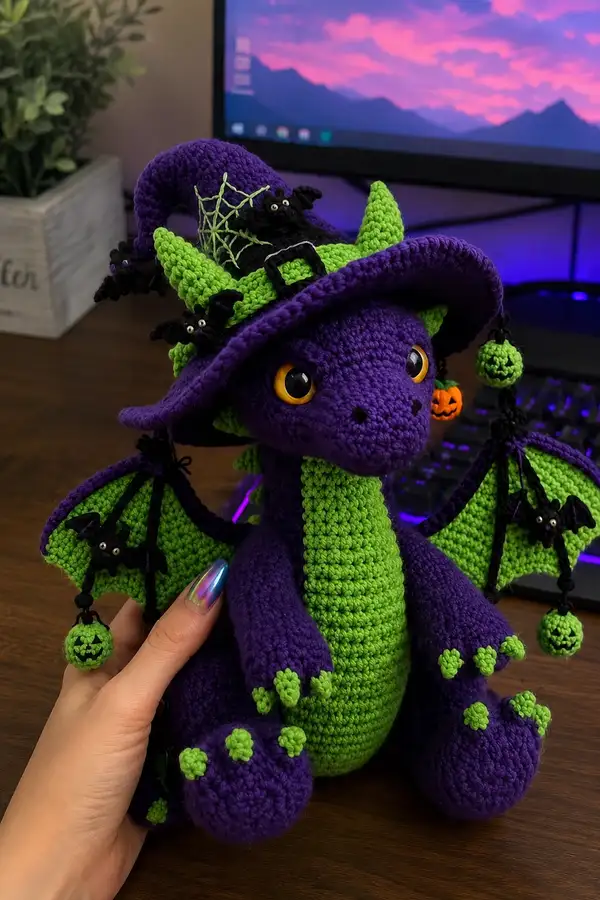
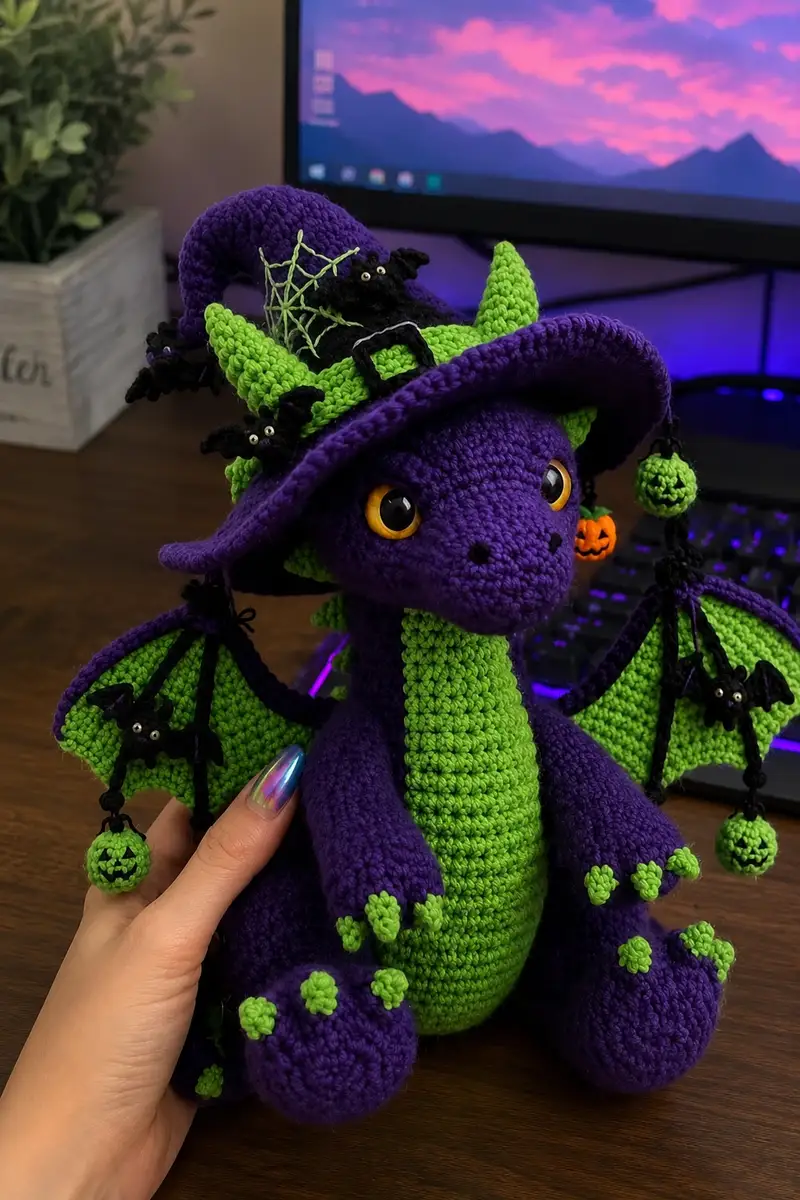
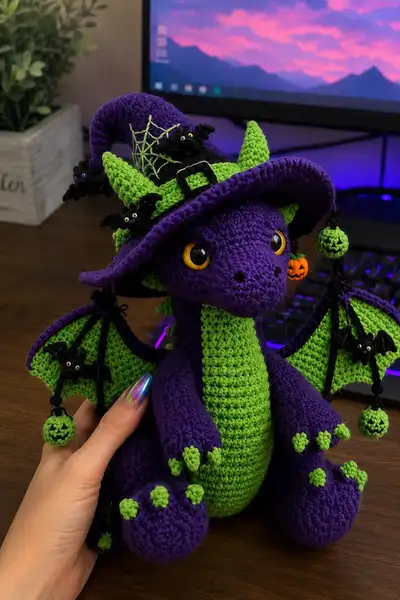
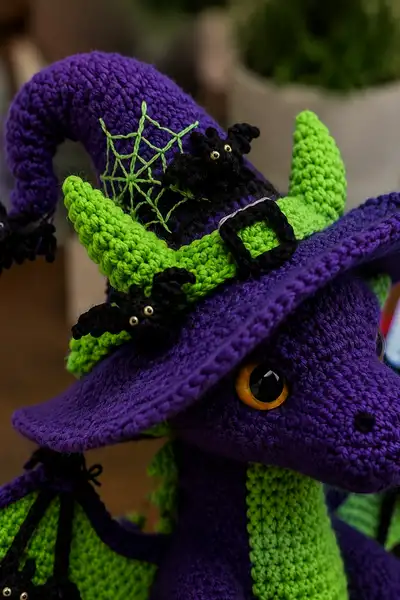
This spooky-sweet witch dragon pairs rich purple yarn with neon green accents for a striking Halloween-ready companion. Featuring a floppy witch hat with embroidered spiderweb, tiny bat embellishments, dangling jack-o-lantern charms, articulated wings, and a cuddly rounded body — every detail is handcrafted to delight. The pattern includes step-by-step construction for head, body, limbs, wings, hat, and many adorable accessories so you can recreate this character exactly or customize your own magical friend.
Progress Tracker
0% Complete
— Head :
Round 1 :
6 sc in magic ring (6)
Round 3 :
(1 sc, 1 inc) x 6 (18)
Round 4 :
(2 sc, 1 inc) x 6 (24)
Round 5 :
(3 sc, 1 inc) x 6 (30)
Round 6 :
(4 sc, 1 inc) x 6 (36)
Round 7 :
(5 sc, 1 inc) x 6 (42)
Round 8 :
(6 sc, 1 inc) x 6 (48)
Round 9-12 :
1 sc in each st (48)
Info :
Place safety eyes between rounds 12 and 13 approximately 10-12 stitches apart for the wide, expressive gaze seen in the sample. Mark the stitch where the eyes are positioned and count both horizontally and vertically to ensure both eyes are symmetrical.
Round 13-16 :
1 sc in each st (48)
Round 17 :
(6 sc, 1 inc) x 6 (54)
Round 18-20 :
1 sc in each st (54)
Round 21 :
(6 sc, 1 dec) x 6 (48)
Round 22 :
(5 sc, 1 dec) x 6 (42)
Info :
Begin light stuffing now — concentrate the fill under the eye area and cheeks for a rounded muzzle. Use small amounts at a time to avoid lumps and to keep access to the neck opening while shaping.
Round 23 :
(4 sc, 1 dec) x 6 (36)
Round 24 :
(3 sc, 1 dec) x 6 (30)
Round 25 :
(2 sc, 1 dec) x 6 (24)
Round 26 :
(1 sc, 1 dec) x 6 (18)
Info :
Neck tube forming: After reducing to 12 stitches, work a neck tube to attach to body. Stuff head firmly but not overstuffed as you complete these rounds. Leave a tail for sewing to the body later.
Round 28-33 :
1 sc in each st (12) (work 6 rounds to create a neck tube, or adjust height for preferred neck length)
Round 34 :
sl st and fasten off leaving a long tail for sewing (12)
Info :
Sew in jaw points if you want a subtle smile or stitch nostrils with 3-4 mm black yarn at the muzzle tip between rounds 9-10. Use a spare blunt yarn needle and small stitches so the face remains delicate.
— Snout/Muzzle (worked separate if preferred) :
Round 1 :
6 sc in magic ring (6)
Round 3 :
(1 sc, 1 inc) x 6 (18)
Round 4-6 :
1 sc in each st (18)
Round 7 :
(1 sc, 1 dec) x 6 (12)
Info :
Stuff lightly and sew to head at rounds 10-12 to form the short tapered snout visible on the dragon. Alternatively, leave snout integrated if you prefer not to join a separate piece.
— Body :
Round 1 :
6 sc in magic ring (6)
Round 3 :
(1 sc, 1 inc) x 6 (18)
Round 4 :
(2 sc, 1 inc) x 6 (24)
Round 5 :
(3 sc, 1 inc) x 6 (30)
Round 6 :
(4 sc, 1 inc) x 6 (36)
Round 7 :
(5 sc, 1 inc) x 6 (42)
Round 8 :
(6 sc, 1 inc) x 6 (48)
Round 9-14 :
1 sc in each st (48)
Info :
If adding the green belly panel as a separate piece, work it now as described in the 'Belly Panel' section. For color change stripes, change to neon green using an Info round before Round 15.
Round 15 :
(6 sc, 1 dec) x 6 (42)
Round 16 :
(5 sc, 1 dec) x 6 (36)
Round 17 :
(4 sc, 1 dec) x 6 (30)
Info :
Begin stuffing body moderately at Round 17. The body should be firm enough to sit upright but still slightly soft to the touch. Leave a generous tail for sewing the head neck tube into position.
Round 18 :
(3 sc, 1 dec) x 6 (24)
Round 19 :
(2 sc, 1 dec) x 6 (18)
Round 20 :
(1 sc, 1 dec) x 6 (12)
Round 21-24 :
1 sc in each st (12) (work 4 rounds to create neck join section and stabilize the joint for sewing)
Round 25 :
sl st and fasten off leaving long tail for sewing
Info :
For a sturdy join, whip stitch the head neck tube inside the body opening around the 12-stitch neck area, aligning the center front of head with the belly panel seam.
— Belly Panel (make 1) :
Round 1 :
6 sc in magic ring with neon green (6)
Round 3 :
(1 sc, 1 inc) x 6 (18)
Round 4 :
(2 sc, 1 inc) x 6 (24)
Round 5-16 :
1 sc in each st (24) (work 12 rounds to make a long rectangular strip — for long belly, continue until desired length, up to 24-28 rounds)
Info :
Flatten the strip as you go, measuring against the body front so the panel will reach from chest to lower belly. When satisfied, sew the strip to the body center from round 8–16 aligning the top of the panel with the chest area under the head.
Round 17 :
sl st and fasten off leaving long tail for sewing
— Arms (Make 2) :
Round 1 :
6 sc in magic ring (6)
Round 3 :
(1 sc, 1 inc) x 6 (18)
Round 4-6 :
1 sc in each st (18)
Round 7 :
(3 sc, 1 dec) x 4 + (2 sc) (14) — shape wrist slightly narrower; note math: working in continuous rounds, perform decreases spaced to create 14 sts total
Round 8-10 :
1 sc in each st (14)
Info :
Change to neon green for claw bobbles if you want the tipped-claw look visible in the sample. You can carry yarn up the inside of the arm for neat color change or fasten off and join the green at the first claw round.
Round 11 :
Work bobbles for claws: *sc 2, bobble in next st* around until you have 3 small raised claws on the hand (adjust spacing to place three bobbles evenly) (14)
Round 12-15 :
1 sc in each st (14) (build upper arm, stuff hand firmly before closing)
Round 16 :
(2 sc, 1 dec) x 3 + (2 sc) (11) — slight taper near shoulder
Round 17-18 :
1 sc in each st (11)
Round 19 :
sl st and fasten off leaving long tail for sewing
Info :
Stuff the hand area firmly so the bobbles read as claws. Attach arms at body rounds 14-16 to sit naturally at sides; secure firmly with multiple passes for stability.
— Legs (Make 2) :
Round 1 :
6 sc in magic ring (6)
Round 3 :
(1 sc, 1 inc) x 6 (18)
Round 4 :
(2 sc, 1 inc) x 6 (24)
Round 5 :
(3 sc, 1 inc) x 6 (30)
Round 6-8 :
1 sc in each st (30)
Info :
These rounds form the spherical foot. Stuff the foot firmly at round 7-8 so the foot retains its round shape and supports the toy sitting upright.
Round 9 :
(3 sc, 1 dec) x 6 (24)
Round 10 :
(2 sc, 1 dec) x 6 (18)
Round 11 :
(1 sc, 1 dec) x 6 (12)
Round 12-18 :
1 sc in each st (12) (work 7 rounds to form leg tube; stuff lightly as you go)
Round 19 :
Work bobble toes tip: place 4 bobbles evenly on the foot top in neon green (make 4 small bobbles spaced around the front of the foot)
Round 20 :
sl st and fasten off leaving long tail for sewing
Info :
Sew legs to the bottom front of the body at rounds 1-4, spacing legs approximately 10-12 stitches apart depending on your seam placement. Add extra stitches through the foot base into the body for stability.
— Tail :
Round 1 :
6 sc in magic ring (6)
Round 3 :
(1 sc, 1 inc) x 6 (18)
Round 4-8 :
1 sc in each st (18) (build length)
Round 9 :
(2 sc, 1 dec) x 4 + (2 sc) (14)
Round 10-14 :
1 sc in each st (14)
Round 15 :
(1 sc, 1 dec) x 4 + (2 sc) (10)
Round 16-18 :
1 sc in each st (10)
Round 19 :
sl st and fasten off leaving long tail for sewing
Info :
Add small neon green spike clusters at intervals along the tail by sewing tiny cones (see 'Spikes' section). A bit of internal wire near the tip allows a playful curl.
— Spikes / Back Ridges (Make 8-10) :
Round 1 :
4 sc in magic ring (4)
Round 2 :
(1 sc, inc) x 2 (6)
Round 3 :
1 sc in each st (6)
Round 4 :
sl st and fasten off leaving tail for sewing into back along the spine
Info :
Sew the spikes centered down the body back and onto the tail with equal spacing. Slightly flatten and shape spikes when sewing so they stand up as seen in the photos.
— Wings (Make 2 composite pieces) :
Wing Membrane Round 1 :
Using neon green: ch 12, sc in 2nd ch from hook and across (11)
Round 2 :
Ch1, turn, sc across 11, ch1 (11)
Round 3 :
Work increases at ends to fan out the membrane: sc across, 3 sc in last st, rotate to other side and work along foundation chain placing 3 sc in last chain, join to create an oval-shaped strip (approx 17-19 sts end-to-end)
Round 4-8 :
1 sc in each st building width and curve to form wing membrane (work until membrane is approx 12-14 rows tall)
Info :
Block or press the membrane flat gently if necessary. The wings in the image show a bright green membrane framed with purple and black veins — you will add the purple border then stitch black lines for the finger veins.
Wing Border Round 9 :
Join purple at edge and sc evenly around membrane creating a contrast border (count will vary; maintain even sc to keep shape)
Wing Finger Strips (Make 3 per wing) :
Ch 20, sc from 2nd ch to end (19), sl st to wing base at appropriate point to mimic finger bones. Repeat for each finger and secure ends. Use black yarn for finger lines and attach with tight sl st.
Info :
After attaching finger strips, embroider or surface crochet thin black veins from the finger tips into the membrane to match the decorative look in the picture. Tie off and hide ends.
Round 10 :
Sew a small black bat to the wing membrane and add a hanging neon green pom-pom ball on one wing tip with a few ch stitches and tight knot to suspend (see 'Bat' and 'Hanging Ball' sections)
Info :
Attach wings to body between rounds 8-12 on either side, placing them slightly back so they appear to sprout from the shoulder blades. Use strong whip stitch to secure and add extra anchoring stitches at the base.
— Hat: Brim and Cone :
Brim Round 1 :
With purple: 6 sc in magic ring (6)
Brim Round 3 :
(1 sc, 1 inc) x 6 (18)
Brim Round 4 :
(2 sc, 1 inc) x 6 (24)
Brim Round 5 :
(3 sc, 1 inc) x 6 (30)
Brim Round 6 :
(4 sc, 1 inc) x 6 (36)
Brim Round 7 :
(5 sc, 1 inc) x 6 (42)
Brim Round 8 :
(6 sc, 1 inc) x 6 (48)
Brim Round 9-10 :
1 sc in each st (48) (work 2 rounds to stabilize brim size)
Info :
If you want a floppy brim like the sample, do not increase beyond this size. To make the brim curl slightly up or down, add a final round in BLO for a neat ridge, then fold and tack down where desired.
Crown Start Round 11 :
Join at center with 6 sc in magic ring (6) to start cone or begin by working upwards from a small circle placed centrally on brim; pick a method you prefer. For continuity, we will work the cone separately and sew it to the brim.
Cone Round 1 :
6 sc in magic ring (6)
Cone Round 3 :
(1 sc, 1 inc) x 6 (18)
Cone Round 4 :
(2 sc, 1 inc) x 6 (24)
Cone Round 5 :
(3 sc, 1 inc) x 6 (30)
Cone Round 6-14 :
1 sc in each st (30) (work 9 rounds to build height of cone)
Info :
To achieve the curved point (the hat tip that curls forward), insert a short length of wire or a firm pipe cleaner up into the cone as you work, or work a series of decreases at the tip to encourage curling. The sample shows a strongly bent tip; wire is recommended for holding the curl.
Cone Round 15 :
(3 sc, 1 dec) x 6 (24)
Cone Round 16 :
(2 sc, 1 dec) x 6 (18)
Cone Round 17 :
(1 sc, 1 dec) x 6 (12)
Info :
Leave a long tail. Insert wire if using then shape tip and sew cone to the brim center. Reinforce with extra stitching on inside of brim for stability. If you prefer not to use wire, shape with stuffing only and make a tighter final decrease to form a curled tip.
Hat Band & Buckle :
Chain to length (approx 48-54 ch depending on brim circumference), sc across to create a band in neon green; fasten off and sew around hat base. Create a small black square buckle by crocheting a 6 x 6 sc rectangle, leaving the center hole open by cutting or crocheting a small frame and sewing to front center.
Info :
Sew two neon green horns to the inner band so they appear to sprout through the brim as in the photo. Horns are worked like cones — see 'Horns' section below.
— Horns (Make 2) :
Round 1 :
6 sc in magic ring with neon green (6)
Round 3 :
(1 sc, 1 inc) x 6 (18)
Round 4-8 :
1 sc in each st (18) (work 5 rounds building cone height)
Round 9 :
(2 sc, 1 dec) x 4 + (2 sc) (14)
Round 10 :
1 sc in each st (14)
Round 11 :
sl st and fasten off leaving tail for sewing
Info :
Sew horns onto hat band before attaching band to brim so the seam hides inside the band. Position horns leaning forward as in the sample to frame the dragon's face.
— Spider Web Embroidery :
Info :
Using neon green embroidery thread or thin yarn, stitch 6 radial lines from the center of hat cone area out to the brim. Connect radials with curved lines to make concentric arcs forming a spider web. Make your central knot secure and weave ends into stitches on the inside of the hat to hide them.
— Small Bat (Make 6 tiny bats for hat and wings) :
Bat Body Round 1 :
6 sc in magic ring with black (6)
Round 3-4 :
1 sc in each st (12)
Bat Wing (each side) :
Ch 6, sc across 5 (5), sl st to side of body. Repeat for other wing and shape tips with decreases or fying wings using small picot if you like.
Info :
Sew tiny gold or white beads as eyes or embroider tiny pinprick highlights in cream for the bat eyes. Attach bats around hat band and wings with a few secure stitches; the sample shows bats perched and dangling — use short chains to suspend some bats from edges of brim or wing tips.
— Hanging Ball / Pumpkin Charm (Make 2-3) :
Round 1 :
6 sc in magic ring with neon green (6)
Round 3 :
1 sc in each st (12)
Round 5 :
sl st and fasten off, stuff lightly and sew closed leaving a short length to attach to hat tip or wing with a short chain
Pumpkin Option Info :
For a pumpkin charm, use orange yarn and embroider a jack-o-lantern face in black after stuffing. In the sample one tiny pumpkin dangles next to the hat brim as a playful earring.
— Claws & Bobbles (detail work) :
Info :
Bobble/claw details on toes and hands are worked with neon green using a bobble stitch (5 dc cluster into same stitch, pull through final loop to finish bobble). Make sure bobbles are tight and full by working into the same loop and closing each bobble with a slip stitch into the next st to secure shape.
— Assembly & Finishing Touches :
Info :
Sew head to body by inserting the neck tube into the body neck opening. Use a mattress or ladder stitch, catching body and neck stitches evenly. Stuff head and body before closing. Add belly panel by sewing the long strip down the center front; use small, even stitches for a clean edge.
Info :
Attach arms at body rounds 14-16 aligning the shoulder seam to give natural arm positioning. Sew legs to the base of the body, slightly angled outward so the dragon can sit. Attach wings further back on the upper body and secure well; reinforce with an invisible thread or embroidery floss if the dragon will be handled a lot.
Info :
Sew hat band to the brim and position on the head. Add embroidered web, sew on bats, and attach dangling charms with short lengths of chain (crocheted ch) and secure knots. Hide all internal yarn tails by threading them through a few interior stitches before trimming close.
Info :
Add eye highlights with a tiny dab of glossy fabric paint if desired. Use a yarn needle to embroider nostrils or a mouth if needed — small, subtle details give the face personality visible in the photographs.
Info :
For extra stiffness in the brim, you can use a thin plastic canvas disk inserted between brim rounds or apply a light coating of diluted PVA glue to the underside once fully assembled and dry. Test on a swatch first to ensure you like the finish.
This whimsical witch dragon brings together playful details, bold color contrasts, and careful shaping to create a truly memorable handmade companion. As you crochet the hat, wings, and tiny bats, you’ll see personality unfold with every stitch — it's a rewarding project that makes a fantastic gift or seasonal decoration. I hope you enjoy each step and treat yourself to the magic of making something unique. 🧶🎃✨