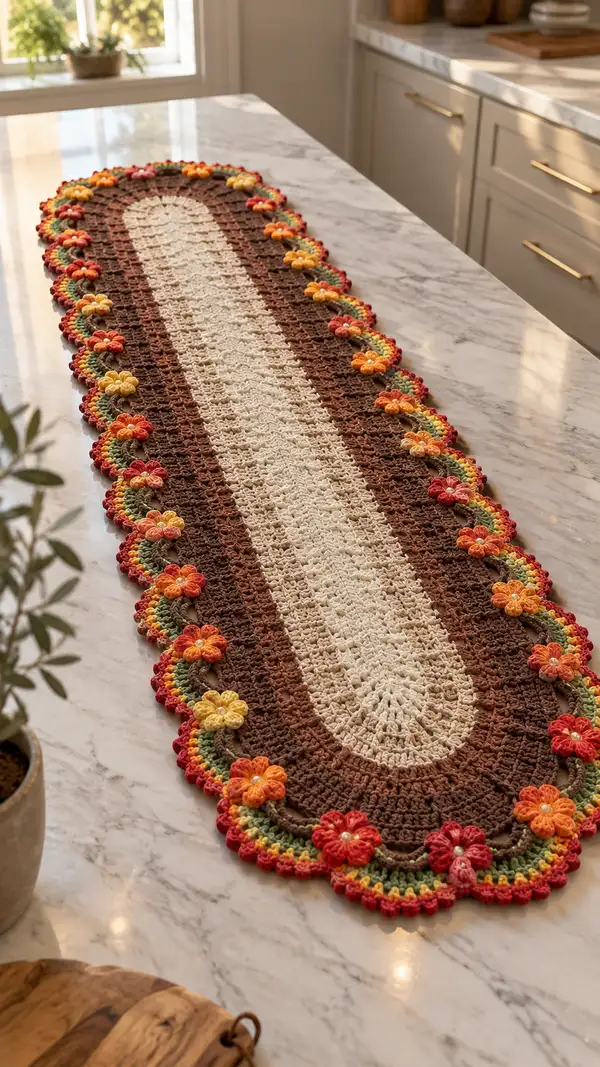
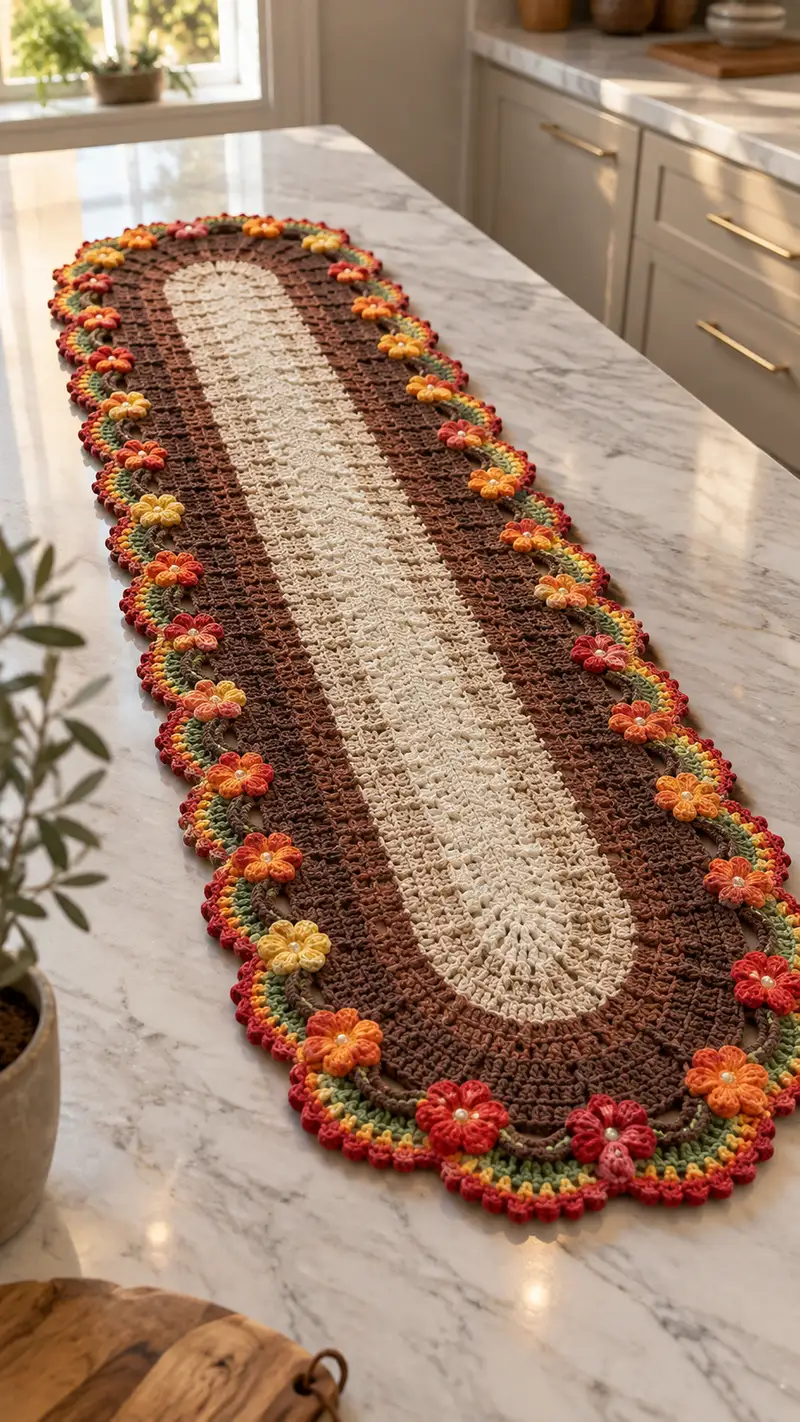
A warm, oval table runner featuring a textured cream center, rich chocolate side panels and a playful scalloped floral edge in autumn shades. The runner is finished with layered arches, leafy chains and 3D five-petal flowers with pearl centers—perfect for seasonal decor or a cozy everyday table accent. The pattern includes step-by-step rounds, tips for color changes, and thorough assembly guidance to recreate the exact layered, handmade look.
Progress Tracker
0% Complete
— Notes & Prep :
Info :
This runner is worked in the round as an elongated oval. Begin by making a foundation chain (shown below) and working around the chain so the piece grows evenly at the two short ends. Use stitch markers to mark the midpoint of each short end and maintain symmetry. Work with a 4.0mm hook unless your fabric is too loose; adjust hook size for desired drape. All rounds are joined unless noted 'continuous rounds'. The pattern shows stitch counts for each round. Check counts after increase rounds and before changing colors.
— Foundation Oval / Center Panel :
Round 1 :
With cream yarn, ch 48. Work 1 sc in 2nd ch from hook and in next 46 ch (47 sc across), then 3 sc in last ch; rotate and work 1 sc in each of the remaining 46 ch along the back side (46 sc), then 3 sc in the first ch to turn (total this round = 47+3+46+3 = 99 sc). Join with sl st to first sc. (99)
Info :
Place stitch markers in the middle stitch of each 3-sc cluster at both rounded ends to mark the centers — these are the oval ends and will remain reference points for increases and later motif placement.
Round 2 :
Ch1, sc in BLO in each st around, placing 2 sc in each of the 6 corner groups (the groups of 3 previously made) to soften curvature. The math: 99 + 6 increases = 105 sc. Join. (105)
Round 3 :
Ch2 (counts as first hdc), hdc in next 2 st, (1 hdc, 1 inc) across each section between corners—work evenly so increases occur at the two end regions only. Practical instruction: work even hdc across the long sides and place (1 hdc, 1 inc) into each of the 6 corner clusters. Resulting count: treat inc as extra 6 stitches. (111)
Round 4 :
Ch1, sc in each st around keeping stitch placement even and smoothing the oval. (111)
Round 5 :
Ch1, (11 sc, inc) x 9 across entire round to expand width slightly and maintain proportional increases at each curved end. Calculation: 111 + 9 inc = 120. Join. (120)
Info :
Check the oval shape; it should be flat with smoothly rounded ends. If ripples appear, undo last round and reduce number of increases by spacing them further apart. If the sides are too narrow, add extra increases near ends only.
Round 6 :
Ch1, sc in each st around. (120)
Round 7 :
Ch2, hdc in each st around. (120)
Round 8 :
Ch1, sc in each st around. (120)
Round 9 :
Ch3 (counts as dc), dc in next 3, *sk 2 sts, 3 dc cluster in next st (shell), sk 2 sts, dc in next 4*; rep between * * around to create textured lacy field. Stitch counts adjust depending on shell placement; aim for 20 shells spaced evenly across the round with dc fillers between (approx 120 sts including shells). Join. (120)
Info :
The textured shell section in rounds 9-14 creates subtle patterning visible in the cream center of the runner. If a tighter texture is desired, substitute sc in the filler spaces.
Round 10 :
Ch1, sc in each dc and shell stitch around, working 3 sc into the center of each 3-dc shell to define it. Maintain count approximately 120. Join. (120)
Round 11 :
Ch2, hdc in each st around. (120)
Round 12 :
Repeat Round 9 pattern (3-dc shell alternated with dc fillers) but offset shells so new shells sit between previous shells for a woven look. Keep stitch count consistent (120). Join. (120)
Round 13 :
Ch1, sc in each st around to lock pattern. (120)
Info :
At the end of Round 13 you will have a stable center panel. Measure width across the middle; adjust next rounds if you prefer a narrower or wider cream center by adding or skipping an even sc/hDc round.
Round 14 :
Ch1, sc in BLO across the next 8 sts to create a subtle ridge separation line where the chocolate side panel will start; sc in each st for the remainder of the round. (120)
Info :
Change to chocolate brown yarn now. Fasten off cream leaving a 6-8" tail to weave in later, or carry cream along if you prefer fewer ends. When joining chocolate, sl st into next stitch and ch1 to start first chocolate round.
Round 15 :
With chocolate, ch1, sc in each st around working firmly into BLO of the ridge created. This creates a defined seam between center and side panel. (120)
Round 16 :
Ch2, hdc in next 4, (hdc, inc) at the regions aligned with the oval ends — work 6 increases evenly among the end areas only to gently broaden the side panels. Calculation: 120 + 6 = 126. Join. (126)
Round 17 :
Ch1, sc in each st around smoothing the transition. (126)
Info :
Place stitch markers at the midpoint of each long side (opposite each other) to mark where future floral motifs will align. You will space 10 flower attachment points per long side later; use removable markers to map positions evenly.
Round 18 :
Ch2, (2 hdc in next st, hdc in next 9) repeat across the round to add texture and very slight shaping; increases happen primarily near ends. This round will give a count of 126 + (approx 12 extra hdc distributed) = 138 (approx). For pattern consistency assume 138. Join. (138)
Round 19 :
Ch1, sc in each st around. (138)
Round 20 :
Ch2, hdc around for two rounds to build body of the chocolate side panel and provide height for decorative edging. (138)
Round 21 :
Ch1, sc in each st around. (138)
Round 22 :
Ch3, *sk 2, 5 dc shell in next st, sk 2, ch1, sc in next st, ch1*; repeat between * * around to create an open scalloped scaffold which the leafy arches will ride over. Aim for 46 shells spaced evenly around entire runner. (Pattern count remains near 138 including clusters.) Join. (138)
Info :
Count shells and spacing; you will use one flower motif per shell when attaching. If you prefer fewer flowers, reduce shell count by spacing two filler sc between shells in Round 22.
— Side Panel Banding & Textured Rows :
Round 23 :
With chocolate, ch1, sc in each st around ensuring that the sc are worked into both dc cluster spaces and filler sc so the round is even. (138)
Round 24 :
Ch1, 1 sc in next st BLO, *ch3, sk next 3 sc, sc in next 3*; repeat around to begin the decorative chain arches that will later be worked in green. This will create approximately 46 ch3 arches around long sides and ends. (pattern repeats 46 arches)
Info :
Place temporary markers inside every 4th arch to count and ensure that later flower placement will be symmetrical along the runner.
Round 25 :
Ch1, sc in each st around to solidify arches. (138)
Round 26 :
Ch1, sc in FLO around to make a soft ridge for the next color layer. (138)
Info :
Change to leaf green yarn for the arch and leaf round. Carry chocolate behind if you want seamless color joins or fasten off and join fresh yarn if you prefer minimal carried strands showing.
Round 27 :
With green, ch1, *in each ch3 arch from Round 24 work: (sc, ch2, 3 dc, ch2, sc) into the arch space*; repeat around to build a layered scallop shell in green anchored to the chocolate base. End count remains matched to arch count: 46 scallops. Join. (approx 138 visual elements)
Round 28 :
Ch1, sc in each st and in the spaces between scallops to even out the round and prepare for flower attachment. (138)
Info :
This green scallop will act as a leaf/arch base. Ensure stitch tension is even so the scallops lie flat. If the scallops curl up, block them lightly before attaching flowers.
— Outer Decorative Scallop & Picot Edge :
Round 29 :
Change to a multicolor or red accent yarn. Ch1, *5 sc in next space at edge (small puff to form prominent scallop), sl st to next sc below*; repeat around to create a pronounced outer scallop edge. Expect one scallop per green scallop (approx 46 scallops). (46 scallops)
Round 30 :
Ch1, working into each of the 5-sc scallops: *(sc, picot, sc, picot, sc)* to add open picot accents that give a small lacy finish between petals. Picot = ch3, sl st into top of ch3. Repeat around. Visual count remains 46 scallops. (46 scallop units)
Info :
Where the multicolor yarn has short color runs you will see variegated scallops matching the photograph; to achieve this with solid colors, change colors every 2 scallops for a segmented look.
Round 31 :
Ch1, sc evenly across the picot points to anchor them. (138 approximate anchor points)
Round 32 :
Finish off outermost edge: slip stitch into each st around with a contrasting small border of 1 sc, 1 sl st alternating, to create a tidy reinforced edge. Fasten off and weave in the ends. (counts align to previous round counts)
Info :
At this stage your runner should lie flat with a defined cream center and chocolate side panels framed by green arches and multicolor scallop edge. If the runner curls, block flat by misting and pinning to a large surface then allowing to dry overnight.
— Flower Motif (Make 20–24) :
Round 1 :
With flower color A (e.g., deep red), make magic ring, ch1, work 6 sc into ring. Join (6)
Round 2 :
Ch2, (2 dc) in each st around to form a dense round of petals base; join. Calculation: 6 x 2 dc = 12 dc (12)
Round 3 :
Ch1, in BLO: (sc, ch3, sc) in each dc around to create 6 ch3 loops for petals. (6 loops)
Round 4 :
Switch to contrasting color B (e.g., pumpkin orange) for petal body. Into each ch3 loop from Round 3: work 7 tr (or 5 dc if using smaller hook) to form a rounded petal. Slip stitch at the base to secure. Repeat for all 6 petals. (6 petals)
Round 5 :
Ch1, sc around the outside of petal bases working 2 sc between each petal to keep petals separated. (approx 24 sc)
Info :
Add a small pearl or bead at the center now using a beading needle and tiny stitches; secure bead with several passes of a matching thread then knot and weave in threads tightly on the back of the flower.
Round 6 :
Using a tiny contrasting round (e.g., light yellow), embroider a small French knot or tiny round cluster in the center with yarn or embroidery thread for contrast. Fasten off leaving a long tail for sewing. (Finishing)
Info :
You may work each petal with a slight gradient by changing colors mid-petal (work first 3 tr with color B, last 4 tr with color C) for tonal depth as pictured. Make 20–24 flowers depending on how dense you want the border to be; picture shows approx 22 flowers spaced evenly around the runner.
— Leaf Chain Motif (Make 46) :
Round 1 :
With olive green, ch8, sl st into 2nd ch from hook, sc next, hdc next, dc next, tr next, dc back down, hdc, sc, sl st into base to create a small leaf loop. Fasten off leaving tail for sewing. Each leaf occupies one arch space on the green scallop. (1 leaf)
Info :
Sew leaf bases to the green arches using matching green yarn; position leaves so they point outward slightly and alternate orientation for an organic look. Use a small whip stitch across the leaf base to secure tightly.
— Attaching Flowers & Leaves :
Info :
Plan flower placement before sewing by placing flowers in each outer scallop (one flower per scallop). Use pins to test spacing; aim for one flower per scallop (approx 46 scallops) but the sample uses flowers at every other scallop along long sides with flowers at almost every scallop at the rounded ends to create focal clusters. This yields about 22 flowers total.
Round 1 :
Sewing step: Using the long tail left on each flower, position flower centered on scallop. From the back side, insert the needle through the base of the flower and through the runner fabric into the center of the scallop ring. Make 6 to 8 small stitches through the thicker flower base to secure. Tie off and weave in end. Repeat for all flowers. (Attachment)
Round 2 :
Sew leaf bases between flowers into the green arches: insert leaf tail into the arch seam from the inside and stitch down through arch base across 3–4 small stitches. Tie and weave in ends. (Attachment)
Info :
If adding pearls, sew bead securely into the very center of each flower after the flower is sewn to the runner. Use a beading needle and thread, pass thread through bead, then through flower base and into runner, repeat 3–4 times to secure, then hide knot on the back.
— Alternate Flower Option: Small Puff Petal :
Round 1 :
Make small 5-loop puff flower using color variations: ch1, (yo, insert hook in next st, pull up loop) x5, yo and draw through all loops, ch1 to close, sl st to base. Fasten off and sew as above. These can be used at ends or to add secondary accents between main flowers. (puff flower)
Info :
Use puff flowers where space is smaller or to create clustered looks. Be sure to anchor puff flowers tightly because puff stitches can be loose if not secured.
— Final Finishing Rounds (Blocking and Edge Reinforcement) :
Round 1 :
After all flowers and leaves are attached, weave in all tails on the wrong side using a yarn needle and hide ends through several stitches to secure. Trim close. (Finishing)
Round 2 :
Wet blocking: pin runner to a flat surface in desired oval shape using rust-proof pins. Gently mist with water until evenly damp. Allow to dry fully (12–24 hours). Blocking will even out scallops and relax slight distortions. (Blocking)
Round 3 :
Optional: if you want a firmer edge, add a small line of fabric glue beneath the outermost scallops on the backside. Use sparingly and test on scrap yarn first. (Optional reinforcement)
Info :
Final inspection: run your hands over the runner to ensure no loose threads or exposed knots remain. If any scallops stick up, re-pin and lightly steam or re-block as needed.
— Pattern Variation Ideas :
Info :
To make the runner wider, add 2–4 more increase sets during the early increase rounds for the chocolate side panel and maintain those ratios in subsequent rounds. To make the runner shorter, reduce the foundation chain by multiples of 2 and compensate in the increase rounds equally at both ends. For a spring look, swap flower colors for pastels and use a light gray rather than chocolate for side panels.
Info :
For an heirloom dense fabric, substitute dc rounds in the center with hdc or even sc for a thicker table protector. Remember to maintain consistent stitch counts when substituting stitch heights.
Completing this runner is so satisfying — every round adds a layer of texture and color that transforms a simple table into a seasonal statement. The 3D flowers and scalloped edge give a handcrafted charm that guests will notice right away. Treat yourself to the blocking step; it elevates the whole piece into a polished finished project. 🧶🍂💐