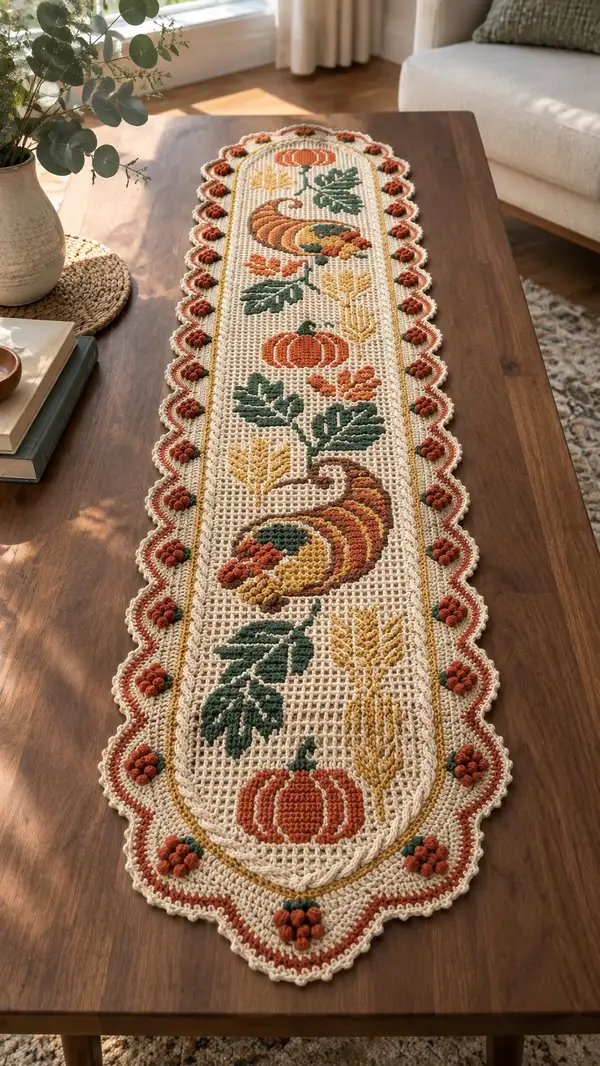
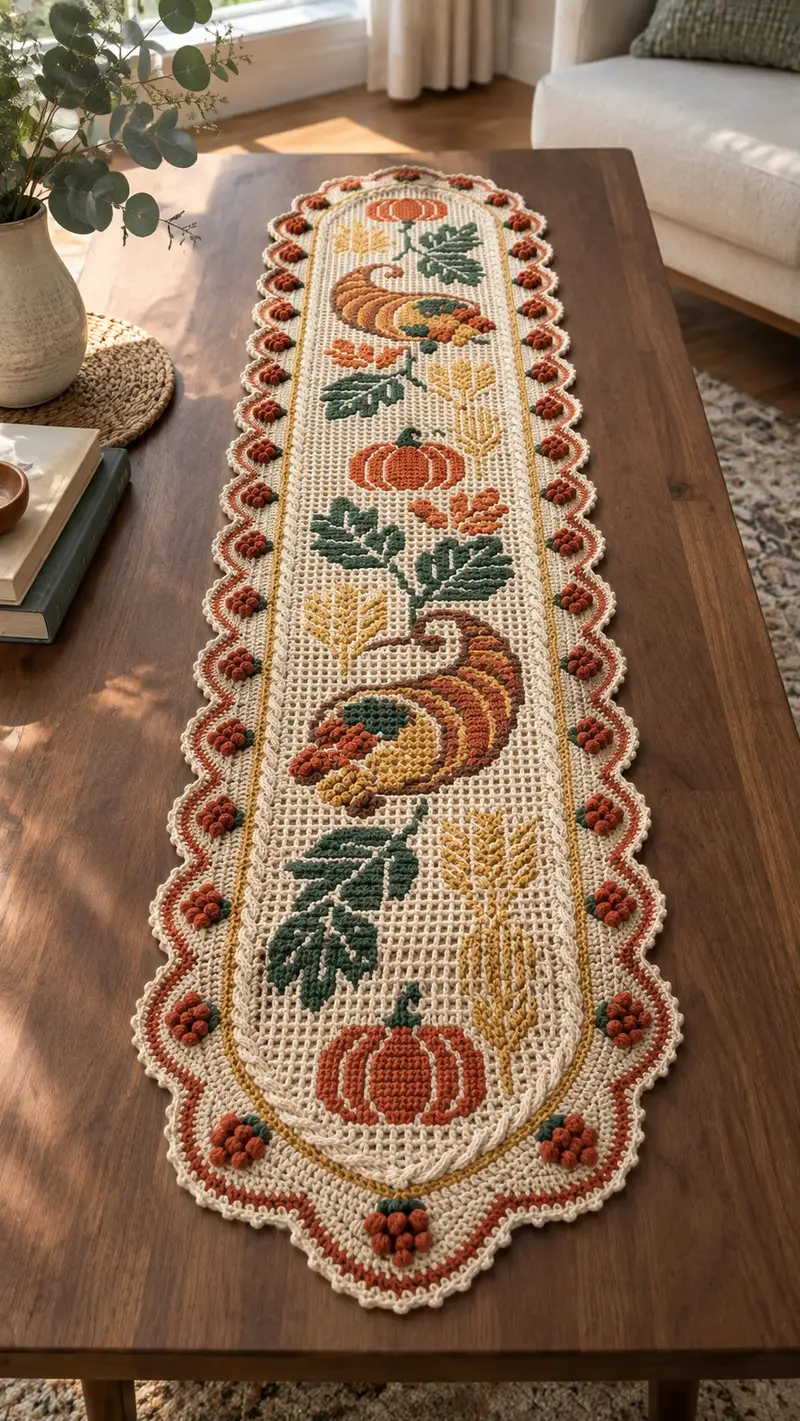
A warm, vintage-inspired table runner celebrating autumn harvest motifs — cornucopia, pumpkins, wheat and leafy vines set on an open mesh background. Worked in a neutral cream with rich rust, mustard, deep green and warm brown accents, it features a scalloped, bobble-trim border for texture and visual charm. This project uses tapestry/surface crochet colorwork and textured bobbles to create a heirloom look ideal for seasonal tables or gift-giving.
Progress Tracker
0% Complete
— Notes & Gauge :
Info :
Gauge and finished size depend on yarn and tension. Using worsted (#4) yarn with 4.0mm hook this runner measures approximately 14.5 in (37 cm) wide by 48-52 in (122-132 cm) long including scalloped ends. Adjust width by adding or removing multiples of 2 mesh units (see pattern notes)
Info :
Pattern is worked flat in rows. We describe the mesh foundation, integrated tapestry colorwork for motifs, and a scalloped bobble border worked after the main panel is complete. Use stitch markers at the beginning of each row and at motif centerlines. All rows are worked RS unless otherwise noted
— Abbreviated Construction Overview :
Info :
1) Work center mesh rectangle with tapestry colorwork charted into the mesh rows. 2) Work rounded end shaping at both short ends to create semi-elliptical caps. 3) Add a double-row frame around the panel in MC with a mustard inner line. 4) Work scalloped border with evenly-spaced bobble clusters. 5) Block, weave ends, and finish
— Center Mesh Foundation :
Round 1 :
Ch 62. (This foundation will create 61 working stitches. Adjust multiples of 2 to change width)
Round 2 :
Row 1 (RS): Sc in 2nd ch from hook and in each ch across — 61 sc (61)
Round 3 :
Row 2 (WS): Ch 1, turn, *sc in next st, ch 1, skip next st; rep from * across, ending with sc in last ch — results in 61 sc and 60 ch-1 spaces (61)
Round 4 :
Row 3 (RS): Ch 1, turn. Work sc into each sc and into each ch-1 space across — 61 sc (61)
Round 5-12 :
Work Row 2 and Row 3 repeat as established to form open mesh background. Keep tension steady to produce an even grid — 61 sts per straight row (61)
Info :
These first rows establish the mesh. The designer used an open sc-and-chain mesh to mimic classic filet while maintaining sturdy fabric for surface colorwork. Place a stitch marker in the middle stitch (st 31) to denote the centerline for motif alignment
— Begin Tapestry Colorwork Placement (Top End Toward Row Numbers) :
Round 13 :
Row 9 (RS): Ch 1, turn. Working in MC, sc 14, change to C (green) and sc 3 for the left leaf start, change to MC and sc remaining 44 — 61 sts (61)
Round 14 :
Row 10 (WS): Ch 1, turn. Work sc in each st across carrying colors as needed, catching floats at back every 6 sts — 61 sts (61)
Round 15 :
Row 11: Work as Row 9 but with color changes to shape small leaf: MC sc 12, C sc 5, MC sc 44 — 61 (61)
Info :
Follow the motif chart for precise color-by-stitch placement. Use tapestry technique: carry unused yarn across WS and trap floats every 6 stitches to avoid long loops. Work color changes by completing the last yarn-over of the previous stitch with the new color to avoid holes
Round 16-32 :
Continue mesh row repeats (odd rows sc across, even rows sc into sc and into ch-1 spaces) while substituting accent colors per motif chart to form small top pumpkin and leaves. Key placements: central pumpkin occupies rows 20-26 centered on st 31, cornucopia detail begins row 28 (see cornucopia section). Each row remains 61 sts (61)
Info :
Work carefully through color change rows. If you prefer, you can work the entire background in MC then add motifs using surface crochet or embroidery; tapestry crochet gives a flatter, integrated look but requires close attention to floats
— Rounded End Shaping (Top Cap) :
Round 33 :
Row 33 (RS): To begin top rounded end shaping, ch 1, turn. Sc 1 in first 29 sts, sc2tog, sc remaining to last 30 sts, sc2tog, sc final stitch — reduces 2 sts total: 59 sts (59)
Round 34 :
Row 34 (WS): Ch 1, turn. Work mesh row pattern across 59 sts maintaining color placement as per chart; if a motif reaches shaping edge, carry color across short floats — 59 sts (59)
Round 35 :
Row 35: Sc across first 28 sts, sc2tog, sc across to last 29 sts, sc2tog, sc final — 57 sts (57)
Info :
Decrease at both short ends by 2 stitches every odd-numbered shaping row to gradually form a smooth curve. Keep track with stitch markers at both ends to ensure symmetry
Round 36-48 :
Continue shaping: Rows 36-48 alternating mesh rows with shaping decreases on the RS shaping rows per sequence: Row 37 down to 53 sts, Row 39 down to 51 sts, Row 41 down to 49 sts, Row 43 down to 47 sts, Row 45 down to 45 sts, Row 47 down to 43 sts (perform sc2tog at each end on shaping rows). Mesh rows maintain counts — odd shaping rows reduce by 2 sts each time
Info :
After reaching 43 sts width at the narrowest of the top cap, switch to reducing every third shaping row to smooth the curve. Keep motifs within central space — any motif stitches that fall beyond the narrowing can be truncated or embroidered later
— Cornucopia Motif Detailed Placement :
Round 49 :
Row 49 (RS): With MC, reposition center marker to current center stitch (usually st (current width+1)/2). Begin cornucopia base shaping using tapestry: sc in MC 8, change to D (brown) and sc 6, change to A (rust) sc 6 for stripes, change to B (mustard) sc 4, complete row in MC — maintain current row stitch count (e.g., 43) (43)
Round 50 :
Row 50 (WS): Ch 1, turn. Work mesh pattern across, trapping floats. Color floats may cross up to 6 sts; if longer, carry with scrap yarn to avoid long floats. Maintain stitch count — 43 (43)
Round 51 :
Row 51: RS tapestry shaping: MC sc across first 6 sts, change to A sc 8 for cornucopia outer curve, change to D sc 5 for inner shading, change to B 4 sts for highlight, MC remainder — 43 (43)
Info :
The cornucopia is built across 10-14 rows of tapestry to create a curved horn shape. Use slightly looser tension on colorwork rows to prevent puckering. If you prefer, stitch the cornucopia as surface crochet after the panel is complete, following the same stitch placement counts
Round 52-62 :
Continue forming the cornucopia arc over rows 52-62, alternating color blocks and small 1-2 stitch transitions per row to produce the tapered curl. Each row holds the same stitch count; refer to motif chart for exact color-by-stitch map (approximate sequence: A, D, A, B stripes with MC background). Keep counts stable at current width (ranges from 43 down to 35 sts depending on row)
Info :
If a motif needs to extend beyond the current narrowed width, you can add short surface stitches after blocking to fill gaps. Tapestry crocheting during shaping is more advanced; surface crochet offers greater flexibility if you are less comfortable changing colors while decreasing
— Central Pumpkins and Leaves :
Round 63 :
Row 63 (RS): With MC, establish area for central pumpkin: sc 12, change to A sc 8 (pumpkin body), change to C sc 6 (leaf detail), finish with MC across — stitch count unchanged for that row (e.g., 35)
Round 64 :
Row 64 (WS): Mesh row in current width, catching floats and maintaining even tension — 35 sts (35)
Round 65-72 :
Build pumpkin with tapered shaping in tapestry across rows 65-72, using A (rust) for outer segments, D for shading, and MC for negative space. Use embroidered ridges later with sl st or surface sc to define pumpkin segments if you prefer extra definition
Info :
For the most graphic definition, add surface single crochet lines over the stitched pumpkin after blocking. Use A for raised ridges and D for deeper shadows. This technique makes pumpkins pop without adding bulk behind the fabric
— Wheat Sheaf & Small Leaf Clusters :
Round 73 :
Row 73 (RS): Work B (mustard) for wheat stems: MC sc 14, change to B sc 6, MC remainder — maintain width (35)
Round 74 :
Row 74 (WS): Mesh row to anchor wheat. Keep floats short by carrying color on WS and trapping every 4-6 sts — 35 sts (35)
Round 75-78 :
Continue building small leaves and wheat tips across rows 75-78 using B and thin D accents; tip rows can be finished with tiny surface sl sts for pointed stalks
Info :
Wheat motifs are best done with small blocks of color only 1-3 stitches wide per row for a natural taper. Use elongated sc (insert hook deeper) for a subtle vertical texture if desired
— Continue Body Mesh & Lower Cornucopia (Lower Half) :
Round 79-94 :
Work mesh and tapestry repeats forming the lower cornucopia and lower pumpkins, mirroring placement from the top. Keep stitch counts consistent per row within the current width. Expect to work approx 16 rows for symmetrical layout — each row maintains same stitch count (variable depending on shaping)
Round 95 :
Row 95 (RS): Prepare for bottom rounded end shaping by planning decreases at row 97 onward; maintain center motifs and avoid placing key motif parts in the area that will be decreased away — current width (typical 43-61 range per earlier shaping) (variable)
Info :
Double-check motif placement before commencing decreases: mark where the bottom pumpkin sits so you do not reduce its central stitches. If necessary, shift motif up by 1-2 rows before beginning final shaping
— Rounded End Shaping (Bottom Cap) :
Round 96 :
Row 96 (WS): Ch 1, turn. Work mesh row across in MC maintaining color floats — current width (variable)
Round 97 :
Row 97 (RS): On shaping rows, sc across first n-2 sts, sc2tog, sc across remaining sts, sc2tog at end to reduce 2 sts total. Repeat shaping decreases every other shaping row for 10-12 shaping rows until desired semicircle is formed (counts reduce by 2 on each shaping row)
Round 98-110 :
Alternate mesh rows and shaping rows until bottom cap mirrors top cap. When narrowest width is reached (approx 43 sts or chosen target), perform one or two rows without decrease to smooth the curve before finishing off the cap
Info :
If you prefer a perfectly symmetrical oval end, you may crochet separate semicircular panels and seam them to the rectangle. This pattern uses integrated decreases to simplify assembly
— Inner Frame & Mustard Line :
Round 111 :
With MC on RS, sc evenly around entire edge of runner working 3 sc into each corner or scallop point to maintain shape. If the panel edge is uneven, add or skip a sc occasionally to keep edge flat — total sc depends on current perimeter (variable)
Round 112 :
Round 2 of frame: Ch 1, turn, sc in each st around working a clean line. When you reach the long sides, work sc in each sc across. On the RS, carry B (mustard) and work a contrasting line: when you reach the center of long sides, drop MC and join B with a sl st facing the RS
Round 113 :
With B, work 1 sc in each st along the inner border to create the mustard outline, sl st to join. Fasten off B and return to MC to prepare for scalloped edge — perimeter stitch count unchanged (variable)
Info :
This thin contrasting line gives a framed look. Work tidy joins—avoid loose loops by finishing off and rejoining yarn when switching colors for the border lines
— Scalloped Border Foundation :
Round 114 :
With MC, attach yarn at a long-side corner and ch 1, sc evenly along edge for foundation. Plan for scallops spaced every 6-7 sts depending on perimeter. Example: work 10 scallops per long side and 3 per rounded end for balanced look — total scallops variable
Round 115 :
Scallop setup row (RS): For each scallop space, work: (sc, hdc, 3 dc, hdc, sc) into same base st to form a shell; skip 3 sts between scallops to create open spacing. Repeat across perimeter, finish with sl st — perimeter unchanged (variable)
Info :
Adjust number of trebles in each scallop to tune height. Keep scallops consistent by counting stitches in each shell. If your perimeter yields unequal spacing at the ends, slightly adjust skip counts between scallops to fit evenly
— Bobble Clusters (Raised Accent) :
Round 116 :
With A (rust), join yarn at the center top scallop and make 1 sc to anchor. Work bobble clusters into the centers of every other scallop as follows: bobble cluster = [(yo, insert, pull up loop) x 5], yarn over and draw through 10 loops, ch 1 to close bobble; secure with sl st into base. Each bobble occupies center of scallop — counts per row correspond to scallop count (variable)
Round 117 :
Alternate bobble row (WS): Work MC over the rest of the scallop edges as slip stitches or single crochet to tidy the back. Ensure bobbles are secure and not twisted — perimeter unchanged (variable)
Info :
For consistent bobble size, use a slightly larger hook (4.5mm) for bobble loops, then switch back to 4.0mm after finishing each bobble. Keep tension relaxed and even while making multi-yarn loops
Round 118 :
With A (rust) and small D (green) accents: On RS, slip-stitch round between scallops to visually separate bobbles from shell bases. At junctions where bobbles meet, add a small 3-st cluster of D to emulate berry clusters (3 sc in the same st) — perimeter unchanged (variable)
Info :
Use contrasting small green accents at the base of some bobbles to mimic small leaves pictured. These are optional but add a hand-stitched artisan look
— Scallop Edge Refinement & Picot Finish :
Round 119 :
With MC, work one more round of sc into each scallop edge stitch to firm up the shell shape. Where scallops meet rounded ends, work 3 sc into corner scallop to preserve curvature — perimeter unchanged (variable)
Round 120 :
Final picot edging (RS): Into each outer sc of scallop, work: sc, ch 3, sl st in 3rd ch to create a picot, skip 1 base stitch and continue. This adds a delicate looped finish that matches the vintage aesthetic — perimeter unchanged (variable)
Info :
Test one scallop for picot spacing before committing. If picots look too close or sparse, adjust ch length to ch2 or ch4 to match scale
— Surface Crochet & Embellishment (Optional) :
Round 121 :
Surface detail (RS): Use a tapestry needle or hook to add surface single crochet outlines around pumpkins, cornucopia curl, and leaf veins. Use A for pumpkin ridges, D for shadows, and C for leaf veins. Work tidy, even stitches following the motif lines
Round 122 :
Raised accents: Add 3D elements like tiny popcorn clusters inside some scallops by making 5-dc popcorns: (5 dc in same st, remove hook, insert into first dc, pull loop through, sl st to close), anchor with sl st into base. Space these at even intervals along the border for texture
Info :
Popcorns and bobbles are heavier than the main fabric; space them and balance with underlying mesh so the runner lies flat. Consider sewing bobbles down on the WS with short stitches to avoid twisting
— Blocking and Finishing :
Round 123 :
Wet blocking: Soak runner in lukewarm water with a mild fabric wash, gently squeeze out excess water, roll in a towel to remove moisture. Pin to blocking mat to exact measurements, shaping scalloped edges and bobble placement; let dry completely
Round 124 :
Weave ends: Weave all yarn tails on the WS for at least 3-4 in (7-10 cm) each, trimming close. For floated yarn ends that are trapped mid-row, secure with small stitches at 4-6 points to prevent long floats from catching
Round 125 :
Final inspection: Remove pins, steam lightly if needed for softened scallops, and lay flat before placing on table. Add non-slip pads under heavy center décor if necessary to protect runner and table
Info :
If you notice asymmetry after blocking, you can adjust by re-pin-blocking only one side and wetting lightly or by reworking a shallow border round to even out spacing
— Troubleshooting & Tips :
Info :
Tip: Keep a printout of your motif chart and mark off rows as you complete them. This is especially helpful while working shaping rows so you do not shift motif alignment inadvertently
Info :
Tip: To change the runner length, work additional straight mesh repeats before starting the bottom shaping. Each added pair of mesh rows adds roughly 3/8 in (1 cm) to finished length depending on gauge
Info :
Tip: If you plan to launder the runner regularly, consider using washable worsted yarn and avoid heavy metallics for yarns used in bobbles and popcorns to keep them soft after washing
Completing this runner is a joyful weaving of texture and color — from the curled cornucopia to the raised bobble border, every stitch tells a harvest story. It makes a beautiful seasonal statement and a thoughtful handmade gift. I hope you enjoy stitching the autumn motifs as much as I enjoyed designing them. 🧶🍂