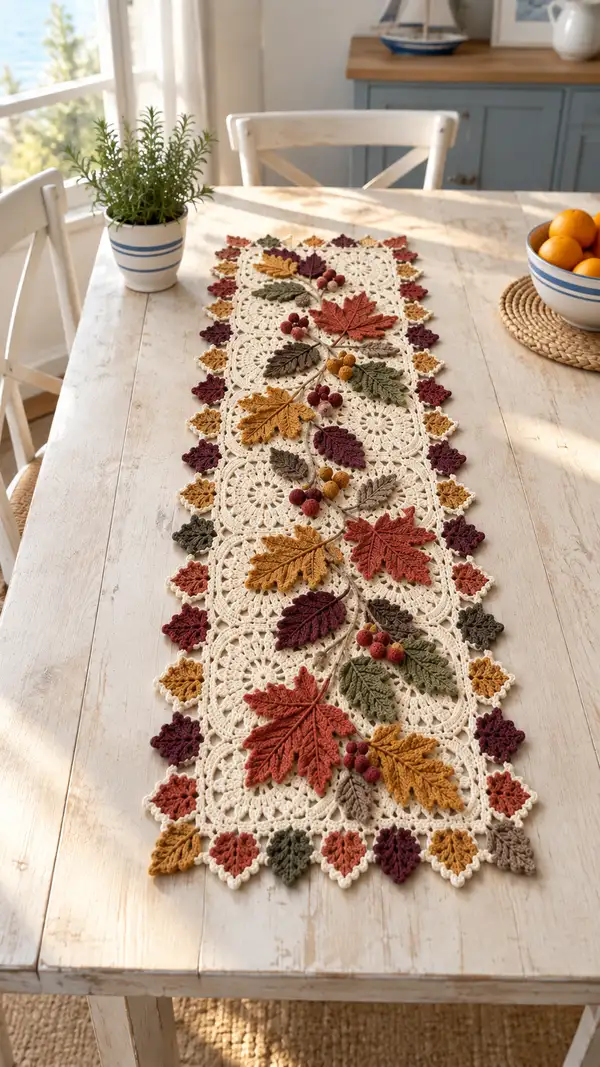
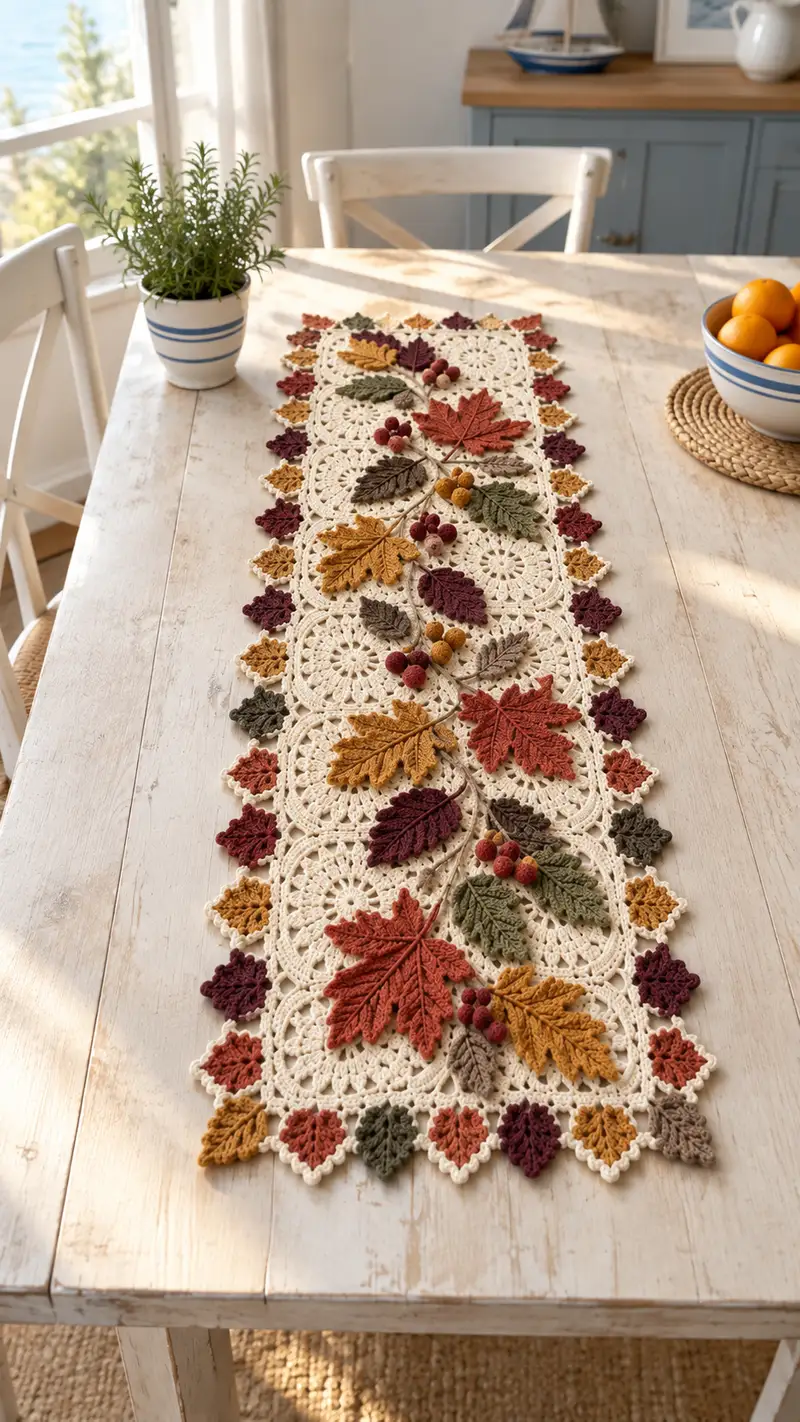
A long, elegant table runner adorned with lacy ivory medallions, layered 3D autumn leaves in warm rust, mustard, olive and brown tones, and tiny bobble berries. The runner combines delicate lace rounds and textured appliques for a cozy, harvest-season centerpiece. Step-by-step modular motifs make this a satisfying sew-together project to decorate your dining table all season long.
Progress Tracker
0% Complete
— Notes & Overview :
Info :
This pattern is modular: create lacy medallion motifs (make 6 for runner pictured), small diamond leaf motifs for border, layered 3D leaf appliques and tiny berry bobbles. Join medallions in a straight column and add an edging of small leaf diamonds. Sew appliques and berries onto medallions after assembly. Block motifs lightly for crisp joins.
Info :
Gauge is not critical but recommended tension: medallion (unblocked) ~13 cm/5 in across using 3.5mm hook and worsted weight yarn. Adjust hook to achieve a flat medallion that blocks well. Use stitch markers at round starts.
— Lacy Medallion (Make 6) :
Round 1 :
MR, ch 3 (counts as dc), 11 dc into ring, join with sl st to top of ch-3 (12 dc)
Round 2 :
Ch 3, dc in same st, 2 dc in each st around, join (24 dc)
Round 3 :
Ch 1, sc in same st, (ch 3, sk next st, sc in next) around to create 12 ch-3 loops, join to first sc (12 ch-3 sps)
Round 4 :
Sl st into first ch-3 sp, *ch 3, 8 dc in same ch-3 sp, ch 3, sl st in same ch-3 sp; sl st into next ch-3 sp; rep from * around to form 12 lacy petals, join (petal clusters formed)
Info :
Ensure petals are evenly spaced; gently block at this stage to shape. Use stitch counts above to verify even distribution of clusters.
Round 5 :
Ch 2 (counts as hdc), hdc in same st, *ch 2, sk 3 dc of petal cluster, (hdc, dc, hdc) in top of next petal, ch 2, sk 3 dc, sl st in base between petals; rep from * around, join (12 textured petal tops)
Round 6 :
Join with sl st into a ch-2 space, ch 3, 2 dc in same sp, ch 1, *3 dc in next ch-2 sp, ch 1; rep from * around, join (12 clusters, 36 dc total)
Round 7 :
Ch 1, sc in same st, (ch 4, sc in next ch-1 sp) around to create 12 ch-4 arches, join (12 ch-4 sps)
Round 8 :
Into each ch-4 sp: (sc, hdc, 4 dc, hdc, sc) to form fan shells; join (12 fans)
Info :
Fans make the medallion lacy and slightly scalloped. Work evenly in each space; if needed place a stitch marker at each fan apex to count easily.
Round 9 :
Ch 1, sc in same st, *ch 3, sk to next fan apex, sc in apex; rep around, join (12 ch-3 sps)
Round 10 :
Sl st into ch-3 sp, ch 3, (2 dc, ch 2, 3 dc) in same sp (shell), *sl st to next ch-3 sp, ch 3, (3 dc, ch 2, 3 dc) in same sp; rep around, join (12 shell motifs)
Round 11 :
Ch 1, sc in same st, ch 5, sc in ch-2 sp of shell; rep around creating 12 long arches, join (12 ch-5 sps)
Round 12 :
In each ch-5 sp: (sc, hdc, 6 dc, hdc, sc) to expand the medallion outer round; join (12 large fans)
Info :
At this stage verify medallion lies flat. If curling occurs, block each medallion with steam or pins to flatten before continuing. Blocking ensures uniform join edges later.
Round 13 :
Ch 1, sc in same st, (ch 4, sc in center dc of fan) around to create 24 ch-4 loops (2 per fan), join (24 ch-4 sps)
Round 14 :
Into each ch-4 sp: sc, hdc, 4 dc, hdc, sc (forming a delicate scalloped outer row), join (24 scallops)
Round 15 :
Ch 1, sc in each st around in BLO to create a neat ridged edge (total sts will equal number of stitches from previous round; expect 24 × 7-ish counts depending on fan width—work one sc per top of scallop across full round)
Info :
Work round 15 in BLO to give a subtle ridge for easier joining to neighboring medallions later. If your stitch count varies slightly due to fans, maintain even spacing and count approximate sc across whole round.
Round 16 :
Ch 1, sc in each st (working both loops) around to firm edge and standardize count (approx 96 sc depending on previous counts). Join and fasten off, leaving long tail for seaming.
Info :
Fasten off and weave in end temporarily or leave long tail for joining. Make 6 medallions identical in color mc (ivory) and block all medallions before joining.
— Small Diamond Leaf Motif (Edge) (Make 36-44) :
Round 1 :
MR, ch 2, 8 hdc into ring, join with sl st (8 hdc)
Round 2 :
Ch 2, hdc in same st, 2 hdc in each st around, join (16 hdc)
Round 3 :
Ch 1, sc in same st, *ch 3, sc in next st; rep around to make 8 ch-3 sps, join (8 ch-3 sps)
Round 4 :
Into each ch-3 sp: (sc, hdc, 3 dc, hdc, sc) to create 8 mini fans, join
Round 5 :
Ch 1, sc in next 2 sts, ch 5, sc in base between next two fans to form pointed diamond corner; rep to make 8 ch-5 sps, join
Round 6 :
In each ch-5 sp: (sc, hdc, 6 dc, hdc, sc) to make elongated diamond points; join. Fasten off and weave ends. Make these in alternating accent colors (plum, mustard, rust, olive, taupe) and block flat.
Info :
Make enough diamond motifs to edge both long sides of the runner and both short ends. Use an odd/even placement guide when assembling so pattern alternates color across runner edges.
— Large 3D Leaf Applique (Make 12 assorted colors) :
Round 1 :
With chosen leaf color, ch 13 (foundation chain). Row 1: sc in 2nd ch from hook, sc across to last ch; turn (12 sc)
Round 2 :
Ch 1, sc across to end, then work along opposite side of foundation chain: sc across to first ch to finish oval, do not join (24 sc total around foundation)
Round 3 :
Ch 2, hdc in same st, (ch 1, sk 1 st, hdc in next) across the long edge until apex, at tip: (hdc, dc, hdc) to form point, continue along the other side (hdc in next, ch 1, sk 1) back to base. End with sl st and fasten off for base leaf shape.
Round 4 :
Reattach at base with sl st, ch 3, dc in same st, (sk 1, 2 dc) along long edge every other stitch to create discrete segments; at tip work (2 dc, ch 2, 2 dc) for pointed tip; mirror along opposite side; join and fasten off.
Round 5 :
With contrast taupe or darker shade for veins, embroider central vein: using tapestry needle and long tail, bring yarn from center base to tip on top surface, then split into smaller veins: create V-shaped embroidered veins on each side by couching yarn with small running stitches from center vein to edges (5–7 veins each side depending on leaf size).
Round 6 :
Optional raised rib: using surface slip stitch or hdc along central vein to create a raised ridge. For more texture, work a decorative picot edge by sl st along leaf perimeter adding picots at the outermost points (ch 3, sl st into same st).
Info :
Large leaves are slightly cupped for realism. If necessary, use a small damp cloth and pin leaf into a shallow curved position while drying. Use thin fiberfill sparingly at the base for slight lift if desired.
Round 7 :
If you want extra dimension, stitch a short length of chain (ch 8-12) to back center as a stem and coat with slip stitch rounds to create rope-like stem; secure and weave in ends. Repeat to make leaves in various sizes and colors (rust, mustard, olive, taupe, plum).
— Small Serrated Leaf (Make 18) :
Round 1 :
MR, ch 3, 6 dc into ring, join (6 dc)
Round 2 :
Ch 1, sc in same st, *ch 3, sc in next dc; rep around to form 6 ch-3 sps, join
Round 3 :
In each ch-3 sp: (sc, hdc, 5 dc, hdc, sc) to make small pointed leaf shapes (6 leaves), join, fasten off. Add embroidered central vein with running stitch.
Info :
These small serrated leaves are perfect to tuck between large leaves and berries. Work in a mix of olive, taupe and plum for variety.
— Tiny Berry Bobble (Make 18-22) :
Round 1 :
With small hook (2.75mm) and berry color, MR, ch 1, 6 sc into ring (6)
Round 3 :
1 sc in each st around (12)
Round 5 :
6 sc, pull short tail and gather, stuff lightly with a tiny amount of fiberfill, finish closing and fasten off leaving long tail for sewing (6)
Info :
Make berries in two sizes if desired: for a smaller berry use MR, 6 sc and fasten off at 6 sc; for plumper one add an extra round of inc before evening out. Attach berries in clusters of 3–5 using yarn tails.
— Stem/Rope (Make 1 long vine and 6 short stems) :
Round 1 :
Ch to desired stem length (runner pictured uses one central vine of approx 120–140 cm woven across medallions, plus short stems 6–10 cm each). Use mc or taupe for natural stem color.
Round 2 :
Row: Work slip stitch in 2nd ch from hook and each ch across to form a firm cord (i-cord style). Fasten off and weave in ends. For thicker stem, round the cord by working sc around cord (work 3 sc per one chain stitch length) to create a rounded rope.
Info :
Pre-measure stems before laying out appliques so positions of small branches and leaf clusters align with medallion centers. Use pins to secure stem during assembly.
— Decorative Joining & Edge (Scallop Join) :
Round 1 :
Arrange 6 medallions in a straight column and mark seam points where three scallop points meet on adjoining medallions. Join medallions using whip stitch or mattress stitch through outer ridged rounds (round 15–16 on medallion). Join medallion A to B by aligning edges and sewing through corresponding BLO ridge stitches every 4–6 sc for stability.
Round 2 :
After joining central medallions, attach small diamond motifs to long edges. Pin each diamond so its point fits between scallops. Using yarn tail, sew diamonds to the medallion edges with small invisible stitches; place diamonds in alternating colors for a rhythmic edge.
Round 3 :
For short ends, create a row of diamonds that mirror each other and tuck seam edge under for a polished finish. Secure firmly and weave all ends on the wrong side to maintain clean top surface.
Info :
Joining method: either join-as-you-go (JAYG) by slip stitching motifs together along round 16 edges or sew after blocking. JAYG yields fewer ends to weave; sewing allows more precise applique placement. Choose preferred method and test on first medallion pair.
Round 4 :
Once diamonds are sewn, create a final scalloped picot edge around entire runner by working 1 sc into each visible sc around, and at every point work (ch 3, sl st into same st) to form picots. This gives a delicate beaded finish to the edge.
Info :
Counts across joining rounds will vary slightly due to fan stitches and diamond attachment. Aim for visually even spacing rather than mechanical exactness—matching neighboring seams is most important for aesthetic balance.
— Placement & Sewing of Appliques :
Info :
Layout the runner face-up on a large flat surface. Place large leaves along a central line in an alternating left-right pattern across the medallions. Tuck small serrated leaves and berries at intersections of leaf tips and stems. Pin everything in place first to evaluate spacing and balance.
Round 1 :
Sew large leaves by threading tapestry needle with long tails left when finishing leaf. From underside, stitch through base of leaf into medallion edge (around medallion round 12–15), use ladder stitch or whip stitch and secure with multiple passes at base; knot and weave tail inside wrong side.
Round 2 :
Sew small serrated leaves with a few invisible stitches along midrib. Sew berry clusters by sewing each berry through its center into medallion fabric, then stitch stems (chains) to anchor point and secure ends on wrong side.
Info :
Be careful not to stretch medallion fabric while sewing appliques. Use short stitches and avoid pulling tight; this preserves the lacy surface and keeps appliques sitting atop the medallion rather than pulling it out of shape.
— Final Finishing Touches :
Info :
After attaching all appliques and berries, steam block runner lightly: lay flat, pin edges to desired shape, spray lightly with water or steam from a distance and let dry overnight. This flattens joins and sets appliques in a gentle arch if desired.
Round 1 :
Trim any visible ends and weave tails securely through multiple stitches on the wrong side. Check both sides for loose threads and secure them. If desired, use a tiny dab of fabric glue at key joins on wrong side for extra stability (optional).
Info :
Use pins to shape the runner on table and spot-check placement; shift appliques slightly if necessary before final secure. Label the underside with fabric tag or tiny loop for hanging if this is used as wall decor rather than table runner.
Completing this table runner is such a joyful milestone! The combination of lacy medallions with warm autumn leaves and little berry clusters makes a cozy yet sophisticated centerpiece. Each motif you crochet and sew on adds personality, and the blocking step truly brings everything together. I hope this runner brings autumnal cheer to your table and sparks compliments at every gathering. 🧶🍁