🧢 Beautiful ✨ Detailed πŸ’ Adorable

Autumn Deer Table Runner Pattern

Autumn Deer Table Runner Pattern
4.3β˜… Rating
8-10 Hours Time Needed
2.8K Made This
βœ‚οΈ

Intermediate Level

Ideal for those with basic crochet experience, featuring slightly more advanced stitches and techniques to expand your skills.

⏱️

All-Day Adventure

Requires 8-10 hours, ideal for a full day of immersive crocheting.

🏑

Cozy Accent

A warm touch for your space that transforms ordinary corners into inviting nooks filled with handmade charm.

🧢 Jump to Pattern ↓

About This Autumn Deer Table Runner Pattern

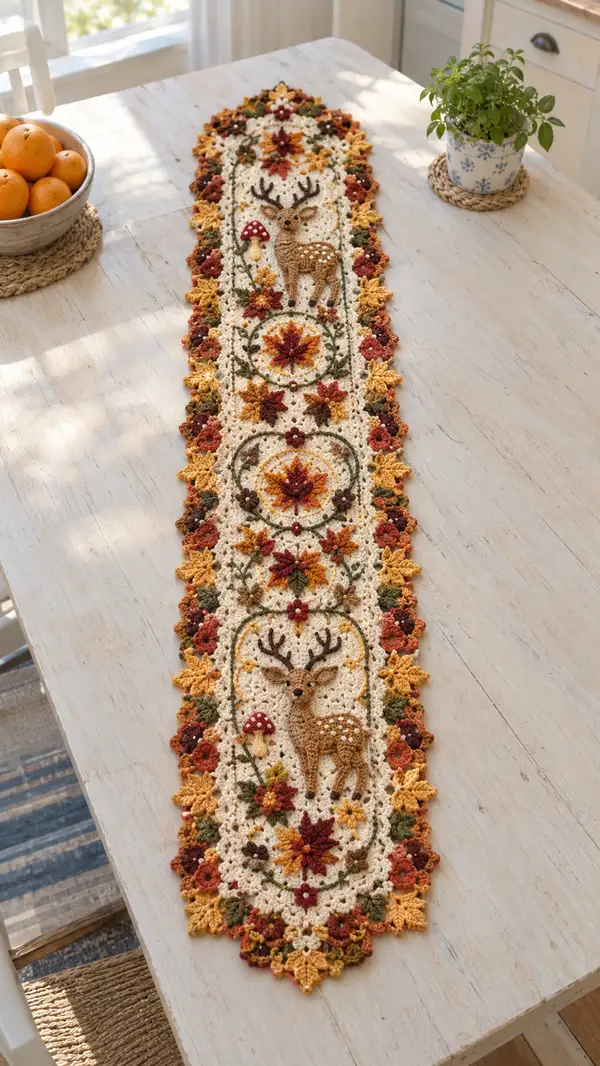
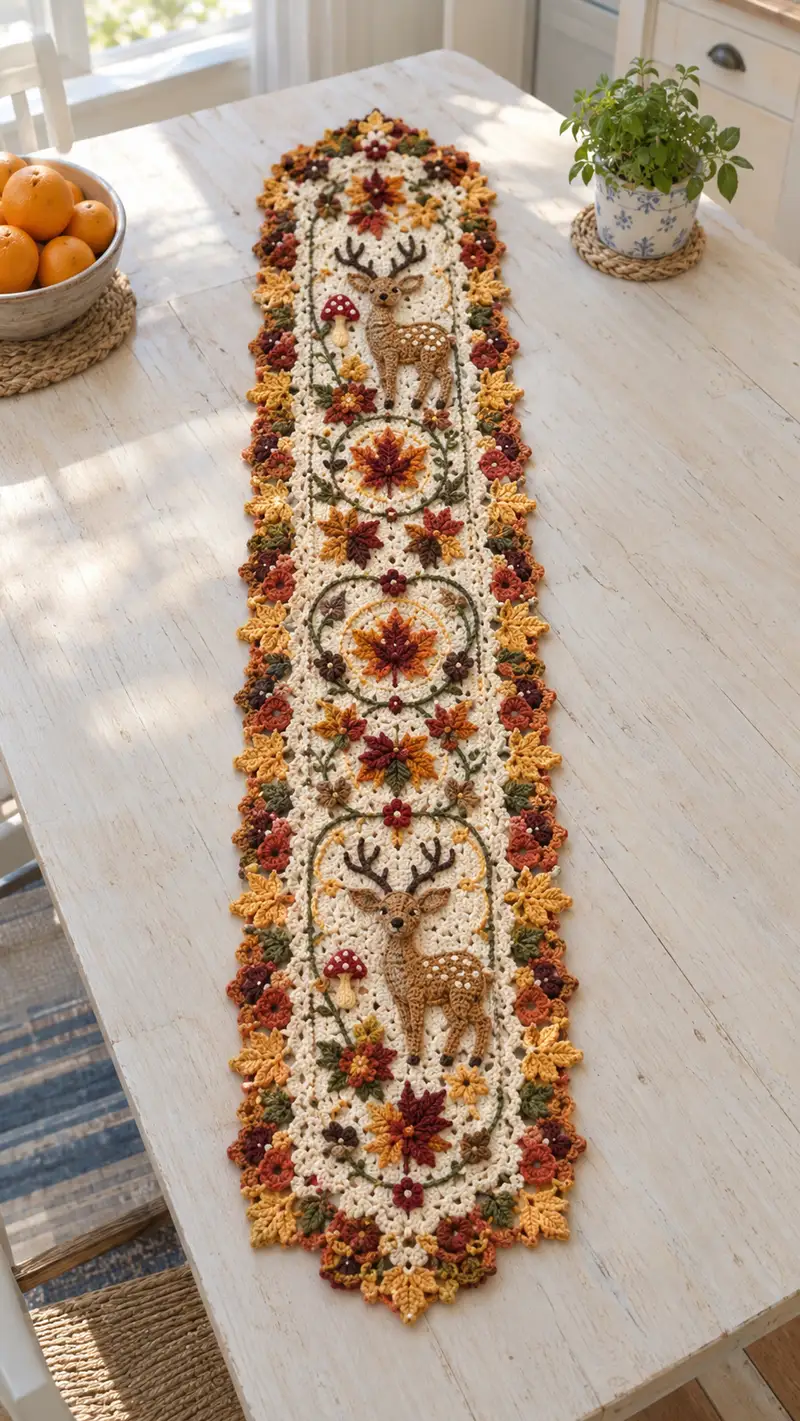
This table runner is built from repeating circular medallions framed by a delicate oval lattice and decorated with 3D deer applique9s, tiny mushrooms, layered maple leaves and clusters of small flowers. The main background is a soft cream that allows autumn shades of mustard, rust, burgundy and olive to pop. Each motif is worked separately or in joined rounds to create a lightweight, textured runner ideal for seasonal decor.

Autumn Deer Table Runner Pattern crochet pattern - detailed view of completed project

The pattern uses a combination of basic rounds, front/back loop work, and small sculpted applique9 techniques for the deer and mushrooms. Plenty of Info sections walk you through placement, color changes and assembly so you can reproduce the look precisely.

Why You'll Love This Autumn Deer Table Runner Pattern

I love this pattern because it balances vintage medallion motifs with playful 3D applique9s β€” the deer and mushrooms add so much character. I also enjoy how the cream background makes the warm autumn palette sing. The modular construction is satisfying to stitch and fun to personalize with your color choices and small embellishments.

Autumn Deer Table Runner Pattern step 1 - construction progress Autumn Deer Table Runner Pattern step 2 - assembly progress Autumn Deer Table Runner Pattern step 3 - details and accessories Autumn Deer Table Runner Pattern step 4 - final assembly and finishing

Switch Things Up

I absolutely loved designing this runner because it offers so many ways to customize while maintaining a cohesive structure. The repeating medallions make it easy to change one motif without altering the whole runner, and the neutral cream background lets any autumn palette shine.

I often experiment with color swaps: try deep teal instead of olive for a cooler palette or rich plum for a more dramatic fall look. You can also scale the runner by adding or removing medallions β€” add a fourth medallion for a longer table, or make two shorter runners for a layered centerpiece.

For a simpler version, skip the 3D deer and stitch flat deer silhouettes with surface crochet or embroidery; for extra texture, use boucle or heathered yarn for leaves. Have fun mixing clusters of beads as flower centers or using a smaller hook for crisper leaves β€” the pattern is very forgiving and welcomes your creative touches.

Common Mistakes & How to Fix Them

βœ— Skipping stitch markers at round starts can cause misaligned motifs and irregular oval shapes; always mark your first stitch of each round. βœ— Working too loosely for amigurumi-style applique9s creates holes where stuffing shows; use a slightly smaller hook for tight stitches. βœ— Not weaving ends under several stitches after color changes causes loose tails; secure and weave ends for durability. βœ— Overstuffing applique9s makes them sit too proud and distort the runner; stuff sparingly and shape gradually. βœ— Joining motifs without blocking may make edges ripple; block each motif flat before joining for a smooth finish. βœ— Failing to count increases/decreases leads to uneven rounds; recount at the end of each round to verify stitch math. βœ— Carrying yarn incorrectly during color changes can create bulky edges; fasten off and rejoin for neat color transitions. βœ— Not pinning placement prior to sewing causes crooked applique9 positioning; pin and audition placement before final stitching.

Autumn Deer Table Runner Pattern

A warm, autumn-inspired crochet table runner featuring delicate medallions, layered leaves and tiny 3D deer applique9 accents. Worked in cream background with golden, rust, olive and brown highlights, this long runner brings cozy fall charm to your table. Detailed construction uses small motifs joined and edged with a textured leaf-and-flower border for a hand-crafted heirloom finish.

Intermediate 8-10 Hours

Materials Needed for Autumn Deer Table Runner Pattern

β€” Main Fabric

  • 01
    Worsted weight yarn (#4), approximately 250g in cream/ivory for main background
  • 02
    50-70g in mustard/golden yellow for leaves and accents
  • 03
    50-70g in rust/orange for maple leaves and small flowers
  • 04
    40-60g in burgundy/deep red for flower centers and leaves
  • 05
    40-60g in olive/forest green for vines and leaf stems
  • 06
    50g in warm tan/light brown for deer main body
  • 07
    20-30g in dark brown for antlers and hoof accents
  • 08
    Small amounts (10-15g each) in white and deep red for mushroom dots and extra details

β€” Tools Required

  • 01
    4.0mm (G) crochet hook for main work
  • 02
    3.5mm (E) hook for tighter applique9 details
  • 03
    3.25mm (D) hook optional for very tight embellishments
  • 04
    Yarn needle for sewing and weaving ends
  • 05
    Small pair of sharp scissors
  • 06
    Stitch markers (at least 6-8)
  • 07
    Blocking board and pins for flattening motifs
  • 08
    Lightweight polyester fiberfill for stuffing applique9s
  • 09
    Optional: tiny beads for flower centers
  • 10
    Optional: fabric glue for securing tiny embellishments
  • 11
    Optional: tapestry needle with fine tip for embroidery details

Progress Tracker

0% Complete

β€” General Notes & Gauge :

Info :

Gauge is not critical for this decorative runner but consistent tension is essential so motifs align. Using worsted weight (#4) yarn and a 4.0mm hook yields motifs that join evenly. Work tightly for applique9 detail pieces to avoid showing stuffing.

Info :

Throughout the pattern rounds, counts are shown in parentheses. When changing colors, fasten off and weave tails rather than carrying yarn across long distances. Block each round/motif flat before joining for precise placement.

β€” Circular Medallion Motif (Make 3) :

Round 1 :

6 sc in magic ring (6)

Round 2 :

6 inc (12)

Round 3 :

(1 sc, 1 inc) x 6 (18)

Round 4 :

(2 sc, 1 inc) x 6 (24)

Round 5 :

(3 sc, 1 inc) x 6 (30)

Round 6 :

(4 sc, 1 inc) x 6 (36)

Round 7 :

(5 sc, 1 inc) x 6 (42)

Round 8 :

(6 sc, 1 inc) x 6 (48)

Info :

Switch to main cream background color now if you began medallion center in an accent. Block this small circle flat before continuing to ensure round symmetry.

Round 9 :

1 sc in each st (48)

Round 10 :

(6 sc, 1 dec) x 6 (42) - create a slight ridge by working final sc of each repeat in FLO

Info :

Use front loop ridges to create a recessed ring for later leaf petals to sit inside. This gives dimensional layering once leaves are attached.

Round 11 :

1 sc in each st (42)

Round 12 :

Join accent color for star leaf layer: *ch2, sk 2 sts, 5 dc cluster in next st, ch2, sl st in same st* repeat around to make 6 petal clusters (42 petals spaced)

Info :

When making petal clusters, work clusters loosely so they lie flat. Use mustard and rust alternately to create a layered star center. Fasten off and weave ends.

Round 13 :

With background color rejoined, 1 sc in each st between petals (42) - this secures petals and forms the medallion face

Round 14 :

*(2 sc, ch1, sk next ch sp) x around to create small scallop texture* (42)

Round 15 :

Change to olive; working in BLO 1 sc in each st (42)

Info :

Round 15 BLO creates a subtle inner ring to anchor the vine embroidery later. Leave a 12" tail for sewing the medallions into the runner center when assembling.

Round 16 :

With cream, 1 sc in each st (42)

Round 17 :

*ch3, sk 2 sts, sc in next st* repeat (creates open lace around medallion) (42)

Round 18 :

Work 1 sc in each st and between ch-arches to even shape (42)

Info :

Block medallion flat and pin evenly; repeat identical process for 3 medallions. These will become the central repeating panels of the runner.

β€” Oval Background Panel (Make 3 - one per medallion) :

Round 1 :

ch 18, join into ring with sl st, ch1, sc 18 around foundation chain to make a narrow oval base (18)

Round 2 :

Inc at each end to shape oval: 1 sc in next 7, (2 sc in next) x2 at end, continue across chain, (2 sc in next) x2 at opposite end, 1 sc in final 7 (22)

Round 3 :

(1 sc, inc) at each short-end around to widen ends, 1 sc along long sides (26)

Round 4 :

1 sc in each st (26)

Round 5 :

Change to lace pattern - *dc in next 2, ch2, sk 2* repeat around producing an openwork background for medallion placement (26)

Info :

These oval panels act as frames for each circular medallion and deer applique9. Place medallion centered on oval and pin before final joining stitches to ensure even border around medallion.

Round 6 :

1 sc evenly around to create a clean attachment edge for applique9s (26)

Round 7 :

Add a decorative ch-arch row: *sc, ch4, sk 3* repeat around (26)

Round 8 :

Sc into ch-arches to tighten lace and create supportive base for embroidered vines (26)

Info :

When assembling later, sew medallion to this oval at the sc round for a secure but flat join. Use small, even whip stitches with tail left from medallion.

β€” Deer Applique9 (Make 2 - small sculpted deer) :

Head & Snout - Round 1 :

Using tan, 6 sc in magic ring (6)

Round 2 :

6 inc (12)

Round 3 :

(1 sc, inc) x 6 (18)

Round 4 :

(2 sc, inc) x 6 (24)

Round 5 :

1 sc in each st (24)

Info :

Place tiny safety eyes (optional) or embroider eyes between rounds 4 and 5, spaced about 6-8 sts apart. If using eyes, insert and secure before adding snout shaping.

Round 6 :

(3 sc, inc) x 6 (30)

Round 7 :

1 sc in each st (30)

Round 8 :

Start shaping snout: change to light cream for nose area, (4 sc, dec) x 5, sc remaining (25)

Round 9 :

(3 sc, dec) x 5 (20)

Info :

Stuff head lightly now with a small amount of fiberfill. For applique9s keep stuffing very modest to maintain a flat profile on the runner; the goal is a gently raised head, not a plush toy.

Round 10 :

(2 sc, dec) x 5 (15)

Round 11 :

(1 sc, dec) x 5 (10)

Round 12 :

5 dec (5) - leave long tail and fasten off; use tail to sew head onto body later

Info :

We used a tighter 3.5mm hook for the deer to ensure compact stitches. If your head is slightly larger or smaller adjust stuffing and placement accordingly for scale with medallion.

β€” Deer Body & Legs :

Round 1 :

Using tan, 6 sc in magic ring (6)

Round 2 :

6 inc (12)

Round 3 :

(1 sc, inc) x 6 (18)

Round 4 :

(2 sc, inc) x 6 (24)

Round 5 :

1 sc in each st (24)

Round 6 :

(3 sc, inc) x 6 (30)

Round 7 :

1 sc in each st (30)

Round 8 :

Start body taper: (3 sc, dec) x 6 (24)

Round 9 :

1 sc in each st (24)

Round 10 :

Work slight surface shaping: *sc 6, inc in next* repeat (28) - adds a slight chest bulge

Info :

Create legs by leaving small openings and crocheting leg tubes directly from the body base or make legs separately and sew. We will make legs separately for cleaner shaping.

β€” Deer Legs (Make 4) :

Round 1 :

Using dark brown for hooves, 6 sc in magic ring (6)

Round 2 :

6 inc (12)

Round 3 :

Switch to tan, 1 sc in each st (12)

Round 4 :

1 sc in each st (12)

Round 5 :

(3 sc, inc) x 3 (15)

Round 6-9 :

1 sc in each st (15)

Round 10 :

Begin slight taper for upper leg: (2 sc, dec) x 3 (12)

Round 11-12 :

1 sc in each st (12) - fasten off leaving long tail for sewing

Info :

Stuff hooves lightly to give a firm foot appearance; legs should be flat enough to sew flush to the oval panel but retain a little shape to read as legs.

β€” Deer Ears (Make 2) :

Round 1 :

ch4, join to form small ring, 6 sc around (6)

Round 2 :

(1 sc, inc) x2, 1 sc in next 2 (8)

Round 3 :

1 sc in each st (8) - fold ear and sl st at base to shape, fasten off leaving tail for sewing

Info :

Sew ears to top sides of head between rounds 3 and 4, curving slightly forward. Use small mattress stitch for a neat invisible seam.

β€” Deer Antlers (Make 2, mirror) :

Round 1 :

Using dark brown, ch6, starting in 2nd ch from hook sc, hdc, dc, sl st at top to create a short branch (4)

Round 2 :

Sew antler base to top of head between rounds 6-7 using yarn tail; shape branches up and out. Use embroidery to fix small prongs if desired.

Info :

Antlers can be made sturdier by crocheting over a short piece of floral wire, folding wire ends back to avoid sharp points, then slip-stitching over wire and sewing into head for poseable antlers.

β€” Mushroom Applique9 (Optional) :

Cap Round 1 :

Using deep red, 6 sc in mr (6)

Round 2 :

6 inc (12)

Round 3 :

(1 sc, inc) x6 (18)

Round 4 :

1 sc in each st (18) - fasten off leaving tail for sewing

Stem Round 1 :

Using cream, 6 sc in mr (6)

Round 2 :

1 sc in each st (6)

Round 3 :

Attach cap to stem and sew to oval panel beside deer for whimsical detail

Info :

Embroider tiny white dots onto cap using white yarn and surface embroidery to create classic toadstool look.

β€” Leaf Motifs (Make ~40 assorted) :

Round 1 :

Using mustard, ch6, sc into 2nd ch from hook, hdc, dc, tr, dc, hdc, sl st to base to form a pointed leaf (6 stitches including sl st)

Round 2 :

Work 2nd row for fuller leaf: *sl st along center, 3 sc along one side, 3 sc back along other side* - shape leaf and fasten off

Info :

Vary leaf sizes by using ch7 or ch8 start chains and changing hook size to 3.5mm for smaller leaves. Make mustard, rust, burgundy and olive leaves and mix placement around medallion and outer border.

β€” Small Flower Cluster (Make ~30) :

Round 1 :

Using deep red, mr, ch2, 6 sc in ring, sl st to join (6)

Round 2 :

Join mustard, *(ch3, 3 dc cluster in next st, sl st)* repeat around to create 6 petals, fasten off (6 petals)

Info :

Sew tiny bead or French knot using embroidery floss in center of each flower for a polished look. Arrange flower clusters in groups of 2-3 along runner edges for visual weight balance.

β€” Connecting Rows & Runner Foundation :

Round 1 :

Create foundation strip by joining three oval-medallion assemblies with 1 sc through each adjacent sc of ovals: line up three oval panels and with cream yarn whip stitch or single crochet join through both layers along the sides to create continuous runner (use whip stitch or join-as-you-go sc)

Round 2 :

After joining ovals centrally, work one round of 1 sc in each st around entire runner perimeter to tidy seams (maintain even stitch count along straight sides and increase gracefully at rounded ends; expect approx 280-320 sc around full runner depending on tension)

Info :

Block assembled runner flat and pin medallions so centers sit level. Use a washable starch spray if you want a crisper table decor finish. Ensure joins sit smoothly on top of your surface; adjust by unpicking or adding small tucks if necessary.

Round 3 :

Work a decorative ladder row to anchor vine stems: *ch4, sl st in next st*, repeat around to create small arches for embroidering vines at later stage (approx 60 arches)

Round 4 :

Sc into each ch-arch to strengthen (approx 120 sc)

Info :

When working around joined seams, place markers at 1/3 and 2/3 positions to ensure medallions remain evenly spaced. Keep counts consistent on both left and right borders for symmetry.

β€” Outer Leaf & Flower Border :

Round 1 :

With mustard, join at runner end center, *ch2, sk 1, 5 dc shell in next st, ch2, sl st in next* repeat along entire edge to create a scalloped shell foundation (approx 48 shells depending on runner length)

Round 2 :

In each shell, work 3 sc, ch1, 3 sc to create a pointed petal, switch colors for alternate shells to create scalloped multi-color effect (maintain same number of shells) (approx 48 petals)

Info :

Add small flower clusters between shells by inserting a tiny 3-petal flower foundation with a few secure whip stitches. Alternate colors rust and burgundy for dynamic texture.

Round 3 :

Attach leaf motifs in the gaps between shell petals using mattress stitch and a matching tail; tuck leaves under shells slightly so they overlay edges naturally. Work leaf placement symmetrically on both sides.

Round 4 :

To finish edge, with cream yarn work a final row: *sc into base of each petal, sl st into space between leaf and shell* repeat. This neatens raw edges and stabilizes applique9s (approx 220 sc)

Info :

For a lacy finish, substitute every 3rd sc with ch2 + sl st, creating intermittent open spaces. If runner will be used frequently, the solid sc finish is more durable.

β€” Embroidered Vines & Detail Work :

Info :

Use olive yarn and a blunt tapestry needle to couch chain-stitched vines along the rectangular spaces between medallions. Bring the yarn up from the back, make a small sl st on top to anchor, and couch long chain loops with small catch stitches every 6-8 mm.

Round 1 :

Embroider 2 parallel vines forming an oval frame inside each oval panel. Add small French-knot-style blooms by wrapping yarn around a needle and tacking down securely to mimic berry clusters (approx 6 clusters per medallion)

Info :

Keep embroidery sparse so it complements rather than competes with crochet texture. Embroider before firmly sewing applique9s in place so you can see final layout and adjust spacing.

β€” Attaching Deer & Small Applique9s :

Info :

Position deer centrally in each medallion oval. Pin head at approx round 5 of medallion and hindquarters around round 11 so deer stands naturally on medallion interior. Use ladder stitch/whip stitch with the long tail left from deer body to attach.

Round 1 :

Sew legs in place so hooves rest just above lower medallion arch. Sew mushroom beside deer using same method, and add small flower clusters and leaves around the base to create a woodland vignette.

Info :

Use small backstitches to embroider white spotting on deer backs and cheeks with white yarn for contrast. Embroider a tiny nose and smiling mouth on snout with dark brown yarn.

β€” Final Border Reinforcement :

Round 1 :

With cream, sc around entire runner edge through both border and base rounds to secure all applique9 attachments and reduce curling. Work 1 sc per st, increasing gently around curved ends (approx 320 sc total)

Round 2 :

Slip stitch around edge using a small neat sl st so the runner edge lies flat and tidy; fasten off and weave all ends thoroughly on the back side.

Info :

Block entire runner now. Wet block or steam block as appropriate for your yarn. Pin edge into a smooth oval shape and allow to dry completely to set shape. This gives the runner a professional, flat finish.

β€” Finishing Touches & Care :

Info :

Weave ends on the backside of the runner, avoiding the decorative front. Use small invisible stitches where necessary to flatten any bulky joins. Press lightly with steam on a low setting if yarn allows.

Info :

Spot clean as needed; hand wash gently and lay flat to dry. If you used beads or glued items, avoid immersing; instead spot-clean and handle with care.

Info :

Now enjoy your autumnal runner! If desired, add a lightweight felt backing to the runner for extra protection on dining surfaces β€” use fabric glue or sew a running stitch around the edge to attach.

Assembly Instructions

  • Attach each circular medallion to its matching oval background by centering and sewing through the sc round that joins medallion and oval. Use mattress stitch with matching cream yarn and sew evenly around, leaving no gaps.
  • Join the three oval-medallion assemblies along their long edges by aligning the sides and slip stitching through both layers or using whip stitch for a flat seam. Work from the center to each end to maintain even spacing.
  • Pin and sew the deer applique9s into the center of each medallion: position head at medallion round 5, body across rounds 7-12, and legs resting at the lower arch. Secure with ladder stitch for an invisible seam.
  • Place small flowers and leaves around medallions and along the outer border; tack each in place with a few tiny stitches and then secure more fully with whip stitch through the base of each motif into the runner foundation.
  • Embroider olive vines between medallions and along the runner using couching and small anchoring stitches. Add French-knot-style berry clusters in burgundy for depth and visual interest.
  • Sew antlers and ears to deer heads using the long tails left from those pieces; shape antlers outward and use a couple of extra stitches at the base for stability.
  • Work a finishing sc round around the entire runner to lock all applique9s and border pieces in place, then a final sl st round to tidy the edge. Weave all tails to the back and trim.
  • Block the entire runner flat and allow to dry. If you used beads or fragile embellishments, check stability and apply a tiny dot of fabric glue behind beads to help them remain secure during use.

Important Notes

  • πŸ’‘Use stitch markers consistently at the beginning of each round to avoid counting errors and maintain proper shaping.
  • πŸ’‘Stuff applique9s very lightly; for table runners you want a subtle raised profile rather than a plush toy bulge.
  • πŸ’‘Block each motif flat before joining to keep medallions true and seams neat.
  • πŸ’‘When sewing applique9s in place, pin and audition placement first so you are satisfied with the vignette before securing.
  • πŸ’‘Work embroidery vines after most applique9s are tacked in place so you can see exactly where stems flow.
  • πŸ’‘Keep a smaller hook for applique9s and finer details to make compact stitches that don't show stuffing.
  • πŸ’‘Reinforce seams at high-stress areas (runner center and ends) with extra small stitches to improve durability.
  • πŸ’‘Weave ends neatly on the wrong side and trim close so the front remains tidy and flat.

Congratulations β€” you made a stunning autumn table runner that combines vintage medallions with playful 3D deer detail. Each carefully placed leaf, flower and stitch brings the runner to life and captures the cozy essence of fall. Enjoy setting your table with this handmade heirloom and celebrate the texture and warmth you've created. πŸ§ΆπŸ‚

You ask,

we answer.

FAQs

What is the finished size of this runner?

Using worsted weight yarn and the specified hook sizes the finished runner measures approximately 14-16 inches wide by 48-52 inches long. Adjusting hook size or yarn weight will proportionally change the final dimensions.

Can I use a different yarn weight?

Yes. You can use any yarn weight but adjust hook size accordingly β€” typically 1-2 sizes smaller than the yarn's recommendation for tight, decorative crochet. Note that stitch density and final measurements will change.

Do I need to stuff the applique9s?

Yes, but minimally. Use a small amount of polyester fiberfill to give deer heads and mushrooms a slight raised profile. Overstuffing will cause lumpy joins and make the runner sit unevenly.

Can I make the deer smaller or larger for scale?

You can scale deer by changing hook size or by adjusting round counts for the deer body and head. For proportionate results, keep leg and head ratios similar to the pattern and test one deer before committing.

How should I wash the finished runner?

Hand wash gently or spot clean. Lay flat to dry to preserve shape. If you used beads or glued touches, avoid immersion; use surface cleaning to protect embellishments.

Is blocking necessary?

Blocking helps motifs lay flat and even, especially important before joining medallions. Wet blocking or steam blocking works; always follow yarn manufacturer's care recommendations.

Can the applique9s be made detachable?

Yes β€” sewing applique9s on with a few removable stitches allows you to change decorations for seasons. Use small loops or snaps on the underside for easy removal and reattachment.

What if my stitch count is off?

If you notice a counting error, unpick to the nearest round with correct count and correct the mistake. Using stitch markers and a row counter helps prevent and quickly identify count issues.