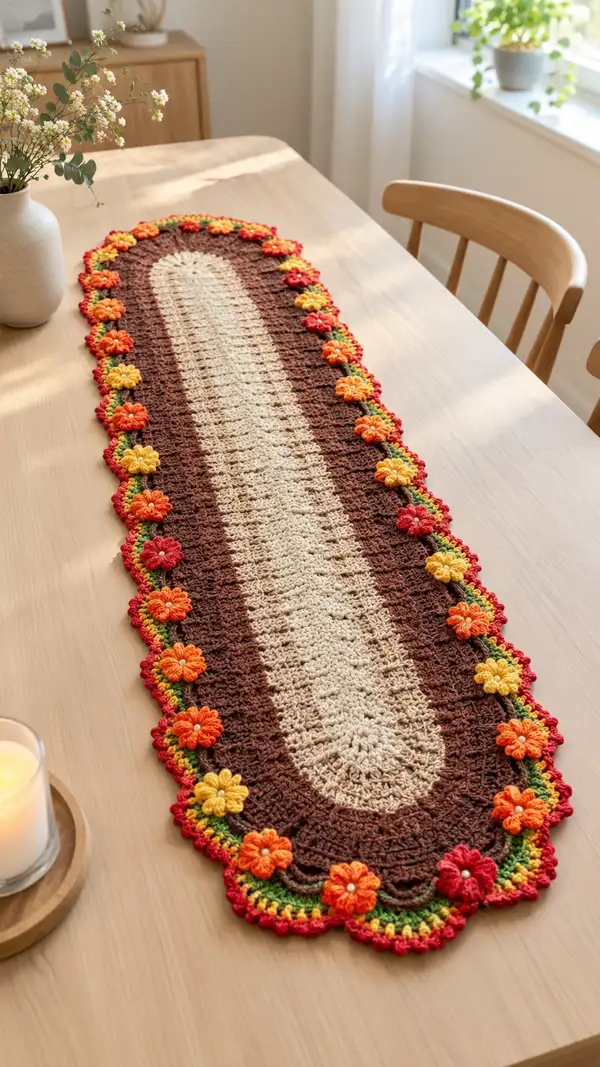
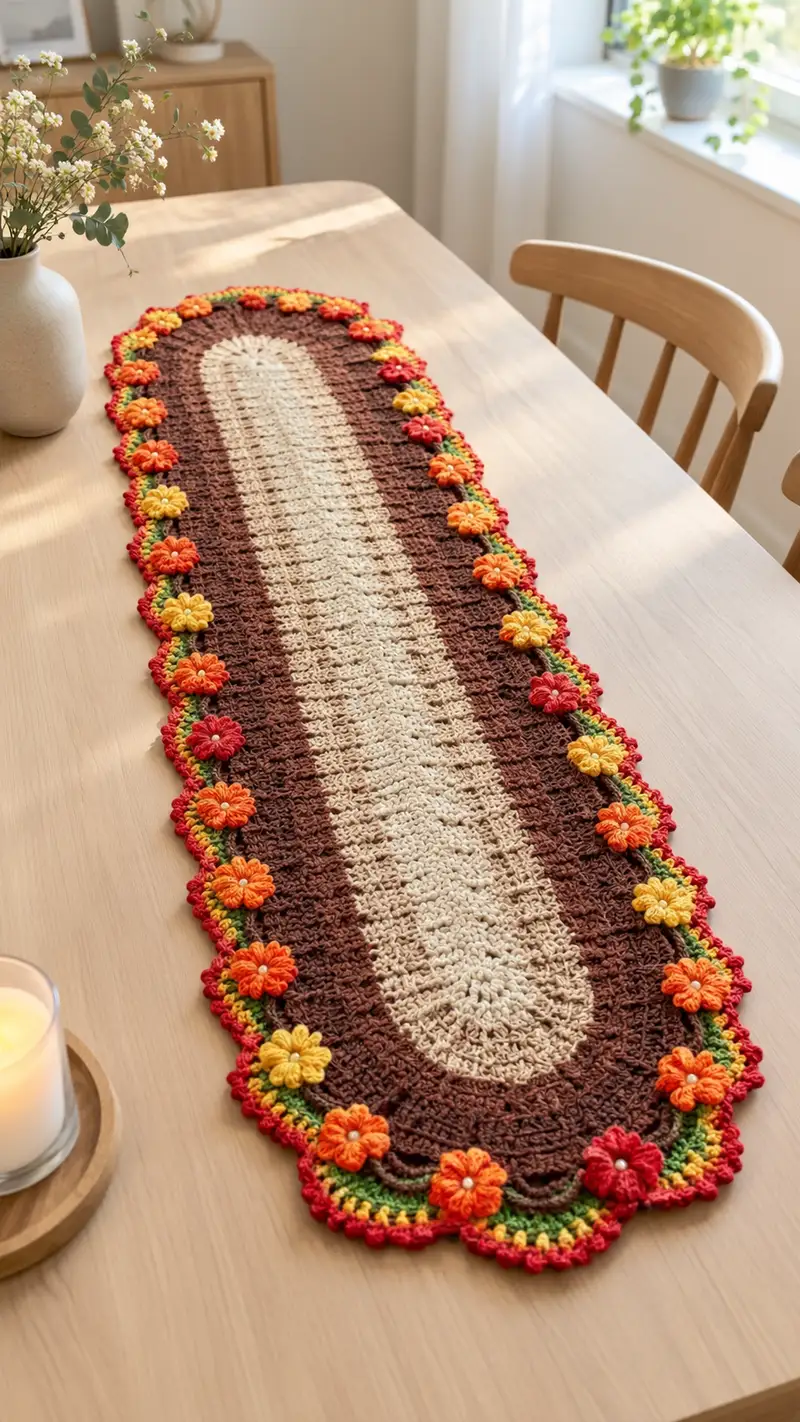
Create a warm, oval table runner inspired by autumn meadows. This reversible runner features a neutral cream center, rich chocolate brown bands, a leafy green vine, and cheerful layered flowers in red, orange and yellow with a scalloped red edge. The pattern uses classic stitches, textured rows and puff-petal flowers to give a handcrafted, cozy centerpiece perfect for dining tables and seasonal decor.
Progress Tracker
0% Complete
— Notes & Overview :
Info :
This runner is worked in joined rounds to create a flat oval. Start with a foundation chain of 40 (this gives an outer stitch count of 83 on Round 1). All round stitch counts are given and calculated for a consistent oval width. Use a 5.0mm hook for a fabric that lies flat; change to 4.0mm for a slightly firmer edging if desired. Work in joined rounds (sl st to join at end of each round) unless otherwise specified. When joining rounds, do not turn; work in the same direction around the oval.
Info :
Abbreviations used: ch, sc, hdc, dc, tr, sl st, puff. Place a stitch marker in the first stitch of each round to keep track of round starts. The runner shown has a cream center, wide brown bands, a green vine round, layered puff flowers in red, orange, yellow and a red scalloped picot outer edge. You will make 24 flowers (12 per long side). Flowers are crocheted separately and sewn on after base rounds are complete.
— Foundation Oval & Center Panel (Cream) :
Round 1 :
Using Cream, ch 40. Sc in 2nd ch from hook and in each ch across to last ch. 3 sc in last ch, continue working on the opposite side of the foundation ch, sc in each chain back to the first ch, 2 sc in first ch (join with sl st to first sc). Total sts = 83.
Info :
Round 1 creates the oval base. Count carefully — formula: total sts = 2*N + 3 where N is initial chain length (here N = 40, so 83 sts). Keep your tension even. Place a stitch marker in the first sc of the round.
Round 2 :
Ch 1, sc in each st around. Join with sl st. (83)
Round 3 :
Ch 2 (counts as hdc), hdc in each st around. Join with sl st. (83)
Round 4 :
Ch 3 (counts as dc), dc in each st around. Join with sl st. (83)
Round 5 :
Ch 1, sc in each st around working in BLO for texture ridge. Join with sl st. (83)
Info :
Working in BLO on this round creates a shallow ridge that frames the central cream area. Keep your stitches perpendicular to the curve so the oval edge remains smooth.
Round 6 :
Ch 2, hdc in each st around. Join with sl st. (83)
Round 7 :
Ch 3, *dc in next st, ch 1, skip next st*; rep from * to * around to create slight mesh texture. If you finish with a ch-1 before the end, adjust last repeat to end with dc. Join with sl st. Approx sts remain effectively 83 base positions.
Round 8 :
Ch 1, sc in each st and in each ch-1 sp around. Join with sl st. (83)
Round 9 :
Ch 2, hdc in each st around. Join with sl st. (83)
Round 10 :
Ch 3, dc in next st, *dc in next st, front post dc around the third dc of previous round to create vertical rib*; rep around keeping sequence such that you work front post stitches over every 6th stitch to create subtle raised columns. Join with sl st. (83)
Info :
If your stitch count starts to drift, recount every 4-6 rounds. The center is worked evenly so the runner remains flat; only increases occur at the base chain ends done on Round 1. From Rounds 2 to 20 we maintain the 83 base positions.
Round 11-14 :
Repeat rounds 5-8 (hdc, dc textured row, sc in each st) to build height of the cream center. Maintain stitch count at 83 structural positions each round.
Round 15 :
Ch 1, sc in each st for one tidy round before introducing brown band. Join. (83)
Info :
At the end of Round 15 fasten off cream and join Chocolate Brown with a sl st in the back loop of the join to create a clean color transition. Carrying cream inside is optional but not necessary since we fasten off.
— Chocolate Side Bands (Main Body) :
Round 16 :
Join Chocolate Brown with sl st in same stitch as join, ch 3 (counts as dc), dc in each st around in back loops only (BLO) to create a defined band line. Join with sl st. (83)
Round 17 :
Ch 1, sc in each st around working through both loops. Join with sl st. (83)
Round 18 :
Ch 3, dc in each st around. Join with sl st. (83)
Round 19 :
Ch 2, hdc in each st around. Join with sl st. (83)
Info :
The Chocolate band is intentionally worked in several textures to read as a wide, cozy stripe. Work evenly and check that the oval remains flat; if slight cupping appears, block lightly after finishing the piece.
Round 20 :
Ch 3, *dc in next st, ch 1, skip next st*; rep around for subtle openwork within the brown band. Join with sl st. (effective structural positions 83)
Round 21 :
Ch 1, sc in each st and ch-1 sp around. Join with sl st. (83)
Round 22 :
Ch 2, hdc in each st around with periodic front post hdc every 8th stitch to create slight raised texture rows; maintain count 83 base positions. Join with sl st.
Round 23 :
Ch 3, dc in each st around. Join with sl st. (83)
Round 24 :
Ch 1, sc in each st around. Join with sl st. (83)
Info :
Continue chocolate band for a total of 20 rounds in brown (Rounds 16-35 inclusive). This creates the deep side panels that frame the cream center. If you prefer a wider or narrower band, add or remove repeats evenly from both ends.
Round 25-30 :
Repeat a sequence of: R25 ch3 dc round, R26 ch2 hdc round, R27 ch1 sc round, R28 ch3 dc with front post repeats, R29 ch1 sc round, R30 ch2 hdc round. Maintain 83 base positions for all rounds. Join each round with sl st.
Round 31 :
Ch 1, sc in each st working in BLO to create a clear edge ridge that will support the vine round. Join with sl st. (83)
Info :
Fasten off Chocolate Brown after Round 31 if you like to keep ends tidy; you may also carry the yarn. Next we will add the green vine/leaf foundation that will hold the flowers.
— Green Vine & Placement Round :
Round 32 :
Join Green at any side stitch on the long edge (preferably center of side) with sl st, ch 3 (counts as dc), *ch 3, skip 3 sts, dc in next st*; rep around entire runner keeping dc placements centered on the long sides and spaced evenly at the rounded ends. After completing the long side repeats, adjust spacing around the curved ends so pattern remains even. Join with sl st. (This round creates 24 ch-3 loops for flower placement — adjust spacing if your stitch gauge differs; aim for 12 loops per long side.)
Info :
To get 12 flower placements per side from 83 sts, place a ch-3 loop approximately every 6 to 7 structural positions. Do a dry pass with contrasting scrap yarn and pin if unsure, then unpick and rework with Green yarn for best symmetry.
Round 33 :
Ch 1, sc in each base st and in ch-3 loops around (work 3 sc across each ch-3 loop to make it tidy), maintaining a smooth edge. Join with sl st. (effective base positions remain 83 though you add sc across loops)
Round 34 :
Ch 2, hdc in each st around. Join with sl st. (83 effective positions)
Round 35 :
Ch 1, sc in each st for tidy foundation before scallop base. Join with sl st. (83)
Info :
At this stage you have established a green vine with evenly spaced loops for flower attachment. Fasten off green and weave ends neatly to the wrong side. If you prefer leaves between flowers, you can work 2-3 elongated hdc leaves on alternating loops before attaching flowers. See Leaf Tip Info below for patterns.
Info :
Leaf Tip: To add a decorative leaf on select loops, rejoin green at the base of a ch-3 loop, ch 3, dc, hdc, sc, hdc, dc, ch 3 and sl st back at base to form an elongated symmetrical leaf. Work leaves on every other loop or where visually preferred.
— Scalloped Shell Base for Flower Attachment (Red Trim Base) :
Round 36 :
Join Bright Red into the outermost stitch of Round 35 with sl st, ch 1, *sk 2 sts, 5 dc in next st (shell), sk 2 sts, sc in next st*; rep around. Adjust final repeats so shells sit roughly centered between the green ch-3 loops. Join with sl st. (Number of shells will equal number of sc between repeats; effectively you will work approx 13 shells across each long side distributed around oval — overall repeats about 24 shells; exact count = 83 / 3 ≈ 27 shell groups depending on spacing.)
Info :
This round creates a strong, decorative base for the outer edge and will visually anchor the flowers. If your repeats do not land exactly at green loops, shift shells slightly by starting the repeat one stitch earlier so shells sit between loops rather than directly over them.
Round 37 :
Ch 1, sc in each st and in the center of each shell (work 1 sc in the center dc of each shell) and across any between-stitch spaces to even out the edge. Join with sl st. (Count equals number of shell centers plus interspersed sc — stays consistent visually.)
Round 38 :
Ch 2, hdc in each st around to build a slightly raised rim for flower attachment. Join with sl st. (visual positions align with previous round)
Round 39 :
Ch 1, sc in each st around. Join with sl st. This round is your final base round; fasten off red or leave for layering with outer picot edge. (visual count consistent)
Info :
Fasten off and weave in ends for any colors you plan to no longer use in base. Now prepare to make Flower Motifs — you will make 24 small layered puff-petal flowers to adorn the green vine loops. Make each flower following the Flower Motif section and use a bead sewn into the centre if desired.
— Flower Motif (Make 24) :
Info :
Each flower is worked in two rounds of puff petals to create a layered look and a small center round to hold a bead. Use Accent colors Red, Orange, Yellow and alternate along sides. Make 24 flowers total: 12 Red/Orange/Yellow sets repeated symmetrically across runner (12 per side as established by vine loops).
Flower Round 1 :
With flower color A (e.g., Red), ch 2, work 8 sc into magic ring. Pull ring tight and join with sl st. (8)
Flower Round 2 :
Ch 2 (does not count), *yo, insert hook in same st, yo and pull up loop (repeat 5 times) — you will have 11 loops on hook — yo and pull through all loops, ch 1 to close puff; sl st in next st; rep from * around for 8 puff petals total. Join with sl st. (8 puff petals)
Info :
Puff stitch detail: For a tidy puff, insert hook, yo and pull loop to same height each time. After collecting loops, finish by yarning over and pulling through all loops once, ch 1 to close. Keep a consistent tension for all petals. The ch-1 between puffs helps define petal separation.
Flower Round 3 :
Fasten off color A leaving a 6 inch tail for sewing. Join flower color B (e.g., Orange) on the back loop of any puff stitch with sl st, ch 2, *work 6-dc petal cluster: (yo, insert in front loop only around puff base, yo and pull through) repeat 6 times collecting loops, yo and pull through all loops, ch 1, sl st in next puff base*; rep around for 8 outer petals. Join with sl st. (8 petals outer)
Flower Round 4 :
Fasten off color B leaving long tail for sewing. Thread bead with strong sewing thread or use a small embroidery floss and sew bead into the center through the round base, then secure thread on the back of the flower with a few stitches. If using a small pearl, stitch through the center of the magic ring hole and knot securely, then hide thread through the back loops. Weave in thread ends safely.
Info :
Alternative petal method: Use 7-loop puff if you desire a fuller outer petal. Keep outer petals in a contrasting color to show layered depth. Make 24 flowers total, mixing red, orange, yellow in a repeated sequence: Red, Orange, Yellow, Red, Orange, Yellow across each long side.
— Flower Attachment :
Info :
Position the 24 flowers: lay the runner flat and place the flowers into the green ch-3 loops so that each loop cradles the back of a flower. Space evenly — aim for 12 per side. Alternate colors symmetrically from the center point outward for a balanced look.
Attachment Step 1 :
Using the long tail left when fastening off outer petal round, sew through the back of the flower and through the base of the green ch-3 loop 3-4 times to fasten securely. Knot on back and weave tail into the runner base for at least 4 inches before trimming.
Attachment Step 2 :
Sew each flower individually with a yarn needle. After securing the bead center thoroughly through thread, run a few securing stitches through the bead base to the fabric to prevent bead loss. If you want extra hold, add a tiny dab of fabric glue behind bead, but allow to dry fully before handling.
Info :
Tip: Place pins through the center of each flower while positioning, then step back and verify symmetry before sewing. If you misplace one, it's easy to unpick and resew before weaving ends.
— Outer Decorative Edge & Picot Finish :
Round 40 :
Rejoin Bright Red at any outermost stitch. Ch 1, sc in each st and 3 sc across the base of each flower where the flower meets the shell — this will create a continuous red rim that frames the flowers. Join with sl st.
Round 41 :
Ch 3 (counts as dc), *skip 1 st, sc in next st, skip 1 st, 5 dc in next st (shell), sc in next st*; rep around aligning shells so they nest between flowers. Join with sl st.
Round 42 :
Ch 1, sc in each st and 1 sc in the center of each shell. Join with sl st for tidy base. (This creates a uniform base for picot.)
Round 43 :
Ch 1, sc in next st, *ch 3, sl st into the top of the next sc (picot), sc in next 3 sts*; rep around creating small picot scallops. Join with sl st. Fasten off and weave in ends.
Info :
The picot round provides a final crisp border and a playful red scallop visible in the photo. If you prefer a subtler edge, reduce picot chain to ch 2 instead of ch 3. For a firmer edge, use 4.0mm hook for rounds 40-43.
— Optional Additional Embellishments :
Info :
To echo the look from the image, you may add a thin inner accent row of bright yellow between the chocolate band and the green vine. Rejoin Yellow at Round 15 join and work a single round of hdc or a small crab stitch (reverse sc) to make a pop of color. This addition is optional and purely decorative.
Optional Round A :
Rejoin Yellow, ch 1, hdc in each st around adjacent to the seam between cream and brown. Join and fasten off. Weave ends. (83)
Info :
Blocking Tip: After finishing, block the runner gently. Pin to shape on a flat surface and lightly steam with an iron held a short distance above (do not press directly onto acrylic yarn). Allow to cool and dry to set shape. Natural fiber yarns may be steamed lightly and pinned while damp for best flattening.
— Finishing & Weaving Tails :
Info :
Weave all tails through the wrong side across at least 4 inches of fabric, following the stitch path to make ends invisible. For ends near flowers, weave into base rounds rather than petals to avoid affecting flower appearance.
Round Final :
Give the runner a final once-over: check all flowers are sewn securely, beads are fastened, and no long tails are exposed. Trim excess yarn and perform a final gentle blocking if needed. Enjoy your new autumn table runner!
Info :
If you wish to lengthen the runner, increase the foundation chain by increments of 4 chains to preserve proportional spacing for outer shells and green loops. Be sure to recalculate the Round 1 total stitch count using formula 2*N + 3 for new chain length.
This Autumn Meadow Table Runner brings warmth and handcrafted charm to any table. Combining textured stitches with bright layered flowers makes it eye-catching and cozy. The modular flower motifs and simple oval base mean you can adapt length or colors easily. Enjoy the rhythmic relaxation of long rounds and the satisfying finish of attaching petals—your table will feel instantly seasonal and inviting! 🧶🍁