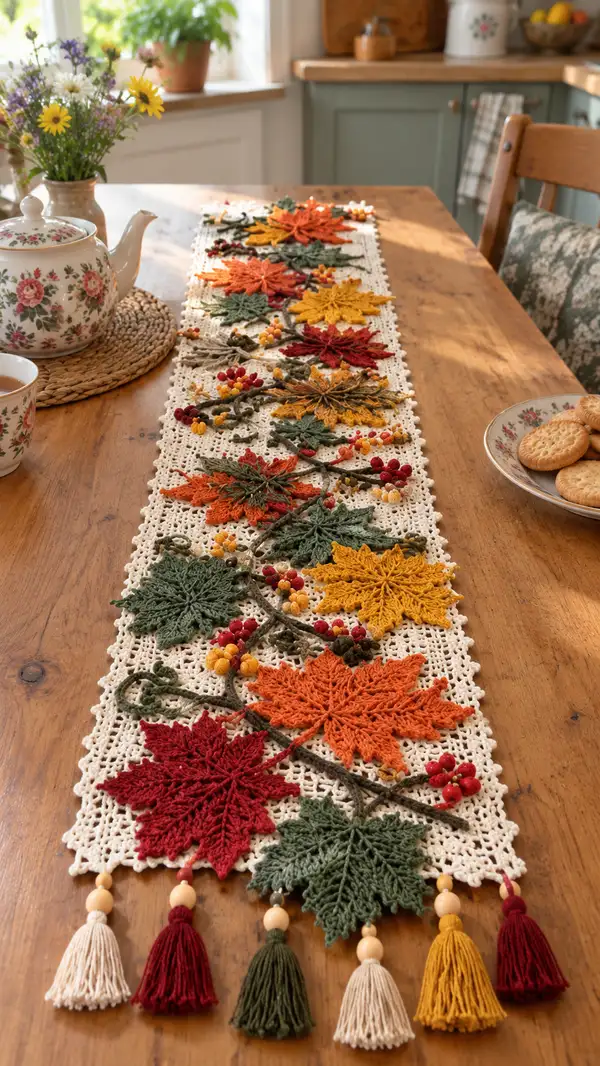
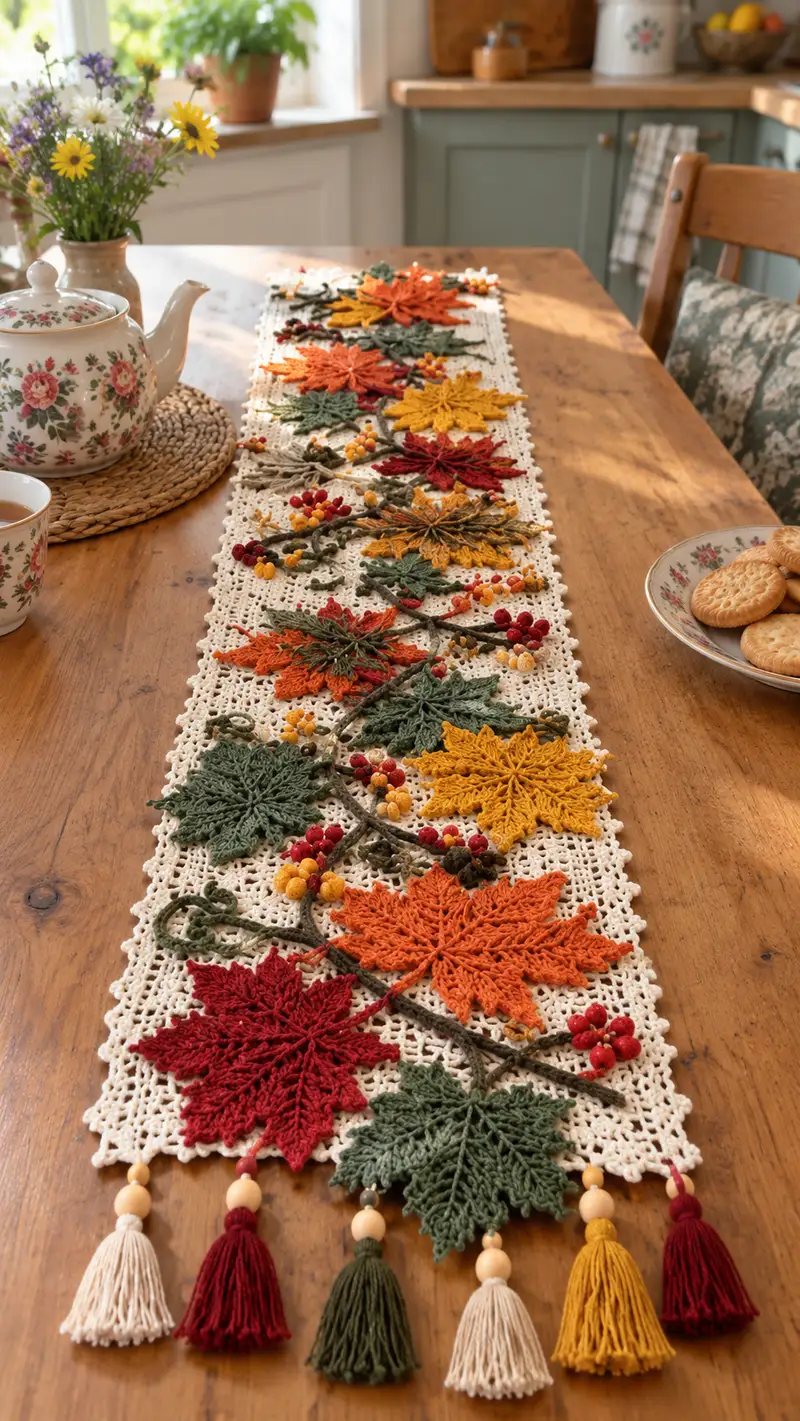
Bring cozy autumn charm to your table with this richly textured runner featuring layered crochet maple leaves, raised braided vines, clustered berries, and a delicate openwork background. Warm fall tones — deep red, burnt orange, golden yellow and olive green — sit atop a cream filet mesh and finish with tasseled beading for a polished seasonal centerpiece. The pattern uses modular motifs assembled into a long runner you can size to fit any table.
Progress Tracker
0% Complete
— Overview & Gauge :
Info :
Finished runner shown measures approximately 12" (30 cm) wide by 56" (142 cm) long including tassels. Measurements will vary based on yarn weight and tension. Gauge for mesh: 10 dc and 6 rows = 2 inches (5 cm) using 3.5mm hook with DK cotton. Adjust hook size to match gauge and keep the fabric firm but flexible.
Info :
Pattern is modular: create the filet mesh base first, then crochet leaves, small leaves, berry clusters and vine cords and assemble. The pattern below provides full round-by-round sets for each motif type and for the mesh and edging. Work motifs flat unless otherwise specified.
— Filet Mesh Background (work flat) :
Info :
Make foundation chain 121 (multiple of 4 +1). This width yields a runner approx. 12" wide; adjust by changing chain length in multiples of 4. We will work 40 rows to create a long, balanced field for motifs. You can lengthen the runner by adding groups of 4 rows in multiples of 4.
Round 1 :
Ch 121. Row 1: Sc in 2nd ch from hook and in each ch across. Turn. (120 sc)
Info :
Use stitch marker at beginning of each row to ensure even ends. Keep the first sc stitch placed firmly to stabilize the mesh edge.
Round 2 :
Ch 3 (counts as dc), sk next st, *dc in next st, ch 1, sk next st* rep across to last st, dc in last st (creates an alternating dc,ch-1 mesh). Turn. (Approximately 60 dc and 60 ch-1 spaces)
Round 3 :
Ch 1, sc in top of ch-3, *ch 3, sk next dc and place sc into ch-1 space, ch 3, sk next dc* rep across placing sc into each ch-1 space. End sc in top of turning ch. Turn. (Creates vertical ladder spacing)
Round 4 :
Ch 3, dc in same st, *sk next st, dc in next ch-3 space, ch1, sk next st* rep across, dc in last st. Turn. (Mesh alternates)
Info :
Work rows 2-4 as a set; the alternating pattern creates a stable but open filet. Count ch-1 spaces every few rows to ensure you maintain width.
Round 5-12 :
Repeat Rows 2-4 sequence 2 times (total rows now 12). Maintain mesh tension. (Each set preserves approximate stitch counts across width)
Round 13 :
Ch 1, sc in each stitch across working into dc and ch-1 spaces to create a solid anchoring row for motif placement. Turn. (Approx. 120 sc)
Info :
Use this solid sc row as the first secure anchoring row for attaching motif stems and some leaf bases. This row will receive slip-stitches when sewing motifs, so make it firm but not tight.
Round 14-24 :
Resume mesh pattern: repeat Rows 2-4 sequence for 11 rows (ending with Row pattern repeat). This creates a long open field where motifs will be laid on top and sewn down. (Counts approximate)
Round 25 :
Ch 1, sc in each st across to make another anchoring row for motif placement. Turn. (Approx. 120 sc)
Info :
Plan motif locations: mark positions for large leaves (approx. 3–4 per half-run) and smaller leaves/berry clusters with removable pins or scrap yarn. Aim for balanced spacing along the runner length.
Round 26-36 :
Repeat Rows 2-4 sequence for 11 rows to create the central mesh section. (Mesh repeats maintain approximate counts.)
Round 37 :
Ch 1, sc across entire row for a firm edge row near finishing. (Approx. 120 sc)
Round 38-40 :
Repeat alternating mesh Rows 2-4 for final 3 rows then finish off, leaving long tail for edging. Turn and block mesh flat to measurements before attaching motifs.
Info :
Blocking: Wet-block or steam-block the mesh on blocking mats and pin straight. Leaves will also be blocked after being crocheted to retain petal shape and lift.
— Large Maple Leaf Motif (Make 10 total in assorted colors) :
Info :
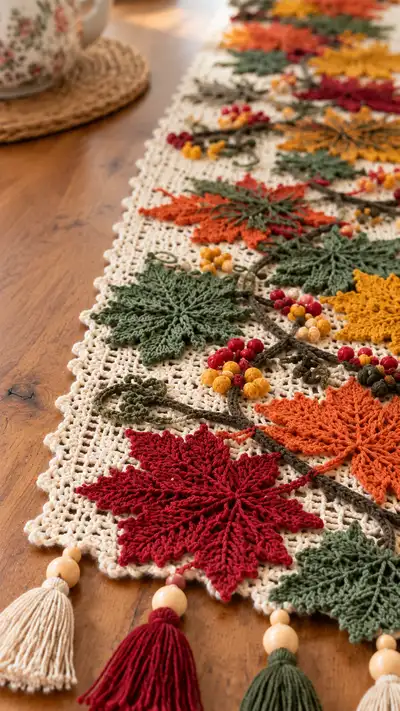
Each large leaf is worked in continuous rounds from a small center and then shaped into 10 lobes using post stitches and chain arches to create the pointed leaf silhouette. The leaf size in photos is approx. 6.5" (16.5 cm) tip-to-tip. Using DK cotton and 3.5mm hook yields similar size.
Round 1 :
Make magic ring, 10 sc into ring. Pull tight. (10)
Round 2 :
Inc in each st around (10 inc). (20)
Round 3 :
(1 sc, inc) x10. (30)
Round 4 :
(2 sc, inc) x10. (40)
Info :
At this point you have a small round that will act as the leaf base. We will work outward into petal sections: each petal uses a small cluster sequence across a set of stitches; place a stitch marker at the beginning of the first petal to track round starts.
Round 5 :
Work in BLO for texture: 1 sc in each st around. (40)
Round 6 :
Switch to right side facing and begin petal shaping. *Ch 7, sl st into next st; rep from * across to create 10 chain arches spaced evenly (10 arches). Fasten off and turn motif to RS. These chain arches mark petal placement.
Info :
Chain arches will be worked into to form pointed petal lobes. Ensure arches are even and not twisted. The following rounds will build petals on top of these arches.
Round 7 :
Join yarn at base of first chain arch, ch 3 (counts as dc), 2 dc into arch, tr, tr, 2 dc, 3 dc into same base st (creates a tall petal), sl st to next base. Repeat for each arch to form 10 raised petals. Fasten off after last petal. (10 petals created)
Round 8 :
Rejoin yarn at base of first petal, working around petals: In each petal: sc into top of first dc, hdc in next, dc in next two, tr in center, dc next two, hdc, sc; sl st to join base between petals. This shapes each petal and thickens edges. (Approx. 80 sts across petals total)
Info :
Use post stitches (fpdc or bpdc) to create vein texture: when shaping petals, place two front-post dc down the center of each petal to mimic a raised midrib. See next rounds for details.
Round 9 :
Working from WS to RS, around each petal work: fpdc around the first tall tr cluster (2 fpdc to create central vein), then sc on sides to anchor. Repeat around all petals. Fasten off. This creates subtle raised veins. (Vein placement: 2 fpdc per petal)
Round 10 :
Rejoin yarn at petal base and work a decorative edging: *ch 3, sl st into tip of petal, ch 1, sl st into base between petals* repeat around. This gives a delicate picot-like ridge. Fasten off. (10 picots)
Round 11 :
Return to RS and work a shallow back layer to give petal thickness: Join yarn at back, sc evenly across petal undersides, bridging spaces with ch 2 where needed. (Approx. 80 sc; counts vary by tension.)
Info :
Block each leaf pinned to shape: stretch each lobe gently outward and pin on blocking board. Lightly steam or wet-block according to yarn instructions so petals hold a lifted shape when sewn down to mesh.
Round 12 :
Weave a stem tail: with RS facing, attach stem yarn and ch 18 (or length needed for seam placement), then sl st back along chain to create a twisted stem cord. Fasten off leaving long tail for sewing. (Stem cord length adjustable)
Info :
Make the number of large leaves indicated (10 in pictured runner): color distribution in photos is roughly 3 orange, 2 red, 2 yellow, 3 green. You may vary as desired.
— Small Leaf Motif (Make 8–12) :
Info :
Small leaves add filler between large motifs. Work similarly to large leaf but with fewer rounds and smaller arches to create 6 lobes. Finished size ~3" (7.5 cm).
Round 1 :
Magic ring, 6 sc into ring. (6)
Round 2 :
Inc in each st around. (12)
Round 3 :
(1 sc, inc) x6. (18)
Round 4 :
1 sc in each st BLO to create a crisp ridge for the leaf base. (18)
Round 5 :
*Ch 5, sl st into next st* around to form 6 arches for lobes. Fasten off. (6 arches)
Round 6 :
Join yarn at first arch; make a small petal: ch3, 3 dc, tr, 3 dc, ch3, sl st into base. Repeat for each arch to form 6 small lobes. Fasten off and block flat. Attach short stem tail ch 8 for sewing. (6 petals)
Info :
Small leaves are best in alternating colors to echo the large leaves. Block and shape while damp for best definition.
— Berry Cluster (Make 12–16 small clusters) :
Info :
Berries are small popcorns worked with very short rounds and sometimes a small bit of stuffing. They are grouped in clusters of 3–6. Use bright cranberry and golden yarns for contrast.
Round 1 :
With 3.0mm hook, ch 2, 6 sc in 2nd ch from hook. (6)
Round 2 :
Work 6 sc in BLO to create a slight rim (6). Do not fasten off.
Round 3 :
Switch to 3.5mm if needed; work 3 rounds of tiny single crochet popcorn: *5 sc in same st, sl st into next st* repeat across to make 1–2 popcorns then fasten off leaving long tail. For puffed berry, add a tiny pinch of fiberfill inside before closing. (Creates 1 popcorn berry)
Info :
Make berries in two sizes: single popcorn (1 berry) and double popcorn (2 closely worked popcorns). Cluster 3-6 berries together and baste to mesh with long tail.
— Vine Cord and Tendrils :
Info :
Vines are crocheted cords (i-cord or chain-stitched tube) worked to length, then twisted and sewn to the mesh to create raised calligraphic lines. Cord thickness in photos matches 3-strand twisted or a 3-row tube worked in sc around a chain.
Round 1 :
Make a base chain the length needed to span motifs (approx. 120 ch for long vine pieces). Using yarn held doubled, sc into 2nd ch from hook and in each ch across to form a tight cord. (Approx. 119 sc)
Round 2 :
Option A (braided look): Make three cords and plait loosely. Option B (tubular cord): With RS facing, join yarn around cord and sc around the chain to form a round tube, working 3 sc around each base sc. Slip stitch to close and finish. (Cord width approx. 6-9 sts circumference)
Round 3 :
For tendrils: ch 20, sl st back along chain to form spiral loops. Make tendril loops at vine endpoints and in-between leaf junctions. Fasten off leaving long tail for sewing. (Tendrils as needed)
Info :
Use brown/charcoal yarn for vine cords for subtle contrast. Make several cords with varying lengths so you can arrange organic curves across the runner.
— Joining Motifs to Mesh (Layout & Sewing) :
Info :
Block all motifs first. Lay out the mesh on a flat surface. Place the large leaves staggered along the center line about 10–12" apart depending on your runner length. Add small leaves and berries around them to create natural groupings. Use pins or safety pins to hold in place before sewing.
Round 1 :
Attach leaf stems and bases to the firm sc anchoring rows of the mesh. Use long tail from each leaf stem and whip-stitch through both the stem tail and anchoring sc row, being careful not to pull too tight. Sew entire stem length to mesh. Repeat for all large leaves.
Info :
Sew leaves at several points along the petal undersides to keep them flat and secure while preserving lift on the top of petals. Sew through the back layer only where you created the back sc round. Use small, neat stitches for an invisible join.
Round 2 :
Arrange and baste vine cords across the runner connecting leaf groups by sewing beads of slip-stitches under the cord then sewing through both cord and mesh every 1/2" with long yarn tail. This creates the raised vine that sits above the mesh surface. Secure ends with tidy knots and weave tails through stitches.
Round 3 :
Sew small leaves and berry clusters along and around the vines. Position berries in clusters of 3–6, using the tails left on each berry to stitch tightly through the mesh. For extra durability, secure each berry with two passes of the needle: one through the berry base and mesh, a second locking pass horizontally beneath the berry.
Info :
Work from the center outward so the runner remains balanced. Step back often to check negative space and overall composition. Use pins liberally to prevent repositioning while sewing.
— Decorative Edge & Scallop (Edging Rounds) :
Round 1 :
With RS facing, rejoin cream yarn at one short end corner. Ch 1, sc evenly around entire perimeter of the runner working 3 sc in each corner. For the long sides, work sc in each dc and sc in each ch-1 space to create a firm edge. (Perimeter approx. 2 x 120 + 2 x 40 = counts vary)
Round 2 :
*Ch 3, sk 1, sl st in next st* repeat around to form small picot scallop; work 3 sc in corners to turn. Fasten off. (Scallops appear along edges at approx. every 4th stitch)
Info :
When adding tassels and beads, reinforce edge stitches where tassels will attach by working an extra pass of sc at those points and leaving long tails for knotting.
— Tassels & Wooden Beads (Make 6 tassels per end or desired) :
Round 1 :
Make tassels: Wind desired yarn color around a 2.5" card 50 times for full tassel. Tie top with a short length of yarn and cut looped edge. Trim ends evenly. Thread long yarn tail through wooden beads and sew bead over the top wrap to create bead accent. Attach to edge by looping the top tie around reinforced sc and secure with a knot, then stitch the tail down inside the back of the runner.
Info :
Alternate tassel colors to mirror leaf palette: cream, red, green, cream, mustard, red as shown. Use two or three wooden beads per tassel spaced to match visual rhythm; secure beads with glue if necessary.
— Final Finishing Rounds :
Round 1 :
Weave in all loose ends on the WS; trim tails close. For any areas where the mesh puckers after assembly, reblock gently and pin to shape, steaming lightly if yarn allows. Allow to dry completely before use.
Round 2 :
Optional: Lightly spray the underside of the runner with fabric stiffener if you want a very flat, stable tabletop piece; allow to air dry fully.
Info :
Care instructions: Spot-clean as needed; hand wash cool and reshape when wet. Avoid tumble drying. The cotton yarn used in the example will soften with use and washing but retain shape if blocked correctly after washing.
This cozy autumn table runner brings seasonal warmth to any table with layered leaves, curled vines, and playful tassels. Each carefully blocked and sewn motif adds depth while the openwork mesh keeps the piece light and elegant. The process is meditative—blocking, shaping and positioning motifs to create a natural, organic composition you'll be proud to display. 🧶🍂 Share this handmade centerpiece at fall gatherings or give it as a thoughtful gift—it's a seasonal statement that also makes for a calming crochet journey. Happy stitching! 🍁