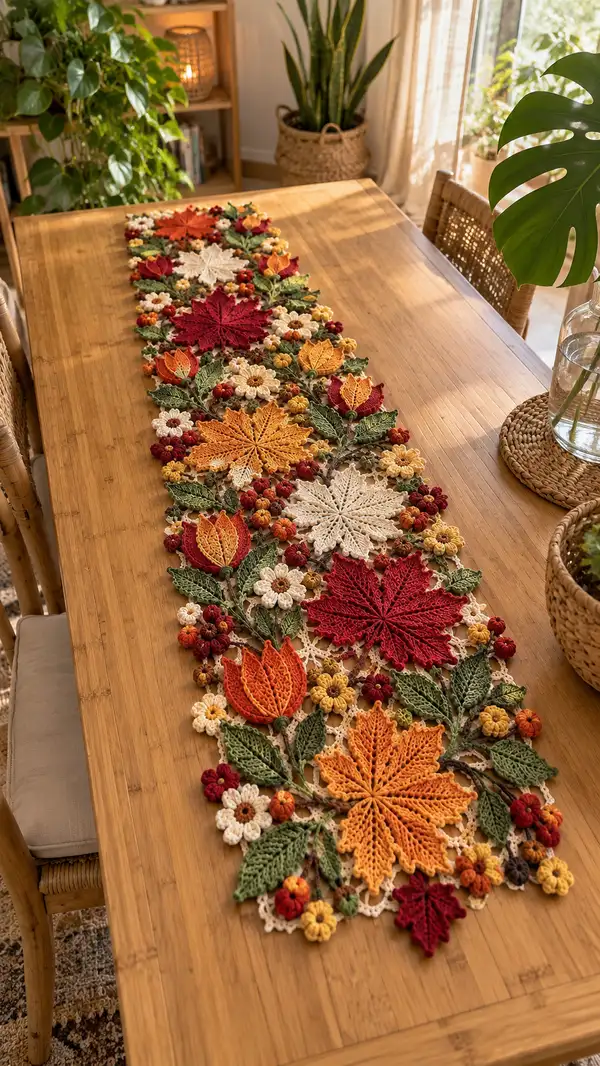
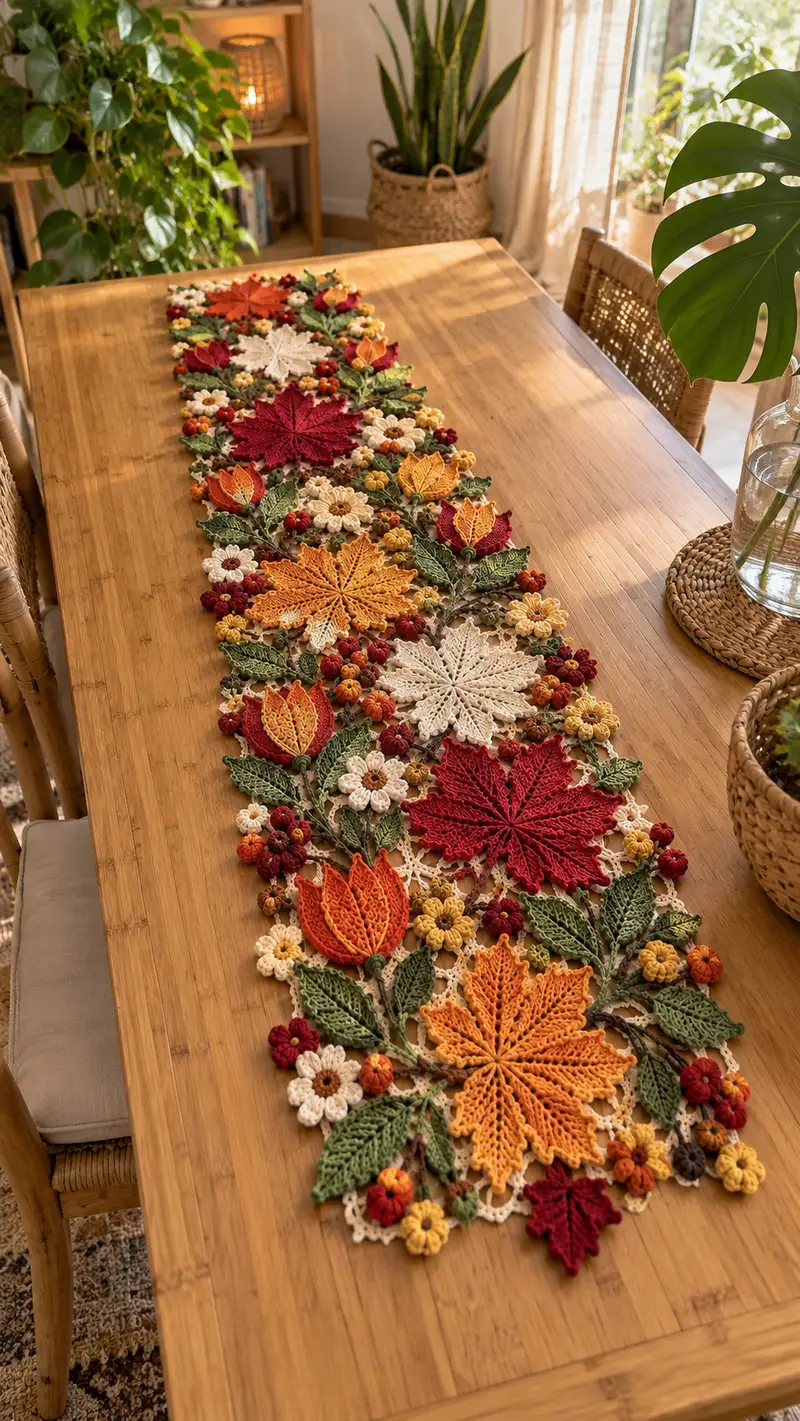
A rich, layered crochet table runner inspired by autumn leaves, tulips, and tiny pumpkins. This runner features large textured maple leaves, tulip blossoms, 3D seed-pod bobbles, and delicate lace connectors in cream, gold, red, orange and moss green. The design is worked as many motifs that are joined with lacy mesh stitches and finished with embroidered stems and surface veins for a dimensional fall centerpiece.
Progress Tracker
0% Complete
— Overview & Construction Notes :
Info :
This table runner is assembled from modular motifs worked mostly in the round then joined with a neutral lace mesh. Work motifs in the color order indicated: leaves and tulips first, then small flowers and pumpkins, then the lace connector. Block each motif lightly to shape before joining. Use stitch markers liberally to mark round starts and special placement points. For 3D pumpkins/bobbles stuff lightly as you go.
Info :
Measurements: The sample runner measures approximately 12-14 inches wide and 58-62 inches long when motifs are joined in the shown layout. You may lengthen or shorten by adding or removing leaf sections or additional floral clusters.
— Lace Connector Mesh (Make a long strip of mesh to join motifs into a runner) :
Round 1 :
Make a chain 60 (or multiple of 6 + 12 to match layout). Ch 1, sc in 2nd ch from hook and across (59 sc) (59)
Round 2 :
Ch 3 (counts as dc), *skip 2 sts, dc in next st; ch 2, dc in same st* repeat across to last 3 sts, dc in last 3 sts (pattern forms open mesh)
Round 3 :
Ch1, sc in each dc and ch-2 sp across to create stable edge. Fasten off and block to an even rectangle for joining points (59)
Info :
These mesh strips are worked in cream. Make enough strips to run under the full length of your motif layout, allowing overlap spaces for sewing motifs on top. For a runner similar to sample, prepare 6-8 mesh strips each 60 chains long and join as needed end-to-end with slip stitches or sewing.
— Large Maple Leaf (Make 4 large maple leaves in various colors) :
Round 1 :
6 sc in magic ring (6)
Round 3 :
(1 sc, 1 inc) x 6 (18)
Round 4 :
(2 sc, 1 inc) x 6 (24)
Round 5 :
(3 sc, 1 inc) x 6 (30)
Round 6 :
(4 sc, 1 inc) x 6 (36)
Round 7 :
(5 sc, 1 inc) x 6 (42)
Round 8 :
(6 sc, 1 inc) x 6 (48)
Info :
These initial rounds create a circular base. The macro maple leaf will be shaped by crocheting pointed lobes from designated stitch groups. Use stitch markers to separate 8 even lobes by placing markers every 6 stitches (48/8 = 6).
Round 9 :
1 sc in each st BLO around (48)
Round 10 :
*(3 sc, ch 3, sl st in base of ch to form picot point), 3 sc in next 6 sts* rep 8 times (48 + 8 picots)
Info :
Picots mark the tips of lobes — you will use them as anchors for creating elongated lobes. Keep work flat and do not over-tighten picots.
Round 11 :
For each lobe: from the picot, ch 6, sl st to picot base, then 6 sc back along chain to shape a raised lobe; repeat around creating 8 raised lobes. After all lobes the count returns to ~48 base sts plus edge loops (48)
Round 12 :
Work 1 sc in each base stitch and 2 sc in each chain-6 return to bulk out lobes creating evenness approximately (56)
Round 13 :
(4 sc, 1 inc) x 8 (64)
Info :
Now begin shaping leaf points: we will sculpt 8 sharp points by working increases to the center of each lobe and then decreasing toward the tip. Keep counts accurate; place markers at lobe centers.
Round 14 :
*(6 sc in center of lobe, fpdc around next 6 sts to create vein ridge), repeat for next lobe* (64)
Round 15 :
*(3 sc, 1 inc, 2 sc, 1 inc, 3 sc) across lobe centers to create sub-increases* rep 8 times (80)
Round 16 :
1 sc in each st around working in BLO on base edge to keep top surface smooth (80)
Round 17 :
(5 sc, 1 dec) x 10 (70)
Round 18 :
(4 sc, 1 dec) x 10 (60)
Info :
Begin light shaping of leaf tip by decreasing in the lobe areas only. If you want a fuller leaf, omit a decrease round and work one even round instead.
Round 19 :
(3 sc, 1 dec) x 10 (50)
Round 20 :
(2 sc, 1 dec) x 10 (40)
Round 21 :
*(Ch 8, sl st in point to create elongated vein loop), secure with sl st and sc around edge to smooth the loop* repeat at each leaf tip. Final count approx (40)
Round 22 :
Working in FLO across the top surface, sc around each lobe edge and add picot points at each tip: *sc x4, picot* repeat (40 + decorative picots)
Round 23 :
Fasten off leaving a 6-8" tail for sewing. Weave tail through last round and close any gap if needed. Block leaf flat into a slightly cupped shape to mimic dried leaf structure.
Info :
Surface veins: use a contrasting darker yarn and surface crochet or embroidery to create 6-8 radiating veins from the base to each lobe tip. Use a blunt needle to couch and stitch the yarn in a raised chain technique. This adds dramatic texture.
— Medium Maple Leaf (Make 6 medium leaves) :
Round 1 :
6 sc in magic ring (6)
Round 3 :
(1 sc, 1 inc) x 6 (18)
Round 4 :
(2 sc, 1 inc) x 6 (24)
Round 5 :
(3 sc, 1 inc) x 6 (30)
Round 6 :
1 sc in each st BLO around (30)
Round 7 :
*ch 6, sl st to form loop for lobe base; 5 sc across next 6 sts* rep to create 6 lobes (30)
Info :
Mark the middle of each lobe with a stitch marker; these will be reference points for shaping the vein ridges later.
Round 8 :
*(2 sc, 1 inc) across each lobe, creating small increase at center (36)
Round 9 :
1 sc in each st (36)
Round 10 :
(3 sc, 1 dec) x 9 (27)
Round 11 :
(2 sc, 1 dec) x 9 (18)
Round 12 :
(1 sc, 1 dec) x 6 then sc around rest (12)
Round 13 :
Edge with crab stitch (reverse sc) around to add a twisted finish. Fasten off leaving tails for sewing (12)
Info :
Surface vein: use a contrasting green/brown for a single center vein. Use surface slip stitch from base to tip along the lobe center for a raised look.
— Small Maple Leaf (Make 8 small leaves) :
Round 1 :
6 sc in magic ring (6)
Round 3 :
(1 sc, 1 inc) x 6 (18)
Round 4 :
1 sc in each st (18)
Round 5 :
*ch 4, sl st to make a point, sc next 3 sts* repeat to create 6 small points (18)
Round 6 :
Fasten off and weave tail for sewing. Add a single surface chain-stitched vein if desired (18)
Info :
Small leaves are used as fillers around tulips and pumpkins; keep them flat and slightly cupped using steam-blocking.
— Tulip Motif (Make 6 tulip blossoms) :
Round 1 :
6 sc in magic ring (6)
Round 3 :
(1 sc, 1 inc) x 6 (18)
Round 4 :
1 sc in each st (18)
Round 5 :
*(ch 6, sl st to form petal base; in ch-6 work 6 sc back toward base), 3 sc next 3 sts* repeat to create 6 tulip petals (18 + petal loops)
Round 6 :
Working into petal loops, sc 8 in each petal loop to bulk the petals (approx 48)
Round 7 :
*(1 sc, 1 hdc, 2 dc, 1 hdc, 1 sc) across each petal to create fluted petal shape* repeat 6 times (48)
Info :
Change to a contrasting inner color at this point if you want bicolored tulips. Carry color inside petals to avoid extra tails. Tuck tails and weave them into base.
Round 8 :
Sl st around petal bases to secure shape, then sc around the base to tidy (48)
Round 9 :
Join two small leaves (created as Small Maple Leaf pattern) to the tulip base by slip stitching through leaf top and tulip base, positioning leaves to curve outward (no increase)
Round 10 :
Fasten off leaving a tail for attaching to mesh. Add a short stem using a chain of 12 worked into the base and then slip stitched back down to make a cord-like stem; secure and weave tail
Info :
For a natural look, slightly block each petal to curve outward. Tulips look best when placed near clusters of small flowers and pumpkins to add variety of scale.
— Layered Daisy Flower (Make 8 daisies) :
Round 1 :
6 sc in magic ring (6)
Round 3 :
(1 sc, 1 inc) x 6 (18)
Round 4 :
Ch 3, *skip 1 st, dc in next st, ch 1* repeat around to form petal bases (18)
Round 5 :
Into each ch-1 sp work: (sc, hdc, dc, hdc, sc) to create fuller petals (18 petals)
Round 6 :
Fasten off outer petals and create inner contrasting center: mr, ch1, 8 sc in mr (8) for center, sl st to finish
Round 7 :
Sew center to flower base using mattress stitch, pulling center slightly up to create a domed center. Add a tiny bobble (see pumpkin/bobble section) in the center for texture
Info :
Work petals tightly to keep shape. Block lightly to flatten petals and create a neat layered look.
— Small 3D Pumpkin/Berry Bobble (Make 30-40 combined small pumpkins and berries) :
Round 1 :
6 sc in magic ring (6)
Round 3 :
1 sc in each st (12)
Round 4 :
Work a round of puff stitches: *(yarn over, insert, pull up loop) x4, yarn over and draw through all loops* around with 6 puffs (6 puffs)
Round 5 :
Stuff lightly with fiberfill, then sc around closing: (sc2tog, sc) x 4 (8)
Round 6 :
Sc2tog x 4 (4) then fasten off, leaving a tail to pull through remaining loops and close. Add a tiny stem using a short brown chain and secure.
Info :
Vary the color and slightly vary the number of puff stitches to create pumpkins (slightly bigger) vs berries (smaller). Leave longer tails for sewing into clusters.
— Large Layered Leaf (alternate style for visual interest) :
Round 1 :
8 sc in magic ring (8)
Round 3 :
(1 sc, 1 inc) x 8 (24)
Round 4 :
(2 sc, 1 inc) x 8 (32)
Round 5 :
1 sc in each st BLO (32)
Round 6 :
*(ch 10, sl st back to create long pointed vein), sc around base smoothing into leaf shape* repeat 4 times to create four main lobes (32)
Round 7 :
Edge each lobe with picots and sc to refine shape; final count remains (32)
Info :
These four-lobed leaves work well as base anchors under large maple leaves. Add surface veins by working a contrasting yarn in fpdc down the center of each lobe for raised texture.
Round 8 :
Fasten off leaving long tail for placement and sewing. Block to shape (32)
— Connecting Stems & Surface Veins :
Info :
Stems are crocheted onto the mesh after motifs are placed. Use a moss green or brown and a small 3.0mm hook. Work a long chain (approx 20-40 ch depending on placement) for each visible stem and then couch it onto the mesh using small whip stitches with matching yarn. For thicker stems, use two strands held together and chain-stitched then slip-stitched back down the chain.
Round 1 :
Ch 24, sl st back along chain to create a stitched cord stem. Fasten off leaving tail for sewing (24)
Round 2 :
For branching stems: at desired points ch 8 and sl st back to create branch, continue sl st along main chain. Secure ends with whip stitch.
Info :
Surface veins on leaves: use a contrasting color and a surface slip stitch technique from base to tip. Work 2-4 veins per leaf depending on size, tapering each vein with decreases in surface stitch frequency.
— Assembly & Joining Motifs :
Info :
Before assembly, layout all motifs on a blocking board or flat surface in the desired arrangement. Use pins to secure; adjust spacing so motifs overlap slightly over the mesh and each other for a seamless look. Place large leaves evenly spaced down the runner center and cluster tulips, daisies, pumpkins and small leaves around them.
Round 1 :
Sew motifs to mesh by placing the mesh under the motif edge and using a mattress/whip stitch through the motif tail and mesh edge. Use long tails left from motifs to sew in neat invisible stitches. Aim for 4-8 sewing points per motif depending on size.
Round 2 :
Overlap small leaves and berries slightly over the edge of larger motifs to hide mesh and create depth. Sew through both motif layers and mesh for stability. Add additional whip stitches along the stem areas to secure heavy clusters.
Info :
When joining two large motifs edge-to-edge, use a slip-stitch seam through outermost round loops to create a decorative visible join, then reinforce from the back with invisible stitches to secure.
Round 3 :
After all motifs are attached, work a final decorative border in cream: join yarn at one end and sc evenly around the entire runner edge, placing picots every 6 sc to create a scalloped edge. Estimated sc count will vary depending on motifs but work evenly spaced (variable)
Round 4 :
Fasten off. Weave in all ends and trim close to fabric. Steam or lightly wet-block the assembled runner to help motifs relax into their final position.
Info :
Use small, nearly invisible stitches for seams that will be seen on the top surface. For heavy areas (clusters of pumpkins and large leaves), stitch through multiple rounds of the motif to anchor them firmly to the mesh so they lie flat and stay in place with use.
— Final Finishing Touches :
Info :
Add tiny seed beads or french knots in the centers of some daisies for sparkle. If attaching beads, secure with a dab of fabric glue on the knot end and then sew bead in place for durability. Optionally, add a few satin ribbon bows hidden under clusters for a gift-ready runner.
Round 1 :
Trim any stray fibers and lightly press with an iron on low through a damp cloth to set the shape. Do not press directly to avoid flattening 3D elements.
Info :
Store runner flat or rolled gently to avoid crushing 3D elements. Spot clean with a damp cloth; hand wash in cool water only if necessary and reblock while damp.
Completing this autumn runner is such a rewarding project — each motif brings a moment of joy and progress as the table fills with layered leaves, tulips and tiny pumpkins. The warmth of the reds, oranges and golds creates an inviting seasonal centerpiece you can use and treasure for years. Take your time with blocking and assembly and enjoy the slow, mindful rhythm of stitching each detail. 🧶🍂🎃