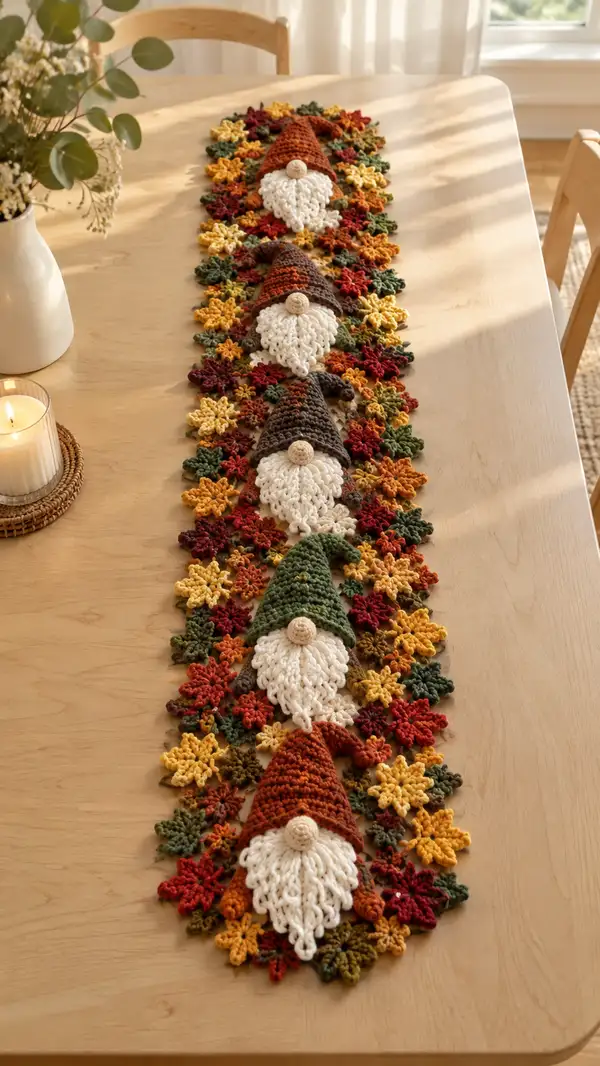
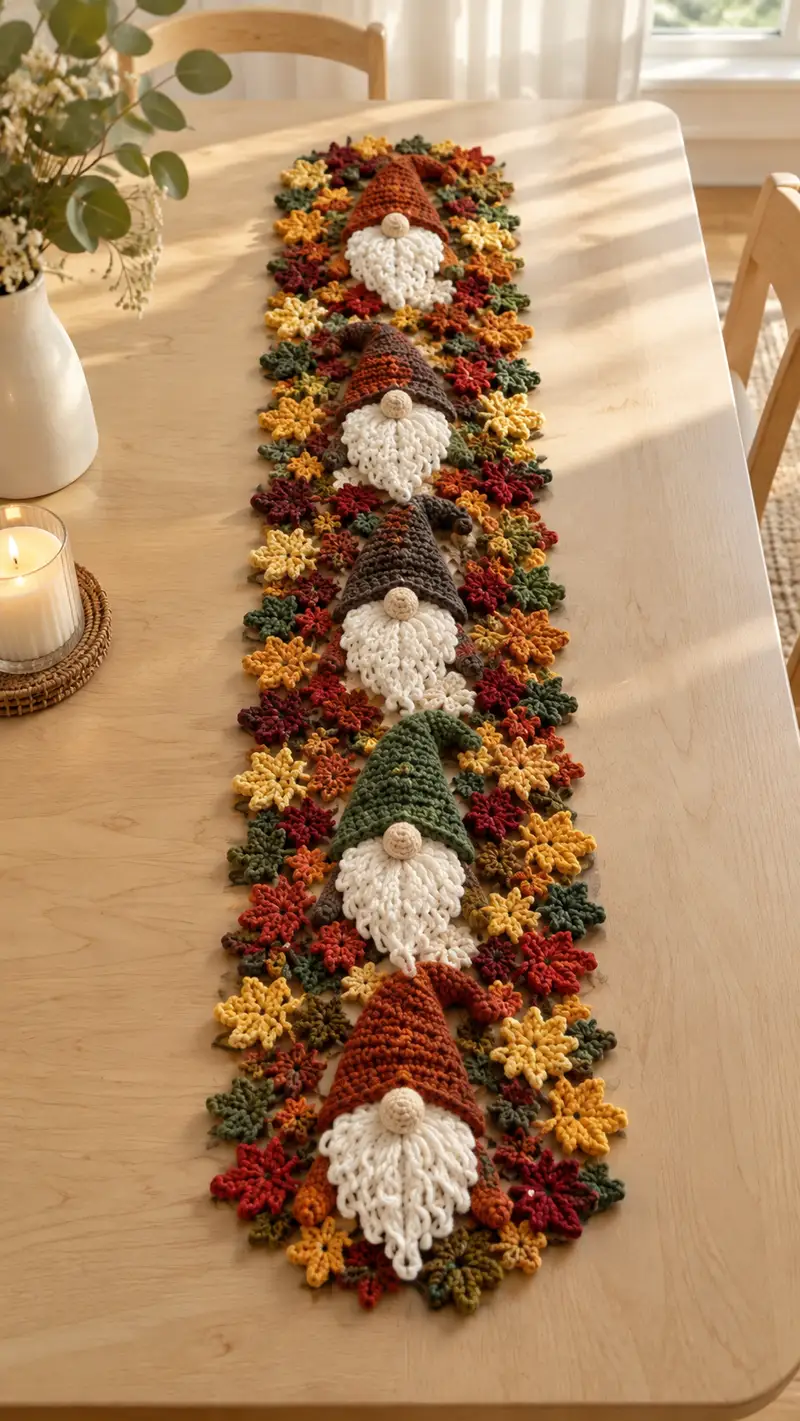
Create a long, seasonal table runner made from four whimsical bearded gnomes set into a field of layered autumn star/leaf motifs. Each gnome features a looped cream beard, a rounded wooden-look nose, a tall textured cone hat in warm fall colors, and tiny curled arms tucked into the floral background. The runner pieces are individual motifs joined into a narrow, elegant centerpiece perfect for Thanksgiving and harvest displays.
Progress Tracker
0% Complete
— Nose (Make 4) :
Round 1 :
6 sc in magic ring (6)
Round 3 :
(1 sc, inc) x 6 (18)
Round 4 :
1 sc in each st (18)
Info :
Switch to smaller hook (3.5mm) if you want a tighter nose. Begin stuffing very lightly; nose should be firm but not overstuffed
Round 5 :
(2 sc, dec) x 6 (12)
Round 6 :
(1 sc, dec) x 4 then 4 sc (8) — alternative shaping to maintain roundness
Info :
Finish stuffing nose firmly to make it pop. Fasten off leaving a long tail (about 15 cm) for sewing. Weave tail through remaining 6 sts and pull closed, weave end into center of nose for a neat finish
— Beard (Looped Flat Triangle - Make 4) :
Round 1 :
Ch 20, turn — this will be Row 1 foundation chain for the triangle beard (20)
Round 2 :
Starting in 2nd ch from hook: sc 19, ch 1, turn (19)
Round 3 :
Ch1, sc in first st, sc to last 2 sts, sc2tog (decrease), ch1, turn (18)
Round 4 :
Ch1, sc in first st, sc across to last 2 sts, sc2tog, ch1, turn (17)
Round 5 :
Repeat sc rows decreasing 1 st each row until you reach 8 sts at the top point (Rows 5-12) (8)
Info :
We are making a centered triangular beard. Keep edges neat by working last sc of each row into turning chain. Do not fasten off.
Round 13 :
Base loop-row: ch1, turn, evenly place 8 loop-stitches across by working lp (loop stitch) into each st across (8 loops). At the end make 1 sc in last st to anchor (8 loops + 1 sc)
Round 14 :
Ch1, sc in anchor st then *ch3, lp in next sc, ch3, sc in next st* across to form decorative chains and loops (work evenly to keep triangular shape)
Round 15 :
Ch1, turn, create 1 sc in sc spaces, then in each loop from previous row work 1 sc, 1 lp, 1 sc to make a layered curly effect; finish with sc at point (maintain triangle shape)
Round 16 :
Ch1, turn, work a shell pattern across the triangle: [sc, ls(lp), sc] in each previous loop-space to create fullness on the beard face (repeat across)
Info :
Loop stitch technique: wrap yarn twice around your finger or hook to create an elongated loop; pull yarn through and complete sc into loop base to anchor. Keep loops even in length (~1.5–2cm) for consistent beard curls
Round 17 :
Continue shaping rows of loops and sc to expand the base slightly: at the first and last stitch of each row add 1 sc to maintain the triangular flare (approx stitch counts will increase gradually)
Round 18 :
Work 2 more loop rows as in Round 16, staggering loops so they overlap the previous row for a shaggy beard surface
Round 19 :
Ch1, sc across base row into each ch-space forming a strong top edge for sewing to backing (st count ≈ 10-14 depending on loop rows)
Round 20 :
Fasten off leaving long tail (20-25 cm) for sewing onto backing. Optional: block flat so loops hang downwards evenly
— Hat (Tall Cone Hat - Make 4; color per photo: rust, brown variegated, moss green, deep rust) :
Round 1 :
6 sc in magic ring (6)
Round 3 :
(1 sc, inc) x 6 (18)
Round 4 :
(2 sc, inc) x 6 (24)
Info :
Hat is worked top-down in the round. Change color or variegated yarn at start if you want a marled effect. Use the same yarn weight as the beard yarn for uniform texture
Round 5 :
(3 sc, inc) x 6 (30)
Round 6 :
(4 sc, inc) x 6 (36)
Round 7 :
(5 sc, inc) x 6 (42)
Round 8 :
(6 sc, inc) x 6 (48)
Round 9-12 :
1 sc in each st (48)
Info :
These even rounds let the crown open to a balanced width; try on the hat against the beard to check proportion. If hat looks too wide, do fewer increase rounds earlier
Round 13 :
(6 sc, dec) x 6 (42)
Round 14 :
1 sc in each st (42)
Round 15 :
(5 sc, dec) x 6 (36)
Round 16 :
1 sc in each st (36)
Round 17 :
(4 sc, dec) x 6 (30)
Round 18 :
1 sc in each st (30)
Info :
At this stage the hat length is established. Leave extra rounds for a long slouchy hat like the photo by continuing even rounds rather than decreasing quickly
Round 19-26 :
1 sc in each st (30) — work 8 rounds to build height and a slouching cone
Round 27 :
(4 sc, dec) x 5 + 2 sc (25)
Round 28 :
(3 sc, dec) x 5 (20)
Round 29 :
1 sc in each st (20)
Round 30 :
(2 sc, dec) x 5 (15)
Round 31 :
(1 sc, dec) x 5 (10)
Round 32 :
1 sc in each st (10)
Info :
To create the curled tip visible in the photo, after Round 32 you will work a short spiral: work 10 sc but allow the fabric to twist slightly and then continue with a few ch and sl st to create a curl. Alternatively, fold the tip and stitch to hold curl
Round 33 :
(dec around) 5 dec (5) — if you prefer a fully closed tip, decrease to 5 sts
Round 34 :
Fasten off leaving long tail (25-30 cm) for sewing to backing. Turn hat inside out slightly and press shape, or lightly steam-block to even out stitches
— Small Curled Arms (Make 8 for background clusters & Make 8 tiny arms for gnomes; pattern below for gnome arms: make 4) :
Round 1 :
6 sc in magic ring (6)
Round 2 :
1 sc in each st (6)
Round 3 :
(1 sc, inc) x 3 (9)
Round 4-8 :
1 sc in each st (9) — work 5 rounds to create length of arm
Round 9 :
Working in BLO throughout this round only: 1 sc in each st BLO (9)
Info :
Use tighter tension on the arm to make it feel cord-like. To curl the arm, stitch the tube to itself at the tip with a few whips to hold a spiral
Round 10 :
Dec around: (dec until 3-4 sts remain) reduce to 4 sts
Round 11 :
Fasten off leaving a long tail for attaching; lightly stuff the end if you want a thumb-like appearance
— Backing Oval / Gnome Base (Make 4) :
Round 1 :
8 sc in magic ring (8)
Round 3 :
(1 sc, inc) x 8 (24)
Round 4 :
(2 sc, inc) x 8 (32)
Info :
This oval will hold the beard, nose and hat. We want a slightly elongated oval: after Round 4 we will work a few short rows at the ends to extend length
Round 5 :
1 sc in each st (32)
Round 6 :
Across the next 8 sts: (2 sc, inc) x 2 to create a slight elongation on both ends; then 1 sc in remaining sts (36)
Round 7-10 :
1 sc in each st (36)
Round 11 :
(4 sc, dec) x 6 (30)
Round 12 :
1 sc in each st (30)
Round 13 :
(3 sc, dec) x 6 (24)
Round 14 :
1 sc in each st (24)
Round 15 :
(2 sc, dec) x 6 (18)
Info :
Do not stuff this backing; it should remain flat. Fasten off leaving long tail for sewing to the floral background lattice
Round 16 :
Fasten off (18)
— Autumn Star/Leaf Motif (Make many in assorted colors: mustard, olive, rust, burgundy, variegated) :
Round 1 :
Ch 5, sl st to form ring (base ring)
Round 2 :
Ch 2 (counts as hdc), 11 hdc into ring, sl st to join (12)
Round 3 :
*Ch3, sc into next hdc* around to form points — repeat 12 times (12 ch-loops)
Round 4 :
In each ch3 loop: (sc, hdc, dc, hdc, sc) to form a fuller petal — repeat 12 petals
Info :
Alternate round or hook size for crisp points. Block petals gently to flatten before joining. Each motif will be joined to neighbors by slip-stitching through outer edges
Round 5 :
Ch1, sc in each st and evenly around petal edges to create a decorative border. Join with sl st and fasten off leaving long tail for joining
Round 6 :
Optional: Add small picot at petal tips: *(ch2, sl st into last st)* around selected petals for lacy edges
Round 7 :
Make extra smaller motifs by using ch4 ring and 8 hdc for tiny filler flowers used along edges
— Joining Flower Lattice (Join-As-You-Go) :
Info :
Lay out motifs in alternating color pattern. Join motifs by slip-stitching through outer sc border loops; use long tails to secure with a yarn needle. Target a runner width of approximately 6-8 motifs across to create narrow central strip
Round 1 :
Pick two motifs; with RS together, align petal tips and sl st through matching sc border points to join 6 points per side. Continue joining in a snake-like chain until you have a long strip slightly wider than 1 motif (this is your background lattice)
Round 2 :
When joining final edges leave small connecting loops free where gnome backings will be sewn to nestle neatly into the lattice
Info :
Work with motifs flat on a table; pin each join before securing to keep runner straight. Alternately, join with whip stitch using tails for invisible joins
— Gnome Assembly (For each gnome) :
Round 1 :
Position a backing oval onto the lattice where you want the gnome to sit; pin in place centered in one motif cell
Round 2 :
Sew around the backing with mattress stitch using long tail from backing (Round 5 tail) to join to lattice; leave top of backing open enough to slip hat brim edge under
Info :
Place beard so point faces downward and the widest part sits over the backing oval. Use pins to hold beard and backing, then stitch beard around the top edge to secure
Round 3 :
Sew beard top edge to backing across 6-8 evenly spaced stitches so beard hangs over motifs naturally
Round 4 :
Attach nose above the beard point: center nose at top triangle center and baste through the base stitch and backing to secure, then sew around nose with tight whip stitches (use long nose tail)
Round 5 :
Position small arms on either side of beard at approx backing round 10 area; stitch arms under the hat brim so they look tucked in (two stitches each side, then weave tail)
Round 6 :
Slip hat over the top of the nose and beard; fold hat brim inward slightly and sew through brim into backing and top of beard to anchor. Make sure hat tip curls outward like in photo
Info :
Use small, hidden stitches through the hat base and backing to prevent the hat from sliding. Check orientation of hat and beard before finishing stitching
— Decorative Edge and Final Assembly :
Round 1 :
Once all gnomes are positioned, use a single-color thin border yarn (brown or dark olive) and sc evenly around entire runner edge to create a unified border
Round 2 :
Work 1 sc in BLO around the border edge to create a slight ridge and neat finish
Round 3 :
Optional: add small picots at every other sc to mimic scattered little leaves (ch2, sl st back into same stitch) — repeat along entire border
Info :
Weave all loose ends into the underside of the runner. Lightly steam-block if needed to set shape and help motifs lie flat. Do not soak if using certain yarns — test a swatch first
Round 4 :
Final trim: cut tails close to woven-in ends and check for any loose join spots; reinforce if necessary with additional whip stitches
Info :
Allow runner to rest for 24 hours after blocking to let fibers relax. If using wooden beads for noses, glue inside or sew through backing carefully for safety
This cozy autumn runner brings the warmth of fall to any table with its layered flowers and jolly gnomes. I love how each little beard and curled hat adds personality to the whole piece. It’s a perfect seasonal project to make for friends and family or to decorate your own home. Gather your autumn yarns and enjoy stitching this charming harvest centerpiece! 🧶🍁