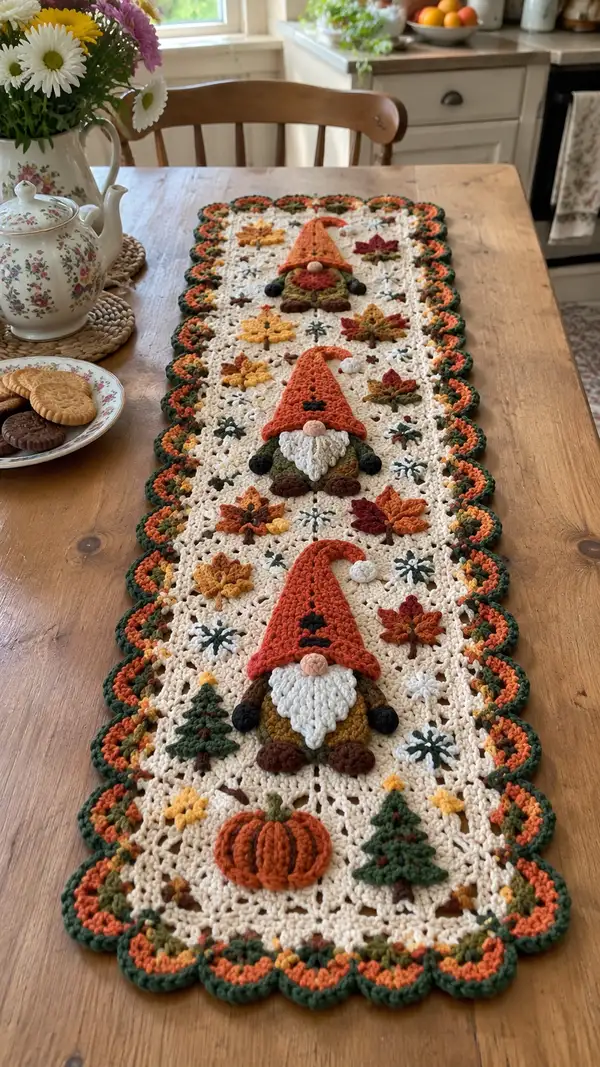
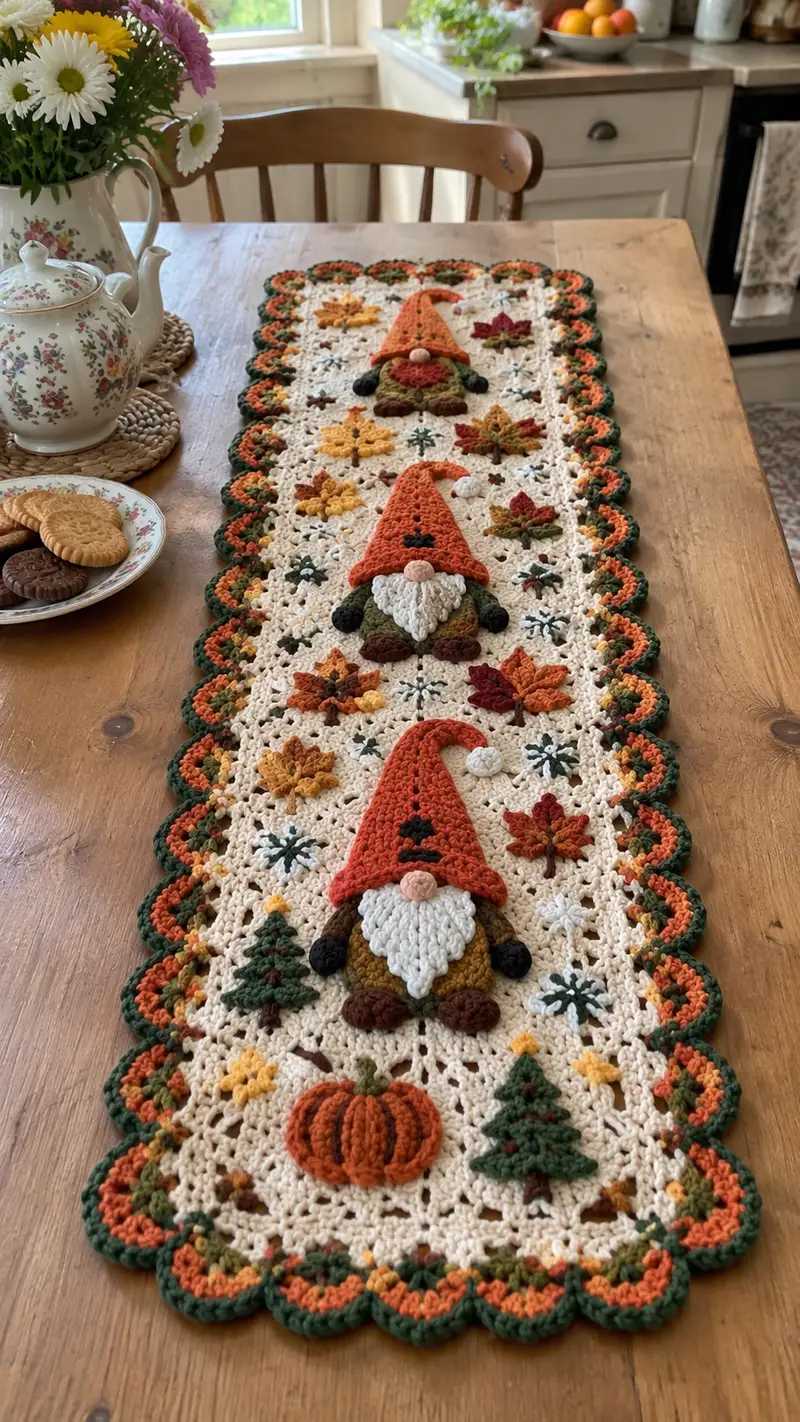
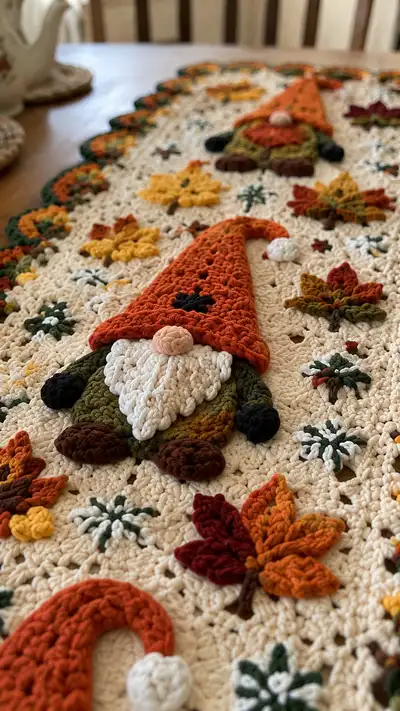
A cozy rectangular table runner featuring three dimensional autumn gnome appliques, scattered fall leaves, tiny trees and a pumpkin — all worked in warm pumpkin, olive, mustard and cream tones. The runner combines a lacy granny-style background with plush 3D motifs and a scalloped multicolored border to create a charming seasonal centerpiece. Perfect for fall decor, this pattern uses medium-weight yarn and offers step-by-step rounds and assembly notes to recreate the layered, tactile look.
Progress Tracker
0% Complete
— Background Panel :
Round 1 :
Using cream yarn and 4.0mm hook, ch 120 (foundation chain). Join with sl st to first ch to form a loop being careful not to twist (120)
Round 2 :
Ch3 (counts as dc), dc in same ch, *ch2, sk 2 ch, (2 dc in next ch) repeat from * around, join with sl st to top of beginning ch3. This creates an openwork mesh base. Maintain even tension (240 dc clusters separated by ch2 spaces)
Info :
If preferred, work this panel as rows instead of a joined loop: start with ch 120 plus turning chain and work open clusters across, turning at the end of chain rows. The circular join gives even tension for the runner.
Round 3 :
Sl st into first ch2 space, ch3, 2 dc in same ch2 sp, *ch2, in next ch2 sp work 3 dc; rep around in each ch2 space, join with sl st to top of ch3 (repeat gives 3-dc clusters in each mesh space) (240 clusters)
Round 4 :
Ch1, sc in same st, *ch3, sk next 3 dc, sc in next ch2 sp between clusters; rep around; join with sl st. This row begins to form a lacy 'granny-lattice' motif for the base (120 sc and approx 60 ch3 spaces)
Round 5-8 :
Repeat Rounds 3-4 pattern sequence two more times (i.e., one round of 3-dc clusters, then one round of sc/ch3 lattices). Work evenly to build a flat rectangular center. Check for curling and gently steam-block if necessary to keep flat (approximately 4 rounds total added)
Info :
Place markers at the positions where the three gnome centers will be attached. Measure roughly equally spaced vertically down the runner to center the three gnomes before continuing with more rounds.
Round 9 :
Ch3, 2 dc in same sp, *ch2, 3 dc in next ch3 sp; rep around, join (this increases the mesh width very slightly). Keep counts consistent with earlier rounds (240 clusters)
Round 10 :
Ch1, sc in same, *ch5, sc between next cluster groups; rep around. This elongates the lacy space to allow motifs to sit on top without bunching (120 sc, 60 ch5 spaces)
Round 11-18 :
Work alternating rounds of cluster rounds and sc/ch-spaces for an additional 8 rounds total to reach approximate runner length and build a stable mesh to receive appliques. Keep the pattern: cluster round (3 dc in space), then sc/ch5 round (sc between clusters, ch5 in spaces). Check layout with marker placement after Round 14 to ensure motifs will land in desired positions.
Info :
At this stage the background should measure roughly 28-30 inches long for the runner in the photo when using worsted yarn and 4.0mm hook. Adjust the number of repeats if you want a longer or shorter runner. Keep the panel flat by blocking before attaching motifs.
Round 19 :
Change to cream yarn if you switched for blocking; work a delicate texture round: ch1, sc in each dc stitch and 1 sc in each ch space around to tidy edges (approx 360 sc). Join with sl st.
Round 20-24 :
Continue working alternating rounds of sc and openwork to create a consistent rectangular field. R20 sc in each st (360), R21 open - *ch3, sk 2, sc between clusters; rep (120 sc + ch3 spaces), R22 sc in each st (360), R23 open as R21, R24 sc in each st (360). These rounds provide enough background depth to support the applique motifs.
Info :
Before making any motifs, block the panel flat and mark the centers for the gnomes and larger motifs using pins so you can audition placement. Background should be firm but lightly textured to receive sewing stitches.
— Gnome (Make 3) - Hat (each) :
Round 1 :
Using burnt orange and 3.5mm hook, mr, 6 sc in mr (6)
Round 2 :
Inc in each st around (6 inc) (12)
Round 3 :
(1 sc, inc) x6 (18)
Round 4 :
(2 sc, inc) x6 (24)
Round 5 :
(3 sc, inc) x6 (30)
Info :
The hat is worked as a tapered cone. At this point you can fold the brim for a rolled look or continue shaping the cone. Leave a long tail for sewing to the head later.
Round 6 :
(4 sc, inc) x6 (36)
Round 7 :
1 sc in each st around (36) - even round
Round 8 :
(5 sc, inc) x6 (42)
Round 9 :
1 sc in each st around (42)
Round 10 :
(6 sc, inc) x6 (48)
Round 11-13 :
1 sc in each st around for 3 rounds (48) giving the hat its tall length. If you want a longer hat, add more even rounds here.
Info :
To create the curled tip seen in the photos, after Round 13 work a short spiral: ch1, sc6, turn (or continue in rounds decreasing slightly), or you can fold and tack the cone to itself. Add a small bobble or pompom by making a 6-sc circle in white if desired.
Round 14 :
(6 sc, dec) x6 (42) - begin gentle narrowing if you prefer a fitted look at the tip
Round 15 :
(5 sc, dec) x6 (36)
Round 16 :
(4 sc, dec) x6 (30)
Info :
Fasten off leaving long tail for sewing. If making the hat lined or with inner structure, make a matching cone in a contrasting color and sew together before attaching tip decor.
— Gnome - Head / Nose (each) :
Round 1 :
Using pale pink for nose and 3.25mm hook, mr, 6 sc in mr (6)
Round 2 :
Inc in each st around (12)
Round 3 :
(1 sc, inc) x6 (18)
Info :
Nose is a tiny puff attached to the brim of the hat; leave a long tail for sewing. You can embroider nostrils with darker yarn after placement for extra detail.
Round 4 :
1 sc in each st around (18)
Round 5 :
(1 sc, dec) x6 (12)
Round 6 :
6 sc in next round (6) - finish and leave tail for sewing
— Gnome - Beard (each) :
Round 1 :
Using white chunky look worsted and 3.5mm hook, ch 10, sc in 2nd ch from hook and across (9)
Round 2 :
Ch1, turn, hdc in first, *fpdc around next st, bpdc around next st, rep across for textured waves; end with hdc (9). This creates a textured scalloped beard panel.
Round 3 :
Ch1, turn, (sc, ch2, skip) repeat across to create little loops at beard edge (approx 5 loops). Fasten off leaving long tail for sewing.
Info :
Beard is made flat and sewn onto the body in an inverted V shape; trim the lower edge into a point before sewing to recreate the triangular beard seen in the photos.
— Gnome - Body (each) :
Round 1 :
Using olive green and 3.5mm hook, mr, 6 sc in mr (6)
Round 2 :
Inc in each st around (12)
Round 3 :
(1 sc, inc) x6 (18)
Round 4 :
(2 sc, inc) x6 (24)
Round 5-7 :
1 sc in each st around for 3 rounds (24) - these rounds create the width of the torso
Info :
If you want the variegated look for the body as in the photo, alternate colors every other round or carry a second strand of slightly different olive yarn and alternate every round to create marled effect.
Round 8 :
(3 sc, dec) x6 (18)
Round 9 :
(2 sc, dec) x6 (12)
Round 10 :
1 sc in each st around (12) - leave opening at top to sew hat and beard; stuff very lightly so applique remains low-profile (do not overstuff).
Info :
Fasten off leaving long tail for sewing the body to the background panel with ladder stitch. Stuff minimally with a small amount of fiberfill to give body gentle relief.
— Gnome - Arms (make 2 each) :
Round 1 :
Using black/dark color and 3.25mm hook, mr, 6 sc in mr (6)
Round 2 :
Inc in each st around (12)
Round 3-6 :
1 sc in each st for 4 rounds (12) - these are the hand/mitten sections
Round 7 :
Change to olive for sleeve: (1 sc, dec) x4 (8)
Round 8-12 :
1 sc in each st around for 5 rounds (8). Leave long tail for sewing to sides of body. Stuff hands very lightly so they hold shape but do not create lumps under fabric.
Info :
Arms are short and sit alongside the body when sewn. Position with a slight forward curve for a natural placement. Use pins to test placement before sewing.
— Gnome - Legs / Feet (make 2 each) :
Round 1 :
Using dark brown and 3.25mm hook, mr, 6 sc in mr (6)
Round 2 :
Inc in each st around (12)
Round 3 :
(1 sc, inc) x6 (18)
Round 4-6 :
1 sc in each st (18) to build roomy foot
Round 7 :
(2 sc, dec) x6 (12)
Round 8 :
1 sc in each st around (12) - Stuff lightly and flatten the sole slightly, leaving long tail for sewing to the lower body edge.
Info :
Make feet slightly oval by stitching a line across the toe underside before sewing into position so the gnome sits as in the photo.
— Small Tree Motif (Make several) :
Round 1 :
Using forest green and 3.25mm hook, ch 6, sl st to form ring, ch1, work 6 sc in ring (6)
Round 2 :
Ch2, (2 dc in next st) x6 (12)
Round 3 :
Ch1, sc in each st, join. Fasten off leaving tail to sew to background at lower section (12)
Info :
To create layered branches, make 2-3 triangular leaf clusters by ch3, 3dc in one st, ch1, sl st into next space; repeat to stack a small christmas-tree style shape. Sew a small brown trunk of 3-4 sc onto the background below tree.
— Pumpkin Applique :
Round 1 :
Using pumpkin orange and 3.5mm hook, mr, 6 sc in mr (6)
Round 2 :
Inc in each st around (12)
Round 3 :
(1 sc, inc) x6 (18)
Round 4 :
(2 sc, inc) x6 (24)
Round 5 :
1 sc in each st around (24) - fasten off leaving tail
Info :
To create the ridged pumpkin look, use a yarn needle and a long length of brown yarn. Starting at top, bring yarn through the center to the edge, then outward to the round 5 edge and back to the center, repeat 6 times to create 6 ribs. Pull slightly to shape the pumpkin. Sew a short brown stem on top.
— Maple Leaf Applique (Make many) :
Round 1 :
Using mustard gold and 3.25mm hook, ch 7, sl st to first ch to form ring, ch1, sc 6 in ring (6)
Round 2 :
Work leaf points: ch4, sl st into base to make a point, in next st ch5 sl st into base, repeat to create 5 distinct leaf lobes around the center (five loops)
Round 3 :
Work into each loop: (sc, hdc, 3 dc, hdc, sc) to form pointed lobes. Fasten off and block each lobe flat for crisp shapes.
Info :
Vary yarn colors between mustard, rust and deep red and assemble each leaf with a small brown stem made from 4 sc. Leaves are sewn flat onto the background with small invisible stitches around the edges.
— Snowflake / Star Tiny Motifs :
Round 1 :
Using cream or dark green and 3.25mm hook, mr, ch3, 6 dc into ring, sl st to join, ch1 (6)
Round 2 :
*ch3, sl st in next dc to create small star points; rep 6 times. Fasten off and leave tail for sewing. Use these small motifs to populate negative space between larger motifs.
Info :
Mix white and green stars for contrast. Sew with matching thread just enough to anchor each motif without adding bulk.
— Border Scallop (worked around entire runner) :
Round 1 :
With cream and 4.0mm hook, attach yarn to outermost sc of background edge, ch1, sc evenly around the entire rectangle, placing 3 sc extra in each corner to keep flat. Join with sl st. Count should be even around (approx 360 sc)
Round 2 :
Change to forest green: *skip 2 sc, (5 dc in next sc), skip 2 sc, sl st in next sc; rep around to form scallops. At corners work 5 dc clusters in corner sc. Adjust spacing of sl sts to keep scallops even.
Info :
Alternate yarn colors for a layered border. The runner photo shows a cream scallop edged in orange then in forest green. We will add two more scallop rounds in different colors.
Round 3 :
Switch to burnt orange: sl st into center of each green scallop, *ch1, (3 dc) in same space, ch1, sl st to next scallop center; rep around. This adds a smaller scallop over the large one.
Round 4 :
Switch to olive: sl st to edge, ch1, sc in each st and 3 sc in each scallop dip to tidy edges; join. Fasten off and weave ends. The multicolored scallop creates the framed look shown.
Info :
Block the border gently to shape the scallops into crisp loops; pin each scallop into a rounded shape while damp and let dry flat for best results.
— Additional Accent Motifs and Texture (scattered) :
Round 1 :
Make small bobbles and tiny popcorns using cream and dark green: *ch2, 5 dc in same st, pull through, fasten off leaving tail; sew into cluster form. These mimic little flowers and filler bits seen between leaves and gnomes.
Info :
Create a variety of sizes (3-dc pop, 5-dc pop, and single sc buds) and use them to balance layout. Sew down only at the center so the surrounding loops retain texture.
— Repeat and Variation Notes :
Info :
Make motif sets for each gnome area: for the top and middle gnome repeat the same gnome parts, but stagger hat shapes: one tall pointed, one curled, one slightly flopped. Use the same rounds but add or subtract 2-3 even rounds in the hat section to vary height.
Info :
For the three gnomes in the photo: lower gnome hat is most curved; middle gnome hat is slightly shorter; top gnome hat sits upright. When placing on the panel pin and dunk lightly with steam to set hat curve if needed.
— Finishing Details :
Round 1 :
Sew gnome bodies to the background: using long tail from body, stitch around the base of the body in ladder stitch attaching to the cream mesh between cluster spaces so the body sits slightly raised (12 attachment points recommended).
Round 2 :
Sew hats to heads and tack hats to the background at 2-3 points to anchor the tall cones so they keep their position. Sew noses to the hat brims centered above the beard.
Round 3 :
Sew feet at the lower end of each body using the long tail, position them side by side and add a few invisible stitches into the background to anchor the gnome so it doesn't lift away from the runner.
Info :
Attach leaves, pumpkins and trees after all gnomes are sewn down. Play with negative space and balance larger motifs with several tiny stars or snowflakes to create the scattered look seen in the photo.
Round 4 :
Weave in all ends. Add a tiny dab of fabric glue on the back of particularly active motifs (like the hat tips) for extra security if the runner will be handled frequently.
Info :
Final blocking: lightly steam-block the entire runner with pinned edges to ensure scallops and background lie flat and the motifs keep their intended shape. Allow to dry completely before use.
Bringing this runner to life is such a joy — the lacy background and chunky gnomes together create a warm autumn centerpiece that people love to touch and admire. Every applique adds a little story: a curled hat, a layered maple leaf, a little pumpkin — they all celebrate the season. Layout, blocking, and careful sewing are the finishing touches that make this piece special. Enjoy creating and sharing this cozy autumn accent in your home! 🎃🧶