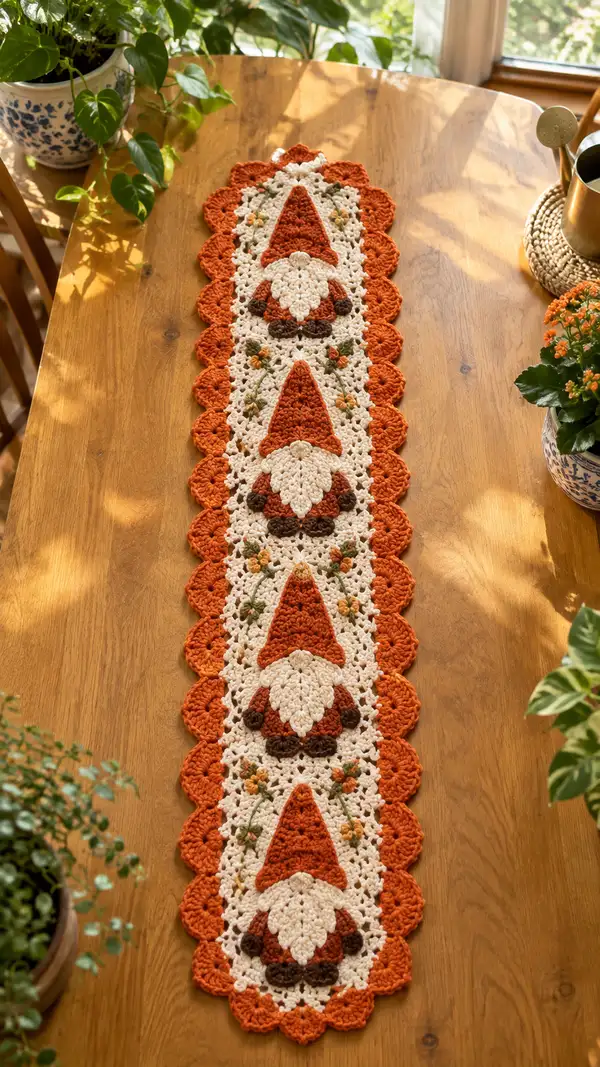
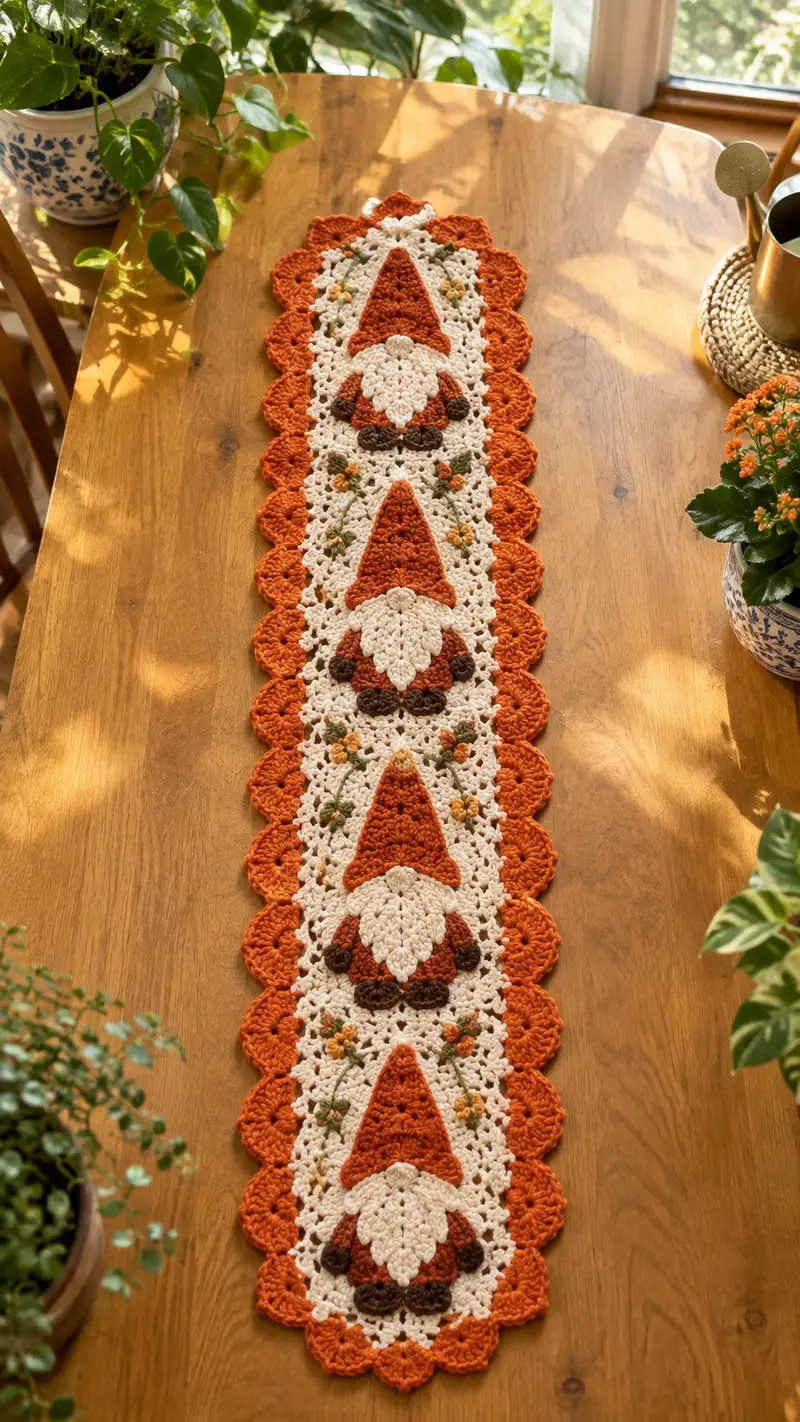
A warm, fall-inspired table runner featuring three charming gnome medallions framed by a scalloped orange border. Worked in soft worsted-weight yarn, this runner combines textured clusters, puff stitches and simple embroidery details for a cozy seasonal accent. Each repeating gnome motif includes a tall conical hat, layered beard cluster, little round nose and tiny bobble feet, joined into a long runner and edged with shell scallops.
Progress Tracker
0% Complete
— Notes & Gauge :
Info :
This runner is worked in modular gnome medallions joined along a lacy cream ground, then edged with an orange scallop border. Gauge is not crucial but will affect finished length. For reference: 10 cm (4 in) square = 12 dc x 8 rows in worsted yarn using 5.0 mm hook. Work tightly enough that motif texture is defined and holes between stitches are minimal.
— Special Stitches & Techniques :
Info :
Puff stitch (small): yo, insert hook, yo, pull up loop; repeat 3 times total to have 7 loops on hook, yo, pull through all loops, ch1 to close (counts as 1 puff). Puff (large): same method with 5 yarn-overs and pulls. Bobble: work 5 dc incomplete into same st, leave last loop on hook, yo and pull through all 5 loops, ch1 to secure. Cluster shell: (dc, ch1, dc) into same st forms shell cluster.
— Gnome Medallion (Make 3; each medallion is worked as concentric rounds) :
Info :
Each medallion is a layered motif: center nose, beard layer, hat cone, feet/bottom bobbles, then lacy background. Work motifs flat in continuous rounds (no turning) unless specified. Use cream for beard/background, burnt orange for hat and scallop, brown for feet, olive and mustard for small embroidered flowers. Keep a stitch marker at the start of each round.
Round 1 :
With cream, mr, 6 sc in ring (6)
Round 2 :
Inc around (6 inc) (12)
Round 3 :
(1 sc, inc) x6 (18)
Round 4 :
(2 sc, inc) x6 (24)
Round 5 :
(3 sc, inc) x6 (30)
Info :
Rounds 1-5 create a small center disc that will become the nose and central joining point for the beard clusters. Keep stitches even; place marker after Round 1 and move up each round.
Round 6 :
1 sc in each st around (30)
Round 7 :
Switch to burnt orange. [Change color] Ch1, 1 sc in same st and in each st around (30)
Round 8 :
Work 10 cluster-shells evenly spaced across front arc to begin hat base: *(skip 1 st, shell in next) rep from * total 10 shells, placing single sc between clusters where needed (30)
Info :
Shell: (dc, ch1, dc) into same st. These clusters lay the foundation for the hat triangle. When placing 10 shells across 30 sts, space them so each shell occupies one st and you separate by 2 sc or as needed to total 30 stitches.
Round 9 :
Round worked in cream to form beard foundation. Change to cream: ch1, 1 sc in each st around (30)
Round 10 :
Beard cluster row: *(puff small in next st, sc in next 2 sts) x10 (30)
Info :
Each puff will create a scale used for triangular beard shape. Make puffs tight and consistent; ch1 between puffs if needed to maintain counts.
Round 11 :
Change to orange for hat shaping at base: 1 sc in each st around (30)
Round 12 :
Begin triangular shaping for hat: (sc 4, dec) x5 (25)
Round 13 :
(sc 3, dec) x5 (20)
Info :
These decreases compress the hat base into a more triangular form. Keep tension even so hat point begins to rise visually from successive decrease rounds.
Round 14 :
(sc 2, dec) x5 (15)
Round 15 :
(sc 1, dec) x5 (10)
Round 16 :
Dec around (5 dec over 10 sts) (5)
Round 17 :
Switch to front post trebles for hat peak texture: join and ch2 (counts as dc), *fpdc around next st, ch1*, repeat to end to form vertical ridge lines across the cone area (work 5 fpdc and chains as spacing) (Count remains visually small; maintain 5 ridges)
Info :
Hat peak is formed by working post stitches and adjustment rows; if you prefer a longer cone, after Round 15 add 1-3 rounds of (sc around) before Row of post stitches to lengthen the hat. Secure and fasten off burnt orange leaving a long tail to weave down the cone to tidy center.
Round 18 :
Change to cream, re-establish round on lower perimeter: join cream at hat base junction, 1 sc in each visible lower loop across hat-beard seam (approx 30 sts) (30)
Round 19 :
Beard shaping round: *(shell cluster (dc, ch1, dc) over puff below to create scalloped beard point, sc in next st) x10 (30)
Round 20 :
Work layered beard scallops: change to cream if not already. *(puff small in shell top, sc next) x10 (30)
Info :
These two rounds create the layered beard effect. The puffs rest to make the triangular beard point overlap the hat base. Place the puffs slightly overlapped so the beard sits forward when motifs are joined.
Round 21 :
Switch to brown for feet detail at bottom edge: join brown on lower edge behind beard, *(bobble in next st, sc next 2 sts) x6 then sc remainder to reach 30 sts total (30)
Round 22 :
Define bobbles: *(sc around bobble to lock shape, sc next 2 sts) x6; sc to end (30)
Info :
Six bobbles placed symmetrically form the tiny feet / boot row beneath each gnome. If you prefer only three feet clusters, place three bigger bobbles and adjust spacing accordingly.
Round 23 :
Change to cream to work the decorative lacy space that will join motifs: *ch3, skip 2 sts, sc in next, ch3, sc in next* around, working 10 lacy arches evenly (30)
Round 24 :
Expand lace: in each ch3 arch work (sc, 2 dc, sc) to create fan arches; sc between fans where round counts allow (30 fans/arches) (30)
Info :
The lacy space around each gnome medallion forms the connecting field between motifs. Keep these rounds flat: if a medallion cups, block lightly before joining.
Round 25 :
Border foundation: with cream, 1 sc in each st around to even out (30)
Round 26 :
Ch1, work 15 shell clusters spaced evenly across the long edges to start scallop border connection points; where motifs will be joined, leave 2 ch spaces for joining (30)
Info :
Each medallion is worked identically. After finishing one medallion, fasten off with long tail for joining on one side, which will be used to seam into the runner base. Make three medallions for the pictured runner - you may add more to extend length.
— Background Joining Strips (Make 2 long strips to connect medallions lengthwise) :
Info :
The horizontal joining strips are worked in cream to create the lacy foundation between gnome medallions. These strips are long rectangular lace bands that slip-stitch seam to medallion sides and form the long runner center.
Round 1 :
With cream, ch 40 (or length matching gnome medallion spacing), sc in 2nd ch from hook and across (39)
Round 2 :
Ch3 (counts as dc), turn, dc in next 2 sts, *(ch2, sk 2, 3 dc in next) rep across until last 3 sts, dc in last 3 sts (39)
Round 3 :
Ch1, turn, sc across into each dc and ch2 space evenly (39)
Round 4 :
Ch3, turn, *3 dc shell into each ch2 space across, dc in top of turning ch to end (39)
Info :
Make two of these strips: one to link the left side of motifs and one for the right side (or make one long continuous strip and join medallions to it). The length of chains depends on how far apart you want the gnomes; adjust ch40 accordingly, keeping stitch multiples compatible with your shell pattern.
Round 5 :
Ch1, 1 sc in each st across (39)
Round 6 :
Edging round: *(ch3, sk 2, sc) rep across to make little arches along the strip edges, finishing with sc (approx 13 arches) (39)
Info :
These strips will be seamed to the medallion sides with whip stitch or slip-stitch join. Make two strips per runner (one each side) and adjust length to match the three medallions plus small gaps between them.
— Joining Medallions to Strips & to Each Other :
Info :
Pin medallions on a blocking board in desired order with strips aligned at both long sides. Use mattress stitch or whip stitch with cream yarn tail left from Round 26 of medallion to seam through the back loops of medallion and strip for a nearly invisible join.
Round 1 :
Position first medallion, align left strip so that strip arches sit between medallion shell markers; using tapestry needle and cream yarn tail, mattress stitch through corresponding sts to join for approx 1.5 cm depth
Round 2 :
Repeat for right side strip. Join second medallion to strips by aligning and stitching through the same strip row positions so medallions sit edge-to-edge with a small lacy gap. Continue until all medallions are joined (3 motifs pictured) (medallion count 3)
Info :
If you prefer a seamless crochet join, use slip-stitch method: with right sides facing, hold medallion and strip edges together and sl st through both loops at each corresponding stitch. This creates a visible ridge; choose the method you prefer for finish.
— Scalloped Shell Border (Work around entire runner after joining all medallions) :
Info :
This border is worked in burnt orange. It creates the scalloped, shell-edged look photographed. Work shells along both long edges and semicircle shells on short ends. The shell is (5 dc, ch2, 5 dc) in one st for pronounced scallop.
Round 1 :
With orange, join at any seam junction, ch1, 1 sc evenly around entire runner edge, placing (2 sc) in corners/short ends to maintain flatness (work approx 220 sc around full runner; count will vary by number of medallions)
Round 2 :
Shell round: *skip 2 sts, (5 dc, ch2, 5 dc) in next st, skip 2 sts, sc in next st*, rep around. Adjust spacing to fit whole circumference so shells sit evenly; you should have approximately 30-36 scallops depending on runner width (Count is based on spacing of skipped stitches and sc anchors)
Info :
To ensure mathematical consistency: if you begin with approximately 220 sc on Round 1 and each shell occupies 1 anchor st + 4 skipped sts (total 5 sts per scallop), expect ~44 shells (220/5 = 44). If you want fewer scallops, reduce initial sc or increase skip count. Adjust so shells look balanced along sides and ends.
Round 3 :
Ch1, sc in each sc and ch2 space across to tidy scallops (work approx 220 sc) (count will match final stitch round)
Round 4 :
Decorative picot: *sc in next st, ch3, sl st into first chain to form picot, sc in next 2 sts* repeat around to accent shell tips (approx 220 picots)
Info :
For short ends, make semicircular scallops by spacing shells tighter so the curve closes. Pin and block shells into semicircles with blocking pins so they sit uniformly around the runner edges before final finishing.
— Embroidered Flowers & Leaves (Add small embellishments in olive and mustard) :
Info :
Tiny embroidered flowers and leaves sit on the cream field between gnomes. Use surface crochet or needle embroidery with olive and mustard yarn. Flowers are 3-4 tiny French knots or small puff clusters; leaves are lazy-daisy stitches or small chain-stitched leaves anchored with a single stitch at base.
Round 1 :
Position flowers approx two per medallion in offset diagonal; use mustard for center: make french knot (wrap yarn twice around needle and pull through) or 2-thread French knot equivalent using tapestry needle. Make 1 or 2 mustard knots each flower center.
Round 2 :
With olive, make 2-3 lazy-daisy leaves radiating from each flower center: insert needle, chain 4 loop, anchor with small sc, repeat for second leaf on opposite side. Secure and weave ends on wrong side.
Info :
Keep floral accents small and sparse: they add visual interest but should not overwhelm gnome medallions. Use matching thread tension to make embroidery lie flat against the lace ground.
— Finishing Touches :
Round 1 :
Weave in all ends: use tapestry needle to pull tails into nearby stitches, duplicate-stitch if necessary to secure changes. Trim close.
Round 2 :
Blocking: lightly steam or wet-block runner to shape scallops and flatten medallions. Pin scallops into semicircles and medallions flat on blocking board and allow to dry fully.
Round 3 :
Optional embellishment: add a small wooden button or felt nose applique on top of center puff if you like more dimensional noses; sew securely through center rounds and close ends neatly.
Info :
Once blocked, the runner will look crisp and even. For extra durability, lightly spray the back with a fabric stiffener following manufacturer instructions and test on scrap yarn first.
— Alternate Size & Repeat Instructions :
Info :
To make a shorter or longer runner, increase or decrease number of medallions. Each medallion with joining strips and shell border adds approximately 12-14 in (30-35 cm) to finished length (depending on gauge). For a table centerpiece length of approx 36 in (90 cm), use two medallions; for pictured length of ~48-60 in (120-150 cm) use three medallions as shown.
Round 1 :
If adding medallions, work them all to Round 26 and then join into strips before edging so scallops align perfectly; adjust strip length by ch increments of 10 to maintain shell multiples.
Info :
For an alternate colorway try cinnamon/cream/olive for a vintage vibe or deep teal and cream for winter holidays. You can also make single medallion placemats by following the same motif and adding a narrower shell edge.
This Autumn Gnome Table Runner brings cozy seasonal charm to your table with textured gnome medallions and a scalloped border. Each stitch creates warm, tactile detail and playful personality. I hope it fills your home with autumnal cheer and becomes a favorite handmade accent! 🧶🍂✨