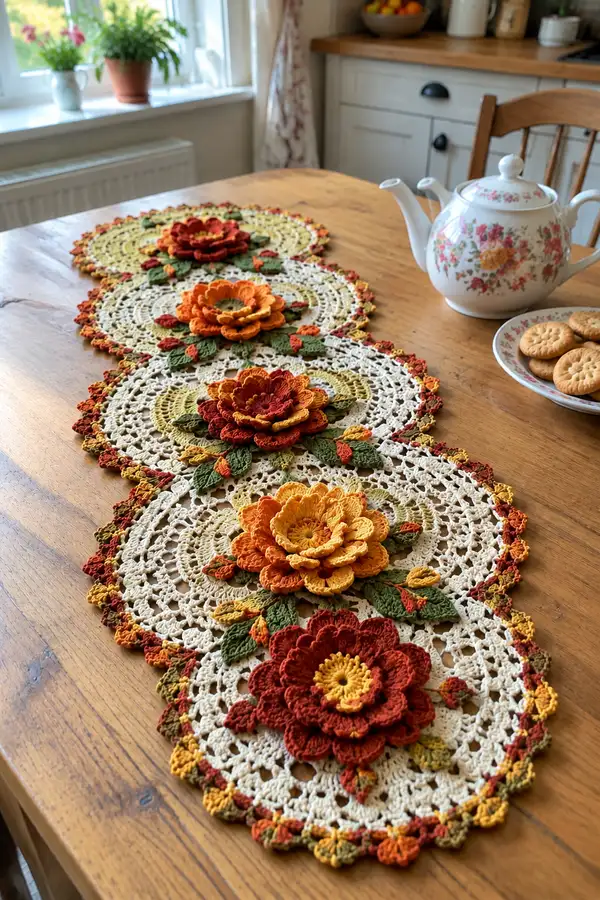
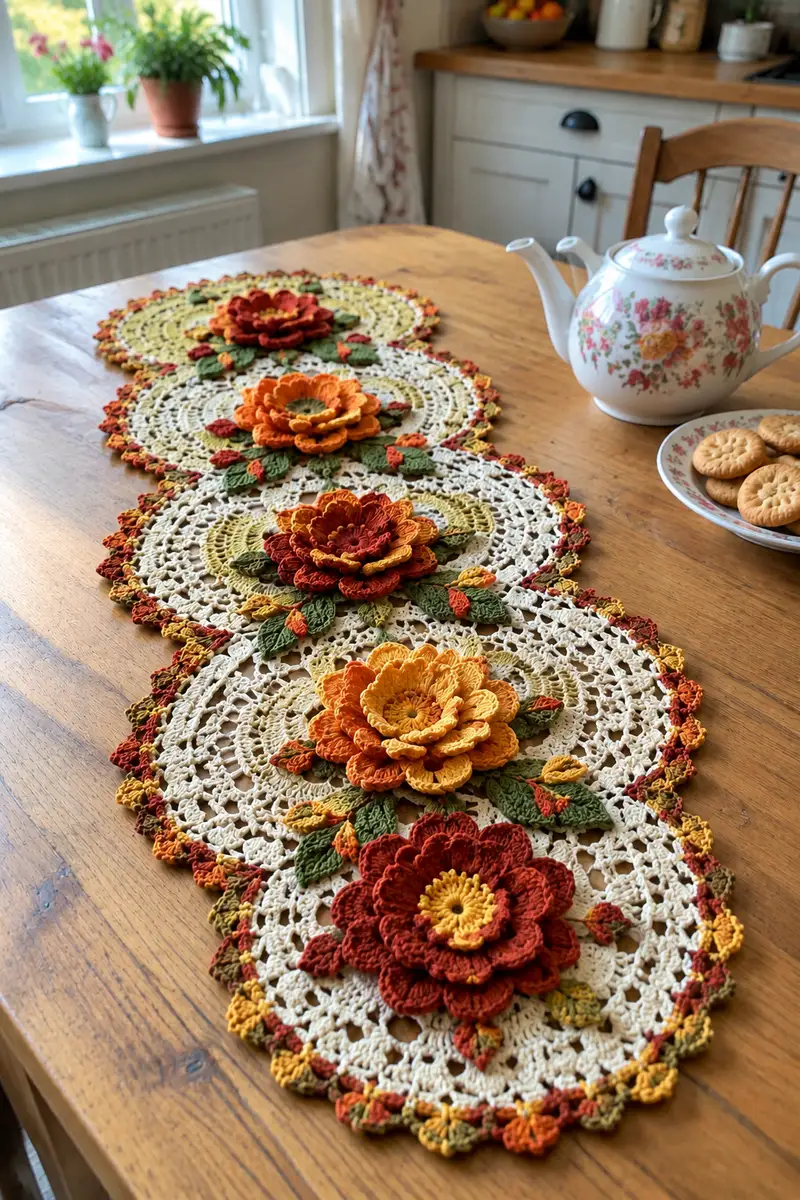
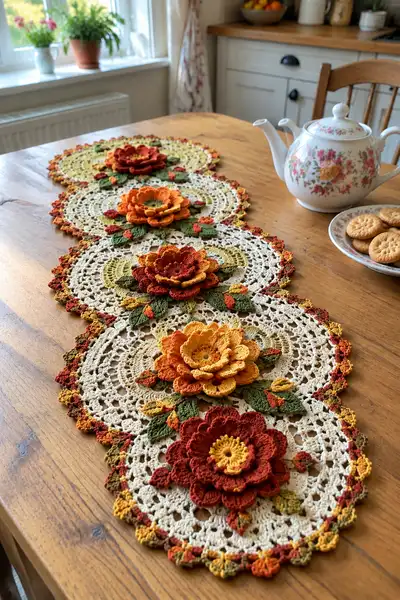
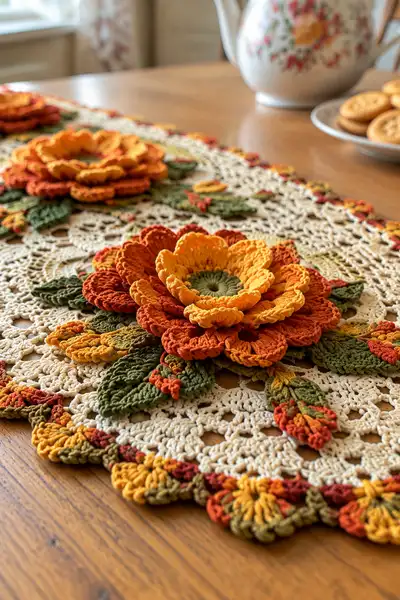
Create a warm, layered lace table runner featuring four linked circular doilies topped with dramatic 3D layered flowers and leafy sprigs. The runner showcases autumn tones—burnt orange, golden yellow, olive green and cream—paired with an open lace background and a scalloped multi-color border. The 3D flowers stack several petal rounds for real dimension while leaves and tiny buds add natural detail. This pattern gives step-by-step instructions to recreate the full runner and all decorative elements.
Progress Tracker
0% Complete
— Overview :
Info :
This pattern describes how to make one circular lace motif, one layered 3D flower with leaves and buds, plus the joining and border instructions to assemble four motifs into a table runner. All counts are given per motif; make four motifs and four flowers unless you choose a different length. Work with a smooth sport/DK cotton for crisp stitch definition and blocking.
— Main Lace Motif (Make 4) :
Round 1 :
Magic ring, ch3 (counts as dc), 11 dc into ring, sl st to top of ch3 to join (12 dc)
Round 2 :
2 dc in each st around (24 dc)
Round 3 :
(1 dc, 2 dc in next st) x12 (36 dc)
Round 4 :
(2 dc, 2 dc in next st) x12 (48 dc)
Round 5 :
(3 dc, 2 dc in next st) x12 (60 dc)
Info :
These early rounds build your dense centre that will transition into lace. Keep tension even; if your round circumference grows too quickly reduce last increase repeat to keep flatness.
Round 6 :
Ch4 (counts as tr), *sk next st, tr in next; ch1* around to create space loops (60 tr clusters, 60 ch1 sps) - sl st to join (sets foundation for shells)
Round 7 :
Sl st into first ch1 sp, ch3, (2 dc, ch2, 3 dc) into same ch1 sp (shell), *sk next tr, shell into next ch1 sp* around. You will have 30 shells (30 shells)
Round 8 :
Ch1, sc in same st, *ch5, sc in center of next shell (ch2 space)* around to create large picot spaces; join with sl st (30 sc + 30 ch5 loops)
Round 9 :
Into each ch5 loop: (2 dc, ch2, 2 dc) shell; sc between shells into sc from previous round around (30 shells; counts alternate to keep symmetry)
Round 10 :
Ch2, *hdc in next 3 sts, ch3, sk next 3 sts* around—creates airy mesh. Count: 30 ch3 sps and hdc clusters aligning with shells beneath
Info :
Begin using a stitch marker at the start of each round to maintain placement through mesh rounds. Keep the work flat; if ruffling occurs, block lightly before continuing to outer rounds.
Round 11 :
Into each ch3 sp: (sc, ch2, 3 dc, ch2, sc) forming extended petals that remain flat—30 petals (approximate stitch groups align to shells below)
Round 12 :
Ch1, sc in each stitch and in ch2 sps around to secure (maintain count approx 180 total stitches across one round due to clusters—work evenly)
Round 13 :
Ch4, *sk next 2 sts, 3 tr cluster in next st, ch2, 3 tr cluster in same st, sk next 2 sts, ch1* around forming raised tr-petals (30 tr clusters)
Round 14 :
Ch1, sc in each st around (this is a stabilization round) - stitches approx 240 including small sc between clusters
Round 15 :
Change to cream (if you prefer to change color here for a lighter outer ring). Ch3, *2 dc in same sp, ch2, sk next sp, dc in next sp* around—creating alternating clusters and chain loops (count will vary depending on previous counts; expect 60–72 clusters)
Info :
If you change color, join color on final sl st of previous round and carry the unused yarn inside if you wish to minimize ends. Use a contrasting color for the final lace rounds for the pictured look.
Round 16 :
Into each ch2 sp: (3 dc, ch3, 3 dc) shell; sc between shells to anchor (this expands motif into lace ring). Expect 30 shells
Round 17 :
Ch1, sc in each st and into ch3 sps, *ch5, sc in next shell top* around to form large picot loops (30 ch5 loops)
Round 18 :
Into each ch5 loop: (2 dc, ch2, 2 dc), sc between shells to anchor (30 shells). You now have an openwork lace ring large enough to accept decorative leaves and flowers
Round 19 :
Ch2, *hdc in next 4 sts, ch4, sk next 4 sts* around—this creates elongated mesh suitable for overlay joins (mesh repeats around)
Info :
Add an extra stabilization round (sc in each st) if your mesh feels too open to hold heavy flowers. The flowers will be sewn on and create weight so aim for balance between openness and stability.
Round 20 :
Ch1, sc in each st and in ch4 sps around. Work evenly to maintain circular shape (stitch total depends on combination of previous rounds; estimate 240–260 sc)
Round 21 :
Begin shaping outer lobes: *ch6, sk 5 sts, sc in next st, ch4, sc in next st* repeat around to form lobed edge base (approx 30 lobes)
Round 22 :
Into each ch6 lobe: (sc, hdc, 5 dc, hdc, sc) to create a scallop; join with sl st between lobes—this yields deep scallops around motif (30 scallops)
Round 23 :
Ch1, sc in each st across scallop top, making evenly spaced sc between petals to flatten scallops (stitch count variable per scallop; overall keep symmetry)
Info :
At this stage measure motif diameter; if you prefer a slightly larger motif, perform an extra round of shells (3 dc, ch2, 3 dc) in ch spaces before final scallops to increase size by ~1–1.5 cm per motif.
Round 24 :
Edging color change to variegated edge (optional): sl st to join, ch3, *2 dc in same st, ch2, sc in next st* around to create dotted edge tabs (count aligns to scallops; expect 30 tabs)
Round 25 :
In each tab: (sc, ch2, puff stitch (yarn over, insert, pull up loop, repeat 3 times, yarn over pull through all loops), ch2, sc) to create textured bobble points. Fasten off and weave ends. Motif diameter should be roughly 22–24 cm depending on yarn and hook.
Info :
Make 4 identical motifs. Block each motif flat using pins and steam or wet blocking to open the lace and set scallops. Blocking is essential to achieve the crisp look in the photos.
— Layered 3D Flower (Make 4) :
Round 1 :
Using mustard or darkest centre color: ch4, join with sl st to form ring, ch1, 8 sc into ring, sl st to join (8 sc)
Round 2 :
(inc) x8 around — 16 sc
Round 3 :
(1 sc, inc) x8 — 24 sc
Round 4 :
Ch2, *hdc in next st, dc in next, ch1* around forming a textured center; finish with sl st to join (24 grouped stitches)
Round 5 :
Switch to medium yellow/gold. Ch3, *in next st work shell: (2 dc, ch1, 2 dc) into same st, sk next st, sl st into next* around forming 12 shallow petals (12 shells)
Info :
Petals are formed in layers. Each layer will be worked as shell petals then lifted and sewn to stack; leave long tails for sewing if you will join layers after finishing rounds.
Round 6 :
Ch1, sc in first shell top, *ch4, sc in center of next shell* around to create loops to attach next petal layer later (12 loops)
Round 7 :
Make first petal layer (inner petals): In each ch4 loop work: (sc, hdc, 3 dc, hdc, sc) — each petal stands proud (12 petals)
Round 8 :
Change to orange tone. Ch3, sl st to base of first petal, then bloom second-tier petals: *(sc, ch2, 5 dc, ch2, sc) into space between first-tier petals* repeat 12 times to create larger petals offset between inner petals
Round 9 :
Turn petals up by working a row of sc at petal base: into each petal foundation sc 6 sc to secure petals upright; sl st to join (counts depend on petals but remain consistent across petals)
Round 10 :
Change to rust/deep orange. Create third, larger outer petal layer: ch3, into each space between second-tier petals work: (sc, ch3, 7 dc, ch3, sc) to form broad outer petals—12 outer petals
Round 11 :
Work a finishing scallop around outer petal tips: sl st evenly across petal tips then *picot (ch3 sl st in 3rd ch), sc across petal edge* around to create delicate crenellations
Info :
Stitch counts within petal layers vary; maintain the same number of petals per layer so petals stack concentrically. If using different yarn/fabric, adjust dc counts of outer petals to preserve proportion.
Round 12 :
Sew petals together: Stack inner, middle and outer petals aligning centers. Use long tails or yarn needle to sew the center of each layer to the one beneath with small whip stitches to hold upright—do not flatten petals while sewing. Add a few short gathering stitches at the petal base to give a cupped shape.
Round 13 :
Optional center textured disc: Using contrasting yellow, attach yarn to center, ch1, 12 sc around, sl st. Next round: (ch3, picot) around to create a tiny pom-like centre. Fasten off leaving tail to sew center to flower base.
Round 14 :
Attach felt backing (optional) or a small disc of tightly woven crocheted fabric: Attach yarn, ch3, 12 hdc into ring to create small disc, fasten off. Sew disc to underside of flower for stability when mounting to lace motif.
Info :
Make 4 flowers. Block each lightly to shape petals: spray lightly with water, shape petals upward and allow to dry, or use a small amount of fabric starch for stiffer petals to keep the 3D look on the runner.
— Leaf (Make 12–16) :
Round 1 :
With olive yarn: ch8, sc in 2nd ch from hook, hdc, dc, tr, dc, hdc, sc in last ch (creates a chain that will be worked back along other side)
Round 2 :
Turn, working along opposite side of foundation chain: sc in next st, hdc, dc, tr, dc, hdc, sc into base — join with sl st at starting sc (approx 14 stitches total forming a leaf)
Round 3 :
Edge shaping: sc in each st except at tip work (picot: ch3 sl st into 3rd ch) to form pointed tip; fasten off leaving long tail for sewing
Info :
Make 3–4 leaves per motif arranged around flower base. Mix a couple leaves using a variegated green or carry a tiny strand of rust yarn under the leaf to create autumn-mottled leaves as in the photos.
Round 4 :
Optional raised centre vein: re-attach yarn at leaf base and FPdc along center chain to create a raised vein—work 6–8 FPdc across center and fasten off
— Small Buds & Petal Tips (Make 8–12) :
Round 1 :
Using rust or golden yarn: ch4, join to ring, ch1, 6 sc into ring, sl st to join (6 sc)
Round 2 :
(inc) x6 (12 sc)
Round 3 :
Ch1, *sc in next 2 sts, ch2* around to make tiny loops for buds; fasten off leaving tail for sewing. Make small teardrop shapes by working 1 sc, 1 hdc, 2 dc in a chain loop if you prefer a petalbud shape.
Info :
Tuck buds between leaves and around flower base for visual interest. Sew securely with multiple small stitches to underlying lace motif so they don't come loose in everyday use.
— Alternative Leaf Variation (Make 8) :
Round 1 :
Ch10, sc in 2nd ch from hook, hdc, dc, dc, tr, dc, dc, hdc, sc along chain, then work reverse along opposite side: sc, hdc, dc, sl st to join for a longer slender leaf (approx 18–20 stitches)
Round 2 :
Edge picots at tip and base: ch3 picot at tip for decorative curl; fasten off
Info :
Use these longer leaves at the join points between motifs to make the runner feel organically linked, as the leaves elongate the silhouette between circles.
— Motif Connector & Join (Repeat for 3 joins to make runner) :
Round 1 :
Prepare joining spurs: On edge of first motif identify three evenly spaced scallops to be used as joining points (left, center, right). On the second motif identify the corresponding three scallops.
Round 2 :
Join motifs using single crochet seam: With right sides facing, line up scallops and use yarn to sl st through both scallop edges, then sc through both layers across the ch2 sp - use approx 6–8 stitches per scallop to secure (repeat for all three scallop pairs). Repeat for all motif joins (three joins total to make four motifs in a row).
Info :
Pin motifs before sewing and check alignment for overall runner curvature. Use a fine upholstery needle and fine cotton sewing thread to make nearly invisible mattress stitches along the seam if you prefer a flatter join.
Round 4 :
For additional decorative connections, crochet tiny chain straps (ch12) between motifs and attach to mid-lace points with small slip stitch loops to echo the floral clusters and tuck leaves in to hide joins.
— Outer Scalloped Border and Final Edging :
Round 1 :
With variegated edge color, join yarn to any outer scallop base, ch3, (2 dc, ch2, 2 dc) in scallop top to reinforce shell; sl st between scallops—follow all outer scallops around runner (approx 120 scallops across 4 motifs)
Round 2 :
Ch1, sc in same st, *ch5, sc in next scallop top* around to form picot bases—this will produce approx 120 ch5 loops around the full runner
Round 3 :
Into each ch5 loop: (sc, hdc, 5 dc, hdc, sc) to create full scallop shells around entire runner; finish round with sl st, fasten off and weave in ends
Info :
Work the border continuously across all four motifs after joining so the scallops line up perfectly. Blocking after the border will open the scallops and blend the joins into a seamless runner.
Round 4 :
Optional picot accent round: With a contrast color, sl st across shell tops then *ch3, sl st into 3rd ch (picot), skip 2 sts, sl st* repeat around to create little raised bobbles along the edge
— Assembly & Final Details :
Round 1 :
Placement: Block all motifs and flowers. Position one flower centrally on each motif; arrange 3–4 leaves and 2–3 buds under flower base so that they sit naturally on the lace and hide the stitches used to attach the flower.
Round 2 :
Sewing the flower: Using long tails or matching yarn, sew through the felt/reinforcing disc to the motif centre using ladder or whip stitch with small stitches. For stability sew 5–8 anchor points around the flower base, alternating stitches through lace and flower disc to prevent slippage.
Info :
For extra hold, add a drop of fabric glue under the flower centre before sewing, then finish stitching while glue sets. If you plan to wash the runner, use a washable fabric glue sparingly or rely on purely stitched joins.
Round 3 :
Sew leaves: Arrange leaves in small clusters under each flower; stitch base of each leaf to the lace motif with small hidden stitches. Insert a few tiny buds (sewn securely) to add accent color between leaves.
Round 4 :
Final shaping: Once all flowers and leaves are attached, re-block the assembled runner gently to coax any flattened petals upwards and to open lace spaces in the border. Let dry completely.
Info :
When storing the runner, place flat or roll loosely around heavy tubes to avoid crushing the 3D flowers. This runner is best for decorative display rather than heavy-duty daily use because of the layered petals.
— Finishing Touches & Variations :
Round 1 :
Starching option: For a stiffer table runner suitable under a centrepiece, mix a light fabric starch and spray evenly while shaping petals and leaves; press lightly and allow to dry thoroughly.
Round 2 :
Color variations: Swap the autumn palette for spring pastels or jewel tones for a different look. You can make three-motif or five-motif versions by adjusting motif counts and connecting fewer or more motifs in the join section.
Info :
Use fine sewing thread and a thin needle to make invisible stitches when attaching flowers if you want a very clean underside. Remember to weave tails back into the nearest round of stitches and trim close.
This layered lace runner brings the best of autumn indoors—handcrafted flowers, leafy accents and vintage-inspired lace make a beautiful centrepiece. Each motif is a little project of its own and together they form a warm, inviting runner you can be proud of. Take your time to shape and block, and enjoy the calming rhythm of lace crochet. 🧶🍁 Display it for seasonal cheer or give as a thoughtful handmade gift. Happy stitching and may each petal bring you joy! 🌼