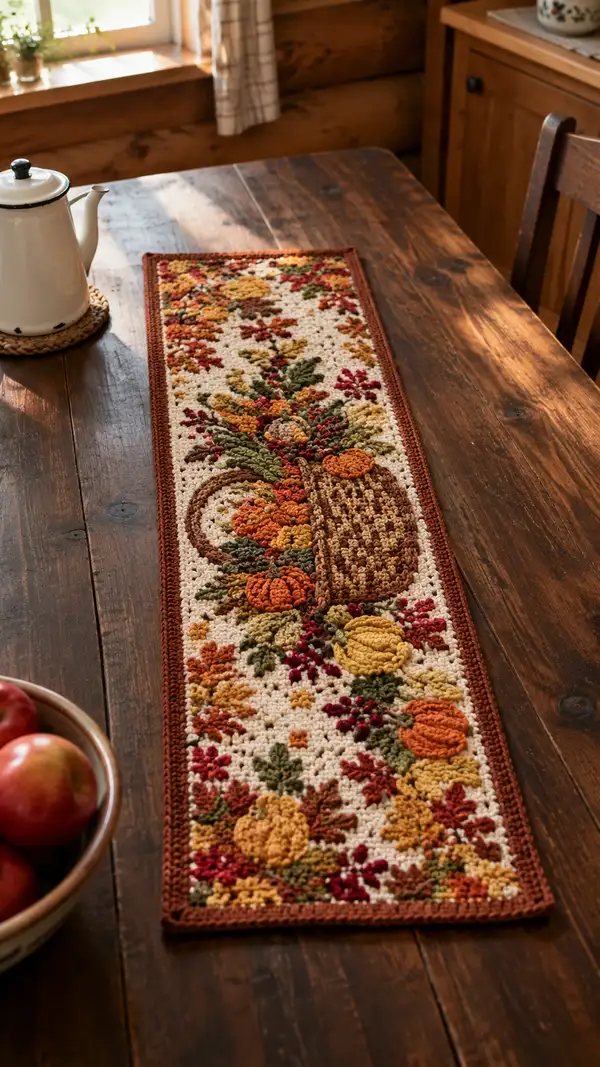
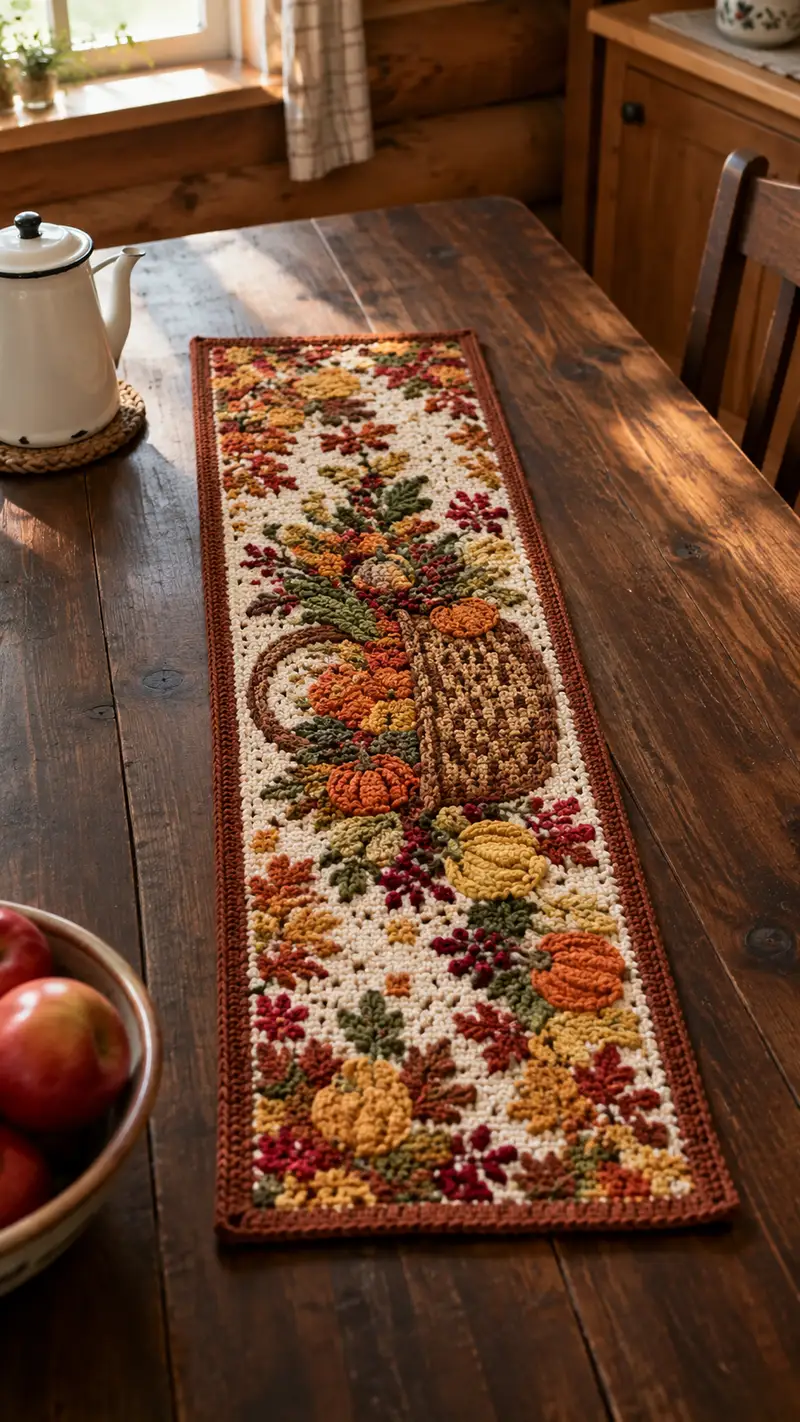
A warm, textured table runner inspired by a rustic autumn harvest scene. This rectangular runner features a cream background filled with raised pumpkins, a woven basket, scattered leaves, berries, and richly colored accents in autumnal rusts, golds, olive, and brown, finished with a deep rust border. The pattern uses single crochet background work with appliqued and surface-stitched textured motifs for a cozy, farmhouse-ready centerpiece. Suitable for crocheters who enjoy colorwork, textured stitches, and applique assembly.
Progress Tracker
0% Complete
— Notes & Gauge :
Info :
Runner is worked flat in rows, then motifs are made separately and sewn or surface-crocheted in place. Gauge is not critical but impacts finished size. With worsted yarn and 4.0mm hook, 16 sc x 18 rows = 4 in (10 cm) measured in dense single crochet. Adjust hook to match tension and desired density.
Info :
Finished approximate size: 14 in (35 cm) wide x 44 in (112 cm) long including border if following exact stitch counts below. Change foundation chain to lengthen or shorten runner in multiples of 1 stitch to keep motifs centered.
— Materials Prep :
Info :
Wind balls/two cakes for each color you expect to use frequently to avoid long carries across the row. Label small bobbins for embellishment colors and keep them near your work.
— Base Panel (worked in cream, RS faces up) :
Foundation :
ch 121. (This gives 121 foundation stitches for each row and a finished width of about 14 in with worsted yarn and 4.0mm hook.)
Row 1 :
1 sc in 2nd ch from hook and in each ch across, turn (120 sc). Note: the foundation ch counts as a stitch; this row will read as 120 sc because we skipped first chain as turning chain for a tight edge.
Row 2 :
ch 1, 1 sc in each st across working into the back bump of the foundation row for a neat edge, turn (120 sc).
Row 3 :
ch 1, 1 sc in each st across, turn (120 sc).
Row 4 :
ch 1, 1 sc in each st across, turn (120 sc).
Info :
Keep tension consistent; use stitch marker in first stitch of odd-numbered rows to mark row starts and prevent drift. Work tightly enough to avoid gaps showing when motifs sit on the surface.
Row 5 :
ch 1, 1 sc in each st across, turn (120 sc).
Row 6 :
ch 1, 1 sc in each st across, turn (120 sc).
Row 7 :
ch 1, 1 sc in each st across, turn (120 sc).
Row 8 :
ch 1, 1 sc in each st across, turn (120 sc).
Info :
These first 8 rows create a stable base and tidy edges. If you prefer a slighter more open fabric, replace every fourth row with a moss stitch (ch1, sc in next st, skip next st, sc in next) but maintain exact stitch counts across the row by adjusting starting position.
Row 9-12 :
Rep Row 5 (ch1, 1 sc in each st across) for rows 9-12, turn at end of each row (120 sc each row).
Row 13 :
ch 1, 1 sc in each st across. At this point place temporary markers where the major motif column will sit: measure 10 sts in from left edge and 10 sts in from right edge to mark inner motif boundaries for the basket and pumpkins; these help with later placement of appliques.
Row 14-20 :
ch 1, 1 sc in each st across for 7 rows, turn (120 sc). Work neat ends by inserting last sc under both loops of turning chain to hide tail.
Info :
Beginning on Row 21 you will work a series of 48 rows to create the length of the runner front field where most motifs sit. Keep a row counter labelled for the main motif area so you can align applique placement across the length.
Row 21-28 :
ch 1, 1 sc in each st across (120 sc). After Row 24, double-check that your motif markers are still visible and re-pin if necessary.
Row 29 :
ch 1, 1 sc in each st across. Info: If you wish to add subtle background color speckling, on this row switch to a single strand of rust and carry it behind for 6 sts then return to cream; keep carried floats no longer than 6 sts and secure every 12 sts with a loose slip stitch to avoid long floats.
Row 30-36 :
ch 1, 1 sc in each st across (120 sc). Continue to maintain even tension. These rows form the central panel bed where appliques will be attached.
Info :
Plan motif layout: major basket motif sits roughly centered between markers and begins around Row 40-44 area. Pumpkins will be appliqued along the midline and near the bottom third. Pin paper templates if needed to test size before crocheting appliques.
Row 37-44 :
ch 1, 1 sc in each st across (120 sc). After Row 44, begin preparing appliques: make 3 pumpkin motifs, 6 leaves of various sizes, several small berry bobbles and 1 basket motif as described below.
Info :
Stop working main panel when you have completed Row 44 here and set the panel aside if you plan to complete appliques first. Alternatively, continue the remaining rows and attach appliques after finishing the entire panel; attaching while the panel is flexible can be easier for placement.
Row 45-60 :
ch 1, 1 sc in each st across (120 sc). Work these 16 rows to create length beyond the main pictorial motif so pumpkins near the lower end have space. Maintain crisp edges by avoiding loose turning chains.
Info :
If you wish to intensify the texture under motifs use 1-2 rows of hdc alternated with sc to raise the motif slightly off the background. Keep track of rows carefully so you can line up motif placements.
Row 61-76 :
ch 1, 1 sc in each st across (120 sc). These rows complete the main field. After Row 76, leave panel and prepare border instructions; appliques can be added now or following the border depending on preference.
Row 77-80 :
ch 1, 1 sc in each st across (120 sc). Finish background field by working 4 rows of sc for a firm edge to support border stitches.
Info :
Fasten off and weave in ends if completing panel before appliques. If adding appliques directly to the working panel, do not fasten off; proceed to applique placement and sewing instructions below.
— Pumpkin Applique (Make 3; small, medium, large variations) :
Materials :
Use worsted yarn in burnt orange, golden yellow and rust for highlights. Small amount of stuffing per pumpkin (about 2-5 g each depending on size).
Pumpkin Small - Round 1 :
With burnt orange, mr, 6 sc in magic ring (6).
Pumpkin Small - Round 2 :
Inc in each st around (12).
Pumpkin Small - Round 3 :
(1 sc, inc) x 6 (18).
Pumpkin Small - Round 4 :
(2 sc, inc) x 6 (24).
Pumpkin Small - Round 5 :
(3 sc, inc) x 6 (30).
Info :
These increases build a flat disk that will be folded slightly and stuffed for a dimensional pumpkin. For a flatter pumpkin reduce to 4 rounds of increases instead of 5.
Pumpkin Small - Round 6 :
1 sc in each st around (30). Change to rust color on last stitch of this round for a highlight if desired.
Pumpkin Small - Round 7 :
(3 sc, dec) x 6 (24). Begin slight curvature.
Pumpkin Small - Round 8 :
(2 sc, dec) x 6 (18). Stuff lightly with fiberfill to create a gentle dome.
Pumpkin Small - Round 9 :
(1 sc, dec) x 6 (12).
Pumpkin Small - Round 10 :
6 dec (6). Fasten off leaving 8 in (20 cm) tail for sewing. Thread tail through a yarn needle and pull to close hole. Shape pumpkin by stitching vertical ribs: run yarn from top to bottom through center and back several times to create 6-8 ribs, pulling gently to form segments.
Info :
Make medium and large pumpkins by continuing increases: Medium add one extra increase round (to 36 sts) then follow shaping decreases; Large add two extra increase rounds (to 42 sts) and adjust subsequent decrease rounds to maintain symmetry. For medium: Round 5 produces 30, Round 6 (4 sc, inc)x6 => 36; then even rounds and decreases proportionally: after increases, 5 rounds even, then decrease rounds (5 sc, dec)x6 etc.
Pumpkin Medium - Rounds (summary) :
Round 1 6, R2 inc =>12, R3 (1,inc)x6 =>18, R4 (2,inc)x6 =>24, R5 (3,inc)x6 =>30, R6 (4,inc)x6 =>36, R7-9 even rounds 1 sc each (36), R10 (4 sc, dec)x6 =>30, R11 (3 sc, dec)x6 =>24, R12 (2 sc, dec)x6 =>18, R13 (1 sc, dec)x6 =>12, R14 6 dec =>6; fasten off, close and stitch ribs as above (counts adjusted to maintain math).
Info :
For pumpkin texture use puff stitches on the surface before finishing: in selected stitches on the top round (the widest round), make 5-loop puff stitches anchored with a sc between each; this creates the knobbly pumpkin skin visible in the photo.
— Leaf Applique (Make 6 small, 6 medium) :
Leaf Small - Round 1 :
With olive, ch 8, sc in 2nd ch from hook, hdc in next, dc in next, tr in next, dc in next, hdc in next, sc in last ch; turn work so leaf has a central ridge by working on opposite side of foundation chain: sc in first chain, hdc, dc, tr, dc, hdc, sc; sl st to first st to close (14 sts total including foundation). Fasten off leaving tail for sewing.
Leaf Medium - Round 1 :
Ch 10 and work as small leaf with one extra dc and hdc to lengthen, finish by sl st and add a central surface FPDC ridge: using chestnut brown, work front post double crochet along the central foundation to create a raised midrib (6 fpdc across). Fasten off, leaving tail for sewing.
Info :
For curled leaves block lightly with steam. Add small embroidered veins with matching darker green using a tapestry needle for realistic definition.
— Berry Cluster (Make many) :
Berry - Round 1 :
With burgundy, ch 2, 5 sc in 2nd ch from hook, sl st to first sc to close (5 sc). Fasten off leaving tail. Stitch clusters of 3-5 berries together with short lengths of yarn to form little berry sprigs. Attach to panel with a few securing stitches.
Info :
Alternatively use bobble or popcorn stitches worked directly onto the background field as you surface-crochet: at RS, insert hook into the sc where berry sits, yo and pull up 4 loops 3 times, yo and pull through all loops to create a small puff, anchor with sc behind.
— Basket Applique (1 large central motif) :
Basket - Round 1 :
With chestnut brown, ch 12, sc in 2nd ch from hook and across (11 sc), ch 1, turn. Work in rows to create an oblong basket body. Row 2: sc across 11, turn. Repeat Row 2 for total of 8 rows to produce a rectangle approx 11 x 8 sts. Fasten off leaving long tail for sewing.
Basket Body - Round 9 :
Join chestnut at end of a short side and work 1 row of fpdc and bpdc alternating along the long sides to create a woven basket texture: *fpdc in next st, bpdc in next st* across. Repeat 2-3 times to build texture and shadowing.
Basket Rim :
With a lighter brown or tan, pick up stitches along the top edge and work sc in each st, then work a row of crab stitch (reverse sc) along the inside edge to define the rim. Add handles by chaining a length and attaching ends to the rim with sl st and extra sc reinforcement.
Info :
Basket internal filler (flowers/greens) can be surface stitched directly to panel using small clusters of greens and berry bobbles. Lightly stuff basket body with fiberfill for a raised look before attaching to the background.
Basket - Final Shaping :
Sew long edges together with mattress stitch to curve slightly and create bowl shape. Use the long tail to sew basket body onto panel at desired placement, securing all around so basket sits flush with the runner surface and holds attached motifs.
— Surface Stitching & Raised Texture (detailed techniques) :
Info :
To place motifs accurately use pins: pin pumpkin centers, basket rim, and major leaf groups first. For raised pumpkins use surface puff stitches or attach finished pumpkin appliques by sewing through the base panel and the pumpkin back, leaving a shallow dome. For veins and stems use stem stitch created by surface slip stitches or embroidery with worsted yarn.
Surface Puff/Bobble :
To work a puff on RS: insert hook into designated sc, yo and pull up loop, repeat 3 more times (for 5 loops on hook), yo and pull through all loops, ch 1 to close puff, secure with a sc right after to anchor. Use this technique for pumpkins and berry clusters.
Surface Basket Weave :
Work front post dc and back post dc in alternating columns along the basket area directly on the panel to create raised ribs of a woven basket. Maintain 1 sc border around basket to blend edges.
Info :
Always anchor surface stitches by inserting into the background sc and pulling through tightly so they do not snag. Weave ends of embroidery yarn behind the surrounding stitches to hide and secure them.
— Attaching Appliques (placement & sewing) :
Info :
Place the basket applique approximately centered horizontally between earlier markers and about 14 rows from the lower edge of the pictorial field (this aligns visually with the photo). Pin in place at four sides and middle. Use matching chestnut yarn and mattress stitch to attach, sewing through both basket base edge and two background stitches for security.
Info :
Arrange pumpkins, largest near the basket mouth, medium slightly offset above, small one near the bottom edge. For natural composition, stagger leaves and berry clusters around pumpkins and along the runner edges. Sew appliques with invisible whip or ladder stitch and add a few anchor stitches into the background to prevent shifting.
Attachment Tip :
When sewing on dimensional pumpkins use a few stitches through the bottom center into the background and then through the inside lower stitches of the pumpkin to create a secure base without flattening the dome.
— Border (worked after appliques are attached) :
Info :
We recommend attaching appliques before the border is worked so you can hide applique tails under the border and stitch through the border for extra security.
Attach Border Round 1 :
Join rust yarn at any corner with sl st. Round 1: ch 1, work 1 sc evenly in each row-end and each end-of-row across the length edges, and 1 sc in each sts across the short ends, placing 3 sc in each corner to keep corners square. Maintain even tension. Around the entire piece you should work approximately 248 sc (this estimate depends on blocking and exact tension; evenly distribute sc along edges and place 3 sc in corners). Fasten off and weave in ends.
Border Round 2 :
Join rust yarn again with sl st. Work 1 sc in each sc around, place 3 sc in each corner to turn neatly. This forms the tidy first border row. Count should remain similar to Round 1 (about 248 sc). Fasten off and weave ends.
Border Round 3 (Decorative) :
Join yarn and work crab stitch (reverse sc) in each stitch around for a firm twisted edge and neat finish. Work 3 crab sts in each corner to maintain square corners. Fasten off and weave in ends. Block runner for final shaping.
Info :
Alternatively, use 1 round of hdc followed by 1 round of sc for a slightly thicker border. For a braided look use alternating fpdc/bpdc rows before the final crab stitch.
— Finishing Touches :
Info :
Trim all loose ends and weave them in behind motifs. Lightly steam-block the runner to even edges and flatten appliques. Use a sponge or cloth as a shield if steaming directly to avoid flattening puff stitches. Let dry flat overnight under weights if available to keep shape.
Final Assembly :
Once blocked, re-check applique security points. Add a small hand stitch at the back of heavy pumpkins or basket if they feel loose. If desired, add a backing fabric for extra stability by cutting a piece of cotton the exact size and blind-stitching it to the back edge under the border, enclosing all ends.
Info :
Label the runner with care instructions: Spot clean or hand wash cold, reshape while damp, lay flat to dry. Avoid machine washing to protect puff and popcorn stitches.
This autumn harvest runner brings hand-crafted warmth to your table with dimensional pumpkins, a woven basket, and scattered leaves—each stitch built with care and texture. The layered appliques and surface stitches make the motifs pop against a cozy cream background, creating a timeless farmhouse centerpiece. I hope you enjoy the meditative process of stitching these tiny details as much as you enjoy the finished piece on your table. 🧶🍁