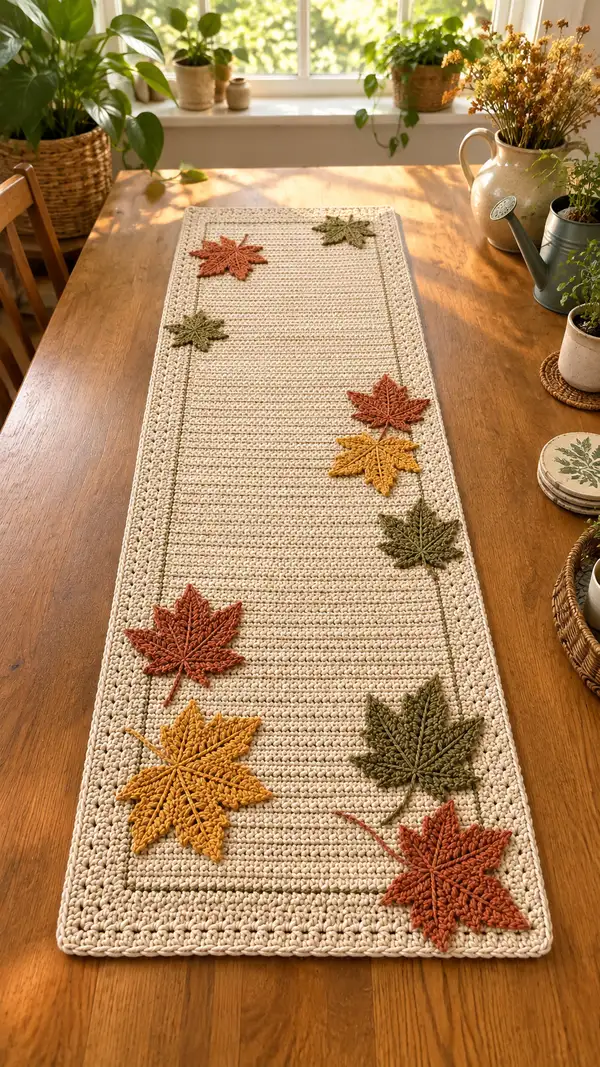
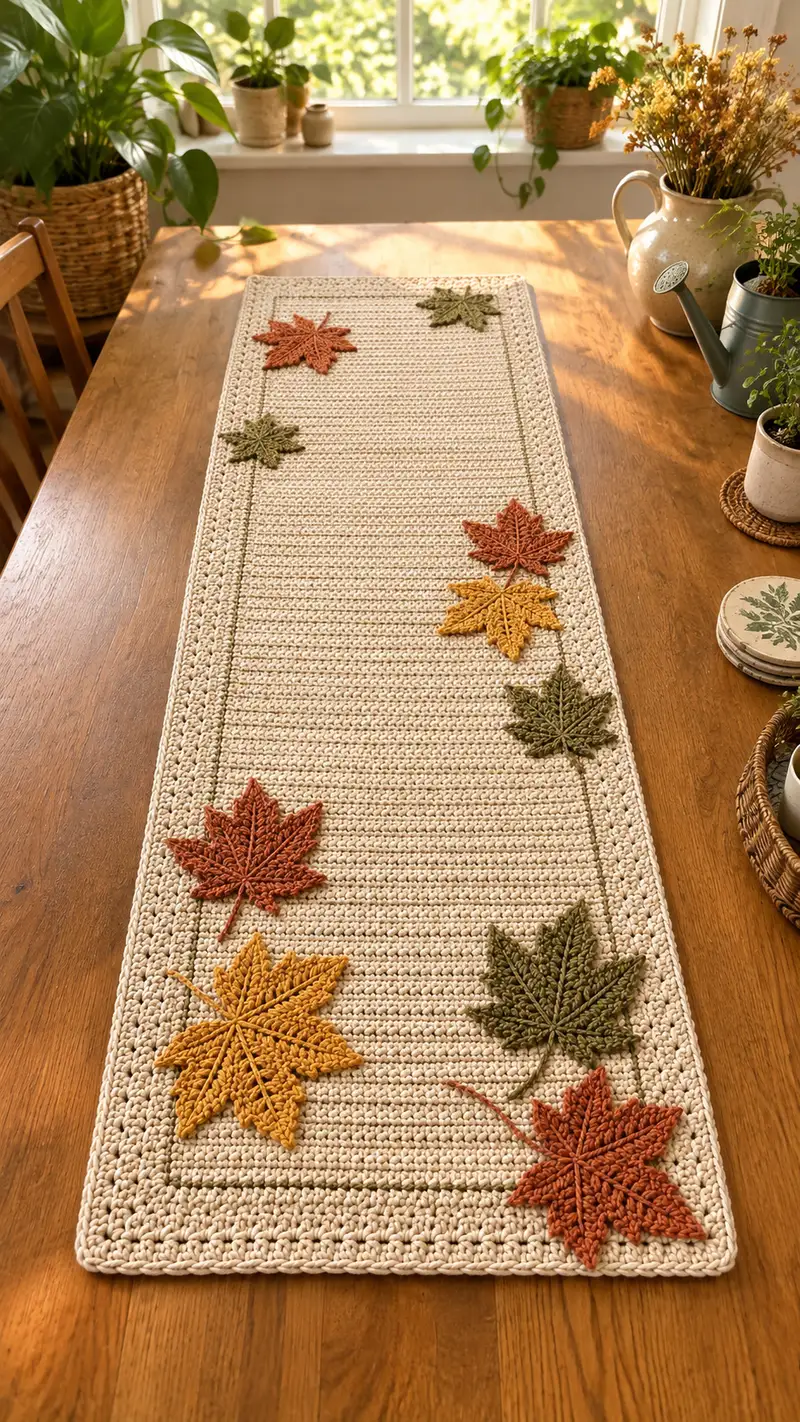
A cozy, long cotton table runner worked in warm cream with textured border and hand-sewn autumn leaf appliques in rust, mustard and olive. This runner features a simple, ridged body panel, an elegant framed outline and sculpted flat leaves you can arrange any way you like. Perfect for seasonal centerpieces or everyday farmhouse style—designed to be durable, washable, and beautiful on a wooden table.
Progress Tracker
0% Complete
— Runner Body (Main Panel) :
Materials & Gauge :
Use worsted weight cotton yarn and a 5.0mm (H) hook. Gauge is not critical for fit but for reference: 12 hdc x 8 rows = 2 in (5 cm) worked in BLO. The sample runner measures approximately 13.5" (34 cm) wide by 52" (132 cm) long after blocking.
Info :
Decide your finished width first. This pattern uses a foundation chain of 86 ch which yields 85 working stitches; adjust in multiples of 1 to change width proportionally. All rows are worked flat, turning at the end of each row.
Foundation :
Ch 86 (or ch to desired width + 1). This creates 85 foundation stitches to work into for Row 1 (85 sts).
Row 1 :
Hdc in 2nd ch from hook and in each ch across. Turn. (85 hdc)
Info :
Working HDC in back loop only (BLO) will create a subtle horizontal rib. In the sample I work Row 1 BLO and continue BLO for the central field rows for texture. Mark the first stitch of each row with a stitch marker during the first few rows to maintain neat edges.
Row 2 :
Ch 1, turn. Hdc BLO in each st across. (85)
Row 3 :
Ch 1, turn. Hdc BLO in each st across. (85)
Row 4 :
Ch 1, turn. Hdc BLO in each st across. (85)
Info :
Check width now. The panel should lay flat. If your edges ripple, try a slightly smaller hook for the first few rows; if edges draw in, try a larger hook for a relaxed edge.
Row 5 :
Ch 1, turn. Hdc BLO in each st across. (85)
Row 6 :
Ch 1, turn. Hdc BLO in each st across. (85)
Row 7 :
Ch 1, turn. Hdc BLO in each st across. (85)
Row 8 :
Ch 1, turn. Hdc BLO in each st across. (85)
Info :
We will work a long central field. The sample uses 120 rows total for a runner approximately 52" long. If you want a longer runner, simply add more rows in multiples of 1; for a shorter runner stop earlier - keep the final size even with your border plans.
Rows 9-20 :
Ch 1, turn. Hdc BLO in each st across. Repeat for each row. (85 each row)
Info :
Place removable stitch markers at rows 30, 60 and 90 if you want to visually divide the runner for applique placement. The sample appliques are positioned roughly at rows 6-12 from either end and staggered along one side.
Rows 21-40 :
Ch 1, turn. Hdc BLO in each st across. Repeat for each row. (85 each row)
Info :
If you prefer single crochet ridges instead of hdc, swap to sc BLO; note gauge will be slightly different and you may need extra rows to achieve the same length.
Rows 41-60 :
Ch 1, turn. Hdc BLO in each st across. Repeat for each row. (85 each row)
Info :
Check for curling along the long edges periodically. If an edge starts to pull upward, try an extra stitch at the beginning or end of problematic rows for a few rows to relax tension, then return to original stitch count.
Rows 61-80 :
Ch 1, turn. Hdc BLO in each st across. Repeat for each row. (85 each row)
Info :
At approximately 110-120 rows you will be nearing the desired length for this sample. The exact row count will depend on your gauge. Measure the runner against your table as you go to get the length you prefer before adding the border.
Rows 81-100 :
Ch 1, turn. Hdc BLO in each st across. Repeat for each row. (85 each row)
Rows 101-120 :
Ch 1, turn. Hdc BLO in each st across. Repeat until you reach your desired length. Sample stopped at Row 120 for 52" total length. (85 each row)
Info :
Fasten off after the last row and weave in the short tail for a neat edge. Block the main panel flat to even out the stitches before adding the inner framed line and outer border.
— Inner Framed Line (Surface Stitch) :
Info :
We will add a simple framed line in olive green roughly 6-8 rows in from the edges of the runner. Work a surface slip stitch or surface single crochet following a guide line. Block your panel first for an even work surface.
Step 1 :
With olive yarn and a yarn needle, bring yarn up at the right side edge approximately 6 rows from the end at Row 6 position. Hold yarn on top of the fabric and insert the needle into the next stitch 6 rows over following a straight guideline parallel to the long edge.
Step 2 :
Surface sl st: pull a small loop through on the surface, then insert the needle one stitch forward along the guideline and pull yarn through to create a smooth line. Continue along the long side until you reach the corner; work around each corner with a gentle curve, keeping one consistent stitch spacing. Repeat on the opposite long side and both short ends to create a full rectangle frame.
Info :
Alternatively, you can work a thin sc border in olive by sl st'ing the olive yarn along the edge then working a round of sc in the olive in the same placement. The surface sl st gives the subtle inset line seen in the sample.
— Outer Border (Worked in Rounds) :
Info :
The outer border creates the raised rope-like frame around the runner. This is worked in rounds all around the blocked central panel. Use the same cream as the main panel. Work evenly with increases at the corners to keep the rectangle flat.
Round 1 (Attach Border) :
Join cream yarn at a corner with sl st. Ch 2 (counts as first hdc). Work hdc evenly along the short side into ends of rows (work one hdc in each row-end loop) until you reach the next corner. Work 3 hdc into corner space. Continue along the long side placing 1 hdc in each end of row across. At each corner work 3 hdc. Repeat around until you return to the beginning. Sl st to the top of beg ch-2 to join. (Maintain approximately one hdc per row on the long sides and one hdc per stitch on the short ends; stitch count will be proportional to your row count.)
Info :
Because the runner is a long rectangle, count your stitches on one short side and one long side and multiply; you will see that the number varies by how many rows you worked. The important part is consistent spacing and 3 hdc in each corner to keep it flat.
Round 2 :
Ch 2, turn. Work 1 hdc in each st around, placing 3 hdc in each corner stitch from previous round. Join with sl st to beg ch-2. This evens up the border and creates a firm edge for the outer rope. (Stitch count mirrors previous round.)
Round 3 :
Ch 2, turn. Work 1 hdc in each st around; join. (Same as Round 2)
Info :
Optional: For a rope-like outer edge, switch to dc clusters on the next round. The sample uses 2 rounds of hdc then a final round of dc-shell to create a soft, cushioned outer edge.
Round 4 :
Ch 3 (counts as dc). *Sk next st, 5 dc shell in next st, sk next st, 1 dc in each of next 3 sts; rep across side; at each corner work (1 dc, ch 1, 1 dc) into the corner space to form a smooth corner. Join with sl st to top of ch-3. This creates a scalloped shell border.
Info :
If you prefer a plainer look, work Round 4 as 1 dc in each st instead of shells. The shells create the rope-like raised outer frame in the sample runner.
Round 5 :
Ch 1, sl st into the center of each shell to accentuate the scallop. Work 1 sc evenly around if you prefer a neat finishing edge. Fasten off and weave in ends. Block lightly once more to set the border.
— Maple Leaf Applique (Make 7 assorted sizes) :
Info :
Leaves are worked flat with a central spine and mirrored sides. Each leaf uses a small foundation chain; the pattern below is for a medium-sized leaf similar to those in the photo. Make larger leaves by lengthening the foundation chain by even numbers and increasing ridge counts proportionally. Make 7 leaves in the colors shown: 2 rust, 2 mustard, 3 olive (or any arrangement you prefer).
Leaf - Foundation Row :
Using 4.5mm hook and chosen leaf color, ch 13. (13)
Row 1 :
Sc in 2nd ch from hook and in next 5 ch (6 sc), 3 sc in next ch (center tip), then sc in next 5 ch, sc in last ch (mirror). Do not turn; continue working along the opposite side of foundation chain: sc in next 5 ch, 3 sc in next ch (center), sc in next 5 ch, sl st to first sc to join. You have created a small oval foundation with a defined center point.
Info :
The above method creates a continuous oval base for leaf shaping. For a sharper maple point, you can instead work a longer foundation chain and shape the lobes with increases and decreases as shown in subsequent rows.
Row 2 :
Ch 1, turn. Work along one side only: sc in next 3 sts, hdc in next 2 sts, dc in center st (the tip), hdc in next 2 sts, sc in next 3 sts. Sl st to next unworked st on the opposite side, repeat mirrored stitches across opposite side: sc x3, hdc x2, dc center, hdc x2, sc x3. Fasten off center point and rejoin for shaping of lobes if desired. (This establishes a small central raised tip.)
Info :
To create the characteristic maple lobes and serrated edges, we'll work short rows that increase toward the center and decrease at the tips. For realism use surface slip stitches or post stitches for the veins.
Row 3 (Vein & Lobe Base) :
Rejoin at the base of a lobe. Ch 1. *Sc in next 2, hdc in next 2, dc in next 1 (toward center), hdc in next 2, sc in next 2; sl st into the base along the center seam to create the central vein. Repeat around each of the 5 lobes of the leaf (left, top-left, top-center tip, top-right, right). Fasten off. (Work symmetry for all lobes.)
Row 4 :
Working back along each lobe edge, pick up from the base and sc in next st, sc2tog to create a small point, then sc in next 2, sc2tog, then sl st to center. This short-row shaping sculpts the serrated edges of each lobe. Repeat for each lobe. (Keep counts even so both sides mirror.)
Info :
For the leaf stem, leave a tail of yarn at the base of the leaf about 8-10" long. You will braid or surface crochet a thin stem and stitch it onto the runner. If you want a raised vein look, use a contrasting darker color and a surface slip stitch to stitch a central line from tip to base.
Row 5 (Finishing Detail) :
Using a smaller hook if desired (4.0mm), pick up the center seam and work 1 sc into each top edge stitch to give a neat outline around the leaf. At each serrated point work 2 sc into the tip to make it slightly pronounced. Fasten off and weave in ends. Block the leaf flat, shaping each lobe, pinning to shape while damp.
Info :
Alternate method for leaf (clear, defined veins): work the base leaf as a symmetrical triangle using increases to the center and decreases thereafter, then use a tapestry needle and yarn surface embroidery to stitch veins. Both methods produce realistic leaves; choose your favorite technique.
Leaf Variation - Larger Size (Optional) :
Ch 17 foundation for a larger leaf. Build with similar row shaping but increase counts across lobes: sc in next 4, hdc x3, dc center, hdc x3, sc x4, and mirror back. Add an extra shaping row to increase width of lobes before finishing with sc edging. Make 2 large leaves in the sample (rust and olive).
Info :
Make leaves in assorted sizes: 2 large, 2 medium, 3 small. Block all leaves flat. Leaves will look most realistic if the veins are added with contrasting yarn using surface slip stitch or yarn embroidery after blocking.
— Leaf Vein Embroidery & Stem :
Step 1 (Central Vein) :
Thread a tapestry needle with a length of darker olive or brown yarn. Bring needle up at the base center of the leaf. Using a simple running or back-stitch follow the center line to tip, creating short stitches on either side to mimic branching veins. Secure yarn at base and weave in tail under the leaf.
Step 2 (Side Veins) :
Create 3-4 small angled veins on each lobe: bring needle up along center line, stitch out diagonally following the ridge of the lobe, then return to center line; space evenly. Keep stitches short and tidy for a delicate look.
Step 3 (Stem) :
Use the long tail left at the base. With the yarn tail, braid or twist into a thin stem about 2.5-3.5" (6-9 cm) long, or surface crochet a stem directly onto the runner. Secure the stem tail under the leaf and weave tidy ends. Optionally, stiffen stem with a dab of fabric glue for additional stability before sewing onto the runner.
Info :
If you want a slightly raised stem, sandwich a tiny length of pipe cleaner inside the yarn stem before folding and stitching; fold the ends of the pipe cleaner under and wrap to hide the metal for safety.
— Assembly & Placement :
Info :
Arrange leaves on the blocked runner before sewing. The sample layout uses a cluster of 3 leaves near one end, spaced by about 1-2"; a single large leaf near the center-right and two smaller leaves scattered toward the opposite end to create balance. Play with your layout until you are happy.
Step 1 :
Pin each blocked leaf into place through the border into the main panel using sewing pins. Leave stems angled outward slightly for a natural fall. Check spacing against table décor to ensure balance.
Step 2 (Sew Leaves) :
Using matching yarn and a yarn needle, whip stitch leaves to the runner along the base seam and lightly tack points along the lobes so leaves lie flat. Use small, neat stitches and secure each stitch well. For extra durability, work three passes along the base of the stem area and weave in ends on the back of the runner.
Info :
Avoid sewing through the border rounds where possible; tack leaves to the central panel so the border retains flexibility. If you want removable leaves, instead stitch on small snaps or buttons to the backside of the leaf and to the runner panel.
Step 3 (Final Touches) :
Weave in all loose ends at the back of the runner. Lightly steam or wet-block the runner once more to even stitches and set the appliques. Trim any stray fibers and check that the runner sits flat and even on your table.
Info :
If you plan on washing, hand-wash gently in cool water and lay flat to dry. Cotton may shrink slightly; blocking after washing will restore shape.
— Optional: Alternate Leaf Technique (Broomstick Lace Vein) :
Info :
This optional technique creates a lacy, vintage leaf using broomstick lace loops for dramatic veins. Use a larger hook to create long loops, then work a round of sc around loops to create points. It adds texture but is more advanced. Use 4.5-5.0mm hook and follow broomstick lace tutorials for loop counts matching your leaf size.
Step :
Work long loops along a foundation chain using a large hook or knitting needle as guide, group loops to form lobes, then anchor with sc rounds to create triangular lobes. Embroider veins in contrasting color. Finish with stem as described above.
Info :
This method is decorative and will produce lighter, more airy leaves — perfect for a delicate seasonal runner but less practical for heavy daily use.
Completing this runner is a wonderfully satisfying project—clean rows, a textured frame and pretty leaf appliques come together to create seasonal charm. Each stitch contributes to a cozy, handmade centerpiece you’ll love to display. 🧶🍂 Enjoy arranging the leaves and changing them with the seasons—this pattern is made to be treasured and used. Happy stitching and proud displaying! 🌿✨