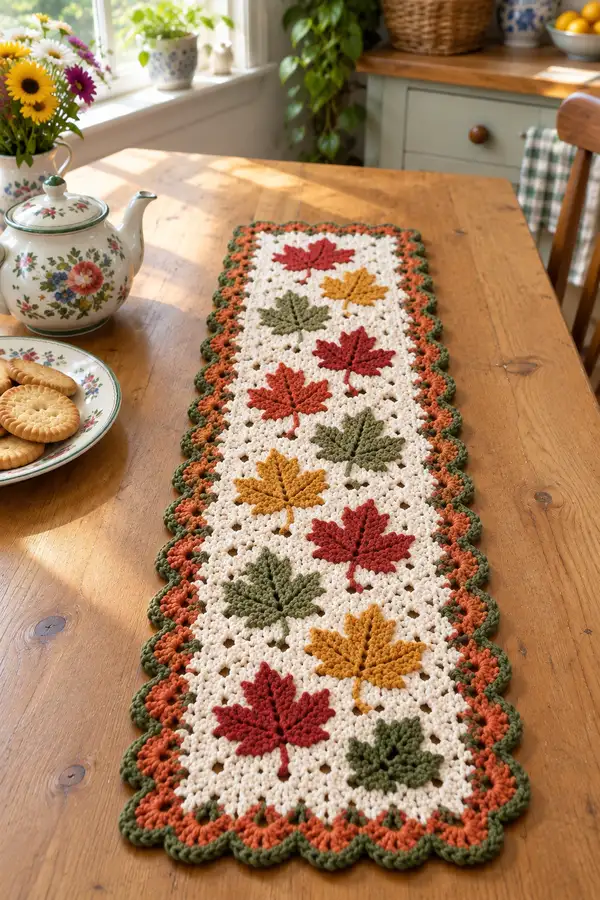
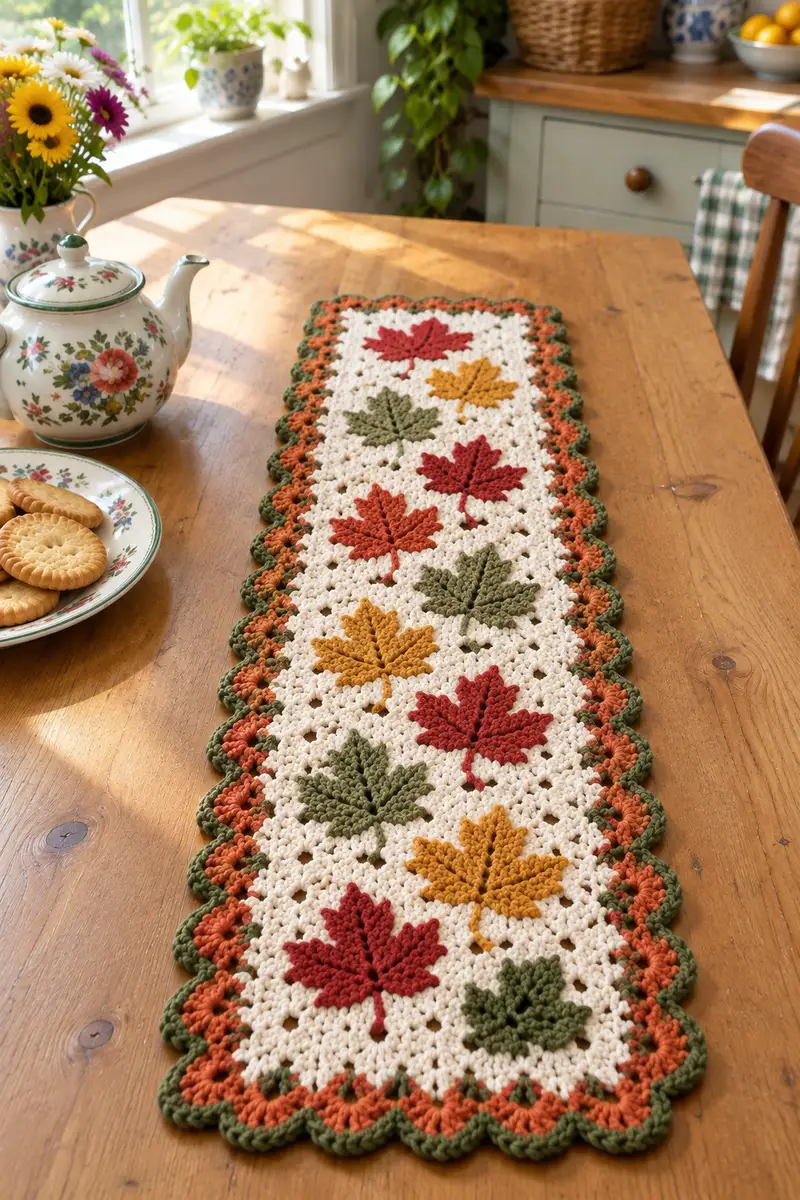
A warm, seasonal table runner featuring textured maple leaf appliques set on a soft cream granny-mesh background with a scalloped autumn-hued border. This pattern uses color changes, simple cluster stitches and a decorative scallop edge to give a handmade heirloom look. Perfect for dressing a dining table, buffet or sideboard during fall gatherings and cozy afternoons.
Progress Tracker
0% Complete
— Pattern Notes & Gauge :
Info :
Gauge is not critical for this decorative runner but will affect final size. Using worsted weight yarn and a 4.0mm hook, each granny cluster row measures approximately 0.5" - 0.6" in height and each cluster repeat (one shell across) measures roughly 0.5" in width. The sample runner as written measures approximately 12" wide x 40" long after blocking (including scalloped border).
Info :
Terminology: In this pattern 'round' refers to a worked row when working flat. Work in continuous rows as described; turn at end of each row unless otherwise noted. Use stitch markers to mark the first stitch of each row during the base panel so leaf placement references are accurate.
— Base Panel (Granny Mesh Rectangle) :
Info :
We will work the base panel as a repeating granny-mesh worked in rows. The foundation chain is built to give 30 shell repeats across (adjust number of repeats in multiples of 3 to shorten or lengthen). The foundation chain here is ch 183 to produce a 30-cluster width. If you prefer wider or narrower, add or remove clusters in multiples of 3 chains plus the turning chain. The counts shown below track cluster counts rather than individual stitches for clarity.
Row 1 :
Foundation chain: ch 183. Turn. (This creates 30 cluster positions across.)
Row 2 :
RS: Skip first ch, 3 dc in 4th ch from hook (counts as first cluster), *ch 1, skip 1 ch, 3 dc in next ch; rep from * across to last 2 ch, 1 dc in top of turning chain. (30 clusters + edge sts)
Row 3 :
Turn. Ch 3 (counts as dc), 3 dc in first ch-1 sp, *ch 1, 3 dc in next ch-1 sp; rep from * across; end with 1 dc in top of turning ch. (30 clusters)
Info :
Maintain this cluster pattern for the body of the panel. Each full row contains thirty 3-dc clusters separated by ch-1 spaces. Mark the first stitch (the first ch-3 or first dc) of every row for reference.
Row 4 :
Repeat Row 3. (30 clusters)
Row 5 :
Repeat Row 3. (30 clusters)
Info :
Place stitch markers at the start of rows 12, 24, 36, 48, 60, and 72 to mark leaf-row reference lines for applique placement. These marks will help you keep leaves evenly spaced down the runner.
Row 6 :
Repeat Row 3. (30 clusters)
Row 7 :
Repeat Row 3. (30 clusters)
Row 8 :
Repeat Row 3. (30 clusters)
Info :
Work in cream/ivory for all base panel rows unless instructed otherwise. Keep tension even for a flat panel—avoid pulling too tightly in chain-1 spaces which can pucker the fabric.
Row 9 :
Repeat Row 3. (30 clusters)
Row 10 :
Repeat Row 3. (30 clusters)
Row 11 :
Repeat Row 3. (30 clusters)
Info :
If you want to add an extra 'breathing row' under leaf placement for visual separation, work one additional Row 3 in cream before placing leaves. The sample sets leaves with every 6 rows between centers.
Row 12 :
Repeat Row 3. (30 clusters) — Mark this row as Leaf Placement Row A (first set of leaves will be centered on the ch-1 spaces of this row).
Row 13 :
Repeat Row 3. (30 clusters)
Row 14 :
Repeat Row 3. (30 clusters)
Row 15 :
Repeat Row 3. (30 clusters)
Info :
The pattern of placing leaves is: rows marked A, B, C etc down the panel spaced every 6 rows. For the sample runner we place leaves centered on Row 12 (A), Row 24 (B), Row 36 (C), Row 48 (D), Row 60 (E), Row 72 (F) and Row 84 (G) to create a staggered set of 7 leaf rows (two leaves per row across the central columns or three columns depending on your layout).
Row 16 :
Repeat Row 3. (30 clusters)
Row 17 :
Repeat Row 3. (30 clusters)
Row 18 :
Repeat Row 3. (30 clusters)
Row 19 :
Repeat Row 3. (30 clusters)
Info :
Continue working even until you reach the next marked Leaf Placement Row. Keep the same color for entire base panel to make appliques pop.
Row 20 :
Repeat Row 3. (30 clusters)
Row 21 :
Repeat Row 3. (30 clusters)
Row 22 :
Repeat Row 3. (30 clusters)
Row 23 :
Repeat Row 3. (30 clusters)
Row 24 :
Repeat Row 3. (30 clusters) — Mark as Leaf Placement Row B.
Info :
By repeating these sets you will create a long strip that matches the sample layout. If you need a longer runner, add sets of six rows (one leaf placement row plus five filler rows) to add length in consistent increments.
Row 25 :
Repeat Row 3. (30 clusters)
Row 26 :
Repeat Row 3. (30 clusters)
Row 27 :
Repeat Row 3. (30 clusters)
Row 28 :
Repeat Row 3. (30 clusters)
Row 29 :
Repeat Row 3. (30 clusters)
Info :
Continue in this manner until you have completed Row 90. The sample runner uses Row 90 as the final background row before beginning the border. The following rows 30–90 are all repeats of Row 3. For brevity each intervening repeat is not listed separately here but should be repeated as 3-dc clusters separated by ch-1 spaces, maintaining 30 clusters per row.
Row 30-90 :
Repeat Row 3 across each row to Row 90. (30 clusters each row)
Info :
Fasten off cream after Row 90 and weave in ends neatly on the WS. Block the panel flat to remove any curl before applique placement if desired. Blocking will make applique stitching easier and more accurate.
— Maple Leaf Applique (Make 14 leaves or as desired) :
Info :
Leaf pattern is worked flat with color changes for different leaves. Use a 3.5mm hook if you prefer tighter detail, or match the base hook for consistent height. Each leaf is approximately 3.5" - 4" wide depending on tension. Work one leaf fully, then make the number needed (sample uses 14 leaves: 2 columns of 7 leaves staggered).
Round 1 :
With leaf color, ch 9. (9 ch)
Round 2 :
Row 1: sc in 2nd ch from hook, sc in next 6 ch, 5 sc in last ch (turn work to work along the opposite side of foundation ch), sc in next 6 ch, sc in final ch. (Total sts: 6 sc along each side + 5 sc at tip = 17 sc)
Round 3 :
Ch 2 (counts as hdc), hdc in same st, *skip 1 st, (3 dc, ch 1, 3 dc) in next st (make a mini-shell to form a lobe), skip 1 st, 2 hdc in next 2 sts; rep across symmetrically to create 5 lobes; end with 2 hdc in base. (Leaf has 5 lobes across with hdc joins, visual count = 5 lobes)
Info :
This row forms the center lobes of the leaf. Work shells deliberately to develop texture. You will create a central stem later with a surface slip-stitch or embroidered tail.
Round 4 :
Ch 2, turn. Work around the edge placing (2 hdc, 3 dc, sl st) into the center of each shell to elongate each lobe and create serrated leaf edges. At base add 3 hdc to round shape. (This rounds increases lobe depth; leaf now more sculpted.)
Round 5 :
Ch 1, sc evenly along edge placing (sc, ch 1, sc) around each small point formed by the tops of shells to make defined serrations. Work a small increase (2 sc) at the widest point on each side of the center lobe to ensure symmetry. (Edge shaping complete)
Info :
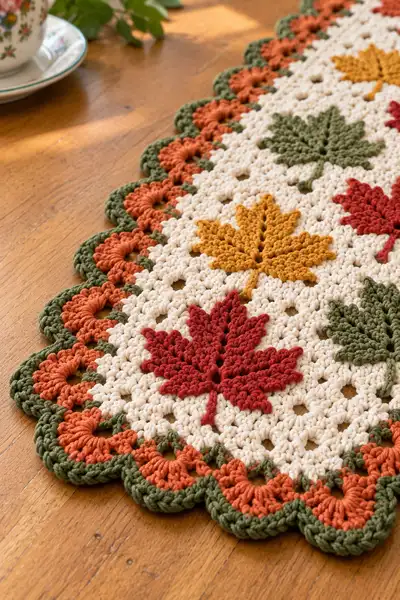
At this point your leaf will look like a rounded multi-lobed shape. We will create the characteristic maple serrations with surface slip-stitch ridges next - these create the vein texture visible in the photo.
Round 6 :
Spin leaf so RS faces up. Using the same color, working from base toward tip, create surface slip-stitch veins: insert hook from front to back at base point, sl st to first lobe point, continue sl st in a zig-zag to form one primary vein at center (about 8-10 sl sts), fasten off. Repeat on each lobe side creating mirrored veins using approx 5-7 sl sts per secondary vein. (Creates raised veins.)
Round 7 :
Using contrasting color for minor accent (optional), embroider small connecting veins between lobes by using backstitch with yarn needle and small length of yarn; weave secure ends on WS. (This step is optional but gives visible stitched vein texture like photo.)
Round 8 :
Optionally block each leaf lightly on a mat to shape edges. Pin points of lobes gently and spray with water or steam then allow to dry. Do not over-dampen; just enough to set shape. Fasten off leaving long tail for sewing through WS for attachment.
Info :
Repeat leaf pattern in colors as desired: autumn red, pumpkin orange, mustard gold, olive green. Make 14 leaves for sample layout (7 per side in two staggered columns). Keep consistent orientation so all stems point toward center of runner (or alternate as you prefer).
— Leaf Stem (optional embroidered stem each leaf) :
Round 1 :
After leaf is positioned, use matching leaf color and yarn needle to embroider a short stem extending 6-10 mm from leaf base onto the cream background. Use a tightly spaced chain stitch or double running stitch to create a neat raised stem.
Info :
Make stems short and tapered—photo shows short stems about 0.5" long. Secure ends on WS with small knots or weave in ends. For a more sculpted stem, you can crochet a chain of 6 with a tiny sl st along its length, then sew that chain in place.
— Placement & Sewing Appliques :
Info :
Work on the blocked base panel. Lay the panel RS up and divide it visually into three vertical columns: left, center, right. The sample runner places leaves in two columns of seven leaves staggered down the center two-thirds of the runner, with small single leaves filling outer positions. Use the marked Leaf Placement Rows (12, 24, 36, 48, 60, 72, 84) to center leaf motifs vertically.
Info :
To position each leaf horizontally: count clusters across. The base panel has 30 clusters; place leaf centers on cluster positions 8, 16 and 24 for three-column layouts, or 10 and 20 for two centered columns. Pin each leaf with applique pins or small safety pins on the RS, checking symmetry before stitching.
Round 1 :
Sewing: With cream yarn needle or matching leaf yarn, use ladder stitch (invisible mattress stitch) around the leaf base using the long tail left from leaf. Sew through the WS of the leaf and into the ch-1 spaces surrounding the chosen cluster so the leaf is firmly tacked to the background. Work 8-10 evenly spaced small stitches along the base and then additional catch stitches around the lobes—avoid large visible stitches on RS.
Info :
After sewing each leaf, arrange and stitch the stem into place with a few small stitches. Remove pins. Repeat for all leaves. Weave all tails into the WS to avoid visible strands on the RS.
— Decorative Scalloped Border (Three-Round Scallop Layer) :
Info :
Border is worked around the entire panel after all leaves are attached. Work with pumpkin orange first to build the inner scallop row, then add green outer scallops. Ensure the panel is flat and edges are even before starting. Work along each edge turning corners with additional stitches to preserve the scalloped rhythm.
Round 1 (Border Base - join orange) :
Join pumpkin orange with a sl st to any stitch on edge RS. Ch 1, evenly sc around edge of panel placing approx 1 sc per 3 dc cluster or every ch-1 space along mesh edge; at corners place (sc, ch 2, sc) to turn. Place 4 sc into each corner to allow for scallops. (Work measured as even sc placement; count per side will vary slightly depending on blocking.)
Info :
Maintain even tension and count scs as you go. For the sample with 30 clusters across and 90 rows, expect approximately 120-130 sc on long sides and 30-34 sc on short ends per pass—adjust slightly to keep scallops even.
Round 2 (Inner Orange Scallops) :
*Ch 3, skip 2 sc, 7 dc in next sc (creates large puff shell), skip 2 sc, ch 1, sl st into next sc; rep from * across each side. At corners work 9 dc in turning sc to make rounded corner scallop. End with sl st to join then turn panel to work outer row. (Creates deep orange scallops.)
Info :
When working corners, treat the corner block as its own mini-arc: 3 sc spacing then 9 dc shell to create smooth rounded corner. Count the number of scallops per side as you go to keep outer green scallops aligned.
Round 3 (Outer Green Scallops) :
Join olive green with sl st at the base of any orange scallop. Ch 2, 6 hdc across top of orange shell evenly (work around the top of the orange shell into its dc stitches), sl st into orange ch-3 gap, *ch 2, 1 sc into orange shell gap, ch 2, 7 dc in next orange shell top; rep from * across sides; at corners work 11 dc in corner shell and finish with sl st join. (Creates an overlapping green scallop that frames the orange.)
Info :
The double-layer scallop (orange then green) replicates the layered border seen in the photo. The green outer scallop sits slightly offset from the orange to create depth. Keep consistent counts across each side so scallops mirror opposite sides.
Round 4 (Optional Edge Finishing) :
If you prefer a defined outer ridge, join cream or a contrasting color and sc around the outermost edge (through the back loops only of the green hdc shells) to create a tidy ridge. Fasten off and weave in ends invisibly on the WS.
Info :
Weave in all tails and block the entire runner flat using blocking mats, gently stretching scallops to a pleasing rhythm. Pin scallops equal distance apart and allow to dry fully for crisp edges.
— Finishing Touches & Optional Variations :
Info :
Optional embroidered veins on the leaves can be added after sewing leaves into place for extra definition. Use a blunt yarn needle and surface slip stitch in a slightly lighter or darker tone than the leaf to create soft shadows. You may also add small embroidered accents (tiny French knots) at leaf bases in stem color for detail.
Info :
Variation: create a shorter runner by stopping at Row 48 or 60 of the base panel and preserving the same border instructions. To make a square placemat-size version, reduce base clusters across and rows down proportionally and use the same scalloped edge steps.
Info :
Care: Lightly spot-wash or hand wash in cool water and lay flat to dry to preserve shape and colors. Re-block lightly after washing if scallops become distorted.
This autumn runner brings a cozy, handmade touch to any table and is full of texture and seasonal color. The sculpted maple leaves sit beautifully against the cream mesh and the layered scalloped edge gives a finished, polished silhouette. It makes a perfect gift for fall hosts or a warm accent for your own home — every stitch adds a bit of handmade charm. Enjoy the rhythmic repeat of granny rows and the satisfying detail of leaf appliques as your runner comes to life! 🍁🧶