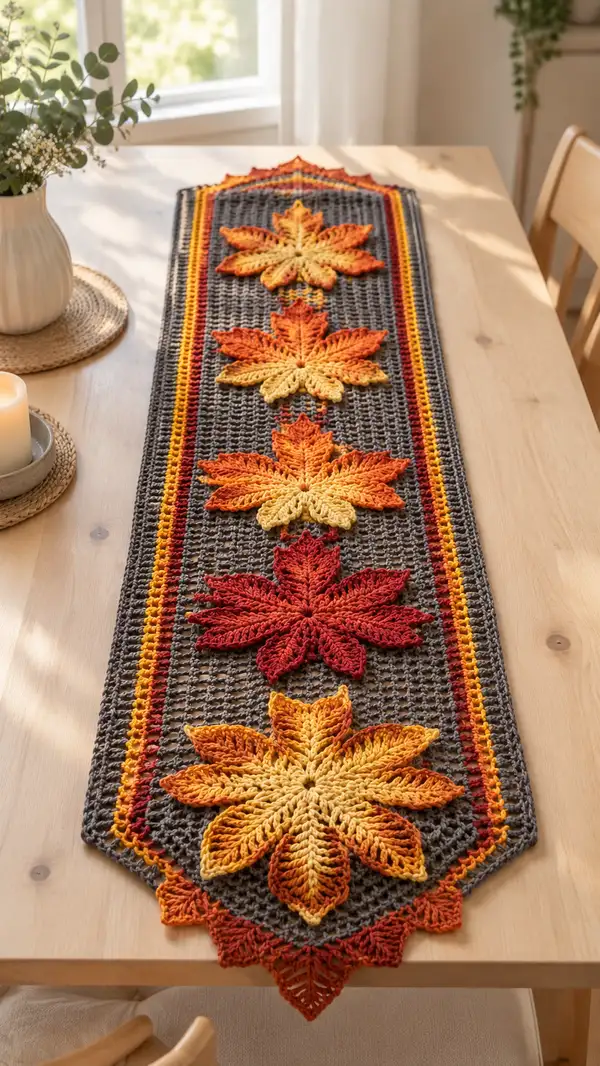
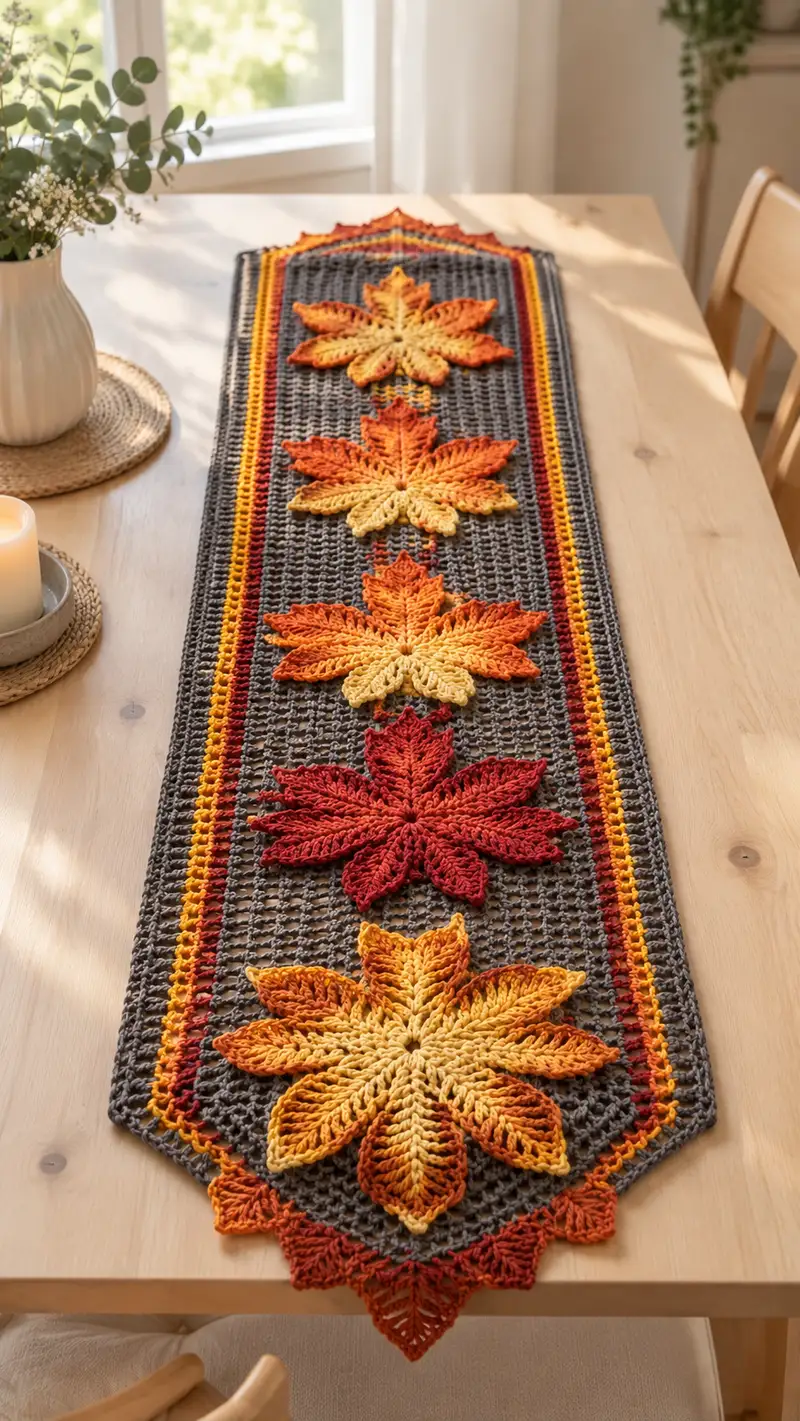
A long, elegant autumn table runner featuring five layered crochet leaves in seasonal gradient shades on a warm charcoal mesh background. The runner combines openwork mesh, bold color-stripe borders, and dimensional leaf appliques to create a cozy centerpiece. Perfect for fall tables, holiday decorating, or gifting, this pattern uses simple stitches with intermediate shaping to achieve a professional finish. Includes detailed placement and finishing tips to recreate the layered leaves and decorative pointed ends.
Progress Tracker
0% Complete
— Notes and Gauge :
Info :
Gauge is not critical for this decorative runner, but using the recommended hook and yarn will produce similar proportions. With worsted cotton and a 4.0mm hook, expect roughly 6-7 dc per 4cm in solid sections and a light open mesh when worked as written. The finished runner pictured measures approximately 13" (33cm) wide by 48" (122cm) long. Adjust foundation chain and number of mesh rows to lengthen or shorten the runner.
Info :
Throughout the pattern 'Round' labels refer to working sequential rows or rounds as needed. Use stitch markers at the beginning of each row for long panels to avoid lost counts. All stitch counts are calculated for even, repeat-based progression—verify counts periodically.
— Leaf Motif (Make 5: 2 Large, 2 Medium, 1 Small - adapt colors) :
Round 1 :
Make a small loop: ch 4, sl st to first ch to form small ring. Into ring: ch 1, 8 sc in ring. Join with sl st to first sc (8)
Info :
Work leaves in gradient or solid colors. For the layered look alternate color bands every 2-4 rounds to create a natural blended appearance. If using variegated yarn, one skein can produce multicolored leaves.
Round 2 :
Ch 2 (counts as first hdc), hdc in same st, ch 3, skip next st, (2 hdc in next st, ch 3, skip next st) x 3, join with sl st to first hdc (16 hdc clusters, 4 ch-3 loops)
Round 3 :
Turn work into a single petal start: sl st into first ch-3 loop, ch 3, 3 dc in loop, ch 2, 4 dc in same loop, sl st into base of loop to form first petal. Repeat to make 4 main petals evenly spaced around ring. After 4 petals you will have 4 lobes (4 petal groups).
Info :
This early petal formation establishes the radial symmetry of the leaf. Keep tension consistent to maintain petal shape. If making a large leaf, do a second round of petal-building for deeper lobes.
Round 4 :
Work between petals to extend leaf base: sl st into space between two petals, ch 3, (dc, hdc, dc) into space, ch 2, sl st into next petal base to secure. Continue around to form 4 extended base points. End with sl st to join. (4 extended base clusters)
Round 5 :
Ch 1, sc evenly around entire motif working 3 sc into each petal base and 2 sc into each space between petals to create a round sc ridge for foundation (approx. 40 sc total for medium leaf, adjust for size)
Info :
Count your sc after this round. For a medium leaf expect approx. 40 stitches. For a large leaf add 8-12 extra sts by adding sc into petals. This ridge becomes the base for forming 8 or more individual leaf points.
Round 6 :
Begin shaping points: *ch 8, skip 4 sc on base, sl st into next sc; rep from * around to create 8 looped points. You should have 8 ch-8 loops. Join with sl st to base (8 loops)
Info :
Loops set each leaf point. For a 7-point leaf (as pictured), work 7 loops instead: ch 9, skip accordingly to space them evenly. Adjust number of loops by altering chain length and skip counts to keep spacing even.
Round 7 :
Working into first ch-8 loop: sl st, ch 2, (2 dc, ch 2, 2 dc) in same loop (petal base), ch 1, 3 dc in next loop, ch 2, 3 dc in same loop, ch 1, (2 dc, ch 2, 2 dc) in following loop—work sequence to create alternating full and smaller lobes. End join. (Creates raised petal structure for 8 points)
Round 8 :
Ch 1, sc around to anchor petals to base, placing 3 sc across each petal surface (approx. 60 sc total). This secures shape and readies petals for detailed veining.
Info :
At this stage switch to a slightly smaller hook (3.5mm) for the veining rounds for crisper stitches, if desired. Change yarn color here if you want a contrasting vein color or darker leaf tip.
Round 9 :
Veining set: For each petal, work (sc, hdc, dc, tr, dtr) down the center of petal by inserting hook around the dc clusters formed previously: sl st to center of petal, ch 1, sc in center cluster, hdc in next top dc, dc in following dc, tr in next loop, dtr at tip. Sl st back to base to anchor. Repeat for each petal (8 veined petals)
Round 10 :
Edge round: ch 1, sc in each st around, placing 2 sc into any wide gaps and 1 sc in tighter spaces to even the perimeter (approx. 68-78 sc depending on leaf size)
Info :
After this edge round, you may work an additional decorative picot or shell edge to accentuate points: optional picot = (ch 3, sl st into top of last st), worked into petal tips only.
Round 11 :
Optional decorative round: For a pointed scallop, in each petal tip work (sc, ch 3, sc) into topmost stitch, then sc around remaining edge. This produces a small scalloped frame emphasizing the pointy tips.
Round 12 :
Fasten off, leaving a long tail (approx. 40-50cm) for sewing onto mesh base. Weave in shorter tails now; leave the long tail for secure attachment later.
Info :
For larger leaves (front and back large motifs), repeat Rounds 1-12 but increase initial sc count in Round 5 to 50-60 and ch loop length to ch 10-12 to produce bigger petals. For smaller leaf reduce counts accordingly. Make the set of five leaves now: two large, two medium, one small. Block each leaf flat, pinning points gently to shape.
— Mesh Runner Body (Foundation and Mesh Rows) :
Round 1 :
Using main background yarn (charcoal gray), ch 161 (adjust multiple of 4 + 1 for desired width). This chain gives approx. 13" width in worsted cotton. Row counts will be worked as 'Rounds' but are rows worked back and forth. Work extra chains at ends as turning foundation.
Round 2 :
Row 1 (establish row): dc in 4th ch from hook (ch-3 counts as dc), *ch 1, sk next ch, dc in next ch; rep from * across to last ch, dc in last ch. Turn. (Approx. 80 dc, 79 ch-1 sps)
Info :
This establishes an even dc grid open enough to show the leaf appliques. If you desire a denser mesh use hdc rather than dc or use smaller hook.
Round 3-12 :
Work mesh pattern: ch 3 (counts as dc), turn, *ch 1, sk next dc, dc in next dc; rep from * across. Each row maintains the dc in every other stitch and ch-1 gaps between, producing an open grid (approx. 80 dc per RS row).
Info :
Mark the center line of the runner with a removable marker or thread to align leaves later. Count rows from the end to ensure symmetric placement: the runner pictured uses 80 mesh rows between pointed ends before finishing border rounds—adjust to achieve desired length.
Round 13 :
Change to stripe accent color A (mustard). Ch 3, turn, dc in first dc, *ch 1, sk next dc, dc in next dc; rep across for one stripe row. Fasten off color A at end of row and carry main color if you prefer to weave inside edge. (Stripe row)
Info :
Carrying the yarn along the edge and catching it in sl sts every 4-5 rows avoids too many ends. For crisp stripes change colors at the last yarn over of the last stitch to avoid loose tails.
Round 14 :
Change to stripe accent color B (deep rust). Repeat the mesh row as Round 13. Fasten off and rejoin main background color for next mesh rows.
Round 15-40 :
Continue mesh pattern in main background: ch 3, turn, *ch 1, sk next dc, dc in next dc; rep across for 26 rows (to create space for leaf placement). Maintain center markers. (approx. 26 mesh rows)
Info :
These 26 rows create the center panel length between the first and last leaf. If you want five leaves spaced evenly, this section will be repeated between leaf placements. Measure and plan the spacing: suggested spacing between leaf centers is 8-10 mesh rows for a pleasing look.
Round 41 :
Change to main leaf placement region: ch 3, turn, dc in first dc, *ch 1, sk next dc, dc in next dc; rep across. This is the row where leaf centers will be aligned. Mark the row with a removable marker. (working row)
Info :
Count mesh spaces across: Example with ch161 foundation you will have 80 dc positions. For five leaves, place centers at approximately positions: 10th, 30th, 40th, 60th, 80th dc (adjust for even distribution). We provide exact placement below.
Round 42-60 :
Resume mesh rows in main color for the next spacing block (19 rows). These rows secure the leaf positions and provide negative space for visual balance. Keep row counts consistent to mirror opposite half of runner. (approx. 19 rows)
Info :
Before both top and bottom pointed ends are added, leave approx. 12-14 rows free at each end to work corner shaping and pointed tip motifs. The pictured runner uses triangular pointed ends built by decreasing row widths and adding a decorative crochet fan motif at the very tip.
— Leaf Placement and Attachment :
Info :
Lay the mesh panel flat, blocked and measured. Mark center of panel lengthwise and across width. For the pictured layout on a 161-ch wide foundation, place leaves as follows (measured from nearest end): Leaf A (large) center at 6 rows from bottom pointed end tip, Leaf B (medium) center at 18 rows above A, Leaf C (small) center at 30 rows above B, Leaf D (medium) center at 42 rows above C, Leaf E (large) center at 54 rows above D. These distances approximate even spacing—adjust to your runner length.
Round 61 :
Pin first leaf (Large) with its long axis aligned to runner center. Mark the base chain loop of leaf center on the mesh row where the leaf will be stitched. Use fine pins to hold points flat. Repeat positioning for remaining leaves before sewing to ensure balance.
Info :
Sew leaves using the long tail left from Round 12. Use matching yarn and a tapestry needle. For each leaf, catch the mesh at approximately every 6th-8th edge stitch along the leaf perimeter with mattress-style ladder stitches for a secure but tidy attachment. Sew through both leaf base and mesh foundation loops; avoid sewing through front of petals where texture is desired.
Round 62 :
Attach leaf perimeter: Starting at leaf tip, sew through base of petal into adjacent dc on mesh, pull gently but do not distort. Continue around, placing 8-12 secure stitches per leaf (depending on leaf size). Finish by weaving tail across back of mesh, then trim.
Info :
For dimensional lift, stitch only the petal bases and leave petal tips free. If you prefer a tighter, glued-down look, stitch closer to the tips. Optionally add a few tacking stitches through petal centers to keep the layers from curling upwards.
— Pointed End Shaping (Make 2 identical ends) :
Round 63 :
With main color, work from bottom edge of mesh to shape point: On last mesh row at end, ch 3, turn, dc in first dc, *ch 1, sk next dc, dc in next dc; rep across until you reach the center 10 dc positions, then dec the row width by working until the last 3 dc before edge, sc2tog across to bring row width in by 4 sts at each end. This begins a tapered decrease. (Taper 1)
Round 64 :
Ch 3, turn, dc across until 2 dc before center, sk 1 dc, dc in next dc, sl st at center to mark tip placement. Continue symmetrical dec to form triangular taper. Repeat dec every two rows until you have approx. 12 dc total across for tip foundation.
Info :
Work both ends the same number of taper rows to preserve symmetry. Leave approx. 6-8 rows at the tip to form a decorative fan motif described below. Keep counts even by measuring and counting stitches across frequently.
Round 65 :
Decorative fan tip: At final narrow row (approx. 12 dc across), ch 1, sc in next 3 sts, ch 3, (5 dc, ch 3, 5 dc) into the center st to create a large fan, ch 3, sc across remaining sts. Turn, fasten off and weave tail to back. This produces a triangular fan accent forming the decorative point.
Info :
Enhance the fan with a contrasting stripe yarn: join color B at fan center and work one extra round of shell clusters (ch 3, 3 dc) into each fan valley for a layered look like the photo.
— Narrow Stripe Border (Both Long Sides) :
Round 66 :
Join mustard stripe color along one long edge: working across edge sts from bottom to top, ch 1, sc evenly along side edge (approx. 80 sc). Turn at corner and continue along top short edge sc count matching width. Work a matching sc row along the opposite long side. (edge sc rows)
Round 67 :
Change to rust stripe color: join at any side, ch 3, dc evenly along side in each sc from previous round to create a narrow dc stripe. Work one dc row only. Fasten off and weave ends. Repeat on opposite side for symmetry.
Info :
Make sure to keep side stripes flush with mesh by working into the very top loops of the mesh base. Count the number of sc from Round 66 before starting the stripe to keep both sides even.
Round 68 :
Return to main color and work 1 row of sc around entire perimeter, working 3 sc into each corner and along the pointed ends around the fan to maintain smooth edges. This unifies the runner look. (Perimeter sc round)
Info :
At the pointed fan tip, place 5 sc across the fan and then 2 sc together into the next base stitch to anchor the geometry. Adjust counts so both end tips appear identical after blocking.
Round 69 :
Decorative shell border: ch 1, *skip 2 sc, (5 dc in next sc), skip 2 sc, sl st into next sc; rep around to form scalloped edging. Where fan tip exists, work a larger shell: (7 dc) for stronger point emphasis. Join and fasten off. (scallop round)
Info :
For a lacy open border, work shells in FLO of perimeter sc to create a raised ridge and leave shells very airy. For a sturdier border work in both loops.
— Decorative Corner Fans and Finish Points :
Round 70 :
At rectangular-to-triangle transition where the point starts, add small fan motifs: Join rust color at corner, ch 3, (2 dc, ch 2, 2 dc) into one base sc to create a petal; sl st to anchor; repeat at each corner and point base for accent (4 small fans per tip area). Fasten off.
Info :
These fans echo the leaf petal shapes and tie the color palette together—place them at the triangular juncture and at opposite end corners for visual repeat.
Round 71 :
Edge pick-up: Return to main color and weave any carried yarn ends into perimeter using tapestry needle. Clip excess. Use steam-blocking or wet-block and pin each leaf tip gently to highlight shape. Allow to dry fully before moving runner.
Info :
Blocking cotton will relax the fabric slightly and open the mesh. If using acrylic, avoid high heat—use a damp towel press to shape instead. If you want crisp leaf points, lightly starch petal tips and re-pin until dry.
— Optional Additional Texture Rows (If you want extra ridge lines) :
Round 72 :
Work 2 rows of FLO ridges along both long sides inside the stripe border to create a decorative raised rib: join main color, ch 1, sc in each st BLO for one row, then sc in each st for a second row. This creates a subtle ridge framing the mesh.
Info :
Ridges help frame the central leaves and add visual weight to the runner. Use these before working the final shell border for a neat finish.
— Finishing Touches and Weaving Ends :
Round 73 :
Weave in ends: Using yarn needle, weave each yarn tail through back of mesh for at least 4-6 cm then trim close to work; for stripes and leaves weave in tails on the reverse side of runner for a clean front look.
Info :
Secure leaves by adding 1-2 hidden stitches under each petal base if using the runner decoratively (not exposed to heavy movement). For table use, secure more stitches to avoid accidental snagging or shifting.
Round 74 :
Blocking: Lightly spray runner with water, pin out to final dimensions on blocking mat, ensuring both pointed ends are symmetrical and leaf centers lie flat. Gently shape leaf points with pins for crisp definition. Allow to dry fully before use.
Info :
For deeper texture on leaf veins, very lightly paint a tiny amount of diluted fabric stiffener to vein rows only after blocking to keep the petal ridges raised. Test on a scrap swatch first.
— Pattern Variations and Sizing :
Info :
To make a narrower runner, reduce foundation chain in multiples of 4+1 and work fewer mesh dc across. For shorter length make fewer mesh row repeats between leaf placements. To create a table topper, scale down by using DK weight yarn with 3.5mm hook and reducing leaf counts to 3 centered motifs.
Round 75 :
Alternative tiny leaf edging: Make 10-12 mini leaves (follow Leaf Motif but stop at Round 8 and fasten off) and sew them along perimeter between shells for an extra autumnal garland effect.
Info :
When sewing mini leaves, tack them using short secure stitches so that each mini is anchored by at least 6 tiny stitches across its base to prevent rotation or tugging when placed on a table with objects on top.
Round 76 :
Optional hanging loop: If you want to use runner as a wall decoration, add a small bar at back: use tapestry needle and short length of matching yarn to create 2 loops at top underside spaced 20 cm apart and knot securely to hang on pegs.
Info :
Label your runner with yarn brand and dye lot on the back with a small sewn-in tag in case you need to repair or replace leaves later. Keep a stitch map or photo of placement for future reference.
Round 77 :
Final inspection: Lay runner on table and inspect for loose ends or uneven leaf placement. Make any minor tacking stitches now to hold leaves in position or adjust shells to match both ends. Press gently if needed and allow to rest before photographing or gifting.
Info :
Store runner flat or rolled to avoid creasing. If you need to machine wash, use a mesh laundry bag and cold gentle cycle, then re-block while damp.
Your Autumn Leaf Table Runner will become a seasonal showpiece that transforms your table into a warm, cozy focal point. Each leaf and stripe is a small celebration of fall color and tactile detail. The combination of open mesh and sculpted leaves makes a sophisticated yet homey impression, perfect for gatherings and everyday use. I hope you enjoyed making every stitch—display it proudly and enjoy the compliments! 🍂🧶