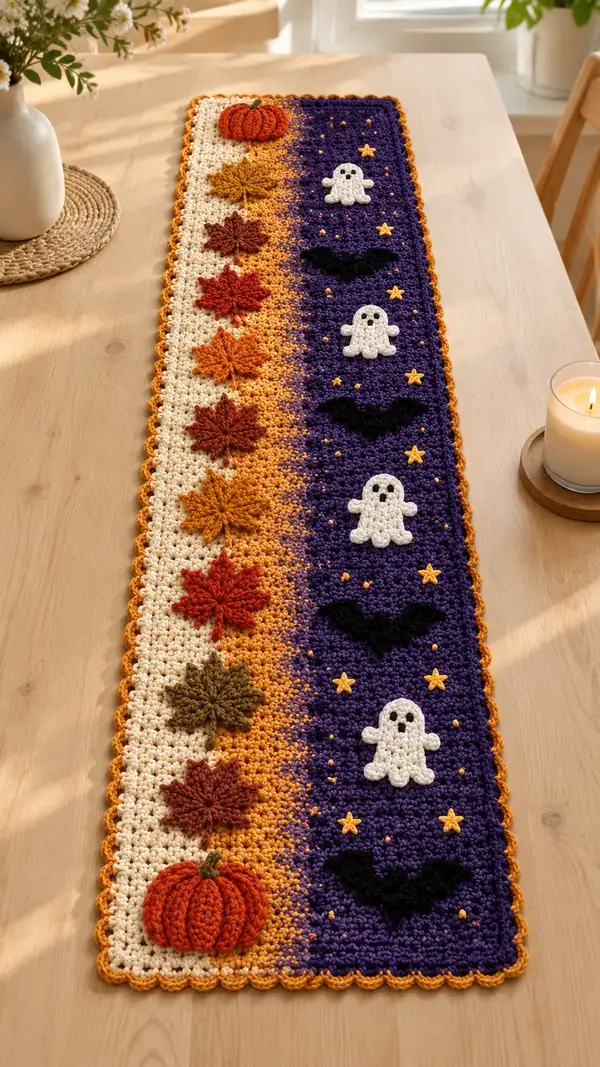
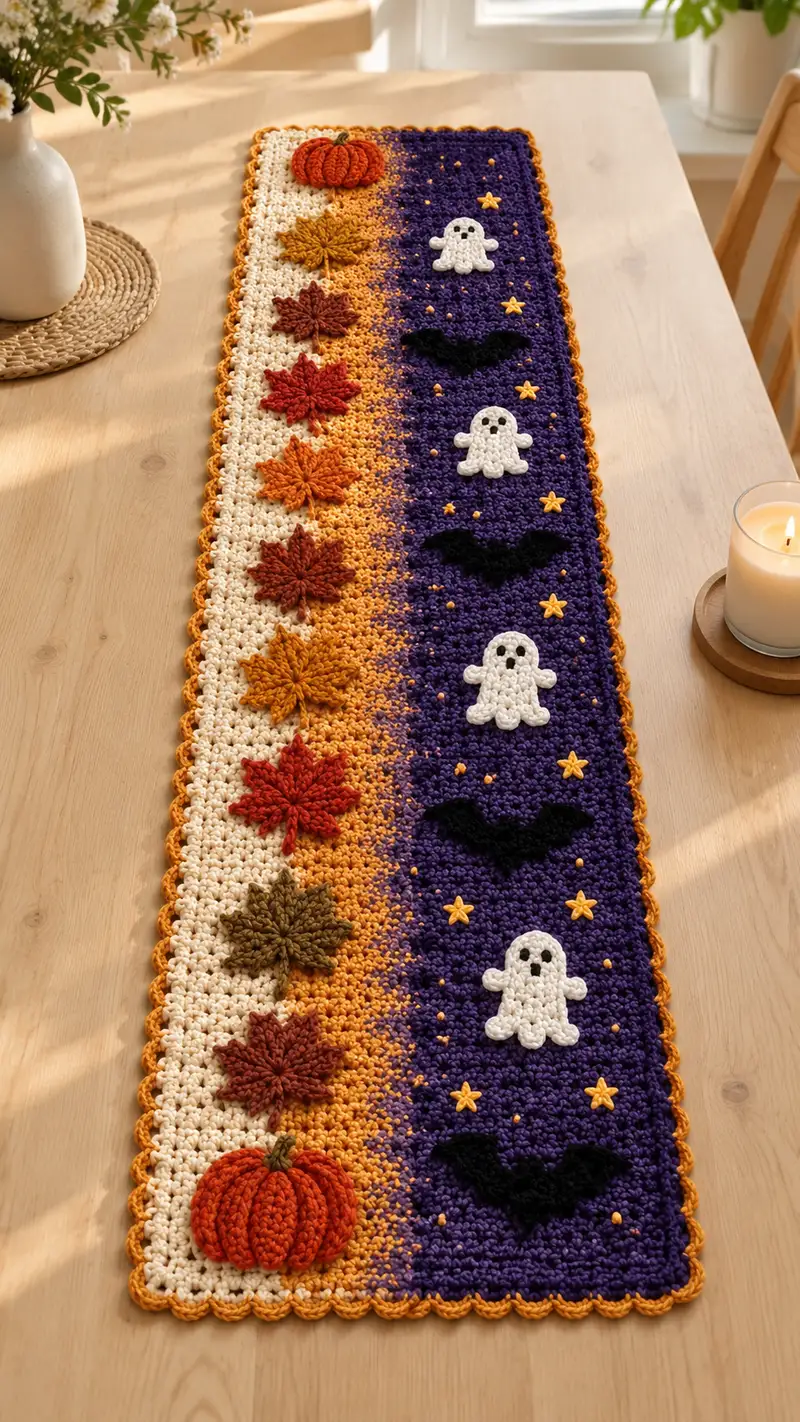
A long, festive table runner that blends warm autumn leaves and pumpkins with playful Halloween ghosts and bats. The design features a textured stitch background with a creamy left panel, an orange-to-purple gradient center, and decorative appliques that are sewn on for a charming 3D effect. Finished with a scalloped golden border, this runner adds seasonal warmth and whimsy to any table.
Progress Tracker
0% Complete
— Finished Size & Gauge :
Info :
Finished runner measures approximately 12 inches (30 cm) wide x 48 inches (122 cm) long before blocking and appliques. Gauge for textured background: 18 sts and 10 rows = 4 inches (10 cm) in moss/grain stitch using 4.0mm hook. Adjust hook size to match gauge as needed.
— Notes :
Info :
This pattern works the main background as horizontal rows (we call them 'Rounds' below for consistency with standard amigurumi-style instructions). The runner is 48 stitches wide across. The left column uses cream/off-white, the center 10 stitches are the gradient area worked with pumpkin/orange and gold, and the right column (24 stitches) is deep purple. Carry colors behind work or use small bobbins of yarn for neat color transitions.
— Main Panel :
Round 1 :
Foundation chain: ch 48 (this creates 48 foundation sts across; counts referenced below assume 48 sts). Turn (48)
Round 2 :
1 sc in 2nd ch from hook, *ch1, skip next ch, sc in next ch; rep from * to end, end with 1 sc in last ch. (Creates first moss/grain row) (48)
Round 3 :
Ch1, turn. 1 sc in first st, *ch1, sc in next ch-1 sp; rep across to last st, 1 sc in last st. (48)
Round 4 :
Repeat Round 3 (48)
Info :
Establish columns visually by counting stitches across: Left column = stitches 1-14 (cream), Gradient column = 15-24 (10 sts), Right column = 25-48 (24 sts). Use stitch markers at stitches 1, 15 and 25 to mark column boundaries.
Round 5 :
Work moss/grain stitch across: for sts 1-14 use cream, 15-24 use pumpkin/orange, 25-48 use purple. Where color changes happen, change color in the last yarn over of the preceding sc to avoid visible gaps. (48)
Round 6 :
Repeat Round 3, carrying the yarns as needed behind the work. Make sure floats are no longer than 6-8 stitches; twist yarns when carrying across more than 2 sts. (48)
Round 7-10 :
Repeat Round 3 for four additional rows, keeping colors as mapped in Round 5 to build a solid base. (48)
Info :
To begin the orange-to-purple gradient, we will gradually exchange certain stitches in the gradient column (sts 15-24) to mustard/gold and then to purple over the next 24 rows to create a vertical blend. Mark the edges of the gradient column with removable stitch markers to maintain correct stitch placement.
Round 11 :
Moss stitch across: Sts 1-14 = cream, sts 15-18 = pumpkin, sts 19-24 = mustard (gold), sts 25-48 = purple. (48)
Round 12 :
Repeat row 11. (48)
Round 13 :
Moss stitch across: Sts 1-14 = cream, sts 15-16 = pumpkin, sts 17-20 = mustard, sts 21-24 = purple, sts 25-48 = purple. (48)
Round 14 :
Repeat Round 13. (48)
Round 15 :
Moss stitch across: Sts 1-12 = cream, sts 13-16 = pumpkin, sts 17-20 = mustard, sts 21-24 = purple, sts 25-48 = purple. (48)
Info :
When changing a stitch color within a row, complete the last yarn over of the previous stitch in the new color to create a seamless color change. Carry unused colors loosely behind the work and twist them around the working yarn at least once every 6 stitches to secure floats.
Round 16 :
Repeat Round 15. (48)
Round 17 :
Moss stitch across: Sts 1-10 = cream, sts 11-14 = pumpkin, sts 15-18 = mustard, sts 19-24 = purple, sts 25-48 = purple. (48)
Round 18 :
Repeat Round 17. (48)
Round 19 :
Moss stitch across: Sts 1-8 = cream, sts 9-12 = pumpkin, sts 13-16 = mustard, sts 17-24 = purple; remain sts 25-48 = purple. (48)
Round 20 :
Repeat Round 19. (48)
Round 21-24 :
Gradually replace more gradient column stitches with purple: by Round 24 the gradient column (15-24) will be half pumpkin/half purple with mustard mixed in. Keep working moss stitch across each row. (48)
Info :
The precise stitch-by-stitch color map depends on how subtle you want your gradient. The schedule above gives a visible but slightly abrupt blend; for a smoother gradient, change colors one stitch at a time across more rows and sample on a swatch before beginning the runner.
Round 25-40 :
Continue repeating moss/grain stitch across rows, gradually shifting the gradient column to be mostly purple by Round 34 and fully purple by Round 40; keep left column cream. Work evenly so the right two thirds reads as deep purple background and the left third shows autumn cream and mustard. (48)
Info :
At this stage, the main field of the runner is complete. Measure the runner: you should have ~40 rows of body before adding appliques; adjust total rows to reach desired length (we recommend 40-48 body rows before border to match sample length). The pattern pictured used 44 body rows before appliques and border were placed. The appliques will be sewn on centered in specific rows (see Applique Placement section).
Round 41-44 :
Keep working moss/grain stitch in final color layout: Left 1-14 = cream, 15-24 gradient to purple (by now mostly purple), 25-48 = purple. Fasten off at end of Round 44 leaving long tail for border if you plan to work border in same yarn; otherwise weave in ends. (48)
— Pumpkin Applique (Make 2 large pumpkins and 1 small) :
Round 1 :
With pumpkin orange, mr, 6 sc in ring (6)
Round 2 :
Inc in each st around (12)
Round 3 :
(1 sc, inc) x6 (18)
Round 4 :
(2 sc, inc) x6 (24)
Round 5 :
(3 sc, inc) x6 (30)
Info :
We will create grooves for the pumpkin by working front post sc rounds next. This makes the pumpkin look ribbed. If you want a flatter applique, skip the post stitches and work flat in rounds.
Round 6 :
1 sc in each st around (30)
Round 7 :
Work 1 fp sc in every 3rd st around to begin ribs: *fp sc around next st, sc next 2 sts; rep from * around (30)
Round 8 :
Repeat Round 7 for deeper ribs (30)
Round 9 :
Fold flat across center and sl st across 6-8 sts on opposite edges to create a slightly domed, 3D pumpkin applique. Add a small amount of fiberfill inside before closing to keep it plump. (30)
Round 10 :
With brown/olive for stem, attach yarn at top center and ch4, sl st back to base to make a short stem. Fasten off. Weave in tail. (stem complete)
Info :
Make one large pumpkin for each end of the runner and one small pumpkin by reducing Round 4 increases: for small pumpkin work R2 to create 10 sc then adjust ribs across 20 sts to get a proportionate small pumpkin.
— Maple Leaf Applique (Make 8 leaves in assorted colors) :
Round 1 :
With chosen leaf color, mr, ch3 (counts as first dc), 2 dc in ring, ch2, sl st to ring to start the central lobe (3 dc, ch2, sl st) (visual center)
Round 2 :
Work petal/lobe formation: *sl st to base, ch4, (dc, tr, dc) in next top of center shell, ch1, sl st; rep to make 5 lobes total. Fasten off leaving tail for sewing. (5 lobes)
Round 3 :
Using surface loop technique, add veins: with contrasting pale yarn, work sl st lines from center towards each lobe edge to mimic leaf veins. Fasten off and weave in ends.
Info :
These maple leaves are intentionally stylized to be bold and lightly 3D. If you prefer a flatter look, reduce the height of lobes and work smaller ch loops for lace in each lobe.
Round 4 :
Optional stem: join olive yarn to base center, ch6, sl st back to base. Fasten off. Repeat to make 8 leaves in colors: burnt red, rust, olive, deep copper, mustard, dark brown, brick red, and cognac.
— Ghost Applique (Make 3) :
Round 1 :
With white yarn, mr, 6 sc in ring (6)
Round 2 :
Inc in each st around (12)
Round 3 :
(1 sc, inc) x6 (18)
Round 4 :
1 sc in each st around (18)
Round 5 :
Form arms: ch3, sl st into row to form right arm loop; move to opposite side and ch3, sl st to form left arm loop. Continue sc around to maintain shell (18)
Round 6 :
Work scalloped base for ghost tail: *sc2tog, ch2, sc in next 2 sts; rep across base to create 4 scallops. (18)
Round 7 :
Fasten off leaving long tail for sewing. Use black embroidery thread or black yarn to stitch two eyes and a small round mouth on each ghost. (decorated)
Info :
Stitch placement for eyes: center the eyes between rounds 3 and 4 of the applique and space about 3-4 sts apart for a friendly expression. Use small French knots or tiny satin stitches for best results.
— Bat Applique (Make 3) :
Round 1 :
With black yarn, mr, 6 sc in magic ring (6)
Round 3 :
(1 sc, inc) x6 (18)
Round 4 :
Work wing shaping in flat rounds: ch1, turn, sc across 9 sts (right side of bat body), fasten off. Re-join at left body side and sc across remaining 9 sts, decrease at tips to shape wings into points. (18)
Round 5 :
Create wing scallops: along wing edges make (sc, hdc, dc, hdc, sc) motif into the outer edge of each wing to form gentle scallops. Fasten off leaving tail for sewing. (wing motifs complete)
Info :
For a cleaner silhouette, steam block each bat lightly, pinning wing tips into desired wing span. Bats in the photo are flat silhouettes sewn onto the purple background.
— Star & Dot Accents (Make 12 small stars and many tiny dots) :
Round 1 :
Small star: with mustard/gold, ch5 join with sl st to form ring; *ch2, (dc, sl st) in ring; rep 5 times to create five points. Pull ring closed and fasten off leaving tail to sew. (5 points)
Round 2 :
Small dots: make French knots with a short length of yarn on the runner background when sewing appliques, or work tiny bullion stitch stars by doing ch6, pull through center to knot, fasten off. Make 20-30 dots to sprinkle across purple field. (dots)
Info :
Stars vary slightly in size to create depth; sew securely with matching yarn and a few hidden stitches on the back of the runner so they do not come loose with use.
— Applique Placement :
Info :
Before sewing any appliques, lay the runner flat and use pins to position each applique. Suggested placement from one short end to the other: large pumpkin at row 2 centered on left cream column, then vertical line of 8 maple leaves spaced every 4 rows down the cream column; at the corresponding rows on the purple field place ghost, bat, ghost, bat, ghost down the center of the purple column spaced every 8 rows. Add star accents and dots scattered between ghosts and bats.
Round 1 :
Pin the large left pumpkin so that its center sits between rounds 2 and 6 of the body rows and between stitch columns 4-11 (center left column). Mark with a removable stitch marker or pin. (placement)
Round 2 :
Pin row of leaves: first leaf immediately below pumpkin (approx rows 6-10), subsequent leaves at rows 10-14, 14-18, 18-22, 22-26, 26-30, 30-34 and 34-38 respectively; all centered within cream left column. (placement)
Round 3 :
Pin ghost/bat column: on the purple side, position first ghost approximately rows 8-12 centered in the purple field (stitches 32-36), then a bat at rows 14-18, ghost at 20-24, bat at 26-30, ghost at 32-36. Even spacing creates a pleasing pattern on the long axis. (placement)
Info :
Use the stitch and row counts to line up appliques so they look vertically centered. The sample runner uses 44 body rows; adjust spacing proportionally if you worked more or fewer rows. Take a photo of the layout before sewing to use as reference for even placement.
— Sewing Appliques :
Round 1 :
Thread yarn needle with matching color tail from each applique. Use mattress stitch or whip stitch from the underside to attach appliques, catching body stitches and applique stitches evenly. Work several passes around the edges to ensure a secure attachment. (attach)
Round 2 :
For pumpkins, sew through the inner fold where you previously sl st-closed the shape to secure the 3D effect. Reinforce stem with a couple of extra stitches. (secure pumpkins)
Round 3 :
Sew leaves by their central base only so lobes remain slightly free and dimensional. Tuck the veins under during sewing for a neat finish. (secure leaves)
Round 4 :
For ghosts and bats, sew around the edges with small, even stitches; for thin elements like bat wings, slip a few stitches into the wing tips to anchor them. (secure silhouettes)
Info :
Tidy the back of the runner by weaving in tails and trimming close. If desired, add a small dab of fabric glue to the back of appliques for extra security, especially for pieces that will be used on a busy table surface.
— Scalloped Border :
Round 1 :
With mustard/gold yarn and 4.0mm hook, join at any corner: ch1, work 1 sc evenly around the runner edges, working 3 sc into each corner stitch to keep corners square. Work 1 sc in each edge stitch and 3 sc in corners (use matching count of edge sts; no change in total body sts). Work all the way around and join with sl st to first sc. (border base)
Info :
To estimate the number of edge stitches for consistent scallops, count the stitches along one long edge and divide by 12 to determine number of scallops; adjust spacing with even sc or skipped sts so scallops look regular. The sample runner uses 44 scallops spaced along the long edges and 6 across the short edges.
Round 2 :
Working into the sc round: *skip 2 sc, in next sc work (5 dc) to form a scallop, skip 2 sc, sl st in next sc; rep around. Make sure scallops on opposing sides align visually. Join with sl st and fasten off. (scallops complete)
Round 3 :
Optional decorative picot round: rejoin mustard/gold in center of each scallop and work (sc, ch3, sl st in first ch) to make small picots for extra texture. Fasten off and weave in ends. (optional)
Info :
Trim any long floats from colorwork on the back before finishing the border. Press the runner lightly, avoiding hot iron directly on acrylic yarn; use a steam setting and protective cloth if needed to shape scallops neatly.
— Finishing Touches :
Round 1 :
Check all applique attachments by gently tugging each; reinforce any loose spots with additional whip stitches. Weave in all tails securely and trim ends. (finish)
Round 2 :
If desired, add small embellishments like beads or tiny bell accents sewn at the base of pumpkins, but ensure they are secure for table use. (optional)
Info :
Store runner flat or rolled rather than folded to avoid creasing appliques. Spot clean as needed; hand wash gently if necessary and reshape while damp before drying flat.
This seasonal table runner brings together classic autumn motifs and playful Halloween charm in one striking project. From textured moss stitch background to layered pumpkins, leaves, ghosts and bats, each applique adds personality and depth. It's a satisfying project that reads like a decor piece, perfect to display all fall season long. 🧶🍂 Add this cozy accent to your table and enjoy the compliments — happy stitching! 🎃