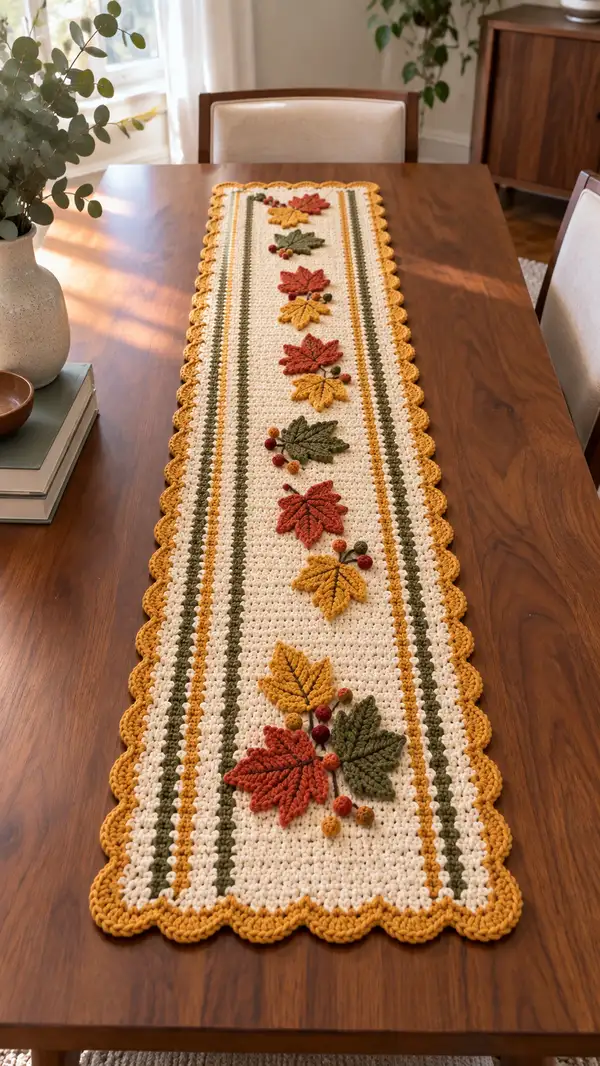
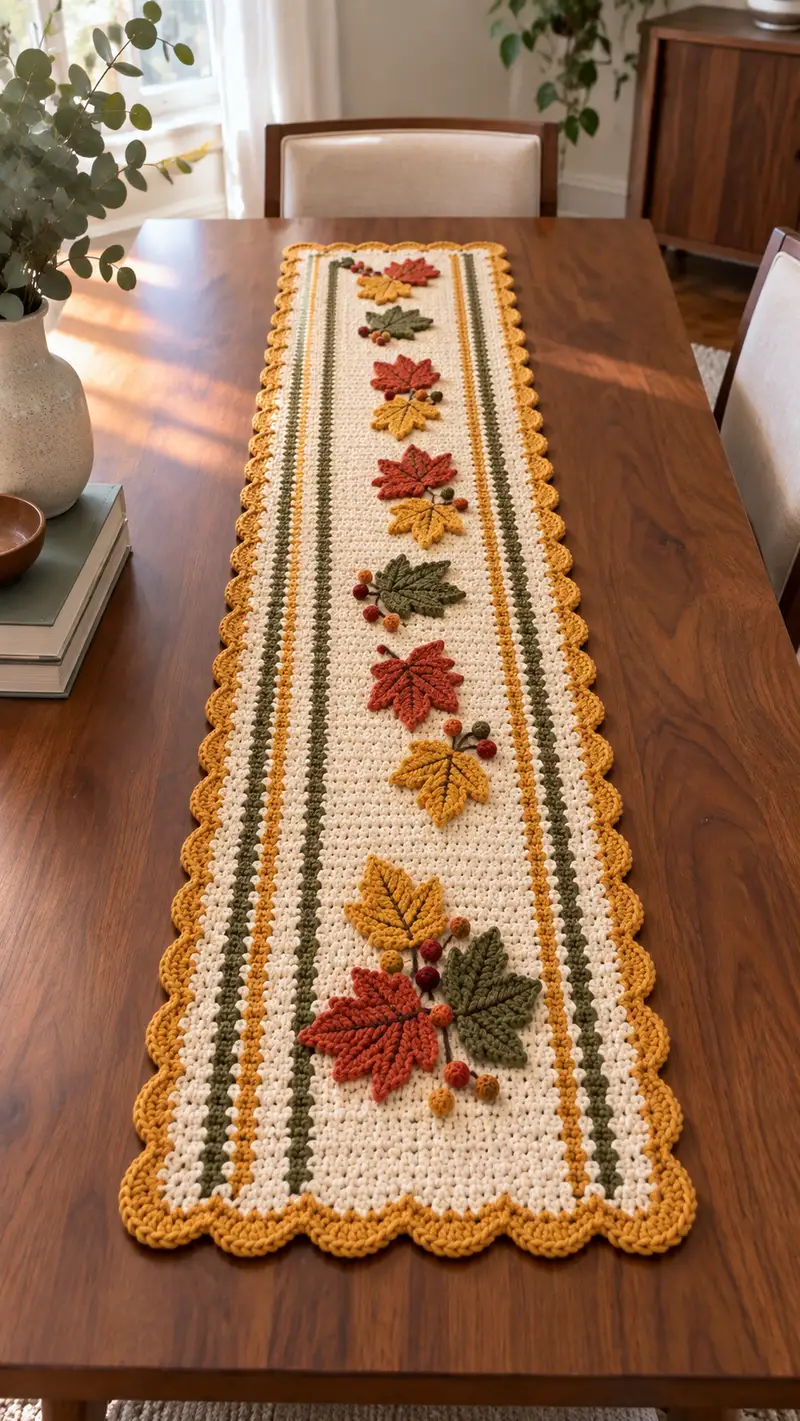
Bring cozy autumn charm to your dining table with this long, elegant crochet table runner. A warm cream ground framed by olive and golden stripes, scalloped edges, and layered crocheted maple leaves with tiny berry clusters creates a handcrafted centerpiece perfect for fall. The pattern includes detailed instructions for the rectangular base, striped colorwork, scalloped border, individual leaves, and berry bobbles—everything you need to recreate this seasonal favorite.
Progress Tracker
0% Complete
— Materials & Gauge :
Info :
Gauge is not critical for function but affects finished width: 16 sc and 18 rows = 4 inches (10 cm) in single crochet using 4.00mm hook. Adjust foundation chain if you wish to change final width. This runner is designed at 92 stitches width and 60 rows long before border for a finished table runner approximately 12.5-14 inches wide and 60-72 inches long depending on tension and yarn.
— Foundation & Notes :
Info :
Work this runner flat in rows; each 'Round' in the base panel refers to a row worked across the foundation chain and turned. Use stitch markers to mark the first stitch of each row when helpful. Color changes are worked at the beginning of a row; fasten off and weave tails or carry color along the side and catch as you go.
— Base Panel (Cream Ground) :
Round 1 :
Foundation chain 93 (this counts as turning chain 1). Row 1: sc in 2nd ch from hook and in each ch across, turn (92)
Round 2 :
1 sc in each st across, turn (92)
Round 3 :
1 sc in each st across, turn (92)
Round 4 :
1 sc in each st across, turn (92)
Round 5 :
1 sc in each st across, turn (92)
Info :
Keep tension even. Use a stitch marker at the first st of each row if you lose track—especially helpful at row ends. Maintain the same color until instructed to change.
Round 6 :
1 sc in each st across, turn (92)
Round 7 :
1 sc in each st across, turn (92)
Round 8 :
1 sc in each st across, turn (92)
Round 9 :
1 sc in each st across, turn (92)
Round 10 :
1 sc in each st across, turn (92)
Info :
Rows 1-10 create a stable base; if you prefer a denser fabric, use smaller hook for the base. Keep edges tidy by working the first st of each row into the very first stitch and the last st into the last stitch (no chaining to turn beyond ch 1).
Round 11 :
1 sc in each st across, turn (92)
Round 12 :
1 sc in each st across, turn (92)
Round 13 :
Change to olive green yarn at beginning of this row. Carry cream if you prefer or fasten off cream. 1 sc in each st across in olive, turn (92)
Round 14 :
1 sc in each st across in olive, turn (92)
Info :
These olive rows form the thin green stripes visible in the runner. If you are carrying color, carry the unused yarn up the side and catch on every 6-8 sts to avoid long floats.
Round 15 :
Change to golden mustard yarn at beginning of this row. 1 sc in each st across in mustard, turn (92)
Round 16 :
1 sc in each st across in mustard, turn (92)
Round 17 :
Change back to cream yarn. 1 sc in each st across in cream, turn (92)
Round 18 :
1 sc in each st across in cream, turn (92)
Round 19 :
1 sc in each st across in cream, turn (92)
Info :
Repeat the stripe motif later to create symmetry: two olive rows and two mustard rows centered on the runner. For now continue working cream rows to reach full runner length before finishing edge. Keep track of row numbers to place leaves accurately later.
Round 20 :
1 sc in each st across in cream, turn (92)
Round 21 :
1 sc in each st across in cream, turn (92)
Round 22 :
1 sc in each st across in cream, turn (92)
Round 23 :
1 sc in each st across in cream, turn (92)
Round 24 :
1 sc in each st across in cream, turn (92)
Info :
At this pace you'll create a smooth, dense center. Count your rows periodically to ensure the final leaf placements fall into the desired rows (see Assembly instruction for exact placement rows).
Round 25 :
1 sc in each st across in cream, turn (92)
Round 26 :
1 sc in each st across in cream, turn (92)
Round 27 :
1 sc in each st across in cream, turn (92)
Round 28 :
1 sc in each st across in cream, turn (92)
Round 29 :
1 sc in each st across in cream, turn (92)
Info :
If your runner will be shorter or longer, add or subtract rows now in cream to hit the desired final length. This pattern places 60 cream-based rows before edging for a long runner; adjust proportionally for shorter table surfaces.
Round 30 :
1 sc in each st across in cream, turn (92)
Round 31 :
1 sc in each st across in cream, turn (92)
Round 32 :
1 sc in each st across in cream, turn (92)
Round 33 :
1 sc in each st across in cream, turn (92)
Round 34 :
1 sc in each st across in cream, turn (92)
Info :
At rows 13-16 and later mirror the stripe sequence again for balanced visuals. Keep track of which rows had color changes so you can match on the opposite end when you add the border.
Round 35 :
Change to olive yarn. 1 sc in each st across in olive, turn (92)
Round 36 :
1 sc in each st across in olive, turn (92)
Round 37 :
Change to mustard yarn. 1 sc in each st across in mustard, turn (92)
Round 38 :
1 sc in each st across in mustard, turn (92)
Round 39 :
Change back to cream yarn. 1 sc in each st across in cream, turn (92)
Round 40 :
1 sc in each st across in cream, turn (92)
Info :
These stripes should mirror the earlier pair for symmetrical appearance along the runner length. We recommend making the cream center length total 60 rows before starting the border sequence.
Round 41 :
1 sc in each st across in cream, turn (92)
Round 42 :
1 sc in each st across in cream, turn (92)
Round 43 :
1 sc in each st across in cream, turn (92)
Round 44 :
1 sc in each st across in cream, turn (92)
Round 45 :
1 sc in each st across in cream, turn (92)
Info :
Rows 41-45 continue the center. If you plan to place 7 leaf clusters, mark their center-row numbers now; typical placement in this pattern is Rows 6, 14, 22, 30, 38, 46, 54 (counting from the first row) — adjust if you shortened the runner.
Round 46 :
1 sc in each st across in cream, turn (92)
Round 47 :
1 sc in each st across in cream, turn (92)
Round 48 :
1 sc in each st across in cream, turn (92)
Round 49 :
1 sc in each st across in cream, turn (92)
Round 50 :
1 sc in each st across in cream, turn (92)
Info :
If your stitch count builds a slight slope at the edges, block the panel flat before finishing the edge to get true straight sides. Use blocking pins and a flat surface; steam lightly or wet block according to yarn label.
Round 51 :
1 sc in each st across in cream, turn (92)
Round 52 :
1 sc in each st across in cream, turn (92)
Round 53 :
1 sc in each st across in cream, turn (92)
Round 54 :
1 sc in each st across in cream, turn (92)
Round 55 :
1 sc in each st across in cream, turn (92)
Info :
Pause here and count rows. If you have reached the intended 60 rows of the cream ground, fasten off and prepare to work edging. If you used a different row count, plan border placement accordingly so stripes remain symmetrical.
Round 56 :
1 sc in each st across in cream, turn (92)
Round 57 :
1 sc in each st across in cream, turn (92)
Round 58 :
1 sc in each st across in cream, turn (92)
Round 59 :
1 sc in each st across in cream, turn (92)
Round 60 :
1 sc in each st across in cream, fasten off and weave in ends (92)
Info :
Complete the base panel and block it flat now. Trim any long tails and press lightly to create crisp edges before doing the border so the shell edging sits evenly around the runner.
— Border & Scallop Edging :
Round 1 :
With golden mustard yarn, join with sl st to any corner of the runner along the short end. Work 1 sc in each row-end stitch along the short side (this will be 60 sc for the short side if you worked 60 rows), then work 1 sc in each st across the foundation chain edge (92 sc), then 1 sc in each row-end along opposite short side (60 sc), then 1 sc in each stitch along the final long edge (92 sc). Total perimeter sc = 304. Join with sl st to first sc
Info :
Count carefully on the first round to establish the perimeter stitch count — this determines shell placement. If your row count differs, adjust perimeter totals. Place 4 stitch markers at the midpoints of each side to help keep shells symmetrical.
Round 2 :
Ch 1, 1 sc in same st, *ch 1, sk next st, 1 sc in next st; rep from * around. This establishes small spacing for shells. Adjust if necessary to create even shell spacing. Join with sl st (approx 304 sc/spacing pattern)
Round 3 :
Ch 3 (counts as dc), *5 dc in next ch-1 sp, sk next sc, 1 dc in next sc; rep from * around to form scallop shells along entire perimeter. At corners, work 5 dc into corner space to help scallop turn. Join with sl st to top of ch-3
Round 4 :
Sl st into center of first shell, ch 1, 1 sc in center of shell, *ch 3, 1 sc in center of next shell; rep from * around. Join with sl st. Fasten off and weave ends.
Info :
This scallop sequence forms large, deep scallops similar to the photographed runner. If perimeter stitch counts don't divide evenly into shell repeats, increase or decrease by 1 or 2 sc along the first round to balance spacing. The visual scallops in the photo are bold — use 5-dc shells for that fullness.
— Leaf Applique (Make 7) :
Info :
Make 7 maple leaf appliques in a repeating color order of rust, mustard, olive for a natural fall palette. Leaves are worked flat from a center spine with lobes created by clusters and picots. Use 3.5mm for tighter shaping if desired.
Round 1 :
With chosen leaf color, ch 11. (This chain forms center spine length; adjust if you wish larger/smaller leaves)
Round 2 :
Row along first side of chain: sc in 2nd ch from hook, hdc in next, dc in next, tr in next, dc in next, hdc in next, sc in next. At tip (last ch), work sc, then work down the opposite side of chain: sc in next, hdc in next, dc in next, tr in next, dc in next, hdc in next, sc in last. Do not turn; join with sl st to first sc. (Total streched shaping)
Round 3 :
Ch 1, *in next small lobe work (sc, hdc, 2 dc, hdc, sc) to make a raised lobe; skip 1 st and rep for each lobe along both sides to create 5 lobes total. Join with sl st to first sc.
Round 4 :
Ch 1, working into back of lobes: *work (sc, picot, sc) into center top of each lobe to create serrated edge and definition, rep across both sides. Join with sl st.
Info :
Picot: ch 3, sl st into base st. This gives the leaf a saw-tooth edge similar to maple serration. Use stitch marker to note the leaf midline for later embroidery veins.
Round 5 :
Working along center spine on right side only: sl st to base of spine, ch 1, 1 sc in next 2 sts, 1 hdc in next, 1 dc in next, ch 2, turn, 1 dc in ch-2, 1 hdc, 2 sc; this builds slight thickness at base for stem area. Fasten off leaving long tail for sewing.
Round 6 :
Using tapestry needle and contrasting darker brown or deep rust thread, embroider a central vein: come up at leaf base, run a line of backstitch to tip. Then add short side veins branching symmetrically into lobes. Repeat on reverse side if you desire double-sided leaves.
Info :
If you prefer, work two leaf halves and sew together lightly with wrong sides facing for slightly puffed leaves. Otherwise the flat leaf is the style shown in the photo. Block each leaf flat for crisp shape before attaching.
— Small Leaf Variation (Make 7 small leaves) :
Round 1 :
Ch 7. Row: sc in 2nd ch from hook, hdc in next, dc in next, hdc in next, sc in last. Work back along the chain with mirror stitches and sl st to join. Fasten off. (Small leaf approx 40% size of full leaf)
Round 2 :
Embroider one central vein with contrasting yarn; these small leaves will be layered under large leaves for natural clusters.
Info :
Create 7 small leaves to pair under or beside the larger maples for layered clusters resembling the photographed runner. Use alternating colors for depth.
— Berry Bobbles (Make 21) :
Round 1 :
Make a small bobble ball: With burgundy, make magic ring, 6 sc in MR (6). Pull ring tight.
Round 2 :
Work 6 inc (12) evenly spaced (12)
Round 3 :
Work 12 sc around (12). Fasten off leaving long tail to sew and stuff lightly with polyester fill (pinch a tiny amount just to round the bobble). Thread tail through top and draw tight to close slightly and secure. Weave end through multiple stitches for security.
Info :
Make bobbles in three colors: burgundy, deep rust, and mustard. The pattern shows groups of 3 to 5 berries clustered with leaves. Make 21 bobbles total (three per cluster for seven clusters) or adjust to your preference.
— Secondary Decoration Stems :
Round 1 :
For stems, use brown or dark rust yarn and a tapestry needle. Cut yarn segments about 6-10 inches long depending on cluster placement. Use simple couching stitches: bring needle from wrong side to right side at stem start, lay yarn along runner surface to berry cluster or leaf base, and run needle back into fabric, catching the stem in 2-3 small stab stitches to secure. Repeat for each stem.
Info :
Stems are decorative and should be sewn in carefully to avoid pulling through stitches. Use a few small secure stitches at base of leaves and around bobbles to hold them in place without visible knots on the front.
— Assembly & Placement :
Round 1 :
Block the runner and all appliques flat. Lay the runner on a large flat surface and mark the centerline with pins or removable chalk. Using the row numbers from the base panel, plan leaf cluster placements centered on rows 6, 14, 22, 30, 38, 46, 54 (these correspond to the earlier placement suggestion). Alternatively distribute clusters evenly along runner length if you changed row counts.
Round 2 :
Arrange each cluster: for each location pin one large leaf as the focal leaf angled slightly outward from the centerline, place one small leaf layered beneath or to the side, then position 3 bobbles nearby to mimic berries in the photograph. Make a visual check that clusters appear balanced on both sides of the runner.
Info :
Take photos of your pinned layout before sewing to ensure you have a record of the composition. This helps if you need to unpin and reposition later. Leave leaf stems overlapping slightly with the runner surface and do not pull them tightly when sewing so they retain a natural lift.
Round 3 :
Sew appliques using matching yarn and small whip or invisible stitches through the leaf base and the runner fabric; avoid sewing through the center of the leaf lobes so they keep dimension. For extra security sew each bobble through twice into the runner, coming up through base of bobble, through runner, and back up, then knot and weave ends on wrong side.
Round 4 :
Use the brown yarn to couch stems: bring yarn up at leaf base, lay yarn along runner surface towards bobbles, then secure with tiny stitches to hidden loops. Trim and weave all tails to the wrong side and secure.
Info :
For longevity, sew through multiple passes and use small backstitches around bobbles. If the runner will be laundered, consider hand-washing on a gentle cycle and not machine drying to prevent distortion of appliques.
— Optional: Raised Vein Stitch for Leaves :
Round 1 :
Using darker yarn and a yarn needle, run a line of surface slip stitches (or couching) down the center of each leaf. For each side of the center add 2-3 short diagonal veins with straight embroidery stitches. This creates the dimensional veining visible in the image.
Info :
Surface slip stitch: Thread yarn through needle, bring up at leaf base, insert into next stitch a short distance away and pull yarn through, moving along surface not through the fabric. This sits slightly raised and mimics yarn ridges in the photo.
— Finishing Touches :
Round 1 :
Once all leaves and berries are sewn, lightly steam-block the runner again to settle appliques. Check for loose stitches and reinforce any bobbles or stems that feel insecure. Trim all stray ends from the wrong side and give the runner one final press under a towel on a low setting if yarn permits.
Info :
Store folded or rolled flat to avoid compressing applique bobbles. If using on a heavily used table, consider placing runner under a protective tray or rotating positions occasionally to even wear.
— Alternate Sizes & Customization Notes :
Info :
To change runner width, add or subtract foundation chains in multiples of 2 to keep edges symmetrical. To shorten or lengthen, add or remove full rows in multiples that keep the stripe centers and leaf placement balanced. For a placemat or short runner, scale leaf sizes down by using a smaller hook or fewer chain stitches for the leaf spine.
Info :
To create a seasonal variation, swap autumn leaves for winter holly leaves and red berries, or summer florals. Adjust colors and number of clusters to match desired aesthetic.
Completing this autumn table runner is such a rewarding finishing touch for home decor — the soft neutral ground, warm stripes, scalloped edges, and layered leaves come together to create a centerpiece that feels both cozy and refined. Each stitch and applique adds personality, and seeing the runner laid out on your table is a lovely moment of pride. 🧶🍂 Whether you make one for seasonal entertaining or as a gift, it’s a handmade project that brings joy every time it’s used. Happy stitching and enjoy arranging your leaves just the way you like them! 🎨