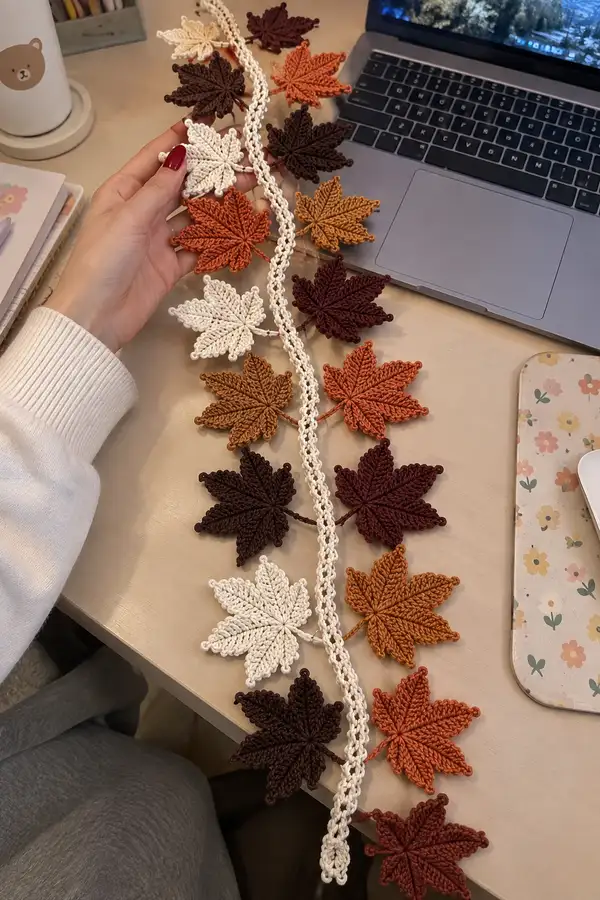
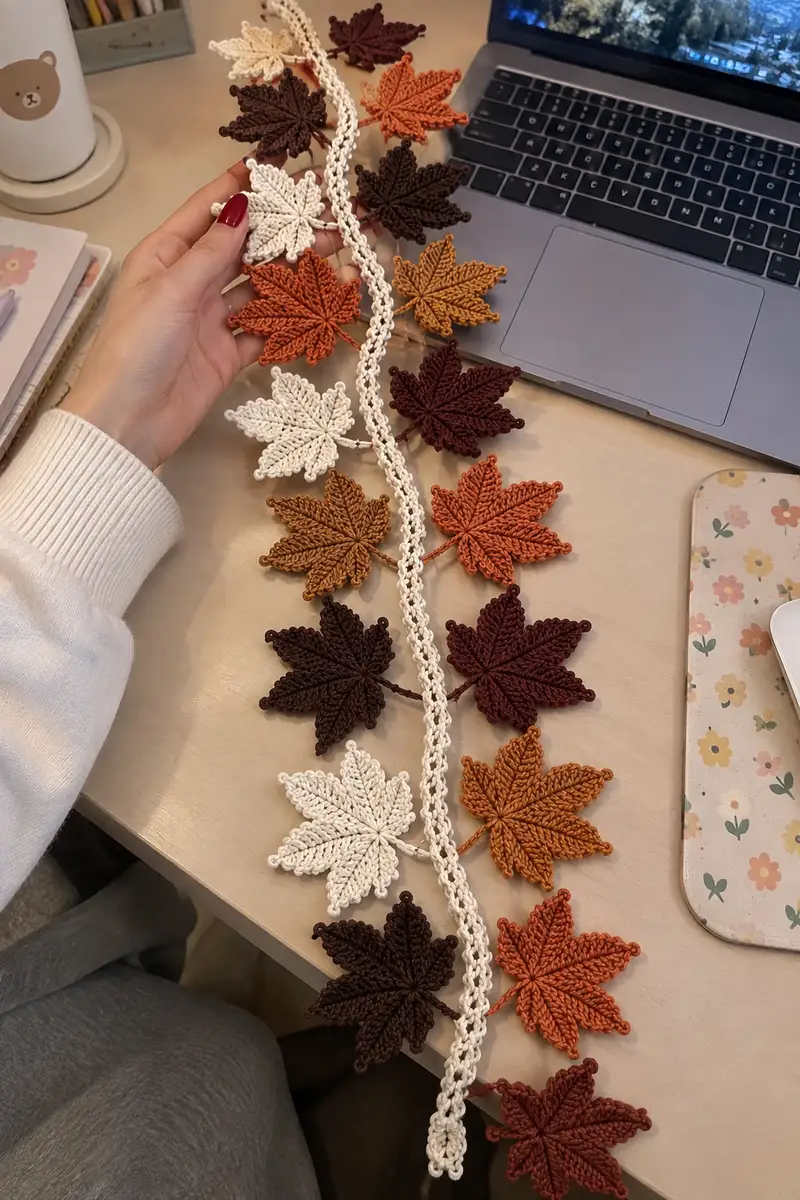
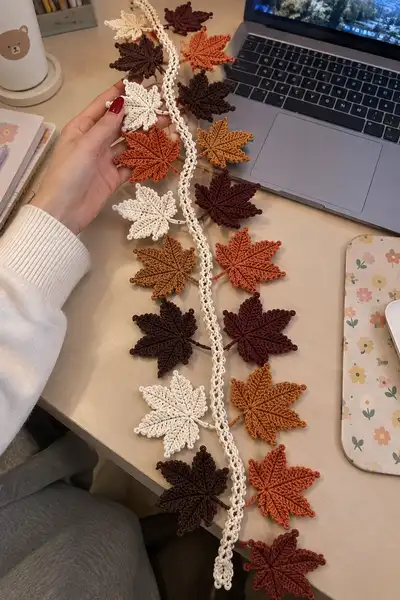
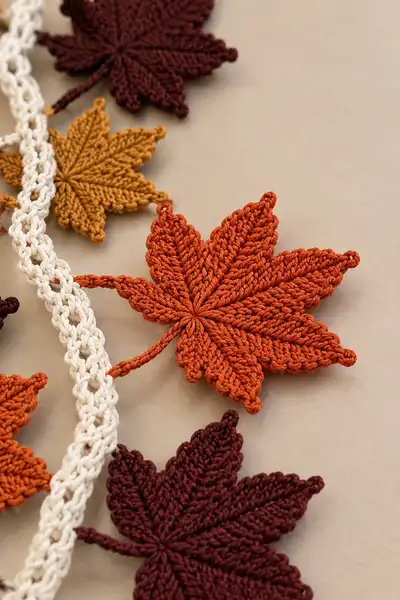
A beautiful fall-inspired garland featuring dimensional crochet maple leaves in warm autumn tones, joined along a soft braided cord. This pattern recreates the layered leaf texture, raised central veins, and tiny stem details visible in the images. Perfect for mantel displays, doorways, or seasonal table decor.
Progress Tracker
0% Complete
— Overview :
Info :
This pattern describes how to make a detailed maple leaf motif worked flat from a small central base and built in layered ribs, then how to crochet a soft braided cord and attach multiple leaves to form a garland. Work leaves in any autumn palette. Each leaf described here uses a base of 14 base stitches (7 lobes x 2 base points), and the rounds build outward to produce elongated lobes. The pattern provides both stitch-by-stitch rounds for the core leaf build and extra Info notes every 5-8 rounds to keep you on track.
— Leaf (Make multiple in desired colors) :
Round 1 :
Make a magic ring, work 7 sc into ring (7). Tighten ring and join by placing a marker in the first sc (7).
Round 2 :
Inc in each st around (2 sc in each) — 7 inc = 14 sts total. (14)
Round 3 :
1 sc in each st around (14). Place marker at start of round. This round establishes the base points for the 7 lobes (2 base sts per lobe).
Round 4 :
1 sc in each st around (14). Keep tension relaxed to make it easier to work elongated stitches on the outside in later rounds. (14)
Info :
Decide on whether you want a firmer leaf. If so, change to a slightly smaller hook now. Keep marker at round start for orientation — each pair of base sts will correspond to one leaf lobe.
Round 5 :
1 sc in each st around (14). Prepare to create the first layer of ribs; we will begin working elongated stitches into chain loops which will be created at the start of the next round. (14)
Round 6 :
(*Sc in next base st, ch8, sl st into same base st to form a loop for lobe foundation*) repeat from * to * around — you will make 14 loops total, two loops per lobe. After last loop, sl st to first sc to close. (14 base points, 14 chain loops)
Info :
The chain loops created in Round 6 will be the scaffolding over which you'll work elongated cluster stitches to shape the lobes. Keep the loops uniform by making consistent chain tension. Use a removable marker to note the start of each pair of loops that will become one lobe.
Round 7 :
*Work into first chain loop: sl st to enter loop, ch2 (counts as hdc), 1 hdc in loop, 2 dc in loop, 3 tr along loop center (or tr clusters if using smaller hook), 2 dc, 1 hdc, sl st to base sc (the same base st the loop was made from)*. Repeat into each of the 14 loops to create the first outward layer. End with sl st to join. Base count remains 14. (14)
Round 8 :
1 sc in each base st around (14). This round tacks the first layer of lobes to the base and defines the leaf outline. (14)
Info :
Check that your first layer of lobes is evenly spaced. Gently pull each lobe outward and flatten it so the stitches align into the lobe shape. If a lobe feels sparse, slightly reduce hook and add stitches in the next outward round for fuller shape.
Round 9 :
Repeat Round 6 loops but reduce to ch7 for a slightly tighter second layer: (*sc in next base st, ch7, sl st to same base st*) around. (14 base points)
Round 10 :
Work into each ch7 loop: sl st to enter loop, ch2, (hdc, 2 dc, 3 tr), 2 dc, hdc, sl st to base — mirror Round 7 but using ch7 loops for smaller profile. After last loop, sl st to first sc. Base remains 14. (14)
Round 11 :
1 sc in each base st (14). Use this round to align the lobes; if a lobe is turning up or down, tug gently while blocked. (14)
Info :
At this point, you have built two external layers that begin to give depth. If you want a fuller leaf, repeat the loop+lobe pair (Rounds 9-11) one more time before the long rib rounds described next.
Round 12 :
*(Sc in next base st, ch10, sl st to same base st)* around — make ch10 loops this time to allow a longer lobe shell. (14)
Round 13 :
Work elongated clusters into each ch10 loop: sl st to enter, ch2, 2 hdc, 3 dc, 5 tr (create height for the lobe center), 3 dc, 2 hdc, sl st to base. Repeat around. (14)
Round 14 :
1 sc in each base st (14). After this round, you'll begin creating the central ribs for each lobe by working along the center of the lobe from the base outward with front-post style stitches. (14)
Info :
To create the raised central veins seen in the photos, we will work 'rib rounds' using front-post stitches that project upward. Keep your tension slightly looser when working the tr ribs so the rib stands proud of the leaf surface.
Round 15 :
Rib round 1: *Working into the center of the lobe you created (enter at the middle of the ch10 shell), ch1, 1 sc, 1 hdc, 3 dc (all worked along the center chain or center space), 1 hdc, 1 sc; return to base and sl st into next base st.* Repeat around for 14 centers (14). This round defines the inner centerline of each half-lobe.
Round 16 :
Sc round: 1 sc in each base st (14). This secures the rib foundations and keeps the base tidy. (14)
Round 17 :
Rib round 2: *Insert hook at the center of the same lobe, ch1, 1 sc, 1 hdc, 5 dc, 1 hdc, 1 sc, sl st back to base.* The longer center dc group pushes the rib out. Repeat around. (14)
Round 18 :
Sc round: 1 sc in each base st (14). Smooth and align ribs. (14)
Info :
If you want a more pronounced rib, use tr instead of dc for the center group in Round 17. Use care — very tall stitches can ripple; keep surrounding sc rounds even to stabilize.
Round 19 :
Rib round 3 (center ridge grows): *Into each lobe center: ch1, sc, hdc, 7 dc (or 5 dc + 2 tr if you prefer mixed), hdc, sc, sl st to base.* Repeat across 14 centers. (14)
Round 20 :
Sc round across base: 1 sc in each base st (14). Take a moment to smooth the ribs with fingers. (14)
Round 21 :
Rib round 4 (peak layer): *Work ch1, sc, hdc, 9 dc (or 6 dc + 3 tr for taller profile), hdc, sc into each lobe center; sl st to base.* This is the peak rib layer that forms the raised vein. Repeat for all 14 centers. (14)
Round 22 :
Sc round: 1 sc in each base st (14). If any ribs appear too tall or loose, pull gently and realign stitches while the yarn is still flexible. (14)
Info :
During these rib rounds you are sculpting the leaf. Step back and compare lobes; you can adjust the number of dc in the rib rounds to make lobes longer or shorter. Maintain the same stitch count on base rounds to preserve symmetry.
Round 23 :
Edge shaping round 1: *Sc in next base st, ch3, 3 sc along the outer edge of the nearest lobe shell (working into outermost dc row from earlier), ch3, sc back into the next base st.* Repeat around pairing each base stitch with this micro-edge to begin forming the serrated edge. (14)
Round 24 :
Edge round 2: 1 sc in each base st to secure edges (14). If you see small gaps at lobe tips, you will fill them in the next couple of tiny picot rounds. (14)
Round 25 :
Picot tips: *Sc in next base st, sc along edge stitches around the lobe to the tip, make picot (ch3, sl st into first ch of picot), sc back along edge to base, sl st into base.* Repeat for each lobe edge — you’ll make 14 small picots, one at the tip of each half-lobe. (14)
Round 26 :
Join round: 1 sc in each base st to tidy joins and secure picots (14).
Info :
These small picots create the tiny pointed tips seen in the photos. If you prefer a rounded look, skip the picot and work 2 sc at the tip in the edge flow instead.
Round 27 :
Round for narrowing near base (optional shaping): *(Sc in next base st, dec over next 2 base sts) x 7.* This decreases the base by 7 decs (from 14 to 7) to create a single stitch per lobe at the very center where the stem will attach. (7)
Round 28 :
1 sc in each base st (7). This forms a neat ring of 7 stitches and readies the center for stem formation. (7)
Info :
If you prefer to keep the 14-base look (two base points per lobe), skip Round 27 and continue with Round 28 as (14). The decrease here makes a slightly narrower leaf center and a cleaner stem join.
Round 29 :
Stem foundation: With same yarn, ch10 from the center base (count chain as chain stem length). If you decreased to 7 base sts in Round 27/28, insert hook into center of the 7-st ring and ch10. If you have 14 base sts, pick every second base st to attach stems or make a short ch6 — both methods work. (chain stem)
Round 30 :
Sew or sl st the chain back along itself to create a thicker stem: starting at the nearest center base, sl st into the second chain from hook and continue sl st back along the chain to the base to create a rope-like stem. Fasten off, leaving a 12 cm tail for sewing to cord. If desired, wrap the tail around the stem and sew to secure. (stem complete)
Info :
Trim and weave in ends through the underside of the leaf so nothing is visible from the top. If you want a longer stem like in the photos, use ch20 then sl st back; for very short stems, ch6 and sl st back.
Round 31 :
Blocking prep: Pin the leaf onto a blocking surface, stretching each lobe so the ribs open evenly. Spritz lightly with water or steam with care. Allow to dry fully before assembly. (blocking)
Info :
Blocking is essential to achieve the crisp, defined lobes and to help the ribs settle. Use rust-proof pins and a light steam; avoid direct high heat which can flatten the yarn texture.
Round 32 :
Optional decorative reverse border: Rejoin yarn near the base on the underside, work 1 sc through both layers around the outer edge of the leaf, placing (sc, picot or sc) at the tip of each half-lobe to reinforce the tips. This will add a neat outline and strengthen the edges (work as needed). (stitch count dependent on edge)
Info :
Repeat this leaf sequence to create as many leaves as you need. The photo shows approximately 14 leaves gathered into a long garland; I suggest making at least 12–16 leaves for a full look depending on spacing.
— Small Stem & Attachment Loop (for each leaf) :
Round 1 :
With working color, attach yarn to center underside where stem begins, ch4, sl st into 2nd ch from hook to create a small loop for sewing, sl st back to starting base and fasten off leaving long tail for sewing. This small loop helps when anchoring to the braided cord. (loop)
Info :
Leave approximately 12 cm of tail for sewing each leaf to the cord. Use this tail to stitch the stem to the cord so the stitches are hidden under the leaf and are secure.
— Braided Cord (make 1 or longer as needed) :
Info :
The braided cord in the photo looks like a soft triple plait of chained panels. We will create three long crochet chains, tighten them slightly, and plait them. Alternatively you can crochet three long i-cords or single-chain strips and braid them. The finished cord should be long enough to support all leaves with desired spacing (measure your display area — for a 1.2 m garland you will need three 1.2 m chains).
Round 1 :
Chain foundation: Make 3 long chains of desired length (example: ch160 each for a 1.2 m garland with small slack). Keep the chains even — measure them against each other while working. (chain length)
Round 2 :
Option A braid: Plait the three chains together as you would hair, overlapping them into an even braid. Tuck ends and whip-stitch to secure. Option B crochet braid: join chains side-by-side, then work 1 sc across each chain strand in rows to form 3 long straps and then plait. Either method creates a soft textural cord. (braid)
Info :
If you braid by hand, a light spray starch can help hold shape; for a softer look leave it unstarched. For durability, once braided, single crochet a long row along one side of the braid to hide join points and give a tidy appearance.
Round 3 :
Create finished ends: Gather ends of braid and wrap with contrasting yarn (approx. 15–20 wraps) then secure with a few stitches and weave in tail. Make a hanging loop at one or both ends using the same yarn or a metal ring. (finished cord)
Info :
When you make the braid, keep gentle tension; too tight a braid will make the cord short and stiff. Aim for a soft, flexible braid that curves naturally under the weight of leaves.
— Attaching Leaves to Cord :
Round 1 :
Layout: Lay your braided cord flat and arrange leaves at desired spacing (photo shows about 8–10 cm between leaf centers). Mark positions with pins. Decide on alternating sides of the cord or both sides for staggered effect. (layout)
Round 2 :
Sewing each leaf: Thread yarn tail from leaf stem onto a yarn needle. From the underside of the cord, insert needle through the cord into underside of the leaf stem and back through cord, pulling snug. Repeat the sewing 3–4 times around the stem to secure. Weave tail into underside and trim. (attach leaf)
Round 3 :
For extra security, place a small dab of fabric glue at the underside where stem meets cord — allow to dry. If your garland will be handled frequently, add a few additional stitches. Repeat for all leaves. (secure)
Info :
Alternate leaf colors and angles for a natural look. Slightly rotate leaves so lobes are not perfectly aligned; this gives more movement and visual interest like the photographed garland.
— Finishing Details :
Round 1 :
Weave all tails through the underside of the cord and leaves to hide them. Trim close but not flush—leave a couple of mm to avoid ends popping out. (weave)
Round 2 :
Lightly steam-block the assembled garland if desired. Pin leaves lightly to open lobes during steaming, then allow to fully dry before hanging. (finishing)
Info :
Store garland flat or loosely coiled to avoid flattening ribs. When hanging, avoid prolonged sun exposure which can fade cotton yarn over time.
— Variations & Customization :
Info :
You can vary the number of rib rounds to create smaller or larger leaves. For miniature leaves, reduce rib rounds (Round 15-21) and use ch loops of ch6–ch8. For oversized statement leaves, increase ch loops and add more rib rounds. Mix yarn weights for texture contrast — a cotton sport weight leaf will look delicate compared to a worsted cotton leaf.
Info :
To make the garland longer, simply make longer braid strands or add additional braided segments joined by bars of slip stitching. You can also add small beads or wooden discs between leaves for a rustic flair.
This cozy leaf garland brings the best of autumn into your home with warm textures and handcrafted charm. Each crocheted leaf is sculpted with raised ribs and tiny picot tips that make the collection feel like a handful of freshly fallen leaves! Arrange them across a mantel, doorway, or table runner to instantly add seasonal warmth. 🍁🧶 Enjoy every stitch and have fun mixing colors to create your perfect fall palette.