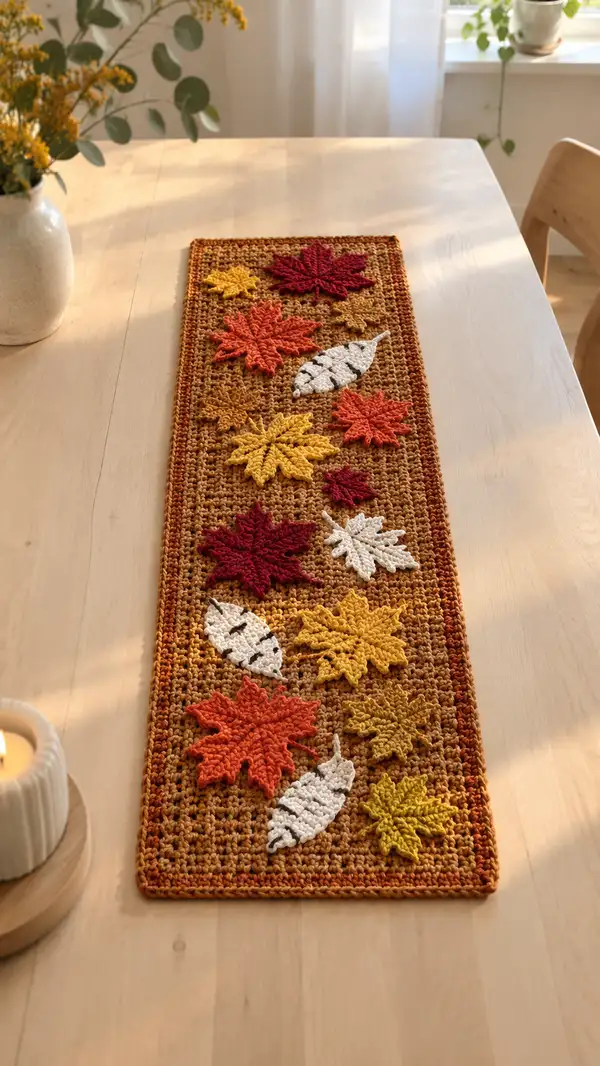
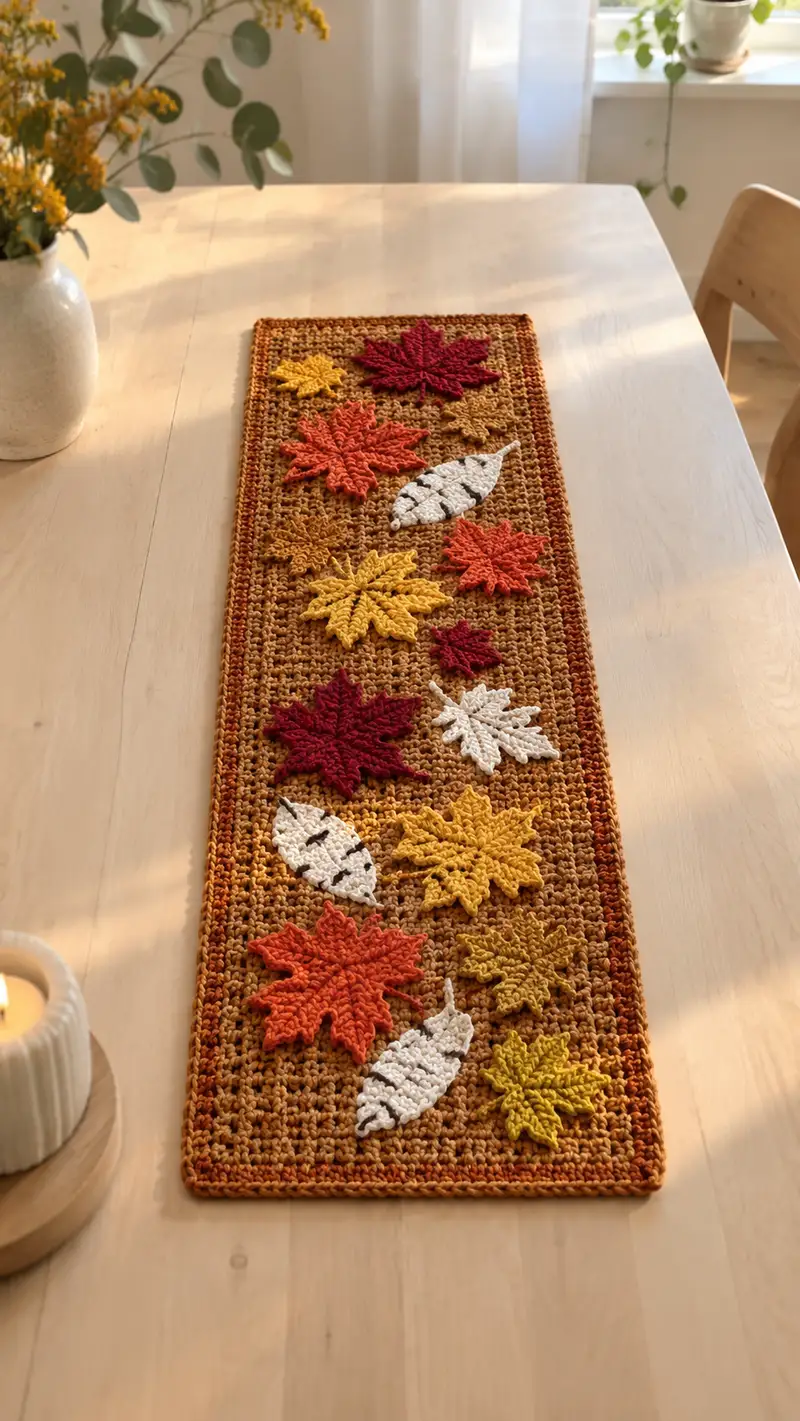
Create a warm, harvest-inspired table runner featuring a textured mesh background and layered crochet leaf appliques in rich fall tones. This rectangular runner uses a simple open mesh stitch for a light-but-structured foundation and a selection of maple and elongated leaves applied on top for dimensional seasonal interest. The finished piece sits beautifully on a dining table, console or dresser and makes a cozy handmade centerpiece.
Progress Tracker
0% Complete
— Notes & Gauge :
Info :
Gauge is not critical for this decorative runner but will affect finished dimensions. With worsted weight yarn and 4.0 mm hook, 10 cm (4 in) in mesh pattern (measured across 8 pattern repeats) = approximately 12 stitches and 6 rows. Finished piece in sample measures roughly 36–38 inches long by 9–10 inches wide. Adjust starting chains to lengthen or shorten the runner.
Info :
Throughout this pattern we refer to rows as 'Round' to keep consistent with a compact instruction structure. When chain counts or row counts change, verify your stitch count at the end of each row. Use stitch markers on every 10th chain on your foundation chain to help avoid miscounting.
— Main Panel (Foundation & Mesh Body) :
Round 1 :
Foundation chain: Ch 81 (this yields a fabric approximately 9.5–10 in wide; change to ch 101 to make it wider). Do not add extra turning chains for this first row if you prefer a tighter edge; otherwise ch 1 to begin.
Round 2 :
Row 1 (RS): Sc in 2nd ch from hook and in each ch across (80 sc). (80)
Info :
Use a contrasting scrap waste yarn or a stitch marker to mark the first stitch of the row if you want to track rows. This sc foundation creates a neat base for the mesh rows that follow.
Round 3 :
Row 2 (WS): Ch 2 (counts as turning ch, does not count as dc). Turn. *Dc in next st, ch 1, sk next st*; rep from * to * across ending with dc in last st. (40 dc, 39 ch-1 sps)
Round 4 :
Row 3 (RS): Ch 1, turn. Sc in each dc and in each ch-1 sp across (sc in each st and space) — you will have 80 sc. (80)
Round 5 :
Row 4 (WS): Ch 2, turn. Dc in first st, *ch 1, sk 1 st, dc in next* across ending with dc in last st. (40 dc, 39 ch-1 sps)
Round 6-15 :
Repeat Rounds 4-5 five more times to build a balanced mesh and solid-row texture (10 rows total including the initial sc base). After Round 15 you will have created an even, slightly open fabric with a consistent stitch count of 80 sc on solid rows and 40 dc separated by ch-1 spaces on mesh rows.
Info :
Change to a variegated or self-striping autumny yarn here if you prefer the background to have tonal variation. To change color, fasten off previous yarn and join new yarn with a sl st in the first st of the next row.
Round 16-35 :
Continue repeating Row pattern: (Row Solid: sc across; Row Mesh: ch2, dc, *ch1 sk1 dc*) for 20 additional rows (this brings the panel to 32 rows total from the starting sc base). Maintain stitch counts: 80 sc on solid rows; 40 dc + 39 ch-1 sps on mesh rows.
Info :
At this point check your length. The sample runner used a foundation of 81 ch and 80 rows of the repeat (solid+mesh alternating) to reach approx 36-38 inches. To lengthen, add repeats in multiples of 2 rows (one mesh + one solid) until desired length is reached.
Round 36-75 :
Repeat the mesh/solid pair for 40 more rows (20 mesh rows + 20 solid rows) or until the panel reaches your desired length. Maintain stitch counts: for each solid row 80 sc; for each mesh row 40 dc and 39 ch-1 spaces. (Total rows in sample: 72 repeats including initial foundation rows; adjust as needed.)
Info :
To create a slightly denser, more textured body, replace some solid sc rows with hdc rows every 8–10 rows. Example: after 10 mesh+solid repeats, do 1 row of hdc across (80 hdc) to add subtle texture. Mark these texture rows so you can mirror them along the entire length if desired.
Round 76 :
Final solid row before edging: Ch 1, turn. Sc in each st across (80 sc). Fasten off color if you plan to switch to a border color.
Info :
If you used variegated yarn for the background and want a crisp border, change to a solid border color (rusty orange or deep brown) now. Carry the background yarn along the edge if you prefer a tonal frame instead.
— Border (worked around entire rectangle) :
Round 77 :
Join border color with sl st in any corner stitch. Ch 1, sc evenly along the short edge, placing approximately 1 sc per row end space (for accuracy: pick up 1 sc in each row end to maintain 72–76 sc along the short edge depending on your row count). Work 1 sc in each top-of-row st along the long side, placing 2 sc in corner stitch to turn neatly. Continue around entire rectangle to meet starting point. Maintain counts approximately proportional to your row/column counts.
Round 78 :
Round 2 of border: Ch 2 (does not count as dc), *dc in next 2 sc, ch 1, sk next sc* around to create an outer openwork echo of the panel texture. Adjust repeats so you end with a balanced corner. (Count will match circumference: approximately 40 dc + ch-1 sps on long sides combined.)
Round 79 :
Round 3 of border: Ch 1, sl st into next st then sc in each st and ch sp around to tidy the border. Work 3 sc in each corner st to keep corners flat. (Total sc count around will vary; ensure even stitch density around all sides.)
Round 80 :
Round 4 (finished edge): Ch 1, turn; work 1 sc in BLO around to create a slight raised ridge, giving the runner a finished edge. Fasten off and weave in ends securely. (This gives a neat raised frame on both sides.)
Info :
Blocking: Lightly steam or wet-block the panel to even stitches and set the border. Pin the edges straight on a blocking mat and allow to dry fully if you like a very flat finished look. If you prefer a slightly relaxed, natural edge, skip blocking.
— Leaf Applique: Large Maple Leaf (Make 4) :
Info :
These large maple leaves create the focal points. Work with 3.5–4.0 mm hook for a slightly tighter edge. The leaf is worked flat in rows with pointed lobes achieved by combinations of increases and decreases; counts below assume starting ch 13 foundation to achieve leaf width approx 6–7 inches depending on yarn.
Round 1 :
Ch 13. Row 1: Sc in 2nd ch from hook and in next 10 ch (11 sc). (11)
Round 2 :
Ch 2, turn. Hdc in next st and across (11 hdc). (11)
Round 3 :
Ch 1, turn. [Sc2tog over first 2 sts] to start taper, sc in next 3 sts, inc (2 sc) in next st (center), sc in next 3 sts, [sc2tog] over last 2 sts. Count: decreases and increases net back to 11. (11)
Round 4 :
Ch 2, turn. Hdc across (11 hdc). (11)
Round 5 :
Ch 1, turn. Create central point: sc in first 2 sts, inc (2 sc) in next st, sc in next 3 sts, inc in next st, sc in last 3 sts. (13)
Round 6 :
Ch 2, turn. Hdc across (13 hdc). (13)
Round 7 :
Ch 1, turn. Form lobes: *sc2tog, sc in next 2, inc in next* across to accentuate points. After working across, you should have 13 sc. (13)
Round 8 :
Ch 2, turn. Hdc across (13 hdc). (13)
Round 9 :
Ch 1, turn. Work shaping for pointed lobes: sc in first 3 sts, inc in next, sc in next 3, inc in next, sc in last 4 sts. (15)
Info :
At this stage you have built a rounded central body. Each side of the leaf will be shaped into lobes using short rows and chains to create the jagged edges reminiscent of maple leaves.
Round 10 :
Ch 1, turn. On RS: Work right-side lobe (work short-row shaping). Sc in first 3 sts, ch 3, join with sl st into the 4th st to create a little spike; continue sc in next 9 sts to the end. (15 plus ch-3 loop on right side)
Round 11 :
Ch 1, turn. Mirror left-side lobe: Sc across filling loops, when you reach the left short-row point, ch 3, sl st in the corresponding base st to form the lobe, then finish sc to end. The leaf should now show two small pointed lobes. (15)
Round 12 :
Ch 2, turn. Hdc across to smooth shape. (15 hdc)
Round 13 :
Ch 1, turn. Work increases at predetermined points to define the five lobes: sc in 2 sts, inc, sc in 3, inc, sc in 3, inc, sc in 2. (18)
Round 14 :
Ch 2, turn. Hdc across (18 hdc). (18)
Round 15 :
Ch 1, turn. Begin point finishing: *sc2tog, sc in next 2* across; create pointed tips by working a small ch-3 loop and anchoring with sl st on each of the five lobe tips. Ensure symmetry left to right. (12 main sc after shaping)
Round 16 :
Ch 1, turn. Work 1 sc evenly around the outer edge of the leaf, working into ch loops to secure points and give a crisp outline. When you reach each lobe tip, work 3 sc in tip to accentuate the point. Fasten off leaving a long tail for sewing. (Edge count variable; ensure five pronounced points.)
Info :
Use a tapestry needle and a length of contrasting thread or yarn to embroider veins: draw a central midrib from base to tip and add 2–3 veins on each lobe using surface embroidery or duplicate stitch. I recommend dark brown for veins on bright leaves for contrast.
— Leaf Applique: Medium Maple Leaf (Make 3) :
Info :
Medium leaves are roughly 60–70% the size of the large maple and use a shorter foundation chain (Ch 9) and fewer rows. Use the same shaping principles (short rows, small ch loops for tips) to create a cohesive look.
Round 1 :
Ch 9. Row 1: Sc in 2nd ch from hook and in each ch across (8 sc). (8)
Round 2 :
Ch 2, turn. Hdc across (8 hdc). (8)
Round 3 :
Ch 1, turn. Sc in 2, inc (2 sc), sc in 2, inc, sc in 2. (10)
Round 4 :
Ch 2, turn. Hdc across (10 hdc). (10)
Round 5 :
Ch 1, turn. Short-row lobe shaping: sc in first 3 sts, ch 3, sl st to the base to create a tip, sc in the remaining sts. (10)
Round 6 :
Ch 1, turn. Mirror on opposite side: sc across securing tip loop. Then 1 sc around edge to neaten, fasten off leaving sewing tail. Embroider veins lightly if desired.
Info :
Make your medium leaves in orange and golden yellow. Block lightly to flatten and define the points before attaching to the main panel.
— Leaf Applique: Small Star Leaf (Make 6) :
Info :
These tiny star-like leaves are purely decorative accents. They work up quickly using ch 7 foundation and a combination of dc and sl sts to create a seven-point mini leaf.
Round 1 :
Ch 7. Row 1: Sc in 2nd ch from hook and across (6 sc). (6)
Round 2 :
Ch 2, turn. *Dc in next st, ch 1, sl st in same base st to form a small point*; rep across forming six tiny points. Fasten off leaving tail for sewing. (6 points)
Info :
These are ideal in bright yellow and small red accents; place them between large leaves to fill negative space.
— Leaf Applique: Elongated Birch Leaf (Cream) (Make 3) :
Info :
The cream elongated leaves give a lighter contrast and mimic birch or poplar leaves. They have an oval body with embroidered dark veins and small serrated edges. Use ch 15 foundation for a leaf roughly 4–5 inches long.
Round 1 :
Ch 15. Row 1: Sc in 2nd ch from hook and in each ch across (14 sc). (14)
Round 2 :
Ch 1, turn. Sc dec 1, sc in next 4, inc, sc in next 4, sc2tog, sc in last. (13)
Round 3 :
Ch 1, turn. Sc across (13). (13)
Round 4 :
Ch 1, turn. Create serration: *sc in next 2, ch 2, sl st in base st* across to make subtle teeth; finish sc to end. Fasten off leaving long tail for placement. (Edge and serrations variable)
Info :
Use a length of brown yarn and a yarn needle to embroider thin veins across the cream leaf; a single centre vein with short slanted stitches to either side is enough to suggest birch bark patterns. You can also use a thin running chain of single crochet to make dark markings like the sample photo.
— Assembly & Placement Map :
Info :
Before sewing, arrange all leaves on the runner to mirror the photographed layout or design your own. I suggest placing the largest maple leaves near the long center line spaced evenly, medium leaves interspersed, and small star leaves as fillers. Birch leaves add vertical contrast. Pin pieces lightly with blocking pins or sewing pins to test composition.
Round 1 :
Placement suggestion (Left to Right, Top to Bottom when runner is RS up): Top section: 1 large burgundy maple near top third, 1 small yellow star near its upper left. Second band: 1 medium orange maple and 1 cream birch leaf crossing slightly over it. Center band: 1 golden maple left of center, 1 small red star near right. Lower band: 1 large burgundy leaf near bottom left, 1 cream birch and 1 orange medium leaf near bottom-right cluster. These placements are approximate — vary to suit your taste.
Info :
When pinning, align leaf bases so that the base of each leaf points slightly toward the runner edge; this emulates how leaves tend to scatter and gives a natural flow. Leave a small amount of overlap between appliques so stitches will hide between layers.
Round 2 :
Sew each leaf to the panel using matched yarn and a whip stitch or ladder stitch. For invisible seams, sew along the underside edges and use small, close stitches. Work around each lobe and tip to anchor points so edges do not lift. Use a tapestry needle and sew with 2–3 passes for security on larger leaves.
Info :
Start by sewing the bottom-most leaves first (those that will remain under layers) and finish with top-most leaves, tucking lower leaves slightly under upper ones for natural layering. Keep stitches tidy and hide ends through several stitches before trimming.
— Embroidery & Finishing Touches :
Round 1 :
Using dark brown or black yarn and a yarn needle, embroider veins: for maple leaves, run a central stem from base to tip (small dashed satin stitch) and stitch 2–3 angled veins on each side; for birch leaves, make short irregular horizontal marks. Use single-ply yarn or a stranded strand to keep stitches delicate.
Round 2 :
Optional: Add French knot 'acorn' dots by making a small knot with brown yarn and sewing it near the cluster bases to mimic tiny seeds or nuts. These are purely decorative and optional.
Round 3 :
Lightly block the entire runner with leaves pinned in position to flatten and set shapes. Spray with water and allow to dry fully. Make sure embroidered veins are dry and secure before moving the runner.
Info :
To clean the runner in future, hand wash gently in cool water with mild detergent and reshape flat to dry. Avoid machine washing to maintain applique positioning and texture.
This autumn table runner brings the warmth of the season to your home with layered, handcrafted charm. Every applique leaf and embroidered vein adds personality and texture that will draw compliments at your next gathering. The mesh base is simple and soothing to crochet while the leaves let you indulge in creative play with color and shape. I hope this pattern inspires cozy afternoons and warm displays through the season! 🍁🧶