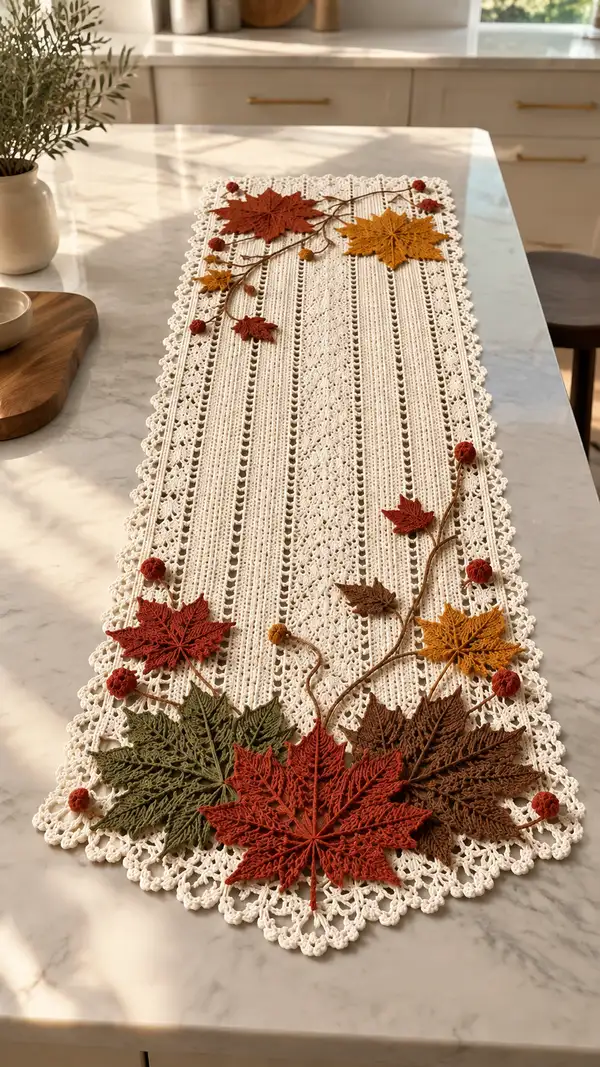
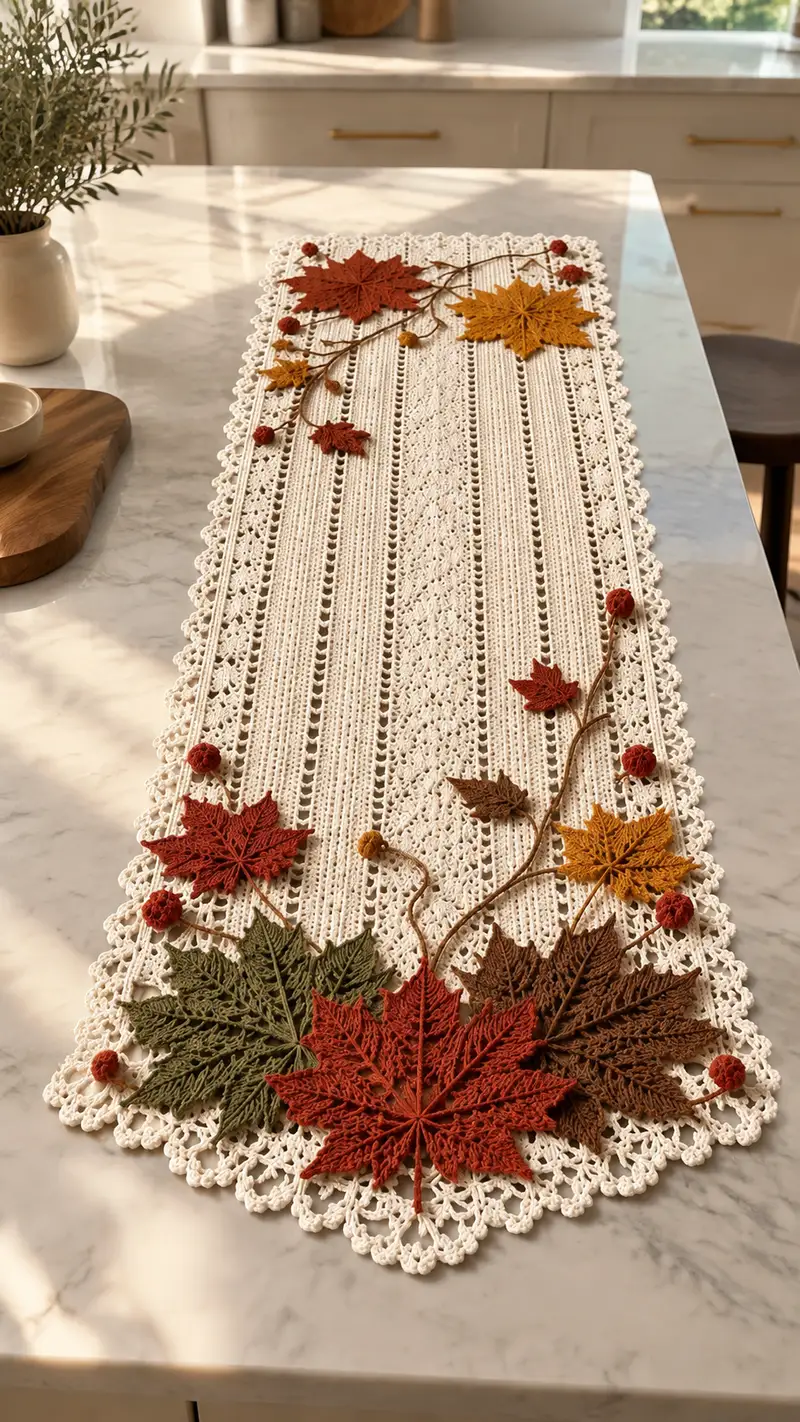
A long, lacy table runner worked in warm cream cotton with delicate scalloped edges and layered autumn leaf appliques in rust, mustard, olive and brown. The runner features alternating lacy panels and raised rib stripes, finished with a vintage-inspired shell border. Hand-stitched leaf motifs, tiny berry puffs and twisted vines are sewn on top for a three-dimensional fall display—perfect for seasonal decor or a thoughtful handmade gift.
Progress Tracker
0% Complete
— Materials & Gauge :
Info :
Gauge: 20 sts x 16 rows = 4in/10cm measured over rib stripe with 3.5mm hook. Gauge is less critical for length but important for motif scale and edge alignment. If your gauge differs, adjust foundation chain to maintain pattern repeat multiple.
— Runner Base (work flat in rows) :
Info :
The runner body is worked as a long rectangular panel in rows (we call them Rounds here). The foundation chain is a multiple of 12 plus 8 for the lace and shell repeats. The sample measures approximately 14in (35cm) wide by 62in (158cm) long before blocking. To make your runner longer or shorter, add or remove multiples of 12 chains keeping the +8 border chains.
Round 1 :
Foundation: ch 200 + 8 (multiple of 12 + 8). For this pattern work ch 208. Use 3.5mm hook. Turn. (208 chains)
Round 2 :
RS: Starting in 4th ch from hook, 1 dc in each ch across to last 3 ch, dc3 in last 3 ch (corner), turn to work back along opposite foundation chains: working into opposite side of foundation ch, 1 dc in each ch to end (208 dc). Info: This sets an even base; count to ensure 208 dc.
Round 3 :
Ch 1, 1 sc in first st, *ch 3, sk 2 sts, 1 sc in next st; rep from * across until 3 sts remain, 1 sc in each of last 3 sts. (Creates initial chain-space eyelets). (Approx 208 sts grouping)
Round 4 :
Ch 3 (counts as dc), turn. Dc in same st, *ch 1, sk ch-sp, (2 dc, ch1, 2 dc) in next sc; rep across creating small clusters and chain spaces. End with dc in last st. This forms the first lace cluster strip. (Pattern repeat working over whole width)
Info :
Maintain tension; lace will look dense until fully blocked. Use stitch markers to mark each 12-stitch pattern repeat across width to keep alignment. Work Rounds 5–10 to establish the alternating panel pattern.
Round 5 :
Ch 1, turn. Sc in first st, *ch 2, sk 1, sc in next 3 sts, ch 2, sk 2 (counts vary) making a slim mesh; rep across. This row evens out mesh for rib stripe to follow. (Even width maintained)
Round 6 :
Ch 2, turn. Work 1 hdc in each st across. This forms the first narrow rib stripe (hdc rib). (208 hdc)
Round 7 :
Ch 2, turn. 1 hdc in BLO in each st across to create raised rib ridge (208 hdc BLO). Info: Working BLO raises a thinner ridge which will contrast with adjacent lace panels.
Round 8 :
Ch 1, turn. Sc in each st across. (208 sc) This evens the ridge before the next lace panel.
Round 9 :
Ch 3, turn. *In next 4 sts work (1 dc, ch1, 1 dc) making fan-shaped shells separated by ch-2 spaces: (shell, ch2) pattern across; end with dc in last st. This begins the second lace panel. (Pattern repeat per 12 sts)
Round 10 :
Ch 1, turn. Sc in each st and ch-space across, placing 2 sc in shell centers for stability. (Approx 208 sc)
Round 11 :
Ch 3, turn. Dc in each st across including into ch-spaces to heighten lace, placing extra dc into central shell ch-space to create vertical columns. (208 dc)
Info :
At this point you have established the alternating motif: narrow rib (hdc, hdc BLO) + wider lace panel. Continue alternating these bands every 4–6 rounds across the entire length. Count rows as you go so appliques will align.
Round 12-15 :
Repeat Rounds 5-8 (rib stripe sequence) across four rows to lock the texture. (Maintain stitch counts across width; 208 sts each row)
Round 16-19 :
Repeat Rounds 9-11 (lace panel sequence) across four rows. This completes the second lace band. (208 sts)
Info :
Every 8 rows is one full band (rib + lace). The sample runner used 28 full bands to achieve 62in length. To adjust length, add or subtract full bands (8 rows each). Keep an even number of bands so that both ends mirror each other when edged.
Round 20-59 :
Repeat band sequence: Rounds 5-19 repeated until your desired length is reached. Keep exact stitch counts (208) each row. For reference, the sample worked bands until panel measured 62in before blocking (approx 224 rows total if each row counted as 1—here condensed into bands). Info: periodically measure and block as you go if you have room; blocking mid-project keeps edges true.
Round 60 :
After final band, finish with a solid stabilizing row: Ch 1, 1 sc in each st across (208 sc). This gives a firm edge to join the scalloped border. Fasten off and weave long tail for joining to edging if preferred. Info: Leave a 60cm tail for slip-stitch joining if you plan to work the scalloped border from the same piece.
— Scalloped Shell Border (work around perimeter) :
Info :
Attach cream yarn at any corner with sl st. We will work a continuous scalloped shell border around the entire rectangle. Use 3.0mm hook for crisper shells. Maintain turning corners by working corner shells.
Round 1 :
RS: Join yarn with sl st at corner. Ch 1, *sc evenly along long edge placing approx 1 sc per row edge (or 1 sc per 2 sts for tidy spacing) until you reach corner; in corner work (sc, ch 3, sc) to turn; continue along short edge same spacing. Repeat until you return to starting point. Maintain approximately 220 sc around depending on your join spacing.
Round 2 :
Shell round: *skip 2 sc, work (5 dc) in next sc, skip 2 sc, sl st in next sc; rep around. In each corner work (sl st, ch3, 5 dc, ch3, sl st) to create rounded corner shells. Adjust spacing to keep shells uniform. (Shell count depends on perimeter length)
Round 3 :
Ch 1, sl st into 2nd dc of each shell, *ch 3, sl st in center of next shell, ch 3, sl st back into 2nd dc to create picot edging between shells; rep around to form a lacy scallop. Fasten off and weave ends. Info: Block your piece flat using pins and a steam or wet-blocking method appropriate for cotton to open up lace and flatten motifs.
— Large Maple Leaf Applique (Make 5 - two large, three medium in sample) :
Info :
Leaves are worked in rounds to create a radial star then shaped into pointed maple lobes using post stitches and chain extensions. Work each leaf in its own color. Use 3.0mm hook for crisp points. Each leaf measures about 8-10in across for the largest, medium leaves are worked fewer rounds for 5-6in size.
Round 1 :
Make magic ring, ch 3 (counts as dc), work 11 dc into ring, pull ring tight and join with sl st to top of ch3. (12 dc) Info: This forms the central star base.
Round 2 :
Ch 1, sc in same st, *ch 3, sk next dc, sc in next dc; rep around creating 6 chain-3 loops. (12 sc + 6 ch3 loops)
Round 3 :
Join in back of each ch-3 loop: *(sl st, ch 6, 1 tr, ch 3, 1 tr) into loop, sl st into next sc; rep around. This begins 6 lobes. Info: The ch6+tr cluster builds lobe length.
Round 4 :
Ch 1, turn. Work along lobe: in the ch6 backbone work (1 hdc, 2 dc, 1 tr) into chain spaces, then in the central ch3 of lobe work a picot (ch 3, sl st into tip) for definition; repeat for each lobe. This adds height and shaping for point formation.
Round 5 :
Ch 1, fold each lobe and work 1 sc along one side of lobe, 1 hdc into tip, 1 sc along other side to anchor; after sc at base of lobe work sl st into base to create defined ridge. Rep for all 6 lobes. Info: This starts the sharp maple points.
Round 6 :
Ch 3, work 1 dtr, 2 tr into tip area to create a pronounced peak; work back down opposite side with 2 dc, 1 hdc; join at base. Repeat for all lobes. After completing 6 lobes you will have an expanded star with 6 main points and small in-between points forming a maple outline.
Round 7 :
Ch 1, working from RS, use front post and back post stitches to create raised veins: *from center to tip work 3 hdc BP, 3 dc FP, 1 tr at tip, then reverse back; secure at base with sc. Repeat for each lobe. Info: Front and back post stitches create the raised rib look of veins seen in the photo.
Round 8 :
Ch 1, use dtr and tr to make small serrated edges along outer edge: *(sc, ch 2, sc) in each outer stitch to mimic serrations; rep around. Fasten off leaving 40cm tail for sewing. Block leaf by pinning to shape with vein ridges in place. Repeat to make additional leaves in different colors. (Each large leaf ≈ 8–10in after blocking)
Info :
To make medium leaves, stop after Round 6 or reduce chain counts in Rounds 3–4 to shorten lobes. Always block leaves pinned over a template to ensure consistent size and symmetrical lobes.
— Small Simple Leaf Applique (Make 6) :
Round 1 :
Ch 9; in 2nd ch from hook sc, hdc, 3 dc, hdc, sc to end. (This creates a small pointed leaf shape). Info: Work flat row then slip-stitch along center back to gather slight cupping if desired.
Round 2 :
With RS facing, sl st around edge adding picots at the tip: *(sc, ch 2, sl st) to create subtle serrations. Fasten off leaving tail for sewing. Block flat.
Info :
These small leaves are used as filler along vines and edges; use darker colors for contrast.
— Curled Berry Puff (Make 12) :
Round 1 :
Make magic ring, ch 1, 8 sc in ring, join with sl st. (8 sc) Pull ring tight. Info: This makes the berry base.
Round 2 :
Ch 1, 2 sc in each st around (16 sc). Stuff lightly with a small pinch of fiberfill to keep berry soft. Do not overfill. (16 sc)
Round 3 :
Ch 1, (sc, dec) around - (sc, sc2tog) to create a rounded cupped shape; work 12 sts remaining. Fasten off leaving long tail and gather center tightly by threading tail through front loops and pulling closed. Secure and weave tail inside berry. Info: For bobble-like berries you can work a round of front loop puff stitches (yo, pull up loop 5 times, yo and draw through 10 loops) then anchor with sc around.
— Twisted Vine (Make 2 long vines) :
Info :
Vines are crocheted cords using the chain and slip-stitch twist method to create a natural, bendable cord that holds a slight curl. Use Brown or Olive yarn. Make vines as long as needed to drape from top to bottom; sample vines are 40–60in to allow meandering across the runner.
Round 1 :
Ch 120 (or desired length). This is your foundation chain for a long vine cord. Info: To shorten or lengthen, add or subtract in multiples of 10 for balanced twist.
Round 2 :
From 2nd ch from hook, sl st in each ch to end. Do not turn. You now have a long slip-stitch cord. Pull one side to twist and coil; steam-block slightly to set curl if desired. Fasten off leaving long tails for sewing. Info: To thicken vine, make two cords and twist them together then sew along seam with yarn needle to join.
— Leaf Vein Embroidery (on leaf RS) :
Info :
Use contrasting yarn (slightly darker shade) and yarn needle to stitch prominent veins on the RS of each leaf. Use backstitch or stem stitch following the crocheted raised posts. This deepens the vein effect and matches the photo's sculptural look.
Round 1 :
Thread yarn needle with long tail. Anchor at center of leaf base on RS. Use straight stitch from center to tip along each lobe, making 2–3 parallel seamed veins per lobe. Secure and weave tail on WS. Info: Keep stitches raised by taking needle under post stitches rather than through stitch holes.
— Assembly Prep & Placement :
Info :
Block all pieces (runner panel, leaves, small leaves, berries, vines) fully before assembly. Use a template or measuring tape to position motifs symmetrically. In the sample, the bottom end cluster uses 5 layered leaves (one large rust center, olive left, brown right, small mustard and rust overlays), while the top end uses two larger leaves and a vine that drapes down the center. Ensure you leave at least 1in of margin from scalloped edge to avoid crowding.
Step 1 :
Lay the runner flat on blocking board or table. Position the largest leaf cluster at one short end: center the biggest leaf slightly off-center toward the right as shown in sample photo. Arrange 2–3 other leaves overlapping at angles to create a natural spread. Pin each leaf in place using blocking pins or sew pins to mark positions.
Step 2 :
Arrange long vine cords before sewing: allow vine to meander with gentle curves across the runner, tucking parts under leaf edges and over lace spaces to mimic natural growth. Pin vine at intervals every 3–4in to maintain curve before final stitching.
Info :
Take photographs of your placement from overhead before sewing; this helps you re-create symmetry when attaching the opposite end motifs. Test placement by moving leaves slightly until you are satisfied with composition.
— Sewing Motifs to Runner :
Round 1 :
Sew large leaves: using matching yarn and yarn needle, secure each leaf with small whip stitches through the base and a few stitches along overlapped edges. Use the 40cm tail left when fastening off to anchor the leaf discreetly along the vein ridges. Sew only through the top two layers where leaves overlap so underlying lace is not pulled tight. Info: Take care not to distort the scalloped edge when stitching near margins.
Round 2 :
Sew vines: lay vine cord paths and tack down every 2–3in with invisible ladder-like stitches using brown yarn. At junctions where vine passes beneath leaf edges catch a few threads from leaf underside to anchor vine securely. For thicker points or where berries will sit, sew the vine onto the runner with extra stitches and knot securely on WS. Info: Use a curved needle for easier under-leaf sewing.
Round 3 :
Attach berry puffs: position berries along vine ends and at leaf tips. Sew through berry centers and vine cord several times to make sure they stay put. For more dimensional berries, leave a short tail of vine poking out to secure bore into berry base then weave tail inside and hide. Info: For extra realism, reduce berry sizes by trimming fiberfill slightly or using smaller initial magic rings.
Round 4 :
Attach small leaves and scatterers: use small leaves to fill gaps on either side of vine. Sew them with a few small stitches at base only so tips remain slightly raised. This gives natural layered depth. Info: Slight curvature is achieved by couching only the base and leaving tips free.
Round 5 :
Finish by weaving all remaining tails to the wrong side through a few stitches and trimming close. If seams show, use tiny dab of fabric glue on WS for extra security—allow to dry completely before reblocking lightly. Info: Avoid glue on RS where visible; always hide glue on WS and near the seam allowances.
— Final Finishing & Blocking :
Round 1 :
Lightly steam block runner on blocking mat, pinning scalloped shells open and flattening leaf points. Do not press too hard on appliques; steam rather than iron to avoid flattening leaf texture. Leave to dry fully. Info: Blocking opens lace and sets motif placement for a professional finish.
Round 2 :
Trim any visible ends, re-tack any motifs that shifted during blocking. Hand-wash gently if desired in warm water with mild soap and lay flat to dry to keep shape. Info: Cotton will relax a bit after washing; re-block if necessary.
— Variation Ideas :
Info :
Change base color to warm cream, taupe or deep ivory for different moods. Use chenille or slightly thicker yarn for more sculptural leaves. For holidays, substitute leaves for holly or poinsettia motifs. To make a runner narrower, reduce foundation chain by multiples of 12 and work fewer bands. For a placemat set, work the same base but shorter and use single leaf clusters in the corners.
This timeless table runner pattern blends airy lacework with dramatic, sculpted leaves to create an elegant autumn centerpiece. With careful blocking and thoughtful placement of the appliques, your finished runner will look like a store-bought heirloom while being completely handmade. I hope this project brings a cozy, seasonal touch to your home and becomes a piece you treasure and use every fall. 🧶🍁✨