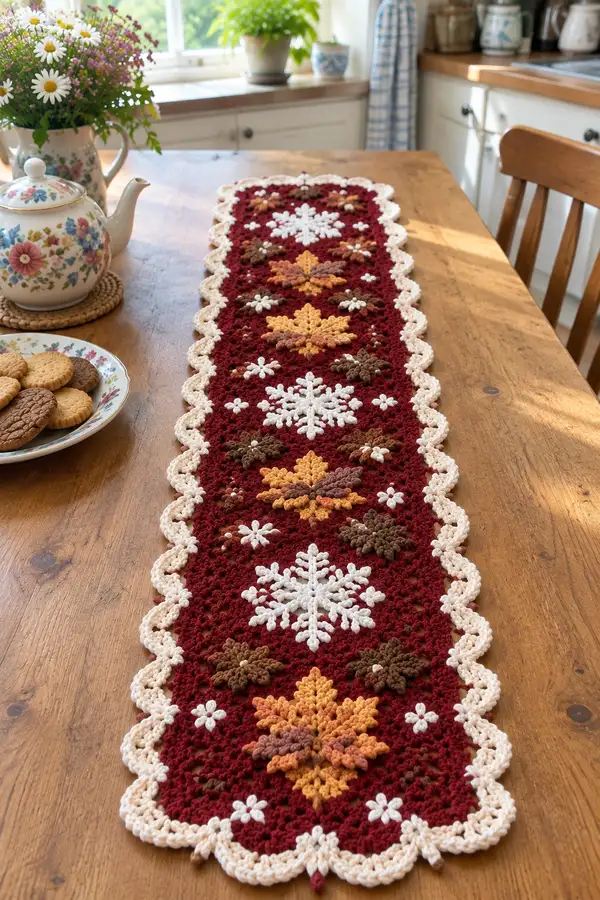
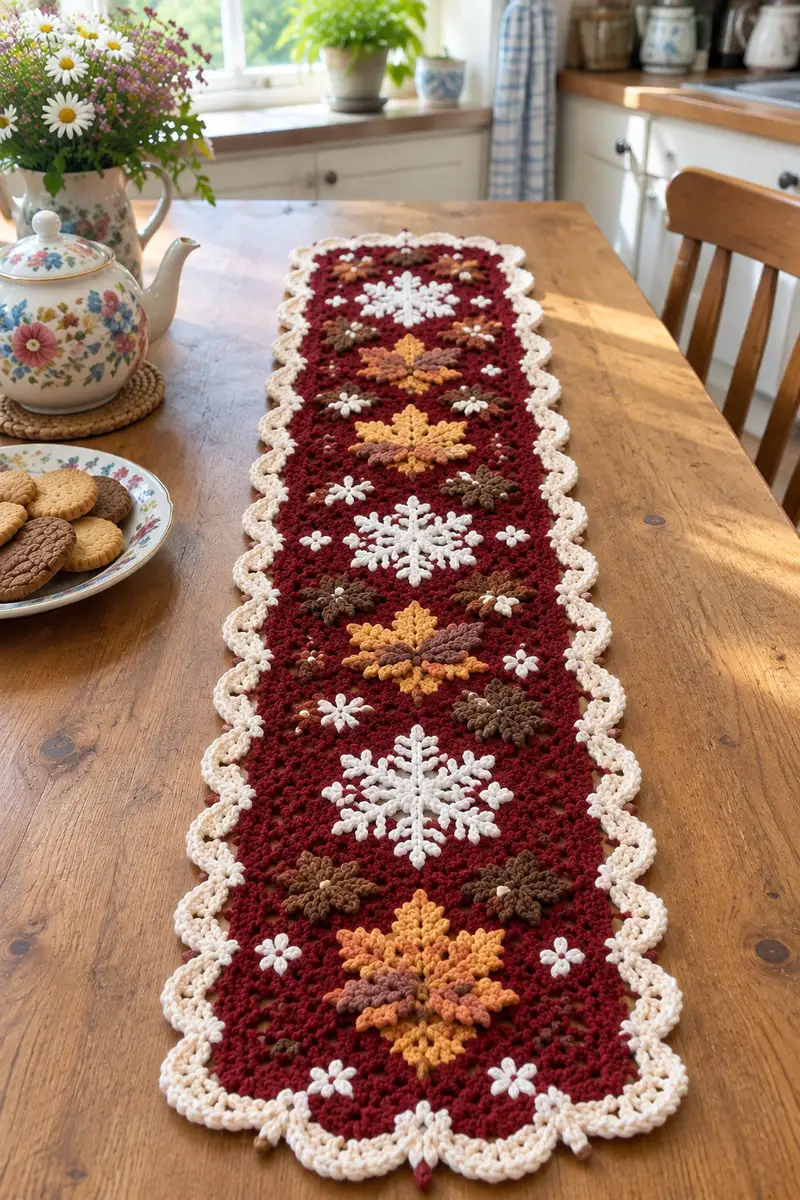
Create a warm autumn-to-winter table runner with rich burgundy background, layered maple leaves, crisp white snowflakes and a scalloped creamy border. This pattern uses textured puff clusters and join-as-you-go technique to place motifs directly into a rectilinear mesh, producing a slim elegant runner perfect for a dining table or sideboard. Finished piece shows layered colorwork, raised leaf petals and delicate picot-like snowflake arms for seasonal charm.
Progress Tracker
0% Complete
— Materials & Gauge :
Info :
Gauge is not critical for fit but affects finished runner size. Using suggested yarn and 4.0mm hook the sample runner measures approximately 11.5 inches wide by 38 inches long. If you change yarn weight or hook, measure a 4x4 inch swatch of the background mesh (clusters and dc rows) and adjust chain foundation accordingly.
— Notes & Techniques :
Info :
Throughout this pattern 'round' often refers to motif rounds. The runner is made from modular motifs (large snowflake, layered maple leaf, small 6-petal flower and 5-round filler rosettes) which are joined into a long narrow grid using a join-as-you-go mesh. Puff clusters are used for leaf texture; instructions for a 4-loop puff are included in the special techniques section. Work motifs with continuous rounds unless otherwise stated and use stitch markers to mark round starts.
— Special Technique: 4-loop Puff Stitch :
Info :
Yarn over, insert hook into stitch, yo and pull up loop, repeat 3 more times in the same stitch so you have 9 loops on hook (including initial loop), yo and pull through all loops, ch 1 to close puff and anchor it. Treat ch1 as a 'close' and count as a puff stitch. Use consistent tension so puffs sit evenly.
— Large Snowflake Motif (Make 6 total) :
Round 1 :
mr, ch1, 8 sc in ring, pull tight, join with sl st to first sc (8)
Round 2 :
ch3 (counts as dc), *ch2, dc in next sc; rep from * around to create 8 dc with ch2 spaces, join with sl st to top of ch3 (8 dc, 8 ch-2 sps)
Round 3 :
sl st into next ch-2 sp, (ch3, 2 dc, ch2, 3 dc) in same ch-2 sp to form first petal, *skip next dc, (3 dc, ch2, 3 dc) in next ch-2 sp; rep from * around; join to top of first st (8 petals)
Info :
Petal round creates the base for snowflake arms. Keep tension even so petals are uniform. Use white yarn for contrast.
Round 4 :
sl st to center of a petal (the ch-2 sp), ch1, sc in same sp, ch3, sc in same sp; sc in each center ch-2 sp around forming 8 sc peaks separated by ch3 loops, join (8 sc, 8 ch-3 loops)
Round 5 :
*Work in each ch-3 loop: (sc, ch3, sc) into loop to form an arm extension; rep around to form 8 arms; join with sl st (16 sc and 8 ch-3 picot loops)
Round 6 :
In each arm picot loop work: sl st, ch4, tr in same loop, ch1, tr in same loop, ch4, sl st back into base to create tall arm; repeat around; finish with sl st (8 arms)
Round 7 :
With white, in each arm work 3 sc along the base to firm the arm, then ch1 and sc into adjacent base between arms to stabilize; join (approx 40 sc total depending on spacing)
Round 8 :
Work decorative picots on each arm tip: ch3, sl st into 2nd ch from hook to make small picot, fasten off and weave ends. Flatten motif lightly when blocking so arms are even.
Info :
Stitch count in rounds 6-7 will vary slightly depending on how many stabilizing sc you place between arms; aim for a symmetrical shape with 8 distinct arms. Block motifs flat before joining to the background to ensure neat assembly.
— Layered Maple Leaf Motif (Make 6 large layered leaves) :
Round 1 :
mr, ch1, 6 sc in ring, join with sl st (6)
Round 2 :
ch2, hdc in same st, (2 hdc in next st) x5, join (12)
Round 3 :
ch2, *[2 hdc, ch1, 2 hdc] in same st (forms base of first leaf lobe), skip next st, sc in next st; rep from * around to create 6 lobes, join (each lobe uses 4 stitches' worth)
Info :
Round 3 begins to form lobed maple silhouette. Work loosely in this round so lobes can be elevated later.
Round 4 :
Change to mid-leaf color (rust). In each lobe: join with sl st at base, ch3 (counts as dc), 4 dc in same lobe top, ch2, 5 dc in same top, sl st back to lobe base to form tall petal (6 lobes)
Round 5 :
Using puff stitch to shape petal ridges: in each lobe top work (puff, ch1, puff) across the lobe top, finish with sl st at base; join (12 puffs total)
Info :
For the puff rounds, use the special 4-loop puff technique described earlier. Keep loops regular to get even dimensional texture.
Round 6 :
Switch to golden yellow for highlight layer. Working between the rust puffs, create small V-shaped picks: sl st into space, ch2, (hdc, dc, hdc) in same space to create a pointed detail at each lobe tip; rep around; join (6 highlights)
Round 7 :
Work a reverse round around the entire leaf to create a neat edge: sc evenly around lobes (approx 36 sc depending on tension), join and fasten off. Leave a long tail for sewing to background.
Info :
For layered look, stack one rust leaf and one golden highlight leaf and orient them slightly offset when sewing to create a dimensional maple leaf. Make 6 layered leaves total and block lightly.
— Small 6-Petal Flower Motif (Make 16) :
Round 1 :
mr, ch1, 6 sc in ring, join (6)
Round 2 :
*ch3, sl st in next st to form picot petal; rep from * around to form 6 small petals, join and fasten off (6 small picot petals)
Info :
These tiny white flowers are decorative fillers; keep them tight and make many. Sew them onto the background with a single thread through the center.
— 7-Round Filler Rosette (Make 12) :
Round 1 :
mr, ch1, 8 sc in ring, join (8)
Round 2 :
ch2, 2 hdc in each st around, join (16)
Round 3 :
ch1, *sc in next st, ch2; rep around, join to form ch-2 spaces between scs (16 sc, 16 ch-2 sps)
Round 4 :
In each ch-2 sp: (3 dc) to make puffy cluster petals; join (16 petals)
Round 5 :
sc around entire rosette to tidy edge (48 sc), join
Round 6 :
ch1, sc in each st for a firm round (48 sc), join
Round 7 :
fasten off leaving tail for sewing; make 12 rosettes in warm brown shades
Info :
These rosettes are used in clusters around main motifs to balance the layout. Make in two brown tones for visual interest.
— Background Rectangular Mesh Panel (Main Runner Field) :
Info :
Work a rectangular grid of alternating cluster rows and dc rows to create the burgundy background that motifs will be joined into. The final runner shown uses 26 mesh rows for the narrow long field and a foundation chain that yields 56 mesh columns. The exact number of rows/columns can be adjusted to match your finished motif layout; below instructions are for the pictured layout.
Round 1 :
Using burgundy, foundation chain 169+3 (to turn) to create a width that will accommodate motifs spaced as pictured. (170 base chains before turning)
Round 2 :
ch3 (counts as dc), dc in next 3 sts, *ch2, skip 2, dc in next 4 sts; rep across to last st, dc in last st, turn. (This establishes even dc blocks separated by ch-2 mesh spaces)
Round 3 :
ch1, sc in each st and in each ch-2 space across; turn (st count will match row 2 total stitches including spaces)
Round 4 :
Ch3, dc in next 3 sts, *ch2, skip 2, dc in next 4 sts; rep across; turn. Repeat Round 3 and 4 to create a sturdy alternating mesh (counts stable each two-row repeat).
Round 5-26 :
Repeat Rounds 3-4 (alternating sc row and dc row pattern) until you have completed 26 mesh rows total (13 dc rows and 13 sc rows). This produces a balanced field to accept motifs. End after an sc row to prepare for join-as-you-go placements. (Maintain same stitch rhythm across)
Info :
Place the completed snowflake, leaf and rosette motifs on top of the mesh using pins to match the layout in the photo: center snowflakes spaced evenly down the runner with layered leaves offset between them. Leave roughly 6-8 dc spaces between major motifs and smaller flowers to mimic pictured spacing.
— Join-As-You-Go Placement & Joining Rounds :
Round 1 :
With mesh still on hook, place first snowflake motif where desired and align a motif edge with mesh ch-2 spaces. Work sc around snowflake edge, joining to mesh by inserting hook through mesh ch-2 spaces and sl st to secure every 3-4 sc as you go. Continue around to attach securely (approx 48 sc join points depending on motif)
Round 2 :
Attach layered maple leaf in the same fashion: position leaf and use long tail to sew through leaf base and into mesh ch-2 spaces with a yarn needle placing stitches every 2-3 stitches; weave tail to back and secure. Repeat for each large motif across the runner field.
Info :
When joining, aim for consistent stitch density so motifs sit flush not puckered. Use pins to hold motifs before sewing or use sl st sparse joins if you prefer crocheted joins. For 3D leaves, sew through round 7 leaf base into mesh only, do not compress leaf layers when attaching—allow them to layer for depth.
Round 3 :
After motifs are positioned, tidy edges by working a round of sc around each motif joining any small gaps with 1 sc in mesh spaces; work extra sc under petals to stabilize. This round acts as reinforcement. Fasten off and weave ends.
— Small Flower and Rosette Placement Rounds :
Round 1 :
Sew small 6-petal white flowers into ch-2 mesh spaces around larger motifs using a single connecting stitch in the center; place clusters of 2-3 rosettes in the spaces between leaves and snowflakes to achieve even fill.
Info :
Balance is key: place white flowers near snowflakes to echo white color and place brown rosettes by leaves for grounded warm clusters. Step back often and view the runner from a distance to check layout symmetry.
— Decorative Accent Beads & Tiny Dots :
Round 1 :
Optional: Use tiny cream French knots with embroidery thread or 1-2 round beads sewn into the center of rosettes and the heart of snowflakes for sparkle. Use a yarn needle and cotton thread to stitch beads securely through motif centers and into mesh backing.
Info :
If the runner will be used for everyday table traffic avoid beads; instead use stitched-on tiny white yarn knots made with a 3 strand embroidery knot to mimic the tiny bright dots seen around motifs.
— Scalloped Cream Border (worked in 3 rounds of cream) :
Round 1 :
With right side facing, join cream yarn in any corner, ch1, sc evenly around entire runner edge working 3 sc in each dc cluster valley and 1 sc in each sc across; at corners work (3 sc, ch2, 3 sc) to create a smooth corner; join (sc count varies by runner width)
Round 2 :
ch3, *skip next sc, (5 dc) in next sc (shell), skip next sc, sl st in next sc; rep around to form scallops. At corners work a slightly larger shell (7 dc) to keep even curvature. Join with sl st to top of first ch3.
Info :
Spacing of shells should produce a balanced scallop. If scallops bunch up, add an extra sl st between shells in that section; if scallops gap, remove one sl st between shells.
Round 3 :
To give rope-like twisted edge, work 1 sc across each shell shell top then *ch5, sc in tip of shell to form picot loop; rep around. Finish with a sl st and fasten off, weave ends to back side.
Info :
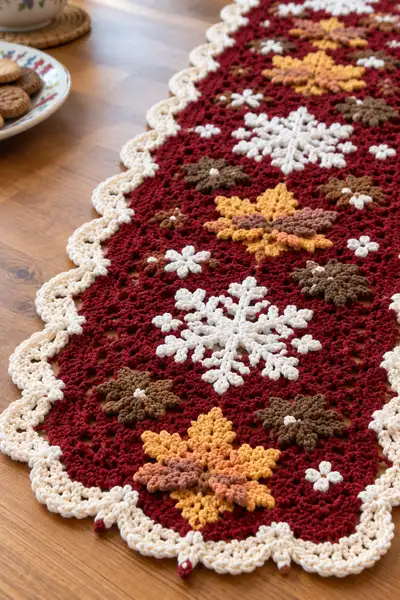
Optional extra: for the tiny burgundy drop points shown at the scallop centers in the photo, add a short picot of burgundy: attach burgundy at each scallop center and make (sl st, ch3, sl st) then secure and weave in. These give the pointed red cues visible at scallop tips.
— Finishing & Blocking :
Round 1 :
Weave in all ends on the wrong side using a yarn needle. Trim ends neatly. Lightly mist the entire runner and pin out on a blocking board to square the edge and give scallops crisp shape. Allow to dry completely before use.
Info :
Blocking is essential to opening puff stitches and evening motif shapes. Use rust-proof pins and allow at least 12-24 hours to dry depending on humidity.
— Care Instructions :
Info :
Hand wash gently in cool water with mild detergent and reshape while damp. Do not tumble dry. For synthetic blends you may be able to use a gentle machine wash in a laundry bag but block immediately after washing.
Final Info :
This pattern uses approximately 120-150+ small rounds across all motif and border sections when counted individually (snowflakes ~8 rounds each, leaves ~7 rounds each, background mesh ~26 rows, scallop border ~3 rounds plus join-as-you-go and finishing steps). Adjust quantities to fit your preferred length and spacing.
This Autumn Leaves & Snowflake runner brings seasonal warmth to your table—combining textured maple leaves, delicate snowflakes and a soft scalloped edge in a rich burgundy field. The layered motifs and tactile puff stitches make this a delight to crochet and to display. Whether as a holiday centerpiece or an autumn accent, it's a pattern you can treasure and customize. 🧶🍁❄️