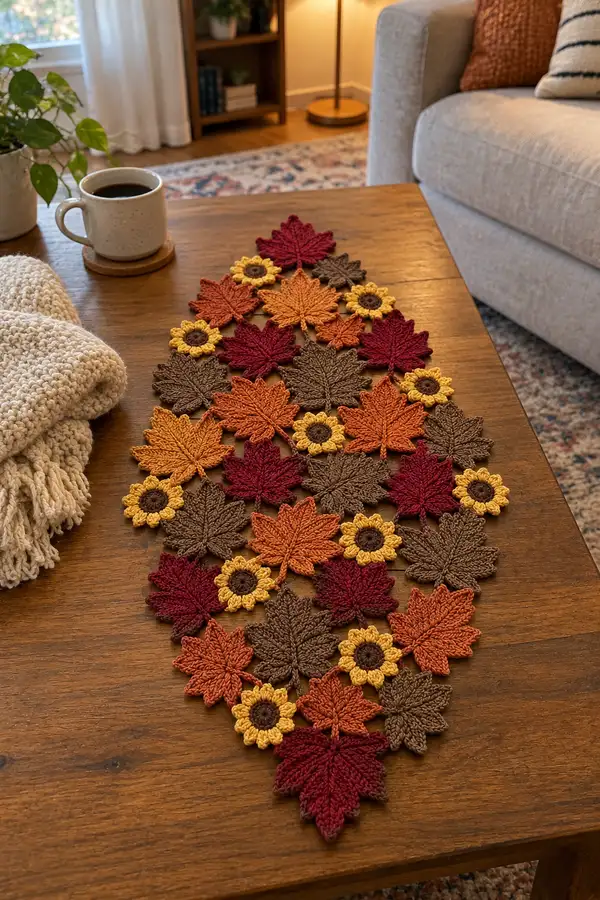
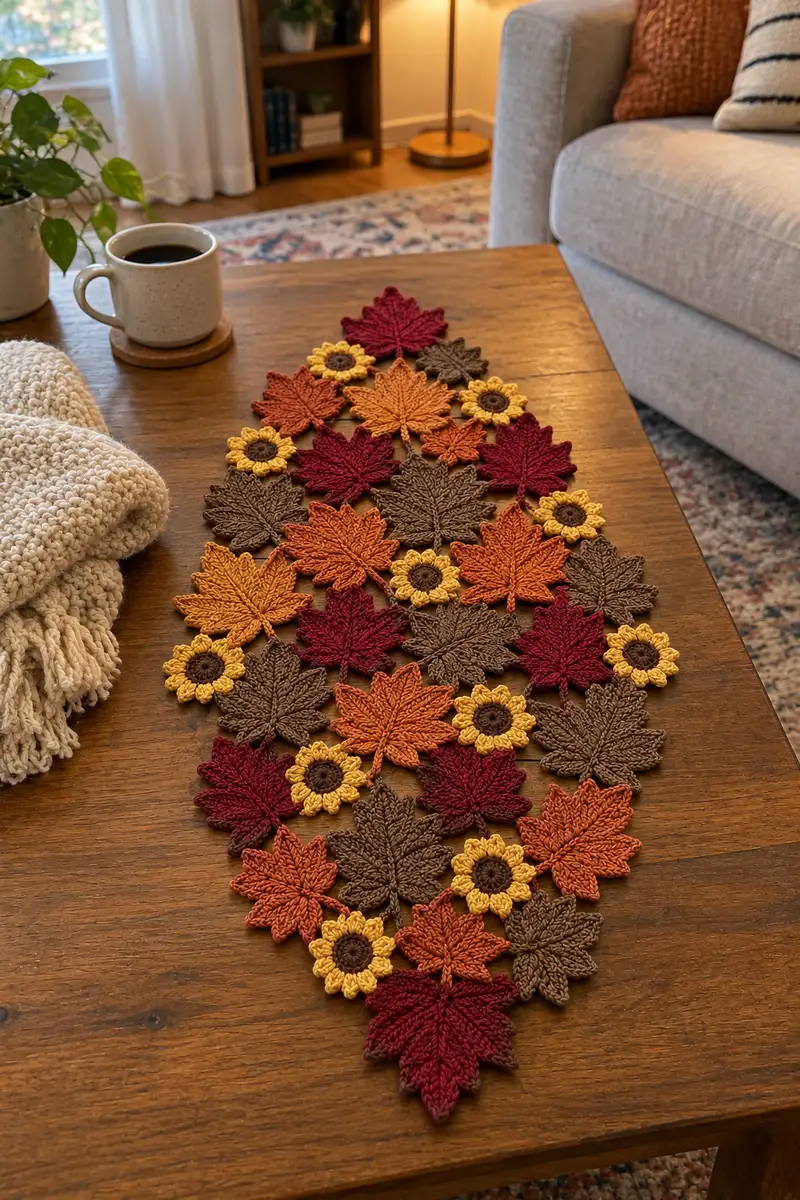
Create a warm, autumn-inspired oval table runner made from joined maple leaf motifs and cheerful sunflower accents. This pattern uses rich fall colors—deep burgundy, burnt orange, warm brown and mustard—to form a pointed-ended runner that lays flat and looks hand-stitched. Each leaf is crocheted flat with defined veins and textured edges; sunflowers are worked in rounds and added between leaves for contrast. Perfect for seasonal tables, centerpieces or gifting.
Progress Tracker
0% Complete
— Overview :
Info :
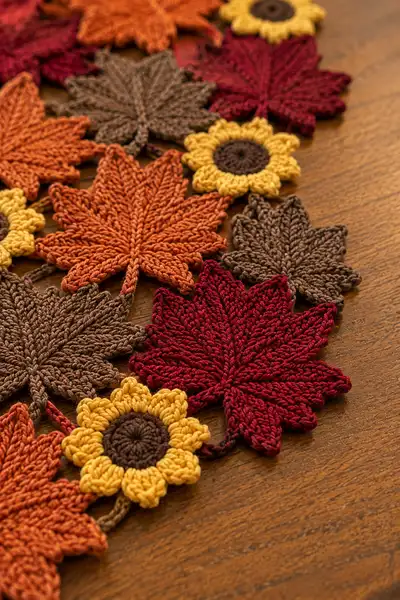
This pattern is built from two primary motifs: a detailed flat Maple Leaf motif and a small Sunflower motif. Leaves are worked flat in the round with front-post and back-post stitches forming a raised central vein and radiating ribs. Sunflowers are worked in small rounds and remain flat to sit in the gaps between leaves. Motifs are blocked and then joined with small 3-ch chain bridges and whip stitch joins to create an oval runner with pointed ends. Use consistent tension and block motifs before joining.
Info :
Gauge is not critical for this decorative runner but keeping consistent stitch size across motifs will ensure a neat join. With worsted cotton and a 4.0mm hook, each maple leaf will measure approximately 5.5-6 inches (14-15 cm) across at its widest point; sunflower motifs approx 2.5-3 inches (6.5-7.5 cm) across. Final runner measures approximately 12-14 inches wide by 36-40 inches long depending on spacing and number of motifs used.
— Maple Leaf Motif (Work 21-24 leaves in colors as shown) :
Round 1 :
Start: Using your chosen leaf color, make a magic ring. Ch1 (does not count), work 6 sc into the ring. Pull ring closed. (6)
Round 2 :
Inc in each st around (work 2 sc in each stitch) — 6 inc. (12)
Round 3 :
(1 sc, inc) x6. Place marker to mark the end of round. (18)
Round 4 :
(2 sc, inc) x6. Continue placing marker at round start. (24)
Round 5 :
(3 sc, inc) x6. This expands the base for the leaf lobes. (30)
Info :
These first five rounds build a small circular base that will anchor the point lobes. Keep tension even and do not turn your work at the end of rounds; work spirally or join with sl st per your preference but maintain consistent starting point using a stitch marker.
Round 6 :
(4 sc, inc) x6 (36)
Round 7 :
(5 sc, inc) x6 (42)
Round 8 :
(6 sc, inc) x6 (48)
Info :
At this stage you have a flat disc. We will start establishing 6 primary ribs/lobes for the maple leaf (six main points). If you prefer a 7-point leaf you can adjust repeats; this pattern uses 6 symmetrical lobes for stability and consistent joining.
Round 9 :
1 sc in next 3 sts, then work a 5-stitch point (hdc, dc, tr, dc, hdc) all into next stitch to form a lobe point; 1 sc in next 6 sts; repeat the 5-stitch point into next stitch; continue to create 6 points total evenly spaced. After completing 6 points you will have expanded by 6×4 additional stitches (24 added). Stitch count: (48 + 24) = 72. (72)
Info :
Points use taller stitches to create the sharp maple tips. Place the points at even intervals — use the stitch marker to identify quarter and mid-points if needed. If you find the points too tall, substitute tr for dc or hdc as needed to suit your yarn and hook.
Round 10 :
1 sc in each st around to even out the row, keeping the stitches around each point tight. (72)
Round 11 :
Work in pattern to shape primary ribs: (3 sc, fpdc around next 3 post stitches to create a raised rib, 3 sc) repeat around; place markers at each rib start. Maintain count 72. (72)
Info :
FPDC here stands for front-post double crochet (US double) worked around the body of the stitch from the round below to create a raised central rib. Use a stitch marker to mark rib centers so future rounds align veins consistently.
Round 12 :
1 sc in each st BLO (72). Working BLO here creates a subtle ridge along the edge so the veins remain prominent.
Round 13 :
Work shaping round: (2 sc, dec) x24 (48). Decrease slightly to refine the shape around the points. (48)
Info :
Begin thinking about the leaf stem: we'll form a narrow tapered stem from the base of the round in a later small chain-and-slip-stitched stem. If you plan to join leaves with thin chain-bridges, leave a long tail for those joins at the end of the motif.
Round 14 :
(1 sc, dec) x16 (32)
Round 15 :
1 sc in each st (32)
Round 16 :
Work a textured vein round: *ch2, skip next st, sc in next st; (fp around corresponding rib from round 11 across 3 posts), sc in next st, ch2;* repeat across to create small chain arches over the ribs. Keep count 32. (32)
Info :
These chain arches and front-post ribs define the veins. If you want deeper vein definition, work an extra round of fpdc over each rib (see alternate technique below): fpdc 1 into the center post of each rib and then work sl st in the chain arches.
Round 17 :
1 sc in each st (32)
Round 18 :
(2 sc, inc) x8 (40)
Round 19 :
(3 sc, inc) x8 (48)
Info :
Round 18-19 re-expand the motif toward the outer lobes so the leaf maintains point definition. These small increases help the lobe tips lie flat once blocked.
Round 20 :
Decorative edge forming the serrated leaf outline: *(sc, hdc, dc, hdc, sc) in next 5 sts, skip 1 st* repeat around — this makes small scallops at the edges of lobes. Maintain count 48 if you skipped evenly; if counts vary, adjust by adding sc between scallops. (48)
Round 21 :
1 sc in each st, working in FLO to create a subtle inner ridge (48)
Info :
At this stage the leaf shape is clearly formed. Fasten off leaving a long tail (~40-50cm / 16-20 inches) for sewing and join chains if you plan to connect motifs directly. We will add a stem next.
Round 22 :
Stem: Reattach yarn at the base center of the leaf, ch12 (or 10 for shorter stem), sc in 2nd ch from hook and across back along the chain to base, sl st into base to anchor. Fasten off and leave tail for joining. (approx 10 sc along chain)
Info :
Make as many leaf motifs as your layout requires. Alternate colors: burgundy, orange, brown as pictured. Block each leaf flat with pins to emphasize points and veins. Use steam or damp-blocking according to yarn manufacturer instructions. Allow to dry completely before assembly.
— Sunflower Motif (Make 8-10) :
Round 1 :
With dark brown center color, make a magic ring, ch1, work 8 sc into ring. Pull tight. (8)
Round 2 :
Inc in each st around (8 inc). (16)
Round 3 :
1 sc in next st, (inc in next) x8 — create a slightly raised center. (24)
Info :
If you prefer a flatter center, switch to a 3.5mm hook for these rounds to keep them tight. Fasten off center color and join mustard yellow yarn for petals.
Round 4 :
Join mustard yellow in any st on R3, ch1, *(sc, ch2, sc) in same st, sl st in next st* repeat around to make small loop bases for petals. You should have 12 small loops (24 chain spaces if worked as shown). Count depends on spacing but aim for 12 loops. (12 loops)
Round 5 :
Petals: In each loop petal: (sc, hdc, dc, hdc, sc) all worked into loop — creates a small rounded petal. Repeat across all loops. Fasten off and weave ends. (12 petals)
Info :
Sunflower motifs remain flat. If you want a more dimensional center, you can work an extra spiral of sc around the center before adding petals, but keep the center flat for a table runner to avoid wobble.
Round 6 :
Optional decorative round: join dark brown again and work a reverse sc round around the petal bases to lock them in and hide joins: 1 sc in each st around, working into back loop where possible. (24-30 depending on previous counts)
Info :
Make as many sunflowers as desired to tuck into leaf gaps. Block flat after finishing to make petals even and neat. Leave long tails for sewing.
— Connector Stems and Joining Chain Bridges :
Round 1 :
To join two motifs with an airy connection: with a matching or contrast thin yarn, attach at a stem tip, ch3 (this is the small bridge), sl st into the base stem of the adjacent motif to join. Repeat as needed to create the open lattice between motifs.
Round 2 :
For slightly stronger joins, ch4 and sc into the next motif instead of sl st; where motifs meet at corners use ch2 and a single sc to keep spacing tighter. No strict stitch count — place joins where natural negative spaces occur between leaf lobes and sunflower petals.
Info :
Join method: pin motifs on a blocking mat into your planned layout, then do a dry-join using long tails to baste them in place to visualise gaps. Perform final joins by whip stitch through back loops or use small chain bridges (ch3) secured with a sl st for an airy look. We recommend joining first along a center row, then building outward to keep the runner symmetric.
Round 3 :
Where three motifs meet, form a small three-point join: sl st into motif A, ch3, insert hook into motif B, pull up loop, ch3, insert into motif C and sl st to complete small triangle chain and secure with a sl st into motif A again. This method creates triangular connectors that add interest and stability. Use consistent chain lengths for uniform spacing.
Info :
Keep all connectors small (ch2-ch4) so the runner remains flat and table-safe. If you prefer a more solid runner, replace chain bridges with 1 or 2 rows of sc between motifs, but be mindful this will alter the overall width and length.
— Suggested Layout and Assembly Sequence :
Info :
Layout as pictured: form a central diamond row of leaves (5 leaves across at the widest center) with subsequent rows staggered above and below creating the tapered pointed ends. Alternate leaf colors to avoid clustering same shades together; place sunflowers in the small gaps between 2-3 leaves to act as visual anchors. See assembly steps below for exact placement technique.
Info :
Start joining at the center of your layout. Pin all motifs first. Join center row left to right, then add rows above and below. When joining, pick up the stem tail from one leaf and the neighboring leaf base — sew through both loops on the underside for a secure but invisible seam.
— Edging and Final Rounds (Optional) :
Round 1 :
Once all motifs are joined, work a subtle scalloped edging around the outermost leaf points for a finished look. Join contrast color at any edge point and ch1, sc evenly around outer edges catching only the outer loops of the leaf. The count will vary with runner size — aim to place 1 sc per 4-6 sts. (variable)
Round 2 :
Scallop round: *(sc, hdc, dc, hdc, sc) in every 4th sc along edge* repeat around the outer outline of the runner to form small decorative scallops. Fasten off and weave ends. (variable)
Info :
If you prefer a minimalist finish, simply weave in ends and gently block the entire assembled runner; the motif edges create a pretty natural outline without additional edging.
— Blocking and Finishing :
Info :
Pin the entire runner to your blocking mat, carefully shaping points and aligning motifs so the oval is symmetric. Use light steam or a damp cloth over the runner, do not press directly for cotton blends. Allow to dry fully (overnight) before trimming tails and final touch-ups. For extra crispness, a light spray starch can be applied (test on a spare scrap first).
Info :
Weave all tails to the underside of the runner so they do not show on the table surface. Trim close but leave enough to avoid ends working free (weave 2-3 cm beyond the trimmed length).
— Notes & Tips (used throughout pattern) :
Info :
1) Keep stitch markers at the start of rounds for motifs you work in spiral to prevent drift; 2) Work front-post stitches carefully, pulling up loops slightly higher on tall stitches to create pronounced ribs; 3) When joining, sew through back loops of both motifs to keep joins less visible; 4) For color changes, fasten off after a round and join the new color by pulling a loop through the first stitch of next round and tying a small tail-in for neater edges.
Info :
Color placement suggestion: alternate colors every other leaf and distribute sunflowers evenly — e.g., a sunflower after two leaves, then two leaves, etc., to follow the image spacing. Photograph your layout before joining to preserve your preferred arrangement.
This oval maple leaf runner brings autumn inside with layered leaves and sunny blooms — each motif a tiny bit of seasonal magic. The join-and-block finish gives the runner a crisp, tailored look while still feeling handmade and warm. I hope making this fills your afternoon with the satisfying rhythm of stitch-by-stitch assembly and a proud moment when you lay the finished runner on your favorite table. 🍂🧶✨