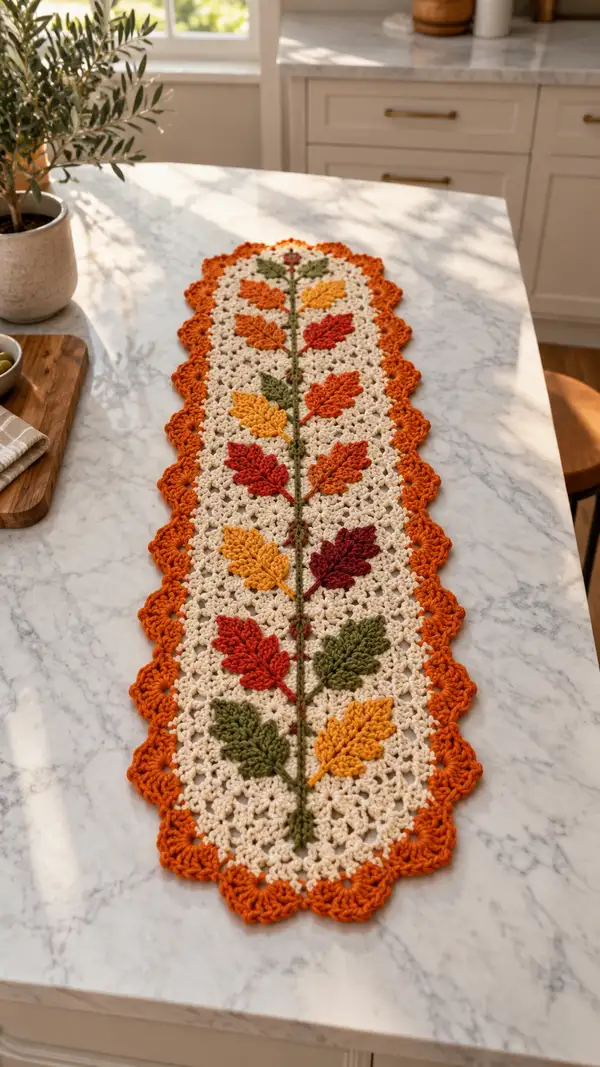
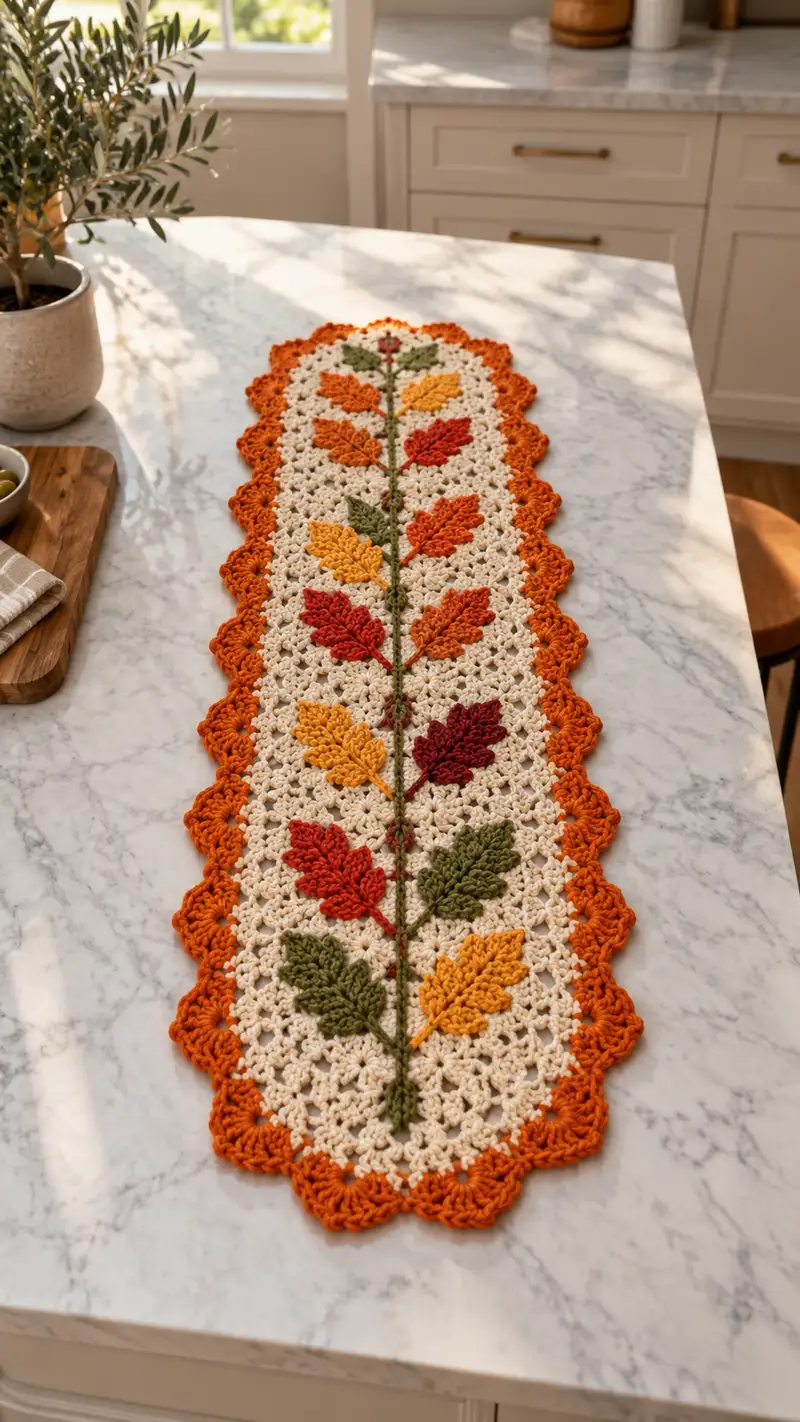
A warm, autumn-inspired table runner featuring a central vine with colorful textured leaves set against a cream openwork background and finished with a scalloped orange border. Designed to sit down the center of a table, this runner blends classic granny-style mesh with raised, worked-on motifs for a cozy fall display. Suitable for intermediate crocheters who enjoy color changes and surface-detail placement. The finished piece creates an elegant seasonal accent for a dining or console table.
Progress Tracker
0% Complete
— Notes & Gauge :
Info :
Runner finished size (approx): 12" wide x 36" long. Gauge is not critical for this decorative runner, but if you want identical size, aim for 16 dc x 8 rows = 4" in mesh. Use worsted weight yarn and a 4.0 mm hook to achieve similar drape.
Info :
Work flat in joined rounds for the oval mesh or row-wise as described. 'Round' in this pattern refers to sequential working steps either around the oval center or as rows; treat them as continuous numbered instructions. Use stitch markers to mark the center and the ends for future leaf placement.
— Foundation Panel (Mesh Center) :
Round 1 :
With cream yarn, ch 51. This creates the central chain for the oval mesh foundation. (51 ch)
Round 2 :
Row 1: RS: dc in 4th ch from hook (counts as dc + ch2), *ch 1, sk 1, dc in next ch; rep from * across to last ch, work 3 dc into last ch to turn the end, continue along opposite side of foundation chain by working dc into next ch, *ch 1, sk 1, dc in next ch; rep from * to end, join with sl st to top of turning ch. Total v-stitch-like units across each side: 17 v-st spaces per side; overall appearance forms an oval with semi-circular ends. (Approximately 70 dc + clusters)
Info :
At the end of Round 2 you will have created the initial oval shape. The 3-dc group in the chain ends creates the rounded ends. Keep your tension even. Use a marker at the center top and bottom to help orient leaf placement later.
Round 3 :
Row 2: ch 3 (counts as dc), *ch 1, dc in next ch-1 space (the ch-1 between pairs), rep from * across each side including into the top of the 3-dc group at each end (work a dc into the central dc of the end cluster to keep continuity); join with sl st to top of turning ch. Maintain 34 v-stitch-ch1 spaces across whole round (approx). (Even mesh)
Round 4 :
Row 3: ch 3, dc in same space, *ch 1, 2 dc in next ch-1 space; rep from * around working 2 dc clusters into those ch-1 spaces and 2 dc into center of end clusters for smooth rounding; join with sl st. This round begins slight widening to achieve the delicate openwork seen in the photo. (Cluster count increases slightly to build width)
Round 5 :
Row 4: ch 3, *ch 1, dc in next ch-1 sp, ch 1, sk next dc; rep across so the mesh alternates v-type stitches and small bars. Join with sl st. This is the start of a stable mesh that will form the cream field for applique placement.
Info :
Keep these mesh rows fairly consistent for the first 8 rounds so you have a stable background. Use the same stitch height (dc) throughout to maintain even holes that mimic the photo's lacy clusters.
Round 6-12 :
Row 5-11: Repeat Round 3 and Round 5 pattern alternately for 7 rows total (repeat pattern: ch3, *ch1, dc in next ch-1 sp; join—then next row ch3, *ch1, 2 dc in next ch-1 sp; join). Work evenly to build the central panel height until you reach approximately 16-18 rows from the start; you should have a rectangular central field with rounded ends beginning to form. Maintain same stitch count across these rows. (Even mesh rows)
Info :
At this stage, lay the piece flat to check the shape. If your oval is too narrow or too wide, adjust by adding or skipping one increase round earlier. The pattern intends the central strip to measure about 10-12" across the widest point before the border.
Round 13 :
Row 12: ch 3, dc in same sp, *ch1, dc in next ch-1 sp; rep to last, join. This is an even row to prepare for placement rounds. Keep stitches tidy; you will later attach leaves to specific rows described below. (Even mesh)
Round 14 :
Row 13: ch 3, *dc in next ch-1 sp, ch1; rep across; join. Continue to alternate the slightly different mesh rows to create a fabric with small diamond openings. (Even mesh)
Round 15-24 :
Row 14-23: Repeat Round 13 and Round 14 alternating as above until you have reached 24 total rows from the foundation (approximately half the desired runner length). This will create the lower half of the runner. The runner in the photo has approximately 40-44 mesh rows total; this builds the first half. Work even and block lightly if necessary before applique placement. (Even mesh)
Info :
Place a temporary safety pin or stitch marker in the central column of v-sts. Count the spaces along the centerline and make marks at even intervals where the leaves will be attached later. The pictured runner shows six pairings (12 leaves) spaced evenly along the center—mark those positions now.
Round 25 :
Row 24 center join: ch 3, dc in same sp, work pattern across mirroring the earlier rounds so the mesh remains symmetrical, preparing to create the top half by continuing for the same number of rows as the lower half. (Even mesh)
Round 26-34 :
Row 25-33: Repeat rounds to mirror the lower half (repeat the alternating two-row mesh pattern). Continue until you have 44 total mesh rows from the start of Round 2 (or until the runner reaches the desired length, approximately 36" including the border). At this point you have a long oval mesh panel ready for leaf attachment and border finishing. (Even mesh)
Info :
If your gauge produces a longer or shorter center, you may adjust the number of mesh rows to reach desired length before starting leaves and border. Blocking now helps to square and smooth the panel for appliquing leaves evenly.
— Leaf Motif (Make 12) :
Info :
Each leaf is worked flat in rows with short shaping and textured stitches (post stitches and clusters) to mimic the raised vein and lobed edges. Make 12 leaves in total: 2 at each pair position (left/right) down the runner. Colors used: mustard, burnt orange, rust red, burgundy, olive. You can vary order as desired; the photo alternates warm and cool autumn tones.
Round 1 :
With leaf color A (e.g., mustard), ch 8. This forms the leaf base chain. (8 ch)
Round 2 :
Row 1: sc in 2nd ch from hook, hdc in next, dc in next 2 ch, tr in next, dc in next, hdc in last; turn. (1 sc, 1 hdc, 2 dc, 1 tr, 1 dc, 1 hdc — 7 sts across). This creates an initial tapered profile.
Round 3 :
Row 2: ch 1, sc in first st, sc in next, hdc in next, dc in next 2, hdc in next, sc in last two; turn. (7 sts)
Round 4 :
Row 3: ch 1, sc in first st, inc sc (2 sc) in next, hdc in next, dc2tog over next two (work a pair of dc in same space then join—creates an indent), hdc in next, sc inc in last two; turn. (9 sts) Slightly expands the center of the leaf to create the wide middle.
Info :
Use post stitches on the right side of the leaf to create a raised midrib. You will work a central column of front post hdc stitches in the following rows to create the 'vein'. Keep the right side facing as you work to accent the texture.
Round 5 :
Row 4: ch 2 (counts as hdc), fp hdc around the center stitch below (front post hdc into the central st), hdc in next, dc in next 2, hdc in next, fp hdc around the central stitch from previous row, hdc in last; turn. (9 sts) The pair of fp hdc stitches form a subtle raised ridge down the center.
Round 6 :
Row 5: ch 1, sc across the row including two sc worked into each end stitch to create a slightly scalloped edge; turn. (11 sts) This builds the lobed leaf edge and sets up for the tapered tip.
Round 7 :
Row 6: ch 1, sc dec at tip (sc2tog at the center-most tip), sc across until last two sts, sc2tog to taper the other end; do not turn—finish off the narrow tip with a sl st. Fasten off leaving a 12" tail for sewing. (9 sts before finishing)
Info :
Weave the tail through the base row to create a small folded stem effect, then knot. Press the leaf lightly with blocking to flatten and define the lobes. Make 12 leaves in the color sequence desired. You can also make leaves by working mirrored rows to create left- and right-facing shapes—simply reverse increases and decreases as you reach the tip.
Round 8-12 :
Repeat Rounds 1-7 to make a total of 12 leaves. Vary colors across the run. Each leaf uses approximately 10-15 grams of yarn depending on size. Block and set aside. (Make 12 leaves)
Info :
For variation, you can work a row of slip stitches along one side of certain leaves to create a slightly cupped effect (use a 3.5 mm hook for tighter edge). This mimics the curled leaf edges in the photo.
— Vine & Stem (Surface Crochet) :
Info :
The vine is a simple surface crochet chain stitched down the center of the mesh to form a thin stem. Work the vine after the mesh is finished and before the border so you can attach leaves along it and then enclose with the border. Use moss green yarn for vine and small knots of brown/green as accents.
Round 1 :
With moss green yarn, join at the very center of the mesh at the bottom (mark previously). Ch 1, sc along the center column of ch-1 spaces up the runner using surface slip stitch method: insert hook through the front loop of the center dc of each mesh row, yarn over and pull through creating a short surface stitch; work a long chain and anchor it every 4-5 stitches with a sl st to the mesh so the vine sits raised. Continue until you reach the top mark. The vine should be a single continuous raised line approx 36" long.
Info :
To get the raised rope effect in the photo, work alternating sc and fp sc along that center line and when secure, use a tapestry needle to pull the vine slightly so it sits reversed (raised). You can also use a narrow cord beneath the surface stitch if you want a firmer ridge.
Round 2 :
Secure vine: fasten off leaving long tail. Weave the tail along the back securing every few stitches. The vine should be continuous with small knots for where leaves will join—these knots act as leaf attachment nodes and look like tiny berries in the photo. Create 6 small wrapped knots with green by winding yarn around the stem and securing with a small stitch at each leaf pair location. (6 knots)
Info :
Pin the leaves along the vine at the marked positions before sewing permanently. In the photo the leaves are staggered: at each marked position there is a mirrored left and right leaf pair, alternating sides as you move up the runner. Plan spacing to be ~2.5" between each pair for a balanced look.
— Attaching Leaves (Applique) :
Round 1 :
Positioning: Lay the mesh flat with the vine centered. Beginning at the bottom knot, align a pair of leaves (left/right) with their base stems meeting at the knot. Use small sewing pins to hold in place. Ensure the leaves' tips point outward and curves match the mesh openings. (Pair 1)
Round 2 :
Sewing: Using matching leaf-color yarn and a yarn needle, stitch each leaf onto the mesh by running small invisible whip stitches under the edge stitches of the leaf, working through the outermost rounds of the mesh so the stitches sit flush. Sew the leaf base firmly to the knot and weave the tail to the back. Repeat for the companion leaf on the opposite side. (Securely sew both leaves)
Info :
Attach leaves from the bottom upward so you can adjust placement as you progress. After sewing each pair, step back and ensure they lie flat and balanced. Trim any long tails and weave them in securely on the WS.
Round 3 :
Repeat Rounds 1-2 to attach the remaining 5 pairs (total 6 pairs = 12 leaves) along the marked knots at even intervals. After attaching all leaves, add one small decorative red or orange accent knot at the very top to mirror the visible top decoration in the photograph. (Attach all 12 leaves)
Info :
If you want slightly more raised leaves, sew only at the leaf base and a few stitches along the central vein, leaving the outer lobes free to stand gently off the mesh like natural leaves.
— Working the Scalloped Border :
Info :
The orange scalloped border frames the entire oval runner. You will work around the perimeter picking up stitches evenly. Use pumpkin-orange yarn and a 4.0 mm hook for the border. Start at the bottom center and work clockwise around. The border uses shell stitches (5 dc shell) and picots to form the scallop.
Round 1 :
With orange yarn and RS facing, join at any central insertion point along the long edge (preferably at the bottom center). Ch 1, work 1 sc along the edge every 3 stitches or into the corners/end rounds around the oval to create a foundation; maintain even spacing—approximately 120 sc evenly around the entire perimeter depending on exact mesh dimensions. (Foundation sc around edge)
Round 2 :
Ch 3 (counts as dc), *skip next 2 sc, 5 dc shell into next sc, skip next 2 sc, sl st into next sc; rep from * around to create scallops. End with sl st to top of initial ch-3. You should have approx 20-22 shells around the long edges plus 1-2 shells over each rounded end to keep the scallops even. (20-22 shells)
Info :
Adjust spacing: If your shells bunch up on the rounded ends, add an extra shell over the end or distribute one extra sl st between shells until scallops look even. Counting shells as you go across the straight edges helps maintain a symmetrical frame.
Round 3 :
Work into each shell: sl st into the center dc of each shell, ch 3, (4 dc, ch 2, 4 dc) all into same center dc to create a large scallop cluster, sl st to join. This deepens the scallop and creates the layered effect in the photo. Repeat around for all shells. (Large scallop clusters around)
Round 4 :
Picot round: ch 1, sc into the center of each large scallop, ch 3, sl st into first ch to create a small picot, sc into next scallop center; repeat around. This adds a small decorative point to the edge and echoes the detailed scalloped border in the photograph. Finish with sl st and fasten off. Weave tails securely. (Picots on scallops)
Info :
For the rounded ends: place a slightly larger scallop cluster (use 5 dc instead of 4) to maintain symmetry. If needed, add an extra sl st between scallops on the curved ends to even the look. Blocking the border while damp will help scallops lie flat and even.
Round 5 :
Optional edging detail: Using a contrasting shade of orange or a rusty brown, work a row of sc around the very outer edge, slip stitching into each picot to outline the scallops for a refined finished look. Fasten off and weave in ends on the WS. (Optional outline)
Info :
Ensure all ends are securely woven into the back and that the border tension is not overly tight. If scallops curl, flatten using gentle blocking or steam from a distance and pin to shape.
— Finishing Touches & Blocking :
Round 1 :
Light blocking: pin the runner to shape on a blocking mat, pulling scallops into smooth curves and aligning the vine straight. Use pins every 1/2" along the scallops and lightly dampen with a spray bottle (or use a steam iron on low from a distance). Allow to dry completely. This sets the mesh and defines the leaves and scallops.
Round 2 :
Final weaving: weave in any remaining tails using a tapestry needle. Secure the vine’s tails on the back of the mesh and stitch any leaf bases again if necessary to prevent lifting. Trim excess yarn ends close to the work. (All tails woven)
Round 3 :
Final inspection: check that each leaf sits flat and that the scallop spacing is even. Add small decorative stitches (tiny French knots using embroidery thread or a few wrap stitches with contrasting yarn) at the vine nodes if you want little berry accents. (Finish and inspect)
Info :
To launder, spot-clean first. Hand wash gently in lukewarm water with mild detergent and lay flat to dry to preserve shape and color. Avoid agitation that may fray or distort the leaves and scalloped border.
— Alternative Size & Customization Notes :
Info :
To make the runner wider, increase the foundation chain by multiples of 6 and add more v-stitch repeats; to lengthen, add more mesh rows before appliquing leaves. You can also substitute a lighter fingering yarn and smaller hook for a more delicate runner or a bulky yarn and larger hook for a chunky seasonal accent. Alternate border stitches for a laceier or bolder finish as desired.
This autumn leaves table runner is a charming blend of lacy crochet and sculpted applique that adds instant seasonal warmth to any table. The detailed leaves and scalloped border make it a beautiful handmade centerpiece you can be proud to display. Take your time with the applique and blocking—those finishing touches make all the difference. 🍁🧶 Display proudly and enjoy how a few carefully placed colors bring a table to life!