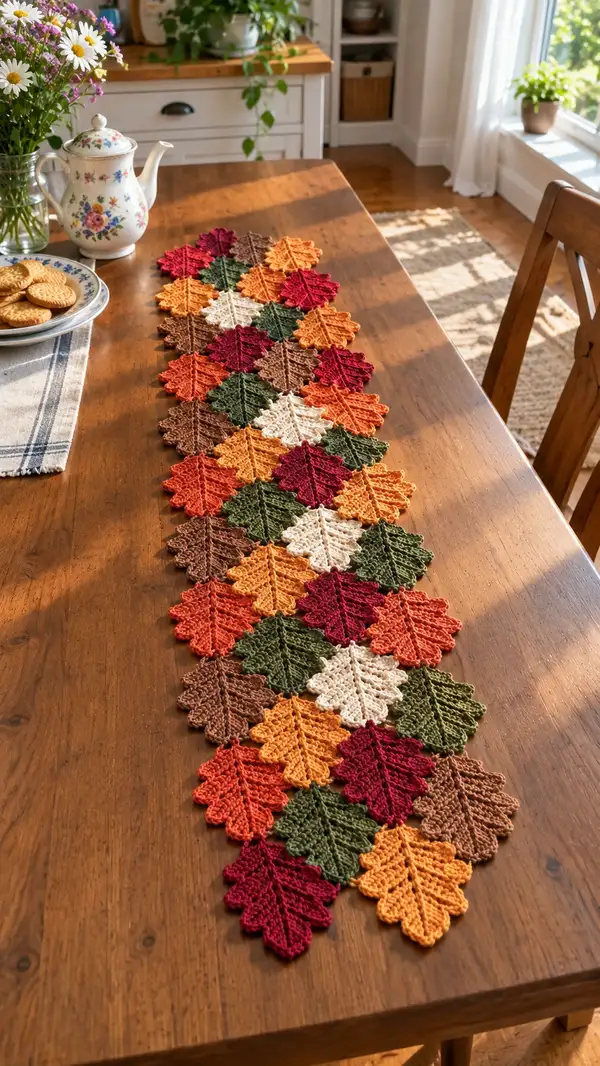
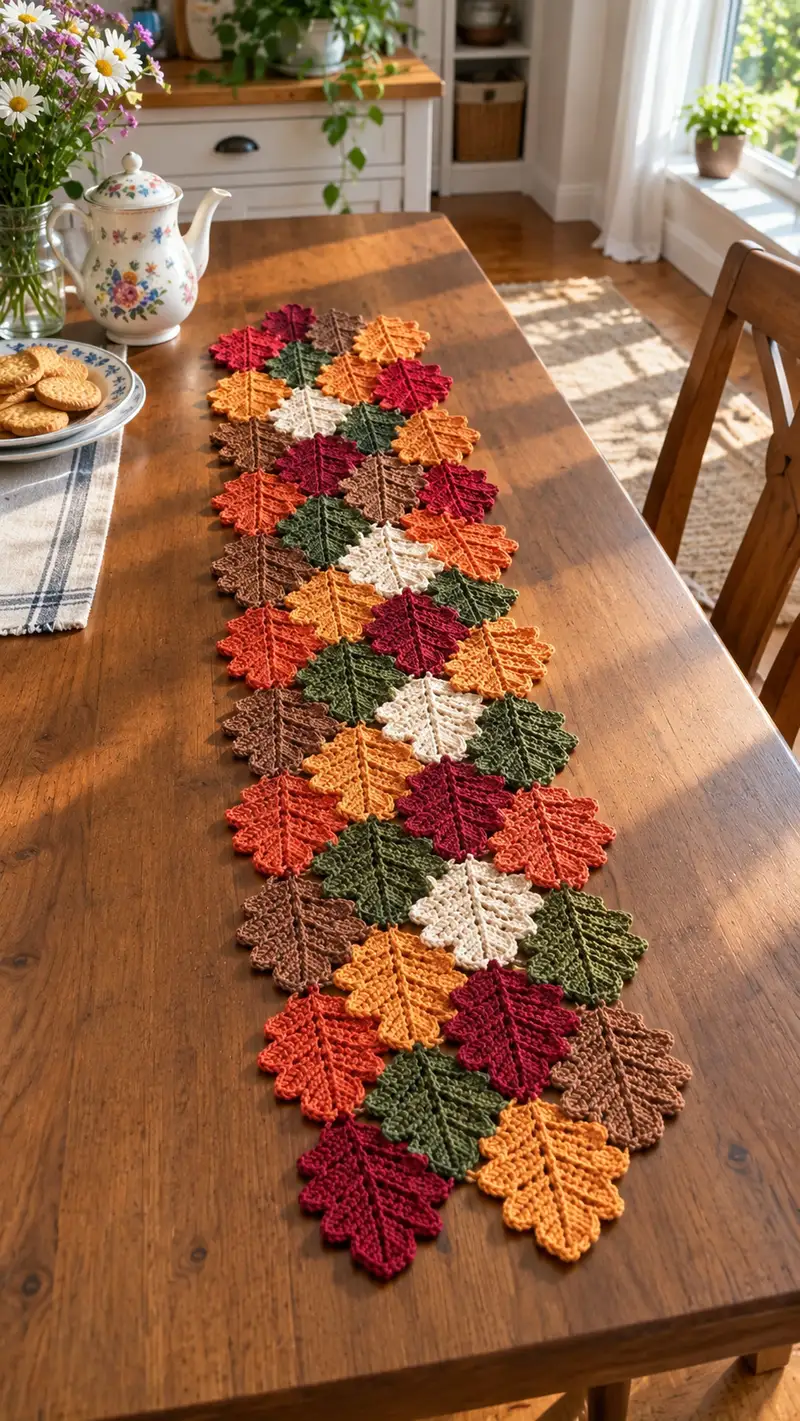
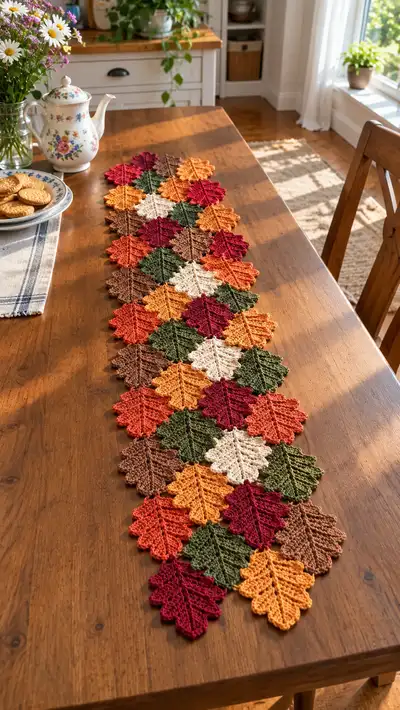
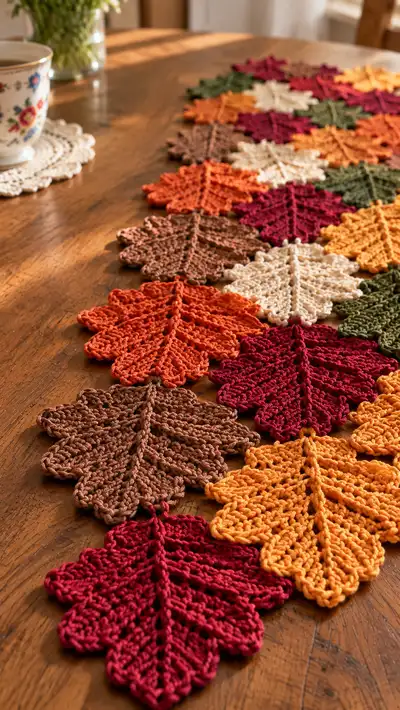
This warm, seasonal table runner is made from interconnected crocheted leaf motifs in rich autumn tones — deep red, pumpkin orange, golden yellow, forest green, cacao brown and cream. The runner is created by making individual textured leaves and joining them in a staggered diamond layout to form a long, elegant centerpiece. Each leaf is worked flat with defined ribs and scalloped edges for realistic foliage detail.
Progress Tracker
0% Complete
— Materials & Gauge :
Info :
Gauge: One finished leaf motif measures approximately 4.5" (11.5 cm) wide and 5" (12.5 cm) long when worked with worsted-weight cotton and 4.0 mm hook. Gauge is not critical for layout but affects runner length.
Info :
Notes: This pattern describes a single leaf motif worked flat in sequential rounds (rows), then a join-as-you-go method to link motifs into the runner. I use US crochet terms throughout. Work tightly enough to avoid gaps between stitches but not so tight that your fabric curls.
— Leaf Motif (Make as many leaves as needed) :
Round 1 :
Ch 9. Sc in 2nd ch from hook, hdc in next, dc in next, tr in next, dc in next, hdc in next, sc in last ch (top). Working back along the opposite side of the foundation chain: sc in next ch, hdc in next, dc in next, tr in next, dc in next, hdc in next, sc in last ch; do not join. (14 sts)
Info :
We are working a flat leaf, so think of each numbered "Round" as a row worked around the chain trace. Place a stitch marker in the first sc you made to mark round starts for later reference.
Round 2 :
Ch 1, sc in same st, sc in next 2 sts, hdc in next 2 sts, dc in next 2 sts, tr in next 1 st (center top), tr in next st down opposite side, dc in next 2 sts, hdc in next 2 sts, sc in next 3 sts. (18 sts)
Round 3 :
Ch 2 (counts as hdc), hdc in same st, hdc in next 2, dc in next 2, 2 dc in next (center increase), dc in next 2, hdc in next 3, sc in next 4. (22 sts)
Info :
On later rounds the center area will form the top point of the leaf and opposite side mirroring defines the outline — keep an eye on symmetry by counting sts on each side of the center increase.
Round 4 :
Ch 1, sc in next 2 sts, sc in next, hdc in next 3 sts, dc in next 2 sts, (2 dc, ch 1, 2 dc) in center top st (this creates a small scallop), dc in next 2 sts, hdc in next 3 sts, sc in next 3 sts, sl st to next to close. (28 sts)
Round 5 :
Ch 2, hdc in same, hdc in next 3 sts, dc in next 4 sts, (tr, ch1, tr) in center top st, dc in next 4 sts, hdc in next 4 sts, sc in next 3 sts. (34 sts)
Info :
In rounds that create scallops at the tip, place the sequence of tall stitches with a chain-1 picot-like space to make a rounded lobe. Maintain counts both sides of center for balance.
Round 6 :
Ch 1, sc in next 3, sc in next 2, hdc in next 5, dc in next 4, 2 dc in center top st, dc in next 4, hdc in next 5, sc in next 4. (42 sts)
Round 7 :
Ch 2, hdc in same, hdc in next 6, dc in next 6, (tr, ch1, tr) in center, dc in next 6, hdc in next 6, sc in next 5. (50 sts)
Info :
Check your stitch counts by splitting the leaf across the center. There should be matching counts on both the left and right sides of the central rib at the end of each round.
Round 8 :
Ch 1, sc in next 4, sc in next 3, hdc in next 7, dc in next 6, dc in center top st and dc in same st (2 dc at center), dc in next 6, hdc in next 7, sc in next 5, sl st to next to secure. (58 sts)
Round 9 :
Ch 2, hdc in same, (hdc, dc) in next 3 sts, dc in next 10 sts, (tr, ch1, tr) in center top st, dc in next 10 sts, (dc, hdc) in next 3 sts, hdc in next 5 sts. (66 sts)
Info :
If you prefer a narrower leaf, stop at Round 7 or 8. For a fuller leaf as shown in the photos, continue through Round 9 or 10. The runner photographed uses large motifs with wide lobes for visual impact.
Round 10 :
Ch 1, sc in next 5 sts, sc in next 4, hdc in next 8, dc in next 12, (2 tr, ch1, 2 tr) in center top st, dc in next 12, hdc in next 8, sc in next 6. (86 sts)
Info :
Round 10 is a wide round and creates the pronounced scalloped outer edge. If you wish to add texture ribs (raised veins), you will add post stitches in the following rounds.
Round 11 :
Ch 1, sc in next 6, sc in next 5, hdc in next 9, dc in next 14, fpdc around the center join post (work 4 fpdc down the middle to anchor the central rib), dc in next 14, hdc in next 9, sc in next 6. (94 sts including fpdc counts)
Info :
Begin creating the central rib: after establishing the leaf outline, use front-post double crochet (fpdc) worked over a vertical column of stitches down the middle to simulate the raised vein. The fpdc column should be worked into the posts of the stitches that form the central chain area; you will place approximately 6–8 fpdc stitches depending on your count.
Round 12 :
Ch 2, 1 hdc in same, hdc in next 8, (dc2tog over next 2 sts) repeated 3 times to form subtle shaping on each lobe, dc in next 16, fpdc in center column creating 6 fpdc along center, dc in next 16, hdc in next 8, sc in next 7. (94 sts)
Round 13 :
Ch 1, sc around edge stitches creating a small picot every 8 sts: (sc 7, ch 2, sl st in 2nd ch from hook) x repeated across the outer edge to form decorative scallops; on each side mirror the sts. Maintain total approx. (94 sts + picots).
Info :
Picots and small chain arches along the edge create the decorative notched look of each lobed leaf tip. Keep the spaces even so motifs will nest neatly when joined.
Round 14 :
Optional decorative ridge: working along WS, use bpdc (back post double crochet) across every 3rd stitch to create a subtle reverse texture. Work 18 bpdc across center half, then continue with sc across remainder to tidy the edge. (Maintains shape)
Info :
Fasten off and weave in ends for the first motif. Block each leaf flat with pins and steam or wet block lightly to shape lobes and flatten seams. Leaves will flatten and keep definition after blocking.
— Alternate Small Leaf (Variation B) :
Round 15 :
Ch 7. Sc in 2nd ch from hook, hdc, dc, tr, dc, hdc, sc; work back along opposite side in mirror (14 sts). (Foundation for smaller leaf)
Round 16 :
Ch 1, sc in next 2, hdc in next 2, dc in next 2, tr in center, dc in next 2, hdc in next 2, sc in next 3. (18 sts)
Round 17 :
Ch 2, hdc in same, hdc in next 3, dc in next 4, (tr, ch1, tr) in center, dc in next 4, hdc in next 3, sc in next 4. (26 sts)
Round 18 :
Ch 1, sc in next 3, hdc in next 4, dc in next 6, dc2 in center, dc in next 6, hdc in next 4, sc in next 4. (34 sts)
Info :
The smaller leaf is perfect for filling gaps in the staggered pattern. Make several of these to vary texture and color placement across the runner.
— Central Vein and Raised Rib Details :
Round 19 :
With RS facing, rejoin yarn at base center (where the foundation chain meets) and ch 1. Work a line of fpdc up the center spine: (fpdc) across 8-10 stitches working into the posts of the central stitches to create the raised vein. Sl st to secure. (8-10 fpdc)
Info :
To position the central vein properly, count across the top scallop to find the exact central stitch. The fpdc column should be centered visually — it gives the leaf a natural ridge.
Round 20 :
Emphasize lateral veins: working from the center vein outward, attach yarn on one side and work small spaced fpdc or hdc clusters (3 hdc clusters) into designated spots at roughly every 6 stitches to emulate smaller side veins. Repeat on the other side. This is decorative and optional.
Info :
Use contrasting or slightly darker thread for the rib if you want the vein to pop. For subtlety, use the same color and rely on texture alone.
— Join-As-You-Go Technique (Connecting Leaves into the Runner) :
Round 21 :
Layout plan: The runner in the photo is built with leaves arranged in staggered rows (diamond grid). Each motif is joined to up to four neighboring motifs along small slip-stitch joins at the leaf base and side lobes. Decide your layout grid first (e.g., 6 leaves across by N leaves long) and arrange colors before joining.
Round 22 :
When you complete the final picot round of a new leaf and reach a spot that corresponds to a neighbor's picot or stitch, join to the neighbor by inserting hook through matching stitch of already-blocked motif, yarn over and sl st to join; continue around, joining at 2–4 evenly spaced points along the edge where leaves meet. (joins vary by motif placement)
Info :
Work joins with a slightly looser tension than your motif rounds so the connection does not pull the motifs in. Try to place joins at the shallow indentation near each scallop so connections look like natural overlaps of leaves.
Round 23 :
Join sequence: Start with the second leaf in the first row. Work to the left base point and sl st into the left neighbor's corresponding st; continue across the bottom edge and sl st into neighbor(s) as needed — typically 3 sl st joins per side-to-side connection (left, lower-left, lower-right) for secure attachment. (Approx. 3 joins per connection)
Info :
Always pin motifs together first to preview how many join points each adjacency requires. Some positions, like row ends, require fewer joins (usually one or two) while full overlaps require three or more for stability.
Round 24 :
Alternate method: Sew joins after completing all motifs using mattress or whip stitch. This yields a flatter back and stronger seam but requires more finishing time. Stitch through both motifs' backs using a matching yarn tail and secure with a knot and weave in. (Sewing method)
Info :
Join-as-you-go is faster and creates a neat front-facing join. Sewing post-assembly is more durable but less seamless visually. I used join-as-you-go in the photos for an integrated look.
— Assembling the Runner Layout :
Round 25 :
Runner layout suggestion: Build a diamond-grid runner by arranging leaves in offset rows. Example 7 x 3 diamond columns (photo uses approximately 7 motifs across diagonally and 9–11 rows lengthwise). Make a paper template to plan color distribution to balance warm and cool tones.
Round 26 :
Start assembly at the center of the runner and work outward for symmetrical balance: Join central row leaves side-to-side with 2–3 sl st joins per seam. Attach subsequent rows below by joining each new leaf to two or three already-placed neighbors, using the base picots and side scallops as anchoring points. (join 2–3 times per adjacency)
Info :
To mirror the photographed layout, alternate large leaves and small leaves so the runner has a tessellated look. Stagger colors so no two same colors touch directly, unless you deliberately want blocks of color.
Round 27 :
Edge alignment: When two leaf tips meet to form a diamond point, join both tips together with 2 sl sts through corresponding picots. Where tips do not meet, use a single sl st join to anchor the corner and maintain shape. (1–2 sl st per tip match)
Info :
Check that the runner lies flat after each row; adjust join tension if the fabric begins to ruffle. If one area puckers, undo and rejoin with slightly looser tension.
— Decorative Border & Finishing Rounds :
Round 28 :
After joining all motifs, work a unifying border around the entire perimeter: With RS facing and a color of choice (e.g., deep brown or cream), join at any seam, ch 1, sc evenly around the outer edge of each exposed leaf edge, placing 1 sc into each outermost stitch and 1 sc into the center of each scallop. Maintain even spacing to keep the border smooth. (Stitch count depends on runner perimeter)
Round 29 :
Ch 2, 1 hdc in same st, *skip 1 sc, (sc, ch 1, sc) in next sc* repeat around to form small chain arches that echo the scallops, sl st to join. This adds a delicate crenelated edge. (Decoration repeats around)
Info :
If you prefer a stronger edge, substitute fpdc into every 3rd st for backbone reinforcement before working decorative arches.
Round 30 :
Final neat edging: With contrasting cream, sc around entire perimeter in BLO of previous round to create a faint ridge. Work 1 sc in each st, smoothing corners with extra sc where needed. Fasten off and weave ends. (Even sc around)
Info :
Weave in ends on the wrong side by threading tail through 4–6 adjacent motifs using a tapestry needle so tails are secure and invisible on the front. Trim flush.
— Optional Stabilizing Backing :
Round 31 :
For a runner that lies exceptionally flat, attach a length of cotton fabric backing. Place runner on backing fabric, trim leaving a 1/2" seam allowance, fold and hand stitch the runner perimeter to backing with small whip stitches, hiding stitches between leaf joins. (Hand-sewn backing)
Info :
Backing protects table surfaces and prevents the runner from catching nap or candle wax on delicate wood. Choose lightweight cotton so the runner still drapes naturally.
— Blocking & Final Touches :
Round 32 :
Blocking: Pin the entire runner into final shape on blocking mats or a rug using rust-proof pins. Spray lightly with water or steam using a garment steamer, then allow to dry fully. Focus pins at scallop points to enhance the leaf shape. (Block to final dimensions)
Info :
Starch or a commercial fabric stiffener can be lightly applied if you prefer an ultra-crisp runner. Test on a spare motif first to avoid discoloration.
Round 33 :
Quality check: Inspect all joins and edge stitches. Reinforce any loose connections by sewing over the join with matched yarn and knotting on the wrong side. Trim remaining tails close to the fabric. (Final inspection)
Info :
Store flat or rolled to maintain shape. Avoid heat or ironing directly on yarn unless safe for fiber content.
— Sizing & Customization Notes :
Round 34 :
To lengthen runner: Add additional diamond rows repeating motif assembly. Each added diagonal row increases runner length by approximately 4.5–5" per row (the vertical influence of motifs). To widen: add parallel columns of motifs and mirror-join them.
Round 35 :
Color planning: For the effect in the photograph, use a repeat palette sequence such as (Pumpkin, Green, Burgundy, Brown, Cream) and stagger them so no two identical colors touch diagonally. For a monochrome runner, vary yarn texture or sheen for interest instead of color.
Info :
You can also work a slim central spine of contrasting color by changing colors on border rounds in a continuous stripe along the runner's center line before blocking.
Completing this Autumn Leaves Table Runner is such a satisfying project — each crocheted leaf brings the cozy warmth of fall to your table. The tactile ribs and scalloped edges create visual depth that looks stunning layered across wood. It makes a perfect gift or a seasonal statement piece for your home. 🌿🍁🧶 Enjoy the meditative rhythm of making each leaf and watching them come together into a beautiful autumn centerpiece!