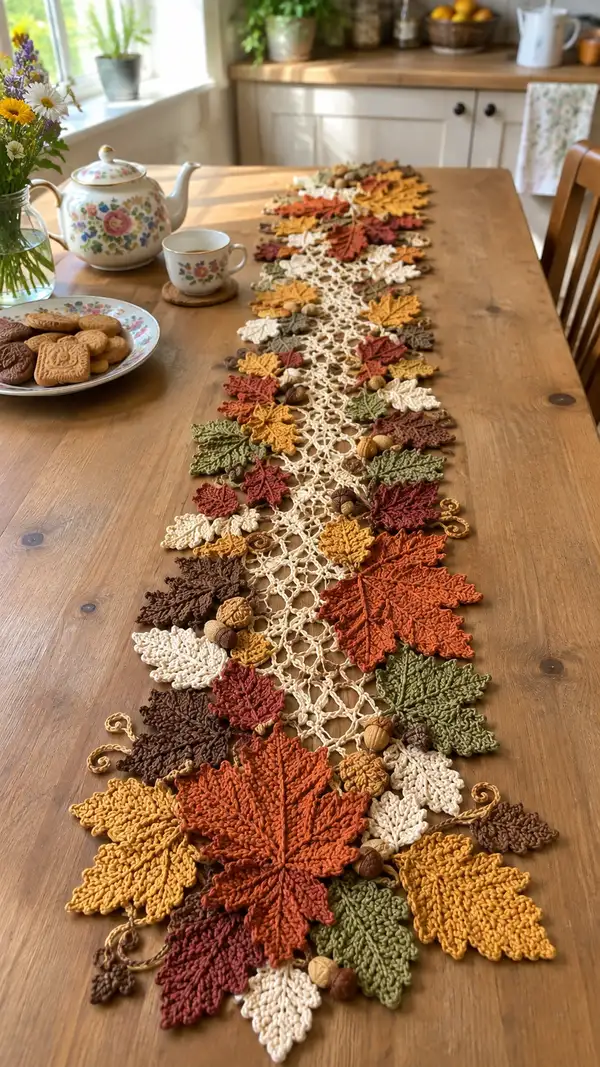
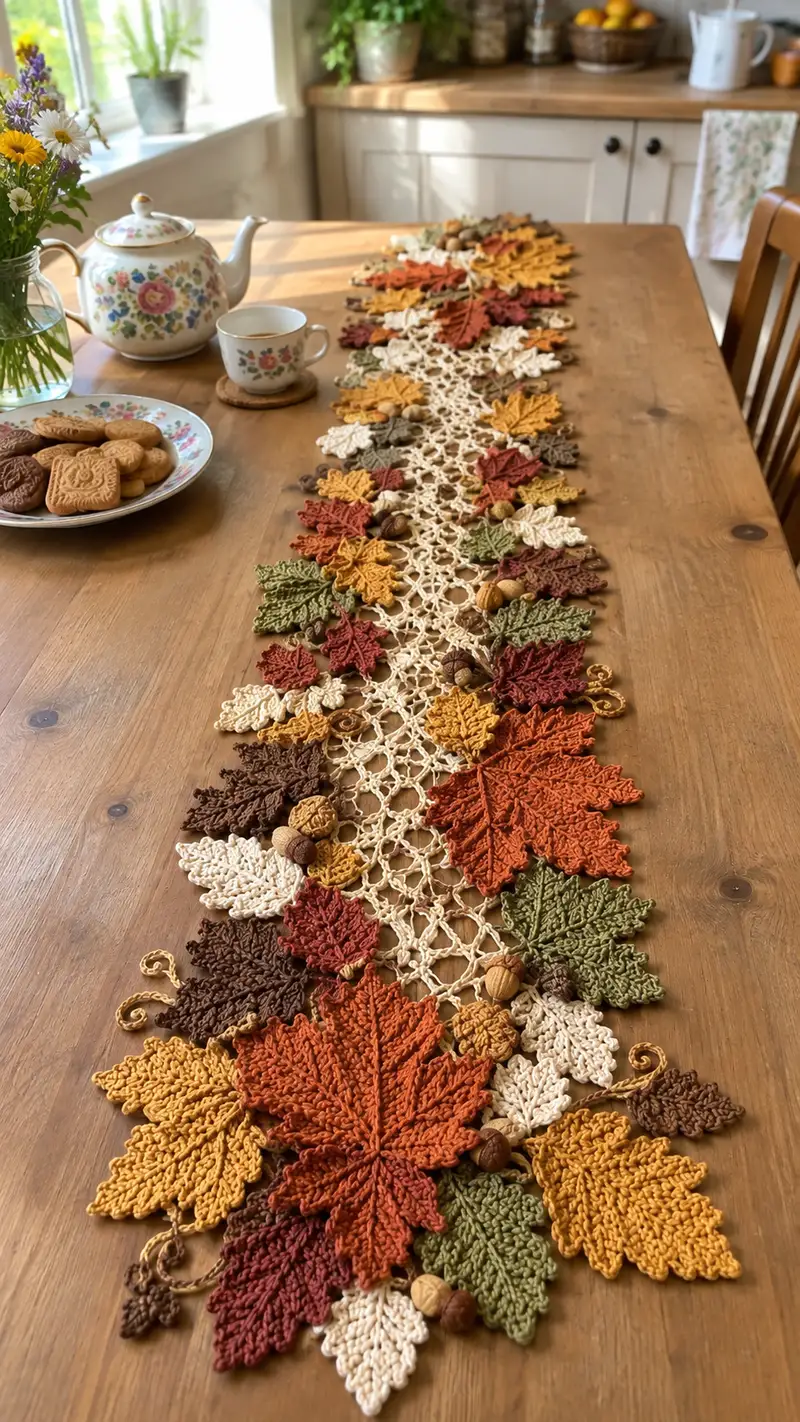
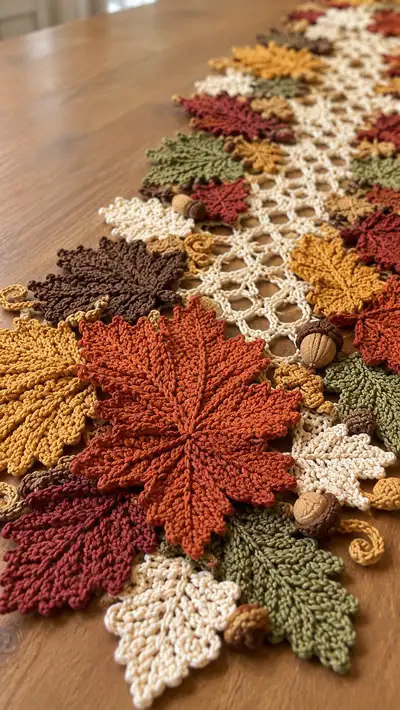
Create a warm, textured autumn table runner made from layered crochet leaves, delicate lace joins, and tiny acorn accents. This runner features rich fall tones—rust, mustard, olive, cream and deep brown—arranged along an airy, lacy central spine. Each leaf is worked flat with raised veins for a realistic, dimensional look, then blocked and sewn to a crocheted lace center for a charming seasonal centerpiece. The pattern includes many motif sizes and detailed assembly instructions for a polished finish.
Progress Tracker
0% Complete
— Materials & Gauge :
Info :
Gauge is not critical for the overall look, but to match sample dimensions: main lace chain and leaf stitches worked with cotton DK and a 3.5mm hook give a runner approximately 12-14 cm wide central lace + leaves, total length dependent on number of repeats. Keep gauge consistent across motifs for clean assembly.
— Stitch Notes & Techniques :
Info :
Leaves are worked flat in rows with a central spine, then edged and embellished. Veins are worked using post stitches (hdc or tr around chs) to create raised texture. Use BLO or FLO for ridged edges where noted. Picots add subtle tips on some leaves. Block every motif before assembly to open lace and flatten shapes.
— Large Maple Leaf (Make 6-8) :
Round 1 :
Ch 31. Work 1 sc in 2nd ch from hook and next 14 ch (15 sc) — this is right half from base to tip (15)
Round 2 :
At tip: ch 3 (counts as first sc for return), turn and work along other side of foundation chain: 1 sc in each of remaining 15 ch back toward base (15) — join to first sc at base with sl st; total across both sides = 30
Round 3 :
Row work around both sides to build tip shaping: ch 1, 1 sc in base join, 2 sc in next st, sc across next 4 sts, inc (2 sc) at next st, 1 sc in next 3 sts, inc, sc across next 4 sts, 2 sc in last base st (working increases near base to broaden leaf base) — count end row: 36
Round 4 :
Ch 1, turn. [Sc in next 2 sts, inc] across first side (repeat 6 times), sc across tip sts (6 sc), then mirror incs on other side: [sc in next 2 sts, inc] x6. Ending stitch count: 48
Round 5 :
Ch 1, turn. Begin shaping lobes: (sc in next 3, inc) x8 across first side (32 sts on that side), sc 8 tip sts, (sc in next 3, inc) x8 on returning side — total 64
Info :
From now on, work a central spine of raised stitches: at the ch 1 row, when you reach the center tip region, work a column of hdc-posts down the returning row on the next pass to create the raised vein. Place stitch marker at the first central spine stitch for later identification.
Round 6 :
Ch 1, turn. Work 1 sc in each st across first side (32), work 8 sc across tip, 1 sc in each st across second side (32) — total 72
Round 7 :
Ch 1, turn. [Sc in next 4, inc] x8 across first side (40), sc 8 across tip, [sc in next 4, inc] x8 across other side — total 88
Round 8 :
Ch 2 (counts as hdc), *hdc in next st; hdc around post of previous row for central spine to create raised vein (work evenly down center while working across tip),* continue hdc until row end. Total approximate: 88 (hdc texture row)
Round 9 :
Ch 1, turn. Work [sc in next 5, inc] x10 across first side (50), sc 8 tip, [sc in next 5, inc] x10 on return side — total 116
Round 10 :
Ch 1, turn. Work 1 sc in each st (116) — even round to stabilize the shape
Round 11 :
Ch 1, turn. Begin shaping distinct lobes: *(sc in next 3, dec) repeated across sets to create indentations): sc3, dec, sc4, dec, sc3 on each half including tip shaping* — calculate carefully: after 116 reduce to 104 (example structure), final count 104
Info :
When working decreases for indentations, make sure to maintain symmetry by mirroring every decrease on the opposing side. Use pins to hold leaf against blocking board and spray-block to flatten while stitch pattern sets.
Round 12 :
Ch 1, turn. Work 1 sc in each st for an even stabilizing round (104)
Round 13 :
Edge shaping: work 2 sc in first st, *sc in next 4, picot (ch3, sl st in 3rd ch), sc in next 4, dec* across edge to form serrated tips. Mirror across tip and return side. Approx total: 120 (including picots counted as decorative)
Round 14 :
Turn and work 1 sc in each st BLO across entire leaf to create a folded ridge rim (120)
Round 15 :
Row of raised veins: Attach contrasting or same-color yarn at base center, ch 2, work tr around chain-spine posts (tr around post) every 2nd stitch traveling toward tip to form 7 raised veins radiating from base — do not count as typical stitches, this is textural (no overall count required)
Round 16 :
Finish edge neatness: sl st evenly around edge if desired; fasten off leaving long tail for sewing. Block leaf firmly onto board to open all lobes and set picots.
Info :
Large Maple Leaf math: counts are illustrative—main goal is symmetrical lobing and even increases. Consistently count both sides each round. Make 6-8 large leaves in rust and deep orange for the sample runner.
— Medium Maple Leaf (Make 8-12) :
Round 1 :
Ch 23. 1 sc in 2nd ch from hook and next 10 ch (11) — right half (11)
Round 2 :
Ch 1, turn, sc in remaining 11 ch across other side back to base, sl st into first sc — total 22
Round 3 :
Ch 1, work (1 sc, inc) across first side x5 then sc 6 at tip, mirror on return side: resulting 30
Round 4 :
Ch 1, [sc in next 2, inc] across side x6, sc across tip, [sc in next 2, inc] other side — total 42
Round 5 :
Ch 1, turn; sc in each st across (42)
Round 6 :
Ch 1, turn; create 5 small lobes: (sc3, dec) x5 across first side, sc6 tip, (sc3, dec) x5 across other side — total reduces to 32
Round 7 :
Ch 1, turn; sc around entire leaf edge (32). Add picot on some tips by (ch3, sl st in 3rd ch) every 6th stitch for delicate serrations
Round 8 :
Work a row of FLO sc around edge to define, sl st to join, fasten off leaving long tail for assembly
Info :
Medium leaves are best in mustard and olive. Block and shape lobes; press gently with steam if needed. Make 8–12 to create layered interest.
— Small Oak-like Leaf (Make 12-16) :
Round 1 :
Ch 17. 1 sc in 2nd ch from hook and next 7 ch (8), ch 1, turn and sc back across remaining ch (8) — total 16
Round 2 :
Ch 1, (sc, inc) alternately across first side x4, sc4 tip, mirror other side — total 24
Round 3 :
Ch 1. Sc in each st across (24)
Round 4 :
Ch 1. (sc2, inc) x6 across both halves forming rounded lobes — total 30
Round 5 :
Ch 1. Sc in each st, then work alternating sc & picot along edge to create small scallops (30)
Round 6 :
Sl st around occasionally to fine shape; fasten off leaving tail for sewing. Block flat with slight curve for realism
Info :
Small oak leaves look charming in deep brown, burgundy and cream. Use them to fill gaps between larger leaves and along the lace edge.
— Tiny Accent Leaf (Make 20-30) :
Round 1 :
Ch 9. 1 sc in 2nd ch and next 3 ch (4), ch 1, sc back across remaining 4 ch (4) — total 8
Round 2 :
Ch 1, (sc, inc) x2 across first side, sc2 tip, mirror back — total 12
Round 3 :
Ch 1, sc in each st (12). Add a single picot at tip if desired. Fasten off leaving long tail for attaching.
Info :
Tiny leaves are excellent for layering atop larger leaves for depth. Make abundant quantities; they sew quickly and add visual texture.
— Acorn Top (Make 10-14) :
Round 1 :
With brown, mr, work 6 sc into magic ring (6)
Round 2 :
Inc in each st around (12)
Round 3 :
(1 sc, inc) x6 (18)
Round 4 :
Ch 1, sc around (18) — work in BLO for textured rim (18)
Round 5 :
Ch 1, (sc 2, dec) x6 (12)
Round 6 :
Sc around rim and create a small loop: [ch 6, sl st into next st] to form a stem loop for sewing. Fasten off leaving a long tail for attaching to acorn body or runner.
Info :
Optionally glue tiny wooden bead under acorn top for more realistic cap, or embroider cross-hatched texture with extra yarn.
— Acorn Body (Make 10-14) :
Round 1 :
With tan, mr, 6 sc in ring (6)
Round 2 :
Inc in each st (12)
Round 3 :
(1 sc, inc) x6 (18)
Round 4 :
Ch 1, sc around (18)
Round 5 :
(2 sc, inc) x6 (24)
Round 6 :
Sc around for 3 rounds to build length (24)
Round 7 :
(2 sc, dec) x6 (18)
Round 8 :
Sc around and stuff lightly with fiberfill for fullness (18)
Round 9 :
(1 sc, dec) x6 (12)
Round 10 :
6 dec (6). Fasten off leaving tail, stuff firmly and sew open end closed. Attach acorn top with whip stitch.
Info :
Sew acorn tops over body edges and hide join with a few decorative stitches. Use glue or thread to secure wooden bead accents if used.
— Spiral Tendril (Make 12-20) :
Round 1 :
With gold or tan, ch 30. In 2nd ch from hook, 2 sc, *3 sc in next ch; 2 sc in next ch* across to create a curling spiral. This will curl naturally into a tendril. Fasten off leaving long tail for attaching.
Info :
To make the spiral curl tighter, use 3 sc in each ch. Pin into a cork board while moist to set curvature if desired.
— Central Lace Spine (Make 1 long strip or multiple joined panels) :
Round 1 :
With cream, ch 50 (or multiple of 10 + 2 for length adjustment). Row 1: dc in 4th ch from hook and across, turn — creates foundation for lacy mesh (approx 47 dc)
Round 2 :
Ch 4 (counts as tr + ch1), *sk 1, tr in next st, ch 1* repeat across to end, turn. Creates alternating tr mesh (approx 24 tr and 24 ch1 spaces)
Round 3 :
Ch 3 (counts as dc), dc in each tr and in each ch1 sp across, turn — stabilizing row (approx 47 dc)
Round 4 :
Ch 5 (counts as tr + ch2), *sk next st, tr in next st; ch2* across row to create larger mesh windows (approx 23 tr x ch2 spaces). Turn
Round 5 :
Ch 2, hdc in each tr and each ch2 sp across to firm mesh (approx 47 hdc)
Round 6 :
Ch 1, sc in each st across to edge for neatness (47 sc)
Info :
If you need a longer runner, make multiple panels of the mesh and join with slip-stitch joins or whip stitch later. Keep panel edge counts identical to ease joining. For sample runner, repeat rounds 1-6 for length ~110 cm (adjust ch foundation to desired runner length).
Round 8 :
Ch 4, turn, dc in next 3 sts, *ch 2, sk 2, dc in next 3* repeat across to make openwork lattice (approx 22 windows)
Round 9 :
Row of joining loops: ch 5, sl st into each ch2 space across to create connection loops for leaves to be sewn through later (22 loops)
Round 10 :
Sc around entire mesh edge to finish and prevent stretching (approx 100 sc around panel edges). Fasten off and block lightly to open windows.
Info :
Central lace can be made narrower or wider by adjusting foundation chain. Work symmetrical mesh repeats and block heavily to create open airy effect. Make sure joining loops are evenly spaced for leaf placement.
— Decorative Raised Veins & Texture (Applied to Leaves) :
Round 2 :
For each leaf, using same color or a slightly darker shade, attach yarn at base and work 7 raised veins: ch 2, then tr around post of central foundation stitch (work tr around post directed towards tip), skip 2 sts, repeat for 7 veins. Secure at base and weave ends. This creates the lifelike central vein and smaller lateral veins.
Round 4 :
For smaller lateral veins, work hdc around posts at spaced intervals leaning outwards for a natural veining effect. On each side of center, place 3-5 lateral veins depending on leaf size.
— Edging and Picot Details :
Round 2 :
To create serrated leaf edges, at the final edge round work: *sc in next 3, picot (ch3, sl st in 3rd ch), sc in next 3, dec* repeating around lobes. This yields decorative teeth along edges that resemble leaf serrations.
Round 3 :
For a smoother look (oak leaves), alternate sc and hdc around edge and place tiny picots only at lobes' tips.
— Assembly Prep & Blocking :
Round 2 :
Wet-block every motif: pin leaves to blocking board with their lobes opened and veins slightly raised. Spray with water or steam lightly and allow to dry completely. Blocking sets shape and ensures even joins.
Round 3 :
Arrange motifs along the lace spine, alternating large/medium/small leaves and colors for a balanced composition. Use the lace's ch5 loops and mesh windows to anchor leaves with stitch tails and sewing. Leave some leaves to overhang the table edge for organic placement.
Info :
Lay out your final design on a large flat surface before sewing. Move pieces until the composition is satisfying—clustered on the ends or evenly distributed along the length according to your preference.
— Sewing Leaves to Lace (Attachment Rounds) :
Round 2 :
Attach leaves using long tails: using mattress or whip stitch sew leaf base into the lace loops or mesh openings. Make 6-8 secure stitches at base, then tack a few edge points to the lace to hold leaf shape. Hide tails by weaving into leaf underside.
Round 3 :
For overlapping leaves, sew from the bottom-most motif first, then layer subsequent leaves on top, tacking them only at base and a few strategic points along lobes to preserve 3D effect. Use small, neat stitches and matching yarn for invisibility.
Info :
Position acorns and tiny leaves into clusters where larger leaves meet; sew and secure wooden acorns with short stitches and a dab of fabric glue if necessary. Tendrils are sewn at their base; curl and tack in place with a single stitch at several points to preserve spiral shape.
— Final Finishing Touches :
Round 2 :
After all motifs are sewn, give the entire runner a final gentle steam block on low heat to settle joins. Press lightly from wrong side or use handheld steamer at a safe distance. Trim any visible tails and weave in securely.
Round 3 :
Optionally tack small beads or wooden nuts among clusters for extra realism. If you prefer a more subtle look, keep acorns only at ends and center clusters.
Info :
Allow the runner to dry completely on a flat surface before moving to avoid shaping changes. Photograph your finished runner and note the arrangement in case you want to replicate it later.
Finishing this autumn table runner is such a joyful, tactile experience — each leaf you crochet adds a pop of seasonal color and texture. Once blocked and assembled, the runner becomes an heirloom-quality accent that transforms any table into a warm fall vignette. I hope making it fills your home with cozy vibes and creative satisfaction. 🧶🍂✨