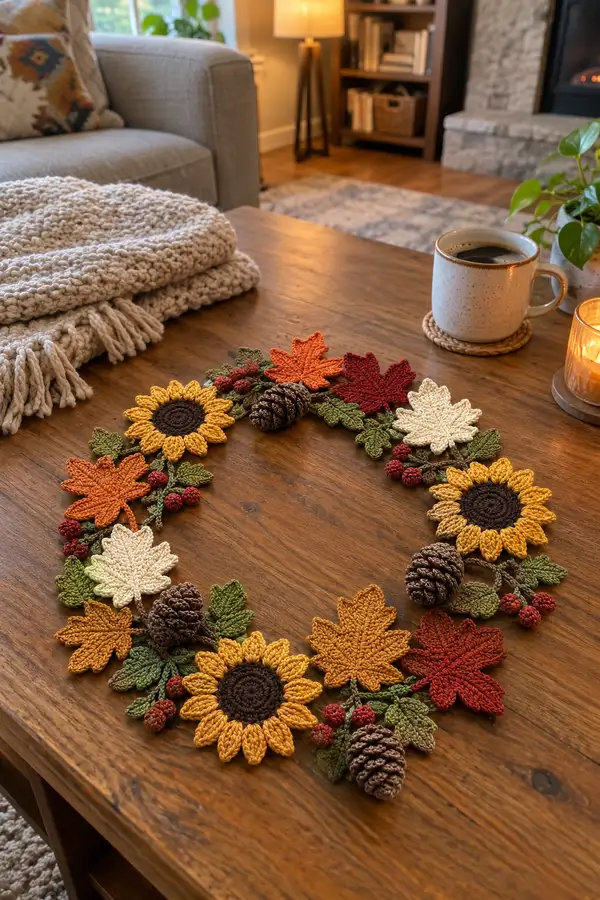
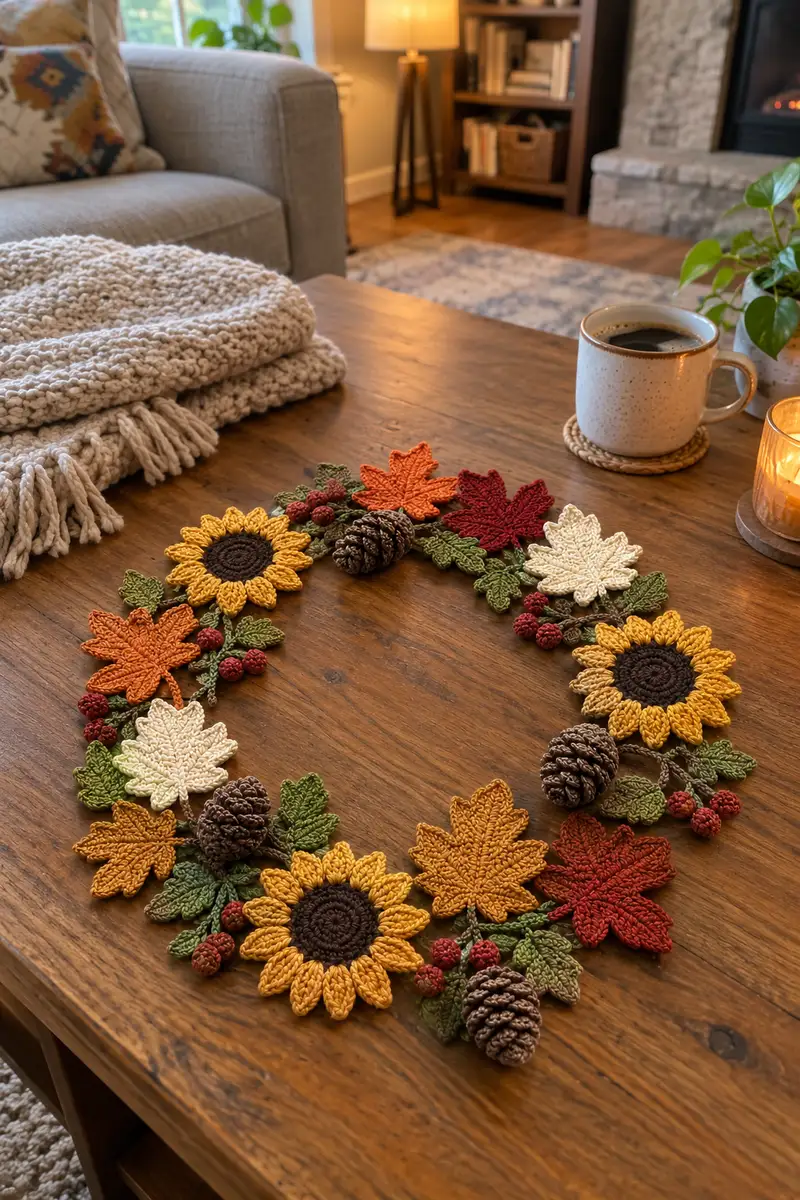
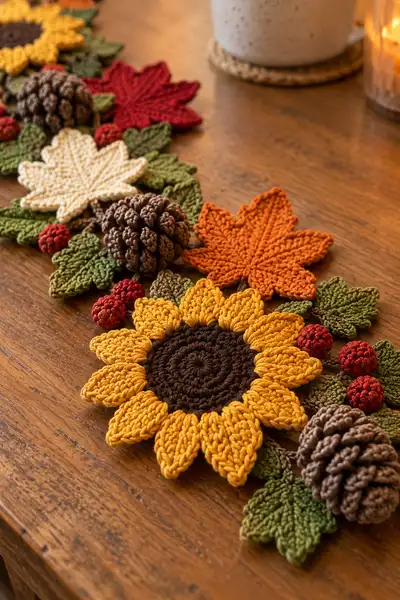
A richly textured autumn table wreath ring featuring crocheted sunflowers, maple leaves, pinecones and berry clusters. This decorative centerpiece uses warm harvest tones and layered motifs to create a flattened oval wreath perfect for a dining or coffee table. The pattern includes step-by-step motif instructions, joining vines and assembly notes to recreate the layered, natural look displayed in the images.
Progress Tracker
0% Complete
— Sunflower Center (Make 3) :
Round 1 :
6 sc in magic ring (6)
Round 3 :
(1 sc, inc) x 6 (18)
Round 4 :
(2 sc, inc) x 6 (24)
Round 5 :
(3 sc, inc) x 6 (30)
Round 6 :
(4 sc, inc) x 6 (36)
Round 7-9 :
1 sc in each st (36)
Info :
Work centers in dark brown. Keep tension fairly tight so the disc stays flat. If your center curls, increase one more round and then stop increases earlier.
Round 10 :
(4 sc, dec) x 6 (30)
Round 11 :
(3 sc, dec) x 6 (24)
Round 12 :
1 sc in each st (24)
Info :
Fasten off and leave long tail for attaching petals. We will attach petals around the outer edge using the tail or with a new color join at each petal base.
— Sunflower Petals (Make 3 sets of 12 petals per flower) :
Round 1 :
Join mustard yarn to an outer stitch of center, ch1, sc in same st, ch2, (sc, ch2) in next stitch to create petal anchors - repeat along edge to make 12 ch-2 petals anchors total
Info :
Each petal is worked into a small ch-2 space; arrange 12 evenly around the center disc. Use markers to mark starts to ensure even spacing.
Petal Round 2 (each petal) :
In ch-2 space: sc, hdc, 3 dc, hdc, sc (7 stitches across petal) Fasten off and weave in tail (7)
Petal Round 3 (texture row optional) :
Join yarn at petal base, 1 sc in first st, FLO: (1 sc in each st) across to create defined fold (7)
Info :
For the plump petal look in the images, use a slightly larger hook or work 3 dc in the center to give a sculpted curve. Block petals individually for a crisp shape.
Petal Finishing :
After making 12 petals, sew any loose edges to the center disc. Slightly curve each petal outward when sewing so sunflower lies flat but petals have dimension.
— Sunflower Final Edge and Backing :
Round 1 :
With brown yarn held at back, sc evenly around back edge of center to secure petals and tidy back (24)
Info :
Weave tail through back and secure with a few extra stitches to prevent petals from shifting. Trim ends close and tuck in.
— Large Maple Leaf (Make 6 - assorted colors) :
Round 1 :
6 sc in magic ring (6)
Round 3 :
(1 sc, inc) x 6 (18)
Round 4 :
(2 sc, inc) x 6 (24)
Info :
We are building a small oval base to then shape into a leaf. Use worsted cotton or acrylic for crisp stitch definition. Change color to chosen maple shade now if needed.
Round 5 :
(3 sc, inc) x 6 (30)
Round 6 :
1 sc in each st (30)
Round 7 :
BLO 1 sc in each st (30)
Info :
Work a center ridge by switching to FLO next rounds to create raised vein later. Leaves are flattened pieces formed by strategic increases and tapered decreases.
Round 8 :
Dec shaping: (4 sc, dec) x 5 (25)
Round 9 :
1 sc in each st (25)
Info :
We will now create leaf lobes by working short shaping wings from the center - you will work along one side then mirror the other. Keep a stitch marker at center top to align lobes.
Round 10 - Lobe start :
Ch1, turn, working along one side: (sc in next 6 sts, hdc, dc, tr) anchor at tip with sl st; repeat mirrored on opposite side to form first pair of lobes. (approx 14 sts per side)
Round 11 :
Work back along the opposite edge: sc in each st to join to base, adjust with 2 decreases evenly to keep shape (approx 28)
Round 12 :
Surface slip stitch center: use a contrasting or same color yarn to embroider central vein from base to tip with sl sts spaced evenly across center length (no change in count)
Info :
Fasten off leaving tail for sewing. Block flat with pins to open the lobes and make edges crisp. Maple leaves are slightly cupped in the finished layout.
— Small Cluster Leaf (Make 12) :
Round 1 :
6 sc in magic ring (6)
Round 3 :
(1 sc, inc) x 6 (18)
Round 4 :
(2 sc, inc) x 6 (24)
Round 5 :
1 sc in each st BLO to create a ribbed texture (24)
Round 6 :
Decrease at one end to form point: (3 sc, dec) x 4 (20)
Round 7 :
Sc evenly across remaining stitches to tidy edge (20)
Info :
These small leaves act as filler and are frequently placed under petals or around berries. Use two green shades and stagger to create depth. Block lightly and starch if you want a stiffer finish.
— Berry (Make multiple clusters - 18 single berries total) :
Round 1 :
6 sc in magic ring (6)
Round 3 :
1 sc in each st (12)
Round 4 :
(1 sc, dec) x 4 (8)
Round 5 :
Dec across: 4 dec (4)
Info :
Stuff berries lightly with a tiny pinch of fiberfill to make them plump but still small. Fasten off leaving a tail for sewing to stems or leaf clusters. Work in deep red shades for realism.
— Pinecone (Make 3) :
Round 1 :
6 sc in magic ring (6)
Round 3 :
(1 sc, inc) x 6 (18)
Round 4 :
1 sc in each st (18)
Round 5 :
Start scale rows: *ch3, sl st in next st* around (18 ch-3 loops)
Info :
Pinecone scales are built by working clusters into the ch-3 loops. We will work multiple layers of scales to achieve the textured cone look. Use a slightly smaller hook if you want tighter scales.
Round 6 (scale layer 1) :
Into each ch-3 loop: (sl st, 3 dc, sl st) to form first scale layer (18 scales)
Round 7 :
1 sc around base of scales to hold them in place (18)
Round 8 (scale layer 2) :
*skip next scale, into next loop: (sl st, 3 dc, sl st)* around offsetting scales to create staggered rows (approx 16 scales)
Round 9 :
1 sc around (16)
Round 10 (scale layer 3) :
Repeat offset cluster round to close cone, decreasing count to form tapered top, (12-14 scales depending on offset)
Round 11 :
Dec rounds at top to close: (2 sc, dec) repeat to reduce circumference steadily until top closes (counts will reduce to 12,10,8)
Round 12 :
Finish: 4 dec (4) Fasten off leaving tail for sewing. Stuff lightly before closing completely so the cone maintains shape but remains slightly compressible.
Info :
To add realism, use a darker brown for the base and a slightly lighter shade on scales, or add a quick dry-brush of lighter yarn fiber using a needle-felting tool if desired (optional!).
— Long Vine / Joining Base (Make 1 long vine chain to arrange motifs) :
Round 1 :
Ch140 (or adjust length to desired oval circumference), sl st to form large ring or leave long chain if you prefer an open runner (140)
Info :
I recommend chaining a length that fits your table; the sample uses an oval approx 30" circumference constructed from a long chain that motifs are sewn onto. Work chain longer if you want additional spacing.
Round 2 :
Round the chain with 1 sc in each ch to create a sturdy cord: 1 sc in next 140 sts (140)
Round 3 :
Work 2 more rounds of sc in each st to bulk the vine: 1 sc in each st (140)
Info :
For a more vine-like look, work occasional ch-3 loops along the edge to attach leaves and tendrils later. Mark positions every 10 chs where major motifs will be attached.
— Tendril and Stem Units (Make 12) :
Round 1 :
Ch15, turn, starting in 2nd ch from hook sc 14 (14)
Round 2 :
1 sc in each st (14)
Round 3 :
2 sc in first and last st to create slight bulb at ends (16)
Info :
Tendrils are narrow cords that you will sew under leaves and berries to position them above the vine. For extra stability, you can insert thin wire into the stitched cord before closing.
Round 4 :
Fasten off leaving long tail for sewing. Slightly twist and steam-block if needed to hold a gentle curve.
— Assembly Preparation and Layout :
Info :
Before joining, block flat all leaves, petals and small leaves. Lay out the vine on your table and arrange sunflower motifs, maple leaves, small leaves, berries and pinecones as shown in the photo. Aim for three sunflower focal points spaced roughly evenly around the oval and tuck leaves and pinecones in between for balance.
Info :
Take photos of your layout before sewing to reference while attaching. Use pins to hold motifs in place and move items until you are happy with spacing, but do not use metal pins that will snag yarn; use fine sewing pins or tailor’s pins instead.
— Joining Motifs to Vine and to Each Other :
Step 1 :
With matching yarn and tapestry needle, sew sunflower centers to vine first: thread tail through center back and use whip stitch to attach to vine at marked positions. Use 6-8 evenly spaced stitches around center to secure (no change in stitch counts)
Info :
Sew petals down by catching the outermost petal base to the vine or adjacent leaves, securing petals so they don't lift. Use small hidden stitches to preserve motif appearance.
Step 2 :
Position maple leaves in between sunflowers and sew through the base of the leaf into the vine with mattress or whip stitch, anchoring with 6-10 stitches depending on leaf size (no stitch counts change).
Info :
For layered look, tuck smaller leaves under larger ones and stitch only at overlap points; this hides seams and produces a natural overlapping foliage effect.
Step 3 :
Sew pinecones by placing base flat on the vine and stitching through a few central scale layers into the vine; make 6-10 stitches around base to secure. If pinecones are a little three-dimensional, add extra stitches into vine and nearby leaves for stability.
Step 4 :
Sew berries in small clusters by grouping 3-4 berries, sewing them together at their bases then attaching cluster to a tendril or directly to vine at desired position. Use stitches at berry base and through vine to prevent rotation.
Info :
When joining motifs, always work from largest to smallest elements. This makes it easier to hide seams and create an integrated look similar to the pictured centerpiece.
— Finishing Touches :
Info :
Weave all ends through backs of motifs and hide tails within adjacent layers using a tapestry needle. Trim ends close. If desired, apply a small dab of fabric glue on hidden seams for extra hold. Steam-block final assembled wreath lightly to set shape.
Info :
Optional: Add a few hand-stitched French knots or tiny seed beads to the sunflower centers for extra texture. These are optional and will change the vintage/folk look slightly.
— Care and Storage :
Info :
To clean, spot-wash with mild soap and water and lay flat to dry. Store flat between sheets of tissue paper to avoid crushing petals and leaves. Avoid storing near direct sunlight to preserve yarn color.
You did it — your own autumn wreath ring centerpiece is complete and ready to warm any table! The layered sunflowers, textured maple leaves, pinecones and tiny berries come together to create a rich, cozy display. Each stitch tells a bit of the season and gives you a handmade treasure to enjoy or gift. 🧶🍂 Place it flat as a runner or loop it as a smaller wreath — either way it's a beautiful fall statement. Happy stitching and enjoy your cozy creation! 🎃✨