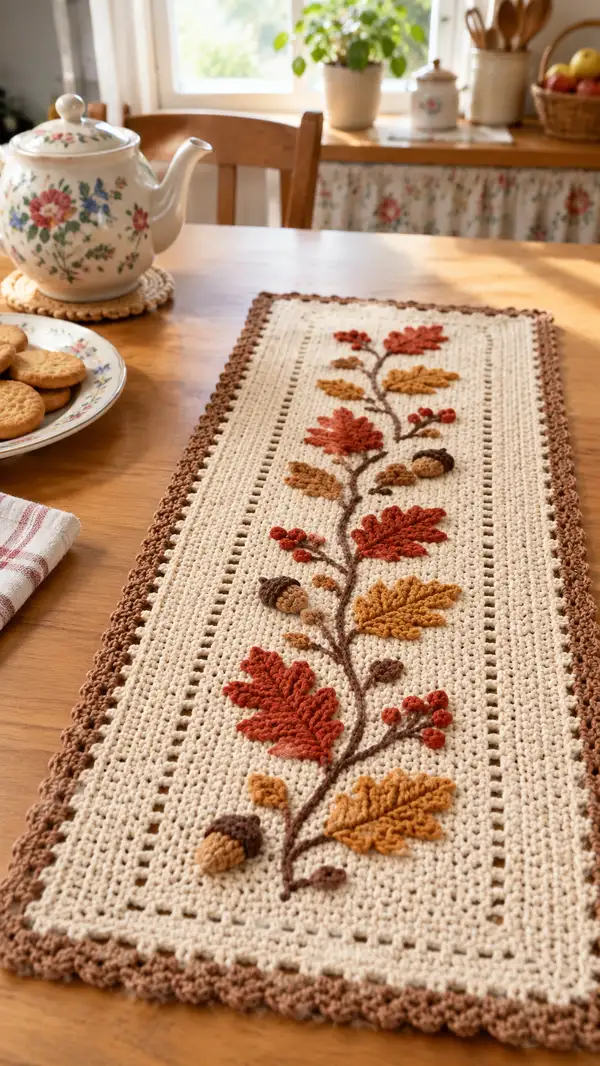
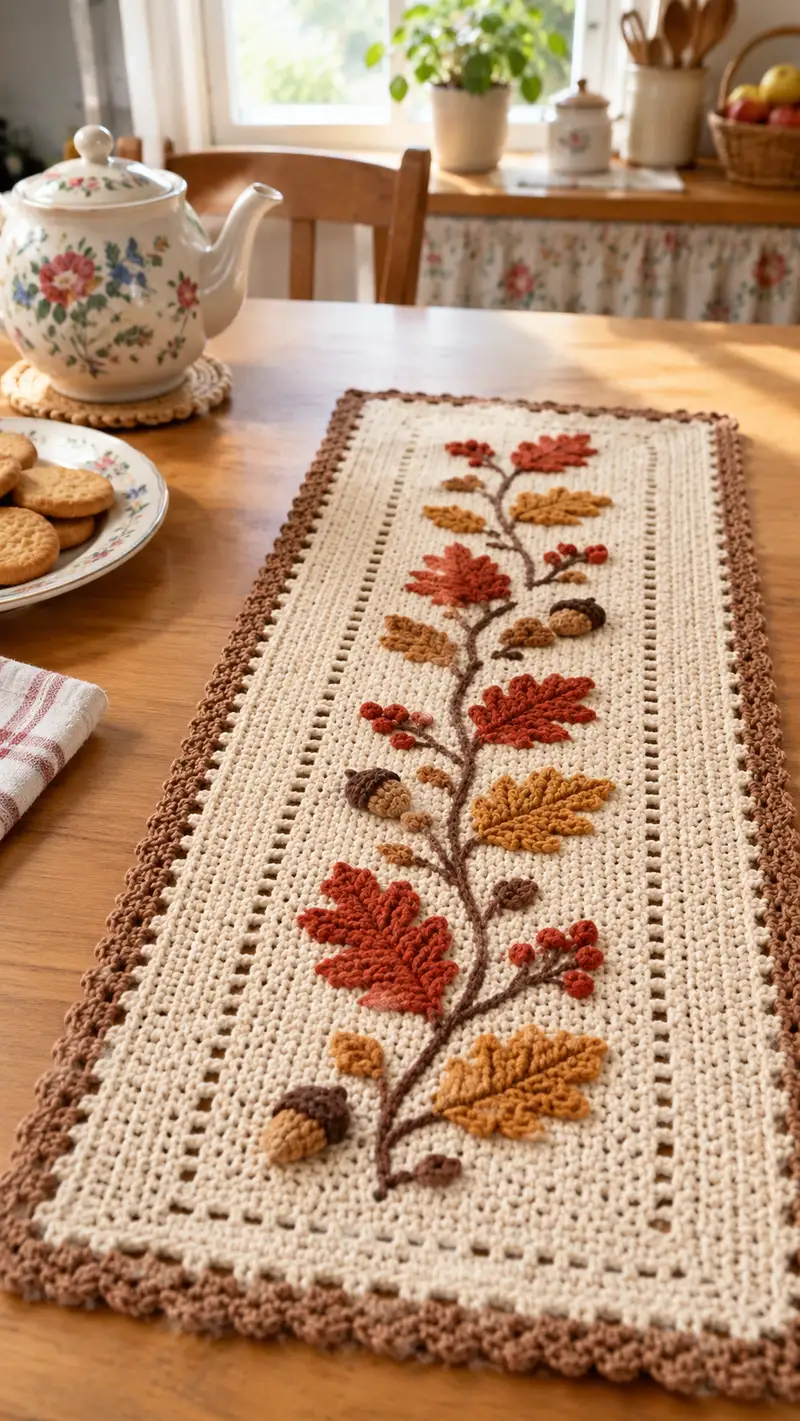
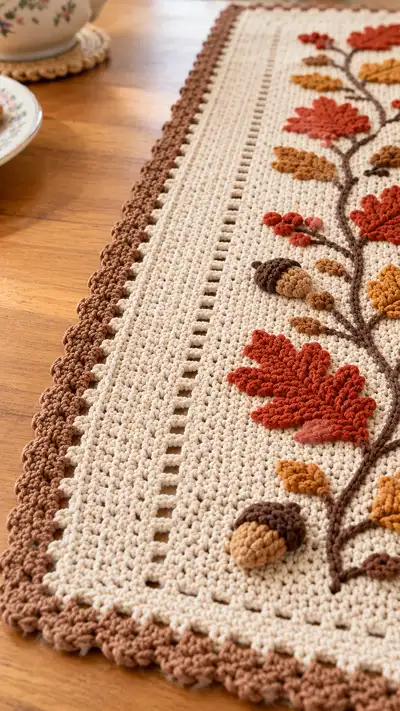
This warm, textured table runner celebrates autumn with raised crochet leaves, acorns and tiny berry clusters arranged on a creamy background. The runner features a dense single‑crochet panel with decorative eyelet verticals, sculpted applique9 leaves in rust, amber and mustard tones, and a soft scalloped brown border. Perfect for fall tables or a cozy kitchen vignette, this pattern combines simple stitches with dimensional surface work for a professional finish.
Progress Tracker
0% Complete
— Notes & Gauge :
Info :
Finished runner shown measures approximately 12" x 36" (30cm x 92cm). Gauge: 16 sc x 18 rows = 4" (10cm) in single crochet using 4.0mm hook. Using a different yarn or hook will change finished size; make a gauge swatch and adjust foundation chain accordingly.
— Base Panel :
Round 1 :
Foundation: Chain 101. (This yields 100 working chains across.) Turn, sc in 2nd ch from hook and in each ch across. (100 sc)
Round 2 :
Ch 1, turn. Sc in each st across. (100 sc)
Round 3 :
Ch 1, turn. Sc in each st across. (100 sc)
Round 4 :
Ch 1, turn. Sc in each st across. (100 sc)
Info :
Work the base in continuous rows (turning each row) to create a tight fabric. Place a stitch marker at Row ends if you like to keep track of rows and counts.
Round 5 :
Ch 1, turn. Sc in first 10 sts, *ch 2, sk 2, sc in next 10*; repeat from * to * across until 10 sts remain at end, sc in last 10 sts. (100 sc plus 4 ch-2 spaces evenly placed)
Round 6 :
Ch 1, turn. Sc in each st and each ch-2 space across, treating ch-2 as a single stitch for counting so total remains 100 sc positions (place 1 sc in each ch-2 space). (100 sc)
Round 7-12 :
Ch 1, turn. Sc in each st across. (100 sc) Repeat for Rows 7-12 to create a substantial border area before applique placement.
Info :
The two vertical eyelet columns shown in the photos are created by repeating an eyelet row pattern at even intervals; these act as visual dividers for the center applique9 stem. You will place applique9s centered between these columns.
Round 13 :
Ch 1, turn. Sc in first 14 sts, *ch 2, sk 2, sc in next 14*; repeat until last 14 sts, sc in last 14. (100 sc positions with 4 ch-2 spaces)
Round 14 :
Ch 1, turn. Sc in each st and in each ch-2 space across. (100 sc)
Round 15-20 :
Ch 1, turn. Sc in each st across. (100 sc) Work even for six rows to form the central field where applique9s will be attached. Block lightly if desired before sewing motifs.
Info :
Mark the central column visually: measure from either edge 25 sts in to mark the left eyelet column and repeat on the right; this centers the motif on a 50-st wide central panel (from st 26 to st 75).
Round 21 :
Ch 1, turn. Sc in first 10 sts, *ch 2, sk 2, sc in next 10*; repeat to end to reintroduce eyelet columns aligned with earlier ones. (100 sc positions)
Round 22-28 :
Ch 1, turn. Sc in each st across. (100 sc) Repeat six rows to provide a long field for applique9 placement; keep edges neat and even by maintaining stitch count.
Info :
Measure the runner length as you work to ensure it matches desired finished length. Adjust base row repeats if you want a longer or shorter runner (add or subtract pairs of rows between the eyelet sets to keep symmetry).
Round 29 :
Ch 1, turn. Sc in first 14 sts, *ch 2, sk 2, sc in next 14*; repeat to last 14 sts, sc in last 14. (100 sc positions)
Round 30-36 :
Ch 1, turn. Sc in each st across. (100 sc) Repeat seven rows—this completes the base field. Fasten off cream color if you wish to add border later; otherwise leave yarn attached for border rounds.
Info :
At this stage, block the base panel flat and pin the eyelet columns straight. Blocking ensures applique9s sit flat and helps with neat border stitching.
— Scalloped Border :
Round 37 :
Join brown yarn at any corner. Ch 1, sc evenly around the entire runner working 2 sc in each corner to turn. Place 1 sc in each row end and 1 sc in each row base along long sides; total stitch count will vary slightly by blocking but aim to keep even tension. (approx 220 sc)
Round 38 :
Ch 1, turn. Sc in each st around for one round to create base for scallops. (approx 220 sc)
Round 39 :
Ch 1, *skip 2 sc, 5 dc in next sc (scallop made), skip 2 sc, sl st in next sc*; repeat around. At corners, work 5 dc into corner sc to maintain curve. Fasten off and weave ends. (approx 44 scallops)
Info :
Adjust scallop frequency to taste: for smaller scallops use 3 dc with smaller spacing; for more pronounced scallops use 7 dc. Keep counts even so scallops align neatly on both long edges.
— Stitching Stem (Surface Chain) :
Round 40 :
Using dark brown yarn, work a surface chain stem: Attach yarn at the center top of panel (between the eyelet columns), ch 1, sl st along RS in a spiral or corkscrew surface chain method to lay a continuous raised stem down the center length. Alternatively, create a crocheted cord (ch 4, 1 sc in 2nd ch from hook and each ch across; fasten off) and sew in place to mimic stem thickness. Length should cover center field from top to bottom (approx 26"/66cm).
Info :
:
Surface chain method: insert hook from RS into a stitch, yarn over and pull up loop, then pull the loop along to next stitch, yo and sl st to secure—creating a raised rope effect. Keep the stem slightly fluid with gentle curves to mimic natural branch shapes.
— Large Oak Leaf Applique9 (Make 4) :
Round 1 :
With Rust color, start with magic ring. MR, ch 1, 6 sc into MR. Pull ring tight. (6)
Round 2 :
Inc in each st around. (12)
Round 3 :
(1 sc, inc) x 6. (18)
Round 4 :
(2 sc, inc) x 6. (24)
Round 5 :
Ch 1, turn into leaf shaping: sc in next 6 sts, hdc in next 6, 3 dc in next 3 sts to form central lobes, hdc in next 6, sc in last 3 sts. (This creates a teardrop base approximately 24 sts wide in row profile)
Round 6 :
Work along perimeter to shape lobes: In RSS (right side shown), *ch 2, sl st into body to create slight curl, 3 dc cluster across rounded lobe edge, sl st back into base*; repeat to create 5 defined lobes. Fasten off leaving long tail for sewing. (lobe clusters x5)
Info :
Alternative leaf technique: substitute elongated puff stitches for the 3 dc clusters to get a puff-textured leaf surface. Use a smaller hook (3.5mm) to make the puff stitches more compact.
Round 7 :
Using a tapestry needle, use a running stitch of brown yarn along the center back to create a folded midrib; pull slightly to add natural curl. Sew leaf to runner centered on stem at desired row. Repeat to make 4 leaves in alternating colors (Rust x2, Burnt Orange x1, Mustard x1).
Info :
Placement tip: space the large leaves roughly 6-7" (15-18cm) apart along the stem, alternating sides to maintain visual balance. Pin in place before sewing. Use small stitches through base only so leaf ‘lobs’ remain free and raised.
— Medium Leaf Applique9 (Make 6) :
Round 1 :
With Burnt Orange, MR, ch 1, 6 sc in MR. (6)
Round 2 :
Inc in each st around. (12)
Round 3 :
(1 sc, inc) x 6. (18)
Round 4 :
Ch 1, shape leaf: sc in next 5, hdc in next 5, 3 dc in next 3 to form small lobes, hdc 3, sc 2. Fasten off leaving tail. (leaf outline complete)
Info :
Make 6 medium leaves in both Burnt Orange and Mustard to mix colors along the runner. Vary orientation (pointing left or right) when sewing to create a natural vine look.
— Small Leaf Applique9 (Make 8) :
Round 1 :
With Mustard, MR, 6 sc into ring. (6)
Round 2 :
(1 sc, inc) x 3. (9)
Round 3 :
Work 2 rows of sc in FLO to flatten slightly, then finish with a small sl st edge. Fasten off leaving tail for sewing. (approx 9 sts)
Info :
These tiny leaves fill gaps and act as accent pieces around acorns and berries. Make 8–10 and keep some extra for experimentation when arranging the composition.
— Acorn Applique9 (Make 3 large, 3 small) :
Round 1 :
Acorn body (Mid-Brown) MR, ch 1, 6 sc in MR. (6)
Round 2 :
Inc in each st around. (12)
Round 3 :
(1 sc, inc) x 6. (18)
Round 4 :
Sc around for 2 rounds even to build height. (18)
Round 5 :
Begin gentle decrease for base: (4 sc, dec) x 3. (15)
Round 6 :
(3 sc, dec) x 3. (12) Stuff lightly.
Round 7 :
(1 sc, dec) x 4. (8) Fasten off and close with darning needle for small acorn bodies. Leave long tail for sewing to cap.
Round 8 :
Acorn cap (Dark Brown): MR, ch 1, 6 sc in MR. (6)
Round 9 :
Inc each st around. (12)
Round 10 :
(1 sc, inc) x 6. (18)
Round 11 :
Work 1 row of sc in BLO to create a scalloped raw edge (18 sc). Fasten off leaving long tail. Sew cap over body top, staggering stitches so cap slightly overlaps body. For larger acorns, add 1–2 extra rows of sc before finishing cap.
Info :
Use small amounts of stuffing to give acorn bodies a rounded shape. Sew acorns to the runner with small invisible stitches at the base of the cap so the seam is hidden.
— Berry Cluster (Make 6 clusters) :
Round 1 :
With Berry Red, MR, ch 1, 6 sc in MR. (6)
Round 2 :
Inc in each st around. (12)
Round 3 :
Work 1 round of puff stitches: *yo, insert hook in next st, pull up loop, repeat 2 times (3 loops on hook), yo and pull through 6 loops, ch 1 to secure puff*; repeat across 6 sts to create clustered texture. Fasten off leaving tail. Make small clusters of 3–5 berries and sew together at base to create a tight cluster.
Info :
Vary berry size by altering puff height or using fewer loops on puff stitch. Attach berry clusters near smaller leaves and along stem junctions for realistic groupings.
— Small Seed Pods & Leaf Buds (Make multiple) :
Round 1 :
With Pale Brown, MR, ch 1, 6 sc in MR. (6)
Round 2 :
Sc around; leave small tail and flatten slightly to make a tiny bud. Fasten off. Make 8-12 and tuck under leaves as filler accents.
Info :
These tiny buds help fill negative space and look charming grouped near acorns or leaf bases. No stuffing needed for most; if you prefer a little fullness, add a small fluff of fiberfill.
— Additional Texture: Raised Veins & Ridges :
Round 1 :
With dark brown and a small hook, embroider raised veins on each leaf: run a strand of slip stitch or chainless cord up the center of the leaf from base to tip using surface slip stitch technique, then add short lateral stitches to create veinlets. Secure ends on WS and hide tails. Repeat for all leaves for cohesive look.
Info :
Embroidery adds realism. Use a contrast slightly darker than leaf color for visible veins; for subtlety, use same family shade as the leaf.
— Final Placement & Sewing :
Round 1 :
Layout: Place the stem centrally between the eyelet columns. Arrange large oak leaves alternating sides approximately 6–8" apart (15–20cm). Position medium leaves, small leaves, acorns and berry clusters in a balanced composition—pin each piece before sewing.
Round 2 :
Sewing method: With a yarn needle and matching thread, attach each motif by sewing only through base stitches (not lobe tips) so edges remain lifted. Use ladder stitch or small whip stitches and secure by weaving tails through several stitches on WS.
Info :
Start sewing motifs from center outwards so you can adjust spacing as you go. Keep motifs slightly overlapping but not crowded to preserve the sculpted look of each leaf and acorn.
— Extra Decorative Rows (optional):
Round 1 :
If you want a more framed appearance, add one round of sc in cream directly inside the scalloped edge, then a final round of slip stitches in brown to bind the scallop bases. Work evenly to maintain consistent edge tension.
Info :
When adding extra rounds, measure and ensure the scallop repeats remain centered. If necessary, add or remove a few sc between scallops to keep spacing uniform.
— Finishing Touches :
Round 1 :
Weave in all ends on WS. Trim tails close to fabric after weaving to avoid bulk. Block runner lightly to flatten and help applique9s settle; pin up any lopsided leaves while wet and let dry thoroughly.
Info :
For added protection, use a lightweight fabric interlining or ironing of a low-temp steam to flatten; avoid high heat on cotton blends. Spot clean with damp cloth as needed—cotton yarn is washable but repeated laundering will soften raised textures.
Round 2 :
Optional: Add a thin ribbon or non-slip backing if the runner will be used on a surface where slipping is a concern. Sew backing using blind stitch along the back edges to conceal.
Info :
Keep a few spare motifs as replacements or to tweak final arrangement if you decide to re-balance the composition later.
This Autumn Leaves Table Runner brings warmth and handmade charm to your table with sculpted leaves, acorns and berry clusters that are a joy to stitch and display. The textured applique9s and cozy color palette make it a perfect seasonal centerpiece or gift. Each small motif stitches up quickly and the layout is forgiving — pin and move pieces until you love the balance. Enjoy curling up with warm tea and watching this runner come to life stitch by stitch. 🧶🍂