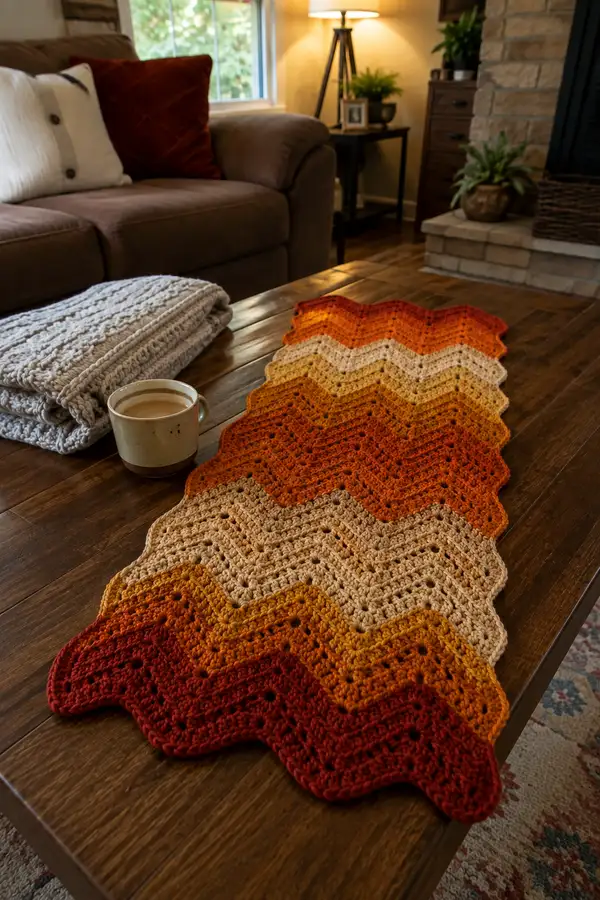
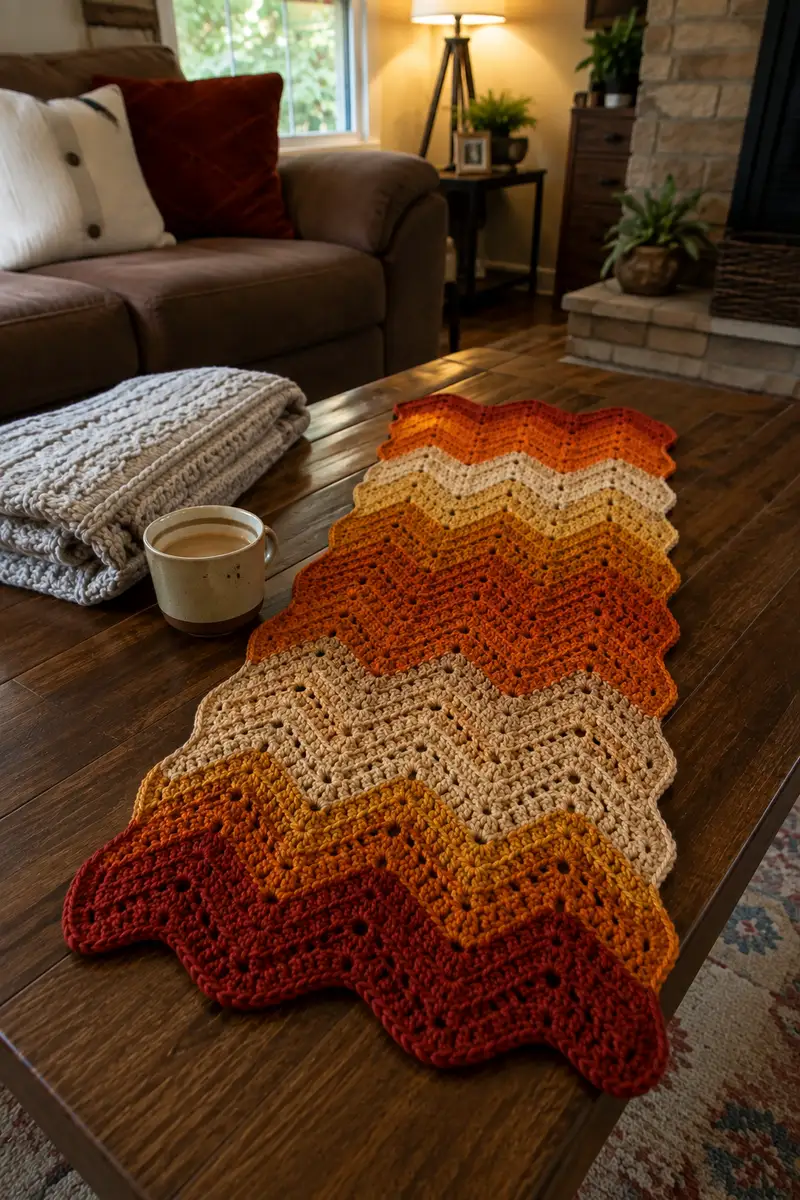
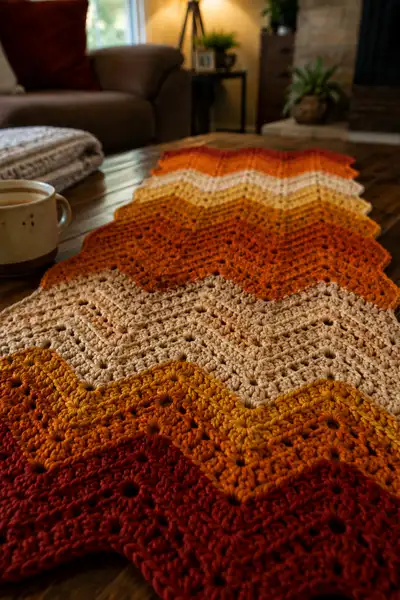
Bring cozy autumn vibes to your table with this Amber and Rust Ombre Ripple Table Runner. Worked in a chevron/ripple stitch with warm gradient bands — deep rust, burnt orange, golden amber, and soft tan — it creates a scalloped edge and textured peaks and valleys perfect for seasonal decor. This runner is worked flat in rows with simple repeats, then finished with a neat single crochet border for stability. Ideal for seasonal styling or as a handmade gift.
Progress Tracker
0% Complete
— Notes & Gauge :
Info :
This pattern is written in US terms. Gauge is approximately 14 stitches and 8 rows = 4 inches in dc ripple pattern using 5.5 mm hook and worsted weight yarn; your gauge may vary with yarn and tension. The runner shown measures approximately 12 inches wide by 48 inches long. To change width: chain any multiple of 12 + 3 for the foundation chain.
Info :
Throughout this pattern 'Round' refers to rows worked flat across. We use ch2 at each turning which counts as the first dc of the row. Maintain consistent tension and block when finished for best results.
— Materials :
Round 1 :
Worsted weight yarn in 7 autumn hues (sample order darkest to lightest): Deep Rust (Color A), Burnt Orange (Color B), Pumpkin (Color C), Mustard/Amber (Color D), Light Tan (Color E), Pale Oat (Color F), Accent Terracotta (Color G). You will alternate color bands; see color banding schedule below.
Info :
Sample color band widths in this pattern: 16 rows per color band for full ombre effect producing seven bands (112 rows) plus 8 rows of edging in final color for a total of 120 rows. Adjust band width to your taste; more rows per band will create wider stripes.
— Foundation Chain (Adjustable) :
Round 2 :
Chain a multiple of 12 + 3 to achieve desired width. Sample: Ch 87 (12 x 7 = 84; 84 + 3 = 87) for an approximately 12" wide runner when worked with worsted weight yarn and 5.5 mm hook.
Info :
Place a stitch marker in the first chain after making the foundation so you can easily count multiples for repeats if you adjust width. If you prefer a narrower or wider runner, calculate: Desired repeats = (desired width in inches / sample width) and multiply the multiple accordingly.
Round 3 :
Row 1 (RS): Dc in the 4th ch from hook (counts as dc after turning), *dc in next 2 ch, dc2tog over next 2 ch (see Note for dc2tog), dc in next 6 ch, 3 dc in next ch (peak), dc in next 6 ch, dc2tog over next 2 ch, dc in next 2 ch; rep from * across until last 2 ch, dc in last 2 ch. (Stitch count remains equal to foundation chain count - 3 turning chains = sample 84 working sts in set pattern positions.)
Info :
Note: dc2tog: yarn over, insert hook in next stitch, yo, pull up loop, yo, pull through two loops (one loop remains on hook), yarn over, insert into next stitch, yo, pull up loop, yo, pull through two loops, yarn over, pull through remaining three loops on hook — this decreases two dc into one tall stitch. This is used to create the valley shaping of the chevron.
— Main Ripple Pattern — Working Rows (Sample chain 87) :
Round 4 :
Row 2 (WS): Ch 2 (counts as first dc), turn. Dc in each st across following the established pattern groupings: place 3 dc in peak stitch (same stitch), dc in plain stitches between shaping, and perform dc2tog at valley positions as encountered. (Maintain the same visual peaks and valleys as Row 1.)
Info :
Always place the 3-dc peak in the same central stitch position of each repeat to maintain symmetry. If you lose track, look for the little holes (created by decreases and chain spaces) that mark valley spaces from the previous row.
Round 5 :
Row 3: Ch 2, turn. Work dc across, keeping to the repeat: *dc in next 2, dc2tog over next 2, dc in next 6, 3 dc in next st, dc in next 6, dc2tog over next 2, dc in next 2*; repeat across to end, working last sts to match pattern. (Row should mirror Row 1 shaping and maintain same stitch count.)
Info :
If counts feel off, count your peaks — you should have an equal number of 3-dc peaks across the row (for ch 87 sample you will have 7 full repeats of the 12-stitch repeat) and valleys formed by dc2tog. Use stitch markers to mark the top of each peak as you progress to keep pattern placement consistent.
Round 6 :
Row 4: Ch 2, turn. Repeat pattern as for Row 3, maintaining tension and positioning 3-dc peaks and dc2tog valleys. Keep an eye on turning chain placement — your ch2 must visually join as first dc.
Round 7 :
Row 5: Ch 2, turn. Repeat the established chevron pattern for Row 5; this is the row where small eyelet holes at valley centers begin to appear and lend texture to the runner.
Info :
These first 5 rows form the base of the repeat. After a few rows, the stitch placement will feel rhythmic — each repeat is 12 stitches wide: the pattern position per repeat is: [3dc peak] - 6 plain dc - dc2tog valley - 2 plain dc (this ordering is staggered slightly by ch2 turning chain but visually consistent).
— Color Banding Schedule (Sample) :
Round 8 :
Info : Color Band Setup — Work the first 16 rows (Rows 1-16) in Color A (Deep Rust). At the end of Row 16, change to Color B (Burnt Orange). Continue with 16 rows per band in the following order: Color A (Deep Rust) Rows 1-16, Color B (Burnt Orange) Rows 17-32, Color C (Pumpkin) Rows 33-48, Color D (Mustard/Amber) Rows 49-64, Color E (Light Tan) Rows 65-80, Color F (Pale Oat) Rows 81-96, Color G (Accent Terracotta or return to Deep Rust) Rows 97-112. Finish with 8 rows of border in the final color for Rows 113-120.
Info :
Change colors at the end of a WS row for a neater color change, or change on the last dc of the WS row by dropping old color and picking up new color on the final yarn over. Carry the unused color along the inside edge or weave in ends after you complete the band to avoid long floats.
— Rows 1-16: Band 1 (Color A - Deep Rust) :
Round 9 :
Row 1 (Band start): Follow Row 1 instructions above in Color A. (Establishing Row - sample width 87 ch.)
Round 10 :
Row 2: Ch 2, turn. Dc across in pattern. Keep the 3-dc peaks and dc2tog valleys consistent. (Work 16 rows total in this color.)
Round 11 :
Row 3: Ch 2, turn. Repeat the established chevron pattern exactly.
Round 12 :
Row 4: Ch 2, turn. Continue patterning; at Row 4 you will notice the texture deepening between peaks and valleys.
Round 13 :
Row 5: Ch 2, turn. Repeat pattern.
Info :
After Row 6-8 in the band, check your edges — the scalloped peaks should sit nicely. If edges begin to wave excessively, block lightly to set the shape. Keep a stitch marker at the last peak to help you ensure the final repeats are complete.
Round 14 :
Row 6: Ch 2, turn. Repeat pattern.
Round 15 :
Row 7: Ch 2, turn. Repeat pattern.
Round 16 :
Row 8: Ch 2, turn. Repeat pattern.
Round 17 :
Row 9: Ch 2, turn. Repeat pattern.
Round 18 :
Row 10: Ch 2, turn. Repeat pattern.
Round 19 :
Row 11: Ch 2, turn. Repeat pattern.
Round 20 :
Row 12: Ch 2, turn. Repeat pattern.
Round 21 :
Row 13: Ch 2, turn. Repeat pattern.
Round 22 :
Row 14: Ch 2, turn. Repeat pattern.
Round 23 :
Row 15: Ch 2, turn. Repeat pattern.
Round 24 :
Row 16 (Band end): Ch 2, turn. Finish last row in Color A. Fasten off and weave in ends or carry color up the side if you prefer to transition without cutting.
Info :
Weave in ends or use a neat join method: join new color with slip stitch into the first st of the next row, ch2 and begin row in new color. If you carry color, hold both yarns at edge and twist them every 2-3 rows to prevent long floats.
— Rows 17-32: Band 2 (Color B - Burnt Orange) :
Round 25 :
Row 17: Join Color B with a slip stitch to the first stitch of the next row (or pick up new color on last yo of previous row). Ch 2, turn. Dc across in established ripple pattern. Continue for 16 rows in Color B, repeating the Row structure from earlier: ch2, turn, dc pattern maintaining 3-dc peaks and dc2tog valleys.
Round 26 :
Row 18: Ch 2, turn. Continue pattern in Color B.
Round 27 :
Row 19: Ch 2, turn. Continue pattern in Color B.
Round 28 :
Row 20: Ch 2, turn. Continue pattern in Color B.
Info :
If you notice one side tending to curl, check that you have not accidentally increased or decreased the stitch count near the turning chains. Counting peaks across the row ensures you maintain the correct placement; you should have the same number of peaks each row as set by the foundation chain (sample: 7 peaks for ch 87).
Round 29 :
Row 21: Ch 2, turn. Continue pattern in Color B.
Round 30 :
Row 22: Ch 2, turn. Continue pattern.
Round 31 :
Row 23: Ch 2, turn. Continue pattern.
Round 32 :
Row 24: Ch 2, turn. Continue pattern.
Round 33 :
Row 25: Ch 2, turn. Continue pattern.
Round 34 :
Row 26: Ch 2, turn. Continue pattern.
Round 35 :
Row 27: Ch 2, turn. Continue pattern.
Round 36 :
Row 28: Ch 2, turn. Continue pattern. (Finish 16 rows in Color B; cut or carry color.)
Info :
To avoid visible jogs in color transitions, consider making the first row in the new color using a surface slip-stitch join across the top to even out tension, then proceed with ch2 and first dc row.
— Rows 33-48: Band 3 (Color C - Pumpkin) :
Round 37 :
Row 29: Join Color C. Ch 2, turn. Work 16 rows in Color C following the same established pattern sequence as previous bands. Maintain the chevron repeat across each row.
Round 38 :
Row 30: Ch 2, turn. Repeat pattern.
Round 39 :
Row 31: Ch 2, turn. Repeat pattern.
Round 40 :
Row 32: Ch 2, turn. Repeat pattern.
Info :
Keep the same rhythm of increases and decreases; the peak always occupies a single stitch where you place the 3-dc cluster. After several rows the ombre flow will begin to show clearly and the scalloped edge shape will be defined.
Round 41 :
Row 33: Ch 2, turn. Repeat pattern.
Round 42 :
Row 34: Ch 2, turn. Repeat pattern.
Round 43 :
Row 35: Ch 2, turn. Repeat pattern.
Round 44 :
Row 36: Ch 2, turn. Repeat pattern.
Round 45 :
Row 37: Ch 2, turn. Repeat pattern.
Round 46 :
Row 38: Ch 2, turn. Repeat pattern.
Round 47 :
Row 39: Ch 2, turn. Repeat pattern.
Round 48 :
Row 40: Ch 2, turn. Repeat pattern. Fasten off Color C at end of Row 48 if not carrying color.
— Rows 49-64: Band 4 (Color D - Mustard/Amber) :
Round 49 :
Row 41: Join Color D. Ch 2, turn. Work 16 rows in Color D following the established ripple pattern. Watch for any tendency to twist at the ends and correct by ensuring turning chain is not counted as extra stitch in the pattern repeat.
Round 50 :
Row 42: Ch 2, turn. Repeat pattern in Color D.
Round 51 :
Row 43: Ch 2, turn. Repeat pattern.
Round 52 :
Row 44: Ch 2, turn. Repeat pattern.
Info :
If you are adjusting runner length you can make this band longer or shorter; adding extra rows in the center band keeps balance visually. Always maintain band lengths consistently on both sides if you want symmetrical ombre placement centered on the table.
Round 53 :
Row 45: Ch 2, turn. Repeat pattern.
Round 54 :
Row 46: Ch 2, turn. Repeat pattern.
Round 55 :
Row 47: Ch 2, turn. Repeat pattern.
Round 56 :
Row 48: Ch 2, turn. Repeat pattern.
Round 57 :
Row 49: Ch 2, turn. Repeat pattern.
Round 58 :
Row 50: Ch 2, turn. Repeat pattern.
Round 59 :
Row 51: Ch 2, turn. Repeat pattern.
Round 60 :
Row 52: Ch 2, turn. Finish Color D band after Row 64 as scheduled (this is Row 64 boundary in overall count).
— Rows 65-80: Band 5 (Color E - Light Tan) :
Round 61 :
Row 53: Join Color E. Ch 2, turn. Work Row 53 through Row 68 (16 rows) in Color E using established ripple repeat. Keep stitches consistent; the lighter shade will show stitch definition clearly so any tension differences are more noticeable here — relax your grip to even tension.
Round 62 :
Row 54: Ch 2, turn. Repeat pattern.
Round 63 :
Row 55: Ch 2, turn. Repeat pattern.
Round 64 :
Row 56: Ch 2, turn. Repeat pattern.
Info :
At the midpoint of the runner (after the fourth band in a seven-band layout) assess overall symmetry. If one side has more ripples or the scallops look off-center, adjust the number of rows slightly in subsequent bands to visually center the color flow on your table length.
Round 65 :
Row 57: Ch 2, turn. Repeat pattern.
Round 66 :
Row 58: Ch 2, turn. Repeat pattern.
Round 67 :
Row 59: Ch 2, turn. Repeat pattern.
Round 68 :
Row 60: Ch 2, turn. Repeat pattern.
Round 69 :
Row 61: Ch 2, turn. Repeat pattern.
Round 70 :
Row 62: Ch 2, turn. Repeat pattern.
Round 71 :
Row 63: Ch 2, turn. Repeat pattern.
Round 72 :
Row 64: Ch 2, turn. Finish Color E band at end of Row 80 in the overall count.
— Rows 81-96: Band 6 (Color F - Pale Oat) :
Round 73 :
Row 65: Join Color F. Ch 2, turn. Continue the same ripple pattern for another 16 rows in the pale oat color. This lighter band gives a soft break before the final accent and helps the ombre blend smoothly.
Round 74 :
Row 66: Ch 2, turn. Repeat pattern.
Round 75 :
Row 67: Ch 2, turn. Repeat pattern.
Round 76 :
Row 68: Ch 2, turn. Repeat pattern.
Info :
Because lighter yarns can appear thinner, maintain a consistent hook and tension so the runner stays even. If you see small gaps grow, tighten your tension slightly or drop to the 5.0 mm hook for the rest of the band.
Round 77 :
Row 69: Ch 2, turn. Repeat pattern.
Round 78 :
Row 70: Ch 2, turn. Repeat pattern.
Round 79 :
Row 71: Ch 2, turn. Repeat pattern.
Round 80 :
Row 72: Ch 2, turn. Repeat pattern.
Round 81 :
Row 73: Ch 2, turn. Repeat pattern.
Round 82 :
Row 74: Ch 2, turn. Repeat pattern.
Round 83 :
Row 75: Ch 2, turn. Repeat pattern.
Round 84 :
Row 76: Ch 2, turn. Finish Color F band at end of Row 96 overall count.
— Rows 97-112: Band 7 (Color G - Accent Terracotta / Deep Rust) :
Round 85 :
Row 77: Join Color G (or return to Color A for a darker accent). Ch 2, turn. Work rows 77-92 (16 rows) in Color G following the established ripple repeat. This final full band brings the ombre back toward deeper tones and frames the runner for a balanced look.
Round 86 :
Row 78: Ch 2, turn. Repeat pattern.
Round 87 :
Row 79: Ch 2, turn. Repeat pattern.
Round 88 :
Row 80: Ch 2, turn. Repeat pattern.
Info :
Make sure the last peak of the band lands squarely at the end so the scalloped edges line up symmetrically with the opposite side. Use your marker to check the last peak stitch position before finishing the band.
Round 89 :
Row 81: Ch 2, turn. Repeat pattern.
Round 90 :
Row 82: Ch 2, turn. Repeat pattern.
Round 91 :
Row 83: Ch 2, turn. Repeat pattern.
Round 92 :
Row 84: Ch 2, turn. Repeat pattern.
Round 93 :
Row 85: Ch 2, turn. Repeat pattern.
Round 94 :
Row 86: Ch 2, turn. Repeat pattern.
Round 95 :
Row 87: Ch 2, turn. Repeat pattern.
Round 96 :
Row 88: Ch 2, turn. Finish the seventh band at Row 112 in overall sequence; prepare to work the final border rows listed below to bring the runner to a neat edge.
— Rows 113-120: Finishing & Border :
Round 97 :
Row 89 (Border Row 1): Join final color (choose a deep accent for contrast) and Ch 1, turn. Work 1 row of sc across across the top of the row to even the surface: Sc in first stitch and in each stitch across. This creates a straighter edge to attach a neat scalloped single crochet edging.
Round 98 :
Row 90 (Border Row 2): Ch 1, turn. Sc in each st across, placing 3 sc in the top of each peak stitch (the topmost stitch of the 3-dc cluster) to hug the scallop. At valley points, work 1 sc in the valley stitch. This balances the edge and stabilizes the scallops.
Round 99 :
Row 91 (Border Row 3): Ch 2, turn. Working from RS, create a decorative scalloped border: *In next stitch, [sc, hdc, 3 dc, hdc, sc] all into same stitch (shell), skip 2 sts; rep across.* This places a shell on each peak of the ripple. Work shells into the top of the peak (3-dc cluster) so scallops align.
Round 100 :
Row 92 (Border Row 4): Ch 2, turn. Work 1 sc in each stitch between shells to anchor shells, and 1 sc across shell centers where space allows, finishing with a neat edge. This finalizes the scalloped edging around the runner ends and long sides (if you prefer to edge the long sides as well, repeat rounds along the long edges after seaming if needed).
Info :
For a uniform finish, work the border the same way on both short ends. To add a long side border, run a single crochet evenly along the long edges, placing increases where the scallops jut out to avoid pulling the runner inwards.
Round 101 :
Row 93 (Final Stabilizing Row): Work 1 round of sc all around the runner, placing 3 sc in corner scallops and 1 sc per st along the sides. This small stabilization round ensures the scalloped border lays flat.
Round 102 :
Row 94 (Optional Decorative Topstitch): Using contrasting thread or a slightly thinner yarn, work a reverse single crochet (crab stitch) around the runner to create a rope-like finished edge. This is optional but gives a professional look.
Info :
Weave in all yarn tails using a yarn needle, sewing them through several stitches inside the runner and trimming close. Wet-block or steam-block gently to even the scallops and allow the runner to relax into its final form.
— Tips & Troubleshooting :
Round 103 :
Info : If your runner waves or curls, pin it flat to a blocking surface while damp and allow to dry for several hours; the chevron edges will shape beautifully when pinned to even tension. For stubborn edges, use a light spray starch after blocking.
Round 104 :
Info : To lengthen the runner, continue adding additional 16-row bands in the same color rotation or repeat a favorite color band. To shorten, remove one or two bands by stopping earlier and adjusting the final border accordingly.
Round 105 :
Info : For a table runner intended for heavy use, consider lining the underside with thin felt fabric pinned and hand-sewn to the underside to protect the yarn and table finish. Use small blind stitches so the felt stays invisible from the top side.
Round 106 :
Info : If you get off-by-one in a repeat, undo back to the last properly counted peak and rework the repeat. Because the repeat is visually distinct, correcting at the start of a repeat is simpler than attempting to compensate later.
Round 107 :
Info : Yarn substitution: you may use acrylic, cotton, or blends in worsted weight; cotton will be less springy and behave slightly flatter; wool or acrylic gives more loft. Test a small swatch of 2-4 repeats before committing to full runner length to confirm drape and gauge.
Round 108 :
Info : For cleaning, check yarn label. Most acrylic or superwash blends are machine washable on a gentle cycle in a mesh bag; block to shape after washing. Avoid hot dryers which may distort scallops.
Round 109 :
Info : Label each color tail as you cut it so you can match it easily if you need to reconstruct color order later. Keeping a small project notebook with row counts per color band helps if you want to reproduce the same runner again.
Round 110 :
Info : Variations: To create a denser runner, work hdc instead of dc in the repeating body; to make an airier runner, substitute dc with tr where appropriate and adjust hook size. Note that stitch counts remain consistent but the final look changes significantly.
Round 111 :
Info : Decorative additions: add tassels or small pom-poms to each scallop end for a boho look. Attach using a small loop and knot, making sure to secure the inside ends so they do not pull free with use.
Round 112 :
Info : Final inspection: run your hand across both sides to feel for loose stitches or tails. Weave and secure any loose threads. If the runner still feels uneven, a gentle steam with an iron held a few inches above the surface will settle fibers and even minor irregularities.
You've created a stunning Autumn Ombre Ripple Table Runner — a cozy, handmade accent that brings instant warmth and seasonal charm to your home. Each ripple and color band works together to create a timeless ombre effect that looks beautiful on coffee tables, sideboards, or dining tables. Enjoy the satisfaction of a project that grows steadily and finishes with elegant scalloped edges. Share a photo and bask in compliments — this runner was made with love and attention to detail! 🧶🍁