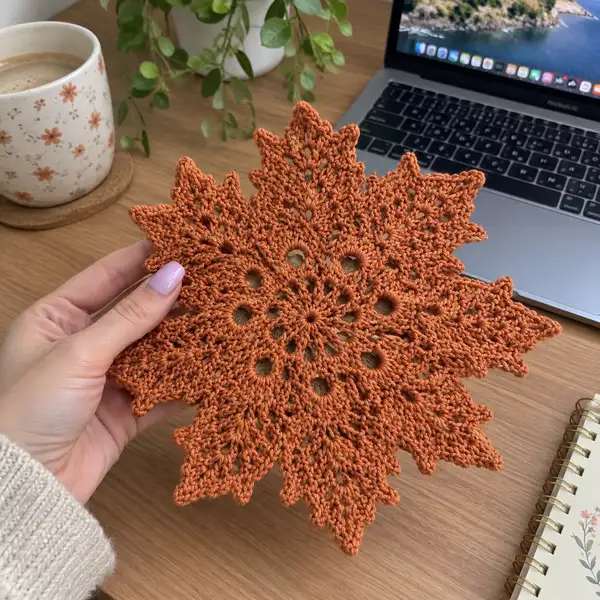
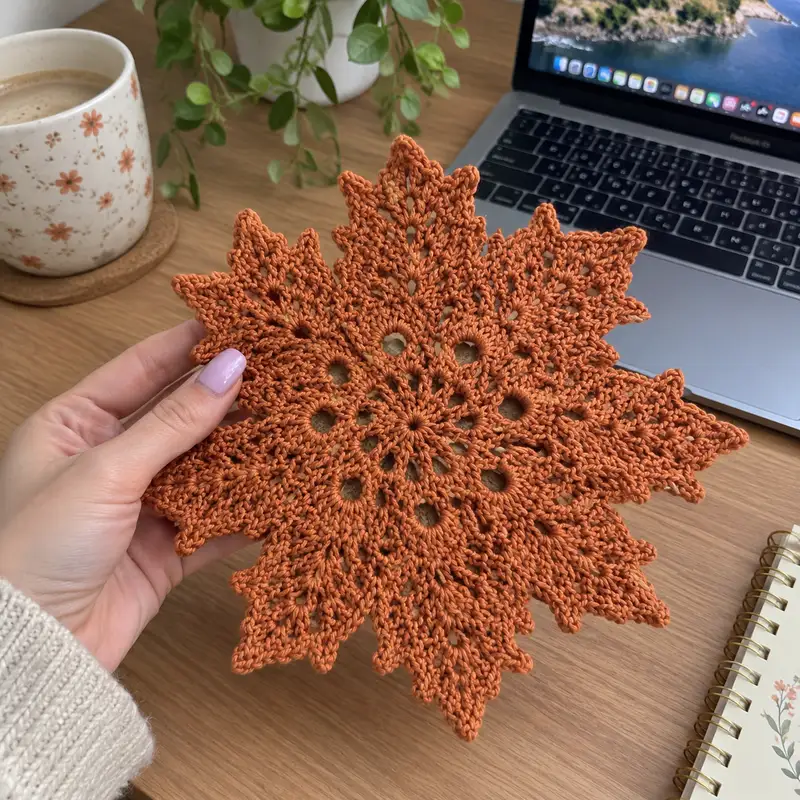
A delicate, vintage-inspired maple leaf doily crocheted in warm rust cotton. This flat decorative piece features an openwork center, radiating vein-like stitches and pointed lobes finished with a picot and shell edging. Sized to sit on a desk or under a mug, it brings cozy autumn charm to any space.
Progress Tracker
0% Complete
— Center :
Round 1 :
8 sc in magic ring (8)
Round 3 :
(1 sc, 1 inc) x 8 (24)
Round 4 :
(2 sc, 1 inc) x 8 (32)
Round 5 :
(3 sc, 1 inc) x 8 (40)
Info :
The center rounds form a tight disk. Keep your tension even and pull the magic ring closed so there is no gap. Place a stitch marker in the first stitch of Round 6 to mark round starts.
Round 6 :
(4 sc, 1 inc) x 8 (48)
Round 7 :
(5 sc, 1 inc) x 8 (56)
Round 8 :
(6 sc, 1 inc) x 8 (64)
Round 9-10 :
1 sc in each st (64)
Info :
Rounds 9-10 form a stable base for the first ring of eyelets. Keep the fabric flat by not over-tightening when joining rounds; use a continuous spiral or join-and-ch to keep your seam invisible.
— Eyelet Ring and Early Lace :
Round 11 :
(1 sc, ch 3, skip 1) x 32 (64 anchor points)
Info :
This creates small ch-3 eyelets that appear as holes in the photograph. The stitch count remains anchored to 64 because each ch-3 is worked between adjacent stitches; treat each chain space as one anchor for the next round.
Round 12 :
Work into each ch-3: (sc, hdc, dc, hdc, sc) into each ch3-sp (64 clusters)
Round 13 :
1 sc in each stitch across clusters (64)
Info :
Round 12 builds the first petal-like clusters around the center. Use your fingers to flatten the clusters evenly so the center stays circular and not wavy.
— Increasing to Create 8 Lobes :
Round 14 :
(7 sc, 1 inc) x 8 (72)
Round 15 :
1 sc in each st (72)
Round 16 :
1 sc in each st BLO (72)
Info :
Working BLO on Round 16 produces a shallow ridge that will begin to read as a 'vein' texture on the leaf underside. If you prefer a less obvious vein, work this round in regular sc.
Round 17 :
(8 sc, 1 inc) x 8 (80)
Round 18 :
1 sc in each st (80)
Round 19 :
*(sc, ch 4, sl st into next anchor) repeat* to form decorative arches (80 anchors)
Info :
Round 19 adds delicate arching that reads as small openwork between later ribs; keep ch-loops even by tensioning the yarn gently while forming arches.
Round 20 :
Work into each arch: sc, hdc, (2 dc, ch1, 2 dc) shell, hdc, sc across each ch4-sp (80 shells)
Round 21 :
1 sc in each st (80)
Info :
This shell round forms the first scalloped suggestion that transitions the round center into shaped lobes. Make sure each shell is centered over its anchor to maintain symmetry.
— Forming the Primary Veins :
Round 22 :
(9 sc, 1 inc) x 8 (88)
Round 23 :
1 sc in each st FLO (88)
Round 24 :
1 sc in each st (88)
Info :
Working FLO at Round 23 creates a small ridge on the surface which will act as a raised vein on the top of the leaf. If you prefer sharper veins, use a slightly smaller hook for this FLO round.
Round 25 :
(10 sc, 1 inc) x 8 (96)
Round 26 :
1 sc in each st (96)
Round 27 :
Work a decorative filet round: *(dc, ch2, dc) into next 2 anchors, sc into next anchor* repeat across (96 anchors)
Info :
Filet style stitches introduce controlled open spaces that will echo the leaf's natural openings. Keep the dc pairs tight enough to ensure the opening feels like a design element rather than a loose gap.
— Building Lobe Height and Texture :
Round 28 :
(11 sc, 1 inc) x 8 (104)
Round 29 :
1 sc in each st BLO (104)
Round 30 :
1 sc in each st (104)
Info :
Rounds 28-30 build the circumference and begin to separate the eight lobes visually. Keep counts tight and even; miscounts will quickly become visible when the lobes are formed.
Round 31 :
(12 sc, 1 inc) x 8 (112)
Round 32 :
1 sc in each st (112)
Round 33 :
Work into each group of 14 anchors around imagined lobe centers: (sc, ch3, sk1, 3 dc cluster, ch3, sc) repeated to emphasize future points (112)
Info :
Round 33 adds small vertical clusters that will become the backbone of each lobe’s central vein. When forming clusters, ensure each cluster sits centered in its lobe segment for even point shaping later.
— Expanding Lobes and Veins (multi-texture rounds) :
Round 34 :
(13 sc, 1 inc) x 8 (120)
Round 35 :
1 sc in each st (120)
Round 36 :
1 hdc in each st BLO (120)
Info :
HDC in BLO softens the texture and adds height without widening much. This helps the leaf lie relatively flat while subtly raising the vein lines.
Round 37 :
(14 sc, 1 inc) x 8 (128)
Round 38 :
1 sc in each st (128)
Round 39 :
Surface ribbing round: sl st in next 2, *fpdc around next st, sl st next 2* repeat across (128)
Info :
Front-post double crochet ribs create accentuated vein ridges that mimic the leaf veins in the photo. Work evenly and align ribs so eight distinct vein groups emerge radially.
— Developing Outer Lobes :
Round 40 :
(15 sc, 1 inc) x 8 (136)
Round 41 :
1 sc in each st (136)
Round 42 :
1 sc in each st FLO (136)
Info :
FLO here raises another faint ridge and helps the lobes keep a rounded profile. Take a moment to check symmetry — count groups of 17 (per lobe) to verify placement.
Round 43 :
(16 sc, 1 inc) x 8 (144)
Round 44 :
1 sc in each st (144)
Round 45 :
Decorative arch round: *(sc, ch5, sl st into base) repeat* (144 anchors)
Info :
Arch rounds add airy negative space reminiscent of the lacy motifs in the image. Keep tensions even so arches form consistent curves across all lobes.
— Heightening Lobe Tips (multiple shaping rounds) :
Round 46 :
(17 sc, 1 inc) x 8 (152)
Round 47 :
1 sc in each st (152)
Round 48 :
1 hdc in each st BLO (152)
Info :
These rounds build the body of each lobe. If you notice any lobe larger than the others, you may have miscounted an earlier increase — unravel back to the last even round and recount in groups of eight anchors.
Round 49 :
(18 sc, 1 inc) x 8 (160)
Round 50 :
1 sc in each st (160)
Round 51 :
Textured cluster round: *(sc, ch2, 3dc cluster over next 3 anchors, ch2) repeat* (160 anchors)
Info :
Cluster rounds create the pronounced ribbed texture visible in the leaf between the lobes. Keep cluster centers aligned with lobe veins; use stitch markers every lobe to ensure correct centering.
— Outlining Lobes and Beginning Points :
Round 52 :
(19 sc, 1 inc) x 8 (168)
Round 53 :
1 sc in each st (168)
Round 54 :
1 sc in each st BLO (168)
Info :
Round 54’s BLO gives definition to the very edge of the leaf so that the subsequent point shaping reads sharply when blocked.
Round 55 :
(20 sc, 1 inc) x 8 (176)
Round 56 :
1 sc in each st (176)
Round 57 :
Work into each lobe-split: *sc 6, (hdc, dc, tr) over center vein, hdc 6, sc into next* repeat x 8 (176)
Info :
This round deliberately focuses several taller stitches over each lobe center; these taller stitches form the upward thrust that becomes the point tip in later rounds. Keep the tall stitch groups centered per lobe.
— Point Elongation and Lacework :
Round 58 :
(21 sc, 1 inc) x 8 (184)
Round 59 :
1 sc in each st (184)
Round 60 :
Work pattern for fine openwork: *sc, ch4, skip 1, sc* across to keep 184 anchors
Info :
This round introduces longer chain loops that make the leaf appear more open and delicate. If your chains are too loose, the points will look floppy; tension and even spacing matter more at this stage than early rounds.
Round 61 :
(22 sc, 1 inc) x 8 (192)
Round 62 :
1 sc in each st (192)
Round 63 :
Surface slip-stitch veins: sl st next 3, *fpdc over next 2, sl st next 3* repeat across (192)
Info :
Surface slip and front-post stitches accentuate vein direction. Work slowly and align these surface stitches visually to maintain eight radial vein groups.
— Drawing the Points to a Tip :
Round 64 :
(23 sc, 1 inc) x 8 (200)
Round 65 :
1 sc in each st (200)
Round 66 :
Point shaping start: *(sc 8, (hdc, dc, tr, dc, hdc) over next 5 anchors, sc 8) repeat x 8 (200)
Info :
The tall cluster in the middle of each repeat pushes up to form the very tip of each lobed point. Check that these taller stitches are centered within each 25-anchor (approx) segment.
Round 67 :
(24 sc, 1 inc) x 8 (208)
Round 68 :
1 sc in each st (208)
Round 69 :
Decrease shaping to sharpen points: *(sc 10, (hdc, dc, tr), sc 6) repeat x 8 (208)
Info :
Here we begin to refine the profile of each point. Slight decreases in later rounds will give the jagged tips seen in the image; be precise — small errors are magnified at the edge.
— Final Point Detailing and Serration :
Round 70 :
(25 sc, 1 inc) x 8 (216)
Round 71 :
1 sc in each st (216)
Round 72 :
Serration round: *(sc 2, picot, sc 2, sk2, sl st into next) repeat across to create small teeth along edges (216 anchors)
Info :
Picots and small skipped stitches make the tiny serrated points visible along each major lobe edge. If you dislike picots, substitute small sc clusters instead.
Round 73 :
(26 sc, 1 inc) x 8 (224)
Round 74 :
1 sc in each st (224)
Round 75 :
Decorative shell edging begin: *(sc 3, (2 dc, ch1, 2 dc) shell in next anchor, sc 3) repeat x 8 (224)
Info :
Shell edging gives the finished leaf a refined silhouette and slightly thicker rim to keep points neat after blocking. Count shells to ensure eight shells align with the lobe centers.
— Built-Up Edge and Final Shaping :
Round 76 :
(27 sc, 1 inc) x 8 (232)
Round 77 :
1 sc in each st (232)
Round 78 :
BLO round for crisp outer ridge: 1 sc in each st BLO (232)
Info :
Working BLO on the final rounds produces a raised outer ridge that helps the leaf maintain structure and makes the points pop after blocking.
Round 79 :
(28 sc, 1 inc) x 8 (240)
Round 80 :
1 sc in each st (240)
Round 81 :
Final serrated detail: *sc, picot, skip 1, sc into next 3, picot* repeat across (240 anchors)
Info :
Round 81 produces the tiny spike details visible on the points; adapt the number of picots per lobe side to match the photographed serration count (about 3-6 small spikes per lobe side).
— Last Rounds and Blocking Preparation :
Round 82 :
1 sc in each st (240)
Round 83 :
Finish round: sl st into next st, fasten off and weave in ends neatly with tapestry needle
Info :
Leave a long tail when finishing to help secure the final rounds and for any final sewing you may want to do after blocking. Wet-block or steam-block the doily into shape, pinning each of the eight lobes sharply to form the leaf points shown in the photo.
Round 84-90 (Optional Stiffening and Edging Variations) :
If you want extra crispness add one or two rounds of firm single crochet or surface slip-stitch and finish with a blocking and starching step. For a contrasting edge: join a contrasting color and work (sc, picot, sc) around each scallop, then fasten off. (Stitch counts will remain at 240 as these are surface/edging rounds designed not to change anchors)
Info :
For a perfect finish, pin dry after blocking and apply a light starch if you want the doily to sit rigidly under a mug or vase. For a softer look, simply steam block and let dry naturally.
This lovely maple leaf doily brings the warm colors and textures of autumn to your home in a compact, handcrafted piece. Its radiating veins and pointed lobes make for a satisfying stitch-by-stitch progression, and the finished item is wonderful for gifting or decorating. I hope you enjoy blocking the veins open and watching the leaf transform — it’s a small joy every time you revisit it. 🧶🍁