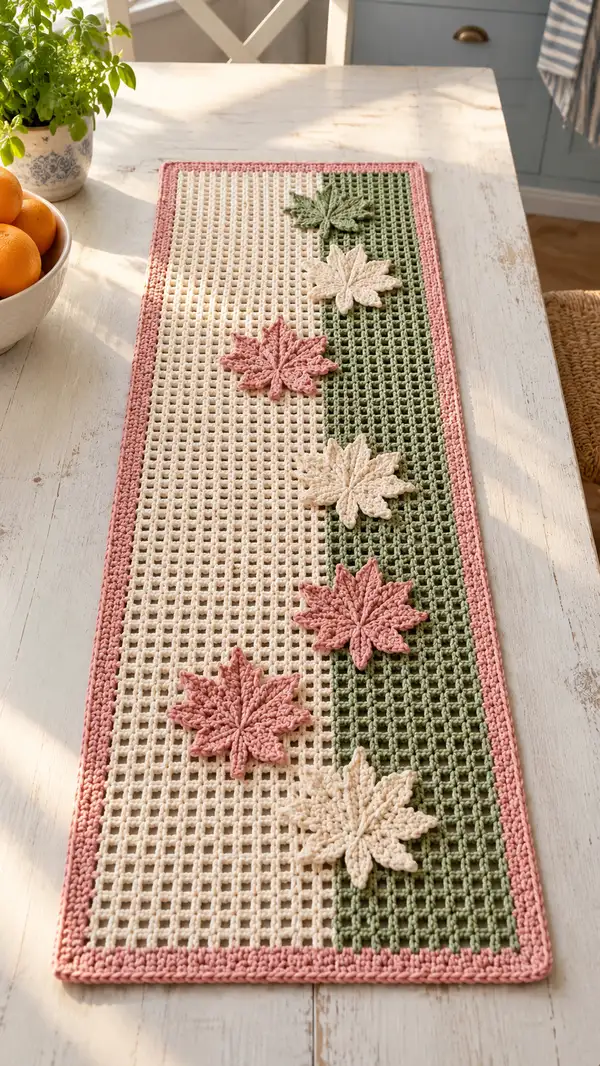
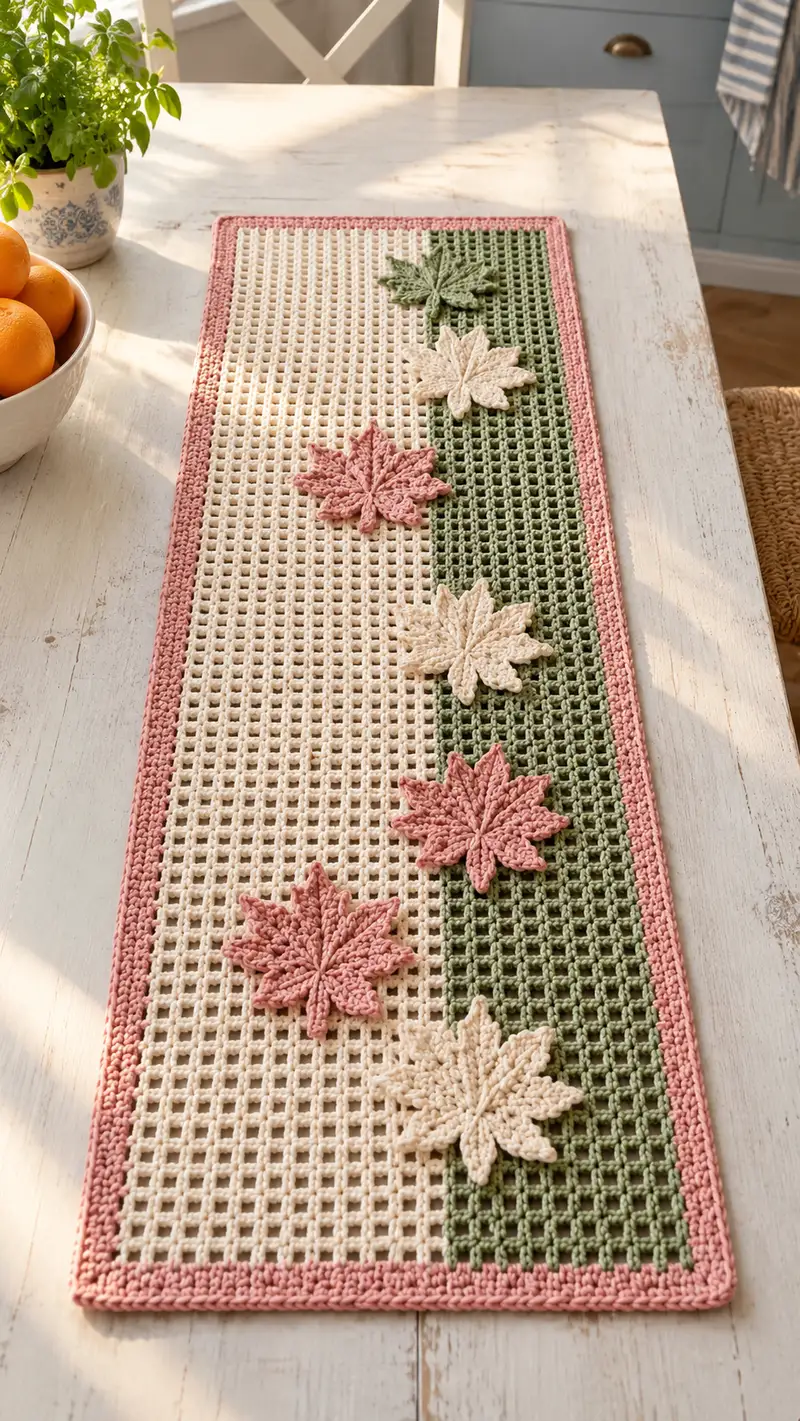
A long, elegant mesh table runner with a vertical green stripe, delicate pink edging and layered maple leaf appliques in soft pink and cream. The openwork grid brings a light, airy texture while the raised leaves add sculptural, seasonal charm. Worked in two panels joined and finished with a neat crochet border, this runner is perfect for a kitchen or dining table accent. A lovely weekend project that balances simple mesh repeats with pretty applique detail.
Progress Tracker
0% Complete
— Notes & Gauge :
Info :
This pattern is written in US terms. Gauge for mesh: 12 dc x 8 rows = 4 inches measured in the mesh grid with 4.0mm hook and worsted cotton. Your yarn and hook choice will affect final size; measure a swatch and adjust hook size for desired firmness of mesh. The pattern is built from two long mesh panels joined lengthwise: a wider cream panel and a narrower green panel. Leaves are crocheted separately and sewn on. Border rounds finish the piece.
Info :
Terminology: We use 'round' here to denote each worked row across the runner for clarity. When counting stitches in mesh rows, we report the number of double crochet stitches (dc) per row. Each mesh 'square' is created by dc and ch1 spaces. Foundation chains and turning chains are included in counts where noted.
— Panel Sizes & Starting Chains :
Info :
Choose final runner width by adjusting mesh repeats. This pattern uses a base: Cream panel = 60 mesh repeats (foundation ch = 2 x 60 + 3 = 123 chains). Green panel = 20 mesh repeats (foundation ch = 2 x 20 + 3 = 43 chains). Joined together with single crochet seam results in an overall runner width of roughly 80 mesh repeats plus borders. Finished approximate size using recommended yarn: 12.5in wide x 40in long. You may scale by changing repeat counts.
— Left Mesh Panel (Cream) :
Round 1 :
With Cream, ch 123 (foundation chain for 60 mesh repeats + 3 turning ch)
Round 2 :
Dc in 4th ch from hook (counts as first dc), *ch 1, sk next ch, dc in next ch; rep from * across. End with dc in top of turning ch (61 dc; 60 ch-1 spaces)
Round 3 :
Ch 3 (counts as dc), turn. Dc in first dc, *ch 1, sk next ch-1 space, dc in next dc; rep across to end; dc in top of turning ch. (61 dc; 60 ch-1 spaces)
Round 4-10 :
Repeat Round 3 (61 dc each row). Work even to build mesh height. (These rows maintain consistent stitch count and even mesh)
Info :
Keep consistent tension; the chains create the grid squares. If your mesh squares appear too large, switch to a 3.5mm hook for the mesh. Use a stitch marker to mark the first dc at the start of each row for counting ease.
Round 11-20 :
Continue repeating mesh row as in Round 3. After Round 20, the panel will be well on its way; maintain same stitch count of 61 dc per row.
Info :
If you prefer, work these rows in alternating blocks to create subtle texture: work rows 11 and 12 in BLO (dc in back loop only) to produce a shallow ridge, then return to full dc for the next 2 rows. This is optional and purely decorative.
Round 21-40 :
Repeat mesh pattern (Round 3) for rows 21 through 40 maintaining (61 dc; 60 ch-1 spaces) each row. Check length often and measure against reference size.
Info :
Begin marking placement for leaf appliques after Row 30. Measure from one short end along the panel and note row numbers where leaves will be sewn. In the sample layout, leaves are positioned approximately at Rows 16, 26, 36, 46, 56, and 66 measured from the short end. You may change spacing to taste.
Round 41-60 :
Continue mesh rows 41 to 60 (61 dc per row). At Row 60 you will have crocheted 60 rows of mesh on this panel—this is designed to match the length of the green panel for joining later.
Info :
If your runner is too short or too long, add or subtract even-numbered mesh row pairs to keep the pattern symmetrical for attaching leaves and border. Always add in multiples of 2 rows to keep symmetry when sewing leaves.
Round 61-90 :
Continue repeating mesh row pattern through Row 90 or until the panel reaches your desired length to match the green panel. Maintain (61 dc per row).
Info :
Fasten off after your last mesh row leaving a 12in tail to weave into the seam area when joining panels. Do not finish borders yet; border will be worked after panels are joined and appliques attached.
— Right Mesh Panel (Green) :
Round 1 :
With Moss Green, ch 43 (foundation chain for 20 mesh repeats + 3 turning ch)
Round 2 :
Dc in 4th ch from hook (counts as first dc), *ch 1, sk next ch, dc in next ch; rep from * across. End with dc in top of turning ch (21 dc; 20 ch-1 spaces)
Round 3 :
Ch 3, turn. Dc in first dc, *ch 1, sk next ch-1 sp, dc in next dc; rep across. (21 dc)
Round 4-90 :
Repeat Round 3 for rows 4 through 90 to match the length of the cream panel. Maintain (21 dc; 20 ch-1 spaces) each row. Fasten off leaving a long tail for joining.
Info :
Work until the green panel length matches the cream panel exactly. Block both panels lightly if needed to square edges before joining. When panels are aligned, the vertical green stripe will sit to the right of the cream field in the finished runner.
— Optional Color Join-As-You-Go (Alternative) :
Info :
If you prefer not to seam panels later, you may work the panels as one long foundation chain (ch 166 = 2*(80 repeats)+3 ) and work color changes within each row across the width: switch to green yarn when you reach the column intended for the stripe, carrying the cream yarn across the back. This technique requires more careful tension control and frequent color fastening. For clarity and stability we recommend making two panels and joining.
— Leaves (Make 6 Appliques - 4 Pink, 2 Cream) :
Info :
Each maple leaf is crocheted flat using textured post stitches to create raised veins. Leaves are made in worsted cotton with a 3.5mm hook for tighter definition. Make 6 leaves in total in desired color distribution (sample uses 3 pink, 3 cream, staggered). Leaves measure approximately 3.25 - 3.75 inches across the widest point depending on tension.
Leaf Round 1 :
Ch 10. Sl st to 2nd ch from hook to create small ring (or create magic loop option). Ch 1, 10 sc into loop, join with sl st to first sc (10 sc)
Leaf Round 2 :
Ch 2 (counts as hdc), hdc in same st, *hdc in next 2 sts; 2 hdc in next st; rep from * around; join with sl st (total approx 13 hdc). This begins to widen the base.
Info :
We shape the leaf by working alternating chains and post stitch sets to build lobes. The pattern below creates 8 lobes for a maple-like shape—each lobe is worked separately on the round and then anchored into the base. Keep a reference photo for shaping the lobes symmetrically.
Leaf Round 3 (Start Lobes) :
Ch 4, sk 1 sc on base, sl st into next sc (forms first lobe foundation), *ch 4, sk 1 sc, sl st into next sc; rep around to make 8 ch-4 loops for lobes (8 loops)
Leaf Round 4 :
Work each ch-4 loop as follows to form lobe: into 1st ch-4 loop: sl st, sc, hdc, dc, hdc, sc, sl st (7 stitches worked into loop). Repeat into each loop around creating 8 small lobes. Join with sl st to base.
Leaf Round 5 :
Ch 1, *work (fpdc, dc, bpdc) across the lobe to build central raised vein: fpdc around next st, dc in next, bpdc around next; rep across each lobe to form texture; join after last lobe. The purpose is to create vertical ridges which will work as leaf veins.
Info :
FPDC = front post double crochet; BPDC = back post double crochet. When working post stitches, be mindful of the direction to maintain a central raised vein in each lobe. Use stitch marker to mark the beginning of the vein row.
Leaf Round 6 :
Ch 1, sc evenly around the entire leaf edge (approx 48 sc depending on tension) to stabilize shape. Join and fasten off leaving a 10-12in tail for sewing.
Leaf Round 7-10 (Optional Vein Embroidery) :
Use a contrasting or same yarn color and yarn needle to embroider a central vein from the base to the tip of each lobe: split strands and couch down with small running stitches, or use surface slip stitch to emphasize veins. Do this for each lobe. Fasten off and weave in ends.
Info :
Block leaves lightly to flatten them and emphasize lobes: pin to a flat surface, spritz with water and allow to dry. Leaves should be slightly raised when sewn to the mesh so they cast a small shadow for a dimensional look.
— Placement & Pinning :
Info :
Position leaves on the cream panel before joining. Sample layout uses 6 leaves staggered vertically along the center-left to center area, alternating pink and cream. Place leaves roughly centered horizontally on the cream panel and aligned by row numbers previously marked (Rows 16, 26, 36, 46, 56, 66). Pin each leaf in place to check spacing and adjust until you are happy with the composition.
— Joining Panels (Side-by-Side Seam) :
Info :
Place panels RS facing up, aligning long edges and rows exactly. With Dusty Pink (or same color as border) join at the seam by working a single crochet seam from one short end to the other. Use the Cream panel as the 'left' piece and the Green panel as the 'right' piece. Align the top and bottom rows carefully.
Round 1 (Join) :
With RS facing, join Dusty Pink at the top corner of one panel, sc through both edges (insert hook through corresponding top stitch of Cream panel and top stitch of Green panel), sc across entire long edge joining every corresponding stitch through both layers. This creates a firm seam. Work 1 sc each stitch across the seam; fasten off and weave in tail. (Number of sc = number of rows; count equals mesh row total, e.g., 90 sc)
Info :
If the stitch counts of the two panels are slightly different, ease the difference by placing two sc in a few places on the panel with fewer rows or by shifting the seam slightly; try to distribute any small mismatches evenly to avoid puckering.
— Attaching Leaves :
Info :
With panels joined and lying flat, pin each leaf in its final position. Use a yarn needle and matching yarn tail left on each leaf to sew the leaf to the mesh ground with small invisible stitches through the mesh squares. Sew only the central base and key points on each lobe so the leaf edge remains free and slightly lifted.
Info :
Sew leaves down at approx 6-8 attachment points: base near stem, and 4-6 small stitches through central vein across the leaf. Keep stitches small and tidy. Weave in ends on the back of the runner and trim close to the surface.
— Border Edging (Worked in Dusty Pink) :
Info :
With panels joined and leaves attached, we will work a 3-round border around the entire rectangle. Work continuously around the short and long edges with 3 sc into each corner to keep corners square. The border visually unifies panels and conceal raw edges.
Round 1 :
Join Dusty Pink at any corner. Work sc evenly around entire perimeter: sc in each row-end and along the long mesh edges working 1 sc for each dc and sc 1 for each ch-1 space where needed to keep counts even. At each corner: (sc, ch 2, sc) in corner space. End with sl st to first sc. (Perimeter stitch count will vary by panel length; maintain even spacing.)
Round 2 :
Ch 2 (counts as hdc), turn and work 1 hdc in each sc around, place 3 hdc in corner ch-2 space to square corners. Join with sl st to top of turning ch. This rounds softens the edge and raises it slightly.
Round 3 :
For a neat finish, work Crab Stitch (reverse sc) around: hold work with RS facing, sl st to next stitch, *insert hook from left to right into next st, sc (reverse), rep around making small reverse sc ridges. Join and fasten off. Weave in ends neatly on WS.
Info :
Alternative edging: if you prefer a flat, less pronounced edge, work one round of sc followed by one round of hdc rather than crab stitch. Adjust edging thickness to suit runner proportion.
— Finishing & Blocking :
Info :
Block the finished runner to square the piece and flatten appliques. Pin to a blocking mat on a flat surface and steam lightly or spritz with water, reshaping the mesh squares and leaves. Allow to dry completely. This step improves drape and neatness dramatically for cotton yarns.
Info :
Weave in all ends on WS using a yarn needle. Trim close. If you notice small gaps where leaves meet mesh, secure with a few extra stitches invisibly from the back. Optionally add a small dab of craft glue under the center of each leaf to help stabilize before sewing; test on scrap first.
This pretty autumn-inspired table runner brings a handmade touch to any table with airy mesh, a contrasting stripe and tactile maple leaves. The construction into two panels makes it approachable while the applique detail gives a small wow factor. I hope you enjoy making it and seeing how it transforms your table—it's a lovely seasonal accent or gift to share. 🧶🍁