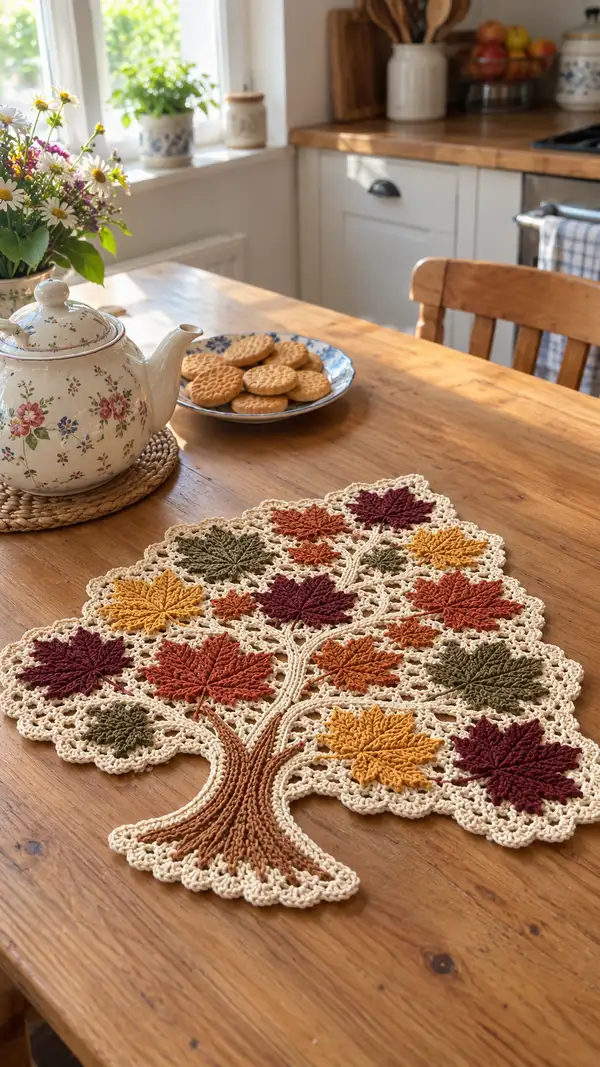
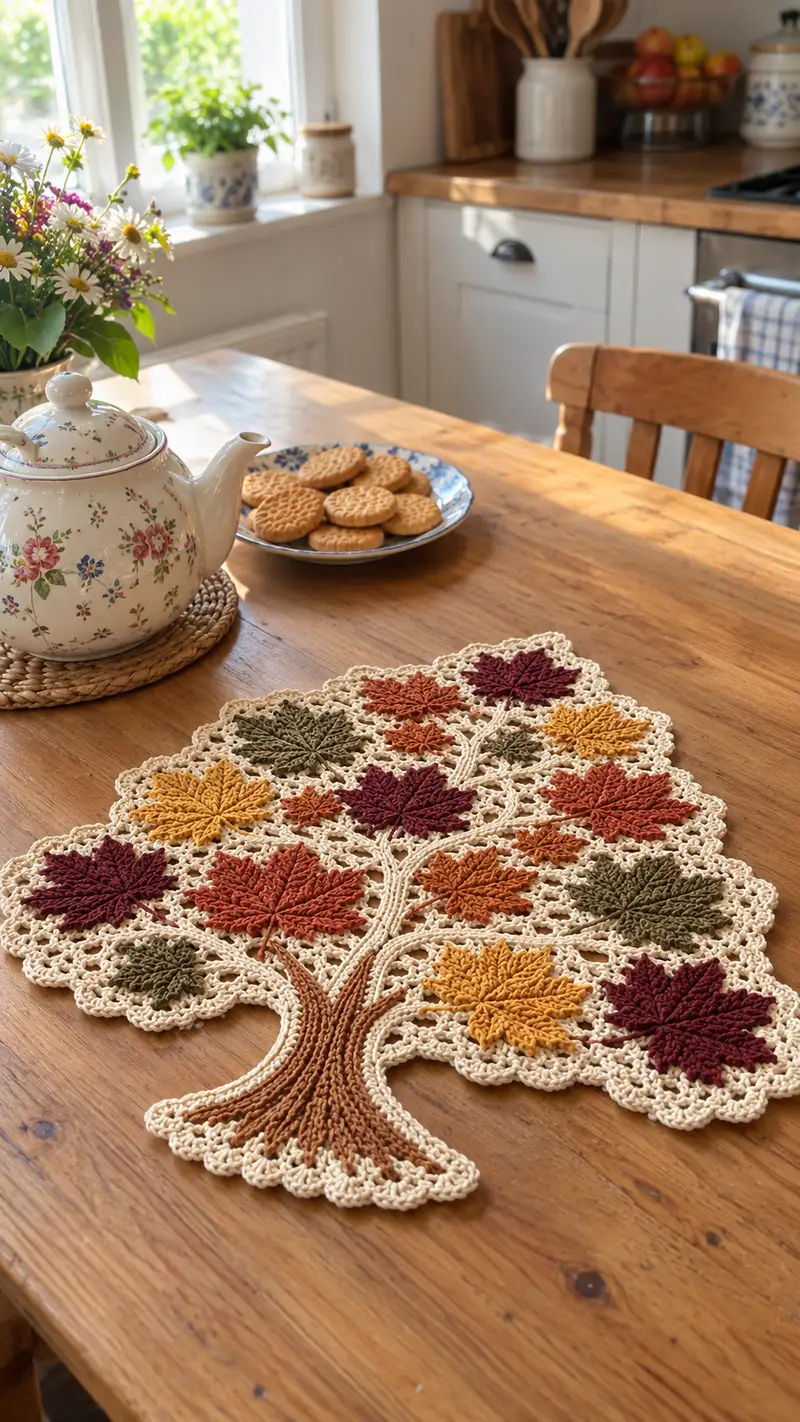
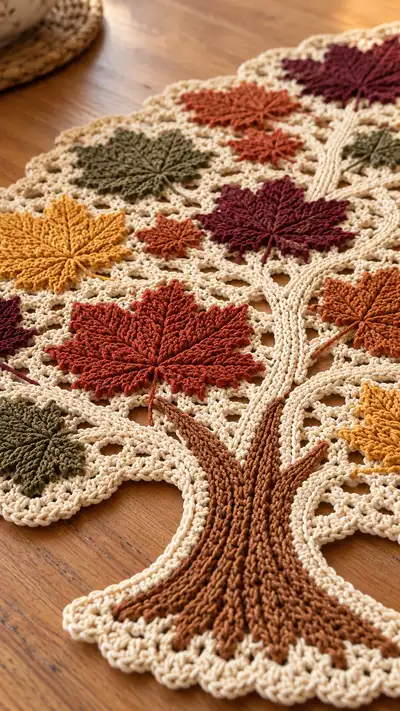
A warm, textured table runner shaped like a stylized maple tree with a sculpted trunk and layered autumnal leaves. This pattern uses crochet motifs joined on a lacy cream background to create a flat, decorative runner perfect for holiday or everyday seasonal display. The runner features raised leaf veins, a ribbed trunk and a scalloped border for a finished, heirloom look.
Progress Tracker
0% Complete
— Project Overview :
Info :
This pattern constructs a decorative tree-shaped table runner by assembling multiple leaf motifs onto a cream lacy background and creating a textured trunk. The pattern is modular: make the trunk panel, make the leaf motifs in sizes large, medium and small, then join motifs to the background with final edging. The pattern uses worsted cotton and a firm tension to keep motif definition.
Gauge :
Gauge is not critical for exact size but recommended tension: 16 sts and 10 rows = 4 inches in sc using 3.5mm hook with worsted cotton. Leaves are sized by rounds not gauge; if your motifs are noticeably larger/ smaller, adjust hook size.
Finished Size :
Approximately 16-18 inches wide and 26-30 inches long depending on yarn and blocking. This size assumes the quantities listed in materials.
— Trunk Panel :
Info :
The trunk is worked flat in joined rounds to produce a ribbed, sculpted surface using alternating fpdc and bpdc to create vertical ribs. It begins with a foundation chain and works outward to create the wider base and narrowing upper sections where branches emerge. Work trunk in brown yarn.
Round 1 :
Ch 28. Turn and sc in 2nd ch from hook and across (27 sc). chain 1, join to first sc with sl st to create an even starting edge (27)
Round 2 :
Ch1, 1 sc in each st across working in the round now: 27 sc. Place marker at first st. (27)
Round 3 :
Ch2 (counts as first hdc), *fpdc around next st, bpdc around next st* rep across to last st, hdc in top of turning ch. End round with sl st to first hdc (27)
Info :
The alternating front and back post double crochets create visual ribs resembling tree bark. Keep post stitches tall and even; use consistent tension and keep ends of rounds seamless.
Round 4 :
Ch1, sc in each st across in BLO to neaten edges and maintain width (27)
Round 5 :
Ch2, *bpdc around next st, fpdc around next st* repeat to end, hdc in top of turning ch (27)
Round 6 :
Ch1, sc in each st across in BLO (27)
Info :
Repeat rounds 3-6 for 12 rounds total to build a vertical section of trunk. This will form a central ribbed column that becomes the middle of the trunk before the flared base is shaped.
Round 7-14 :
Repeat Rounds 3-6 twice more (27)
Round 15 :
Begin base flare: Ch1, sc in first 5 sts, 2 sc in next st, *sc in next 6 sts, 2 sc in next st* repeat to last 5 sts, sc in last 5 sts (total increases evenly distributed). New count: 27 + number of incs. (Calculate: base increases every 7 stitches across 27 sts gives 3 increases -> 30)
Info :
When increasing for the base, distribute increases evenly to create a symmetrical flare. Mark central rib and center stitches to keep trunk aligned when attaching to leaves.
Round 16 :
Ch2, *fpdc around next st, bpdc around next 2 sts* repeat to end, hdc in turning ch (30)
Round 17 :
Ch1, sc in each st across in BLO (30)
Round 18 :
Increase again for full base: Ch1, sc in first 6 sts, 2 sc in next st, *sc in next 7 sts, 2 sc in next st* repeat across, sc in last 6 sts (33)
Round 19 :
Ch2, *bpdc around next st, fpdc around next st* repeat (33)
Round 20 :
Ch1, sc in each st BLO (33)
Info :
Continue alternating post stitch rounds with even sc rounds to build trunk height. Keep count consistent. If you desire a wider base, add increases following the same pattern evenly across a round.
Round 21-30 :
Repeat rounds 16-20 for 5 rounds (33)
Round 31 :
Shape shoulder/narrowing where branches start: Ch1, (sc in next 10 sts, dec) x 2, sc in remaining sts across. (33 -> after 2 dec = 31)
Round 32 :
Ch2, *fpdc around next st, bpdc around next st* rep across (31)
Round 33 :
Ch1, sc across in BLO (31)
Info :
At the top of the trunk, plan three branch sockets by marking positions with stitch markers. These will align with the major branch arms worked later as extensions of the trunk in cream to match background.
Round 34 :
Fasten off leaving long tail for sewing to background later. Weave in ends and block trunk flat following rib direction to emphasize vertical lines.
— Large Maple Leaf Motif (Make 7) :
Info :
Large leaves are worked from the center out, using a magic ring start. Rounds 1-6 establish a circular base. Rounds 7-14 build radiating ribs (veins) using chained spokes and raised stitches. Rounds 15-20 build pointed lobes and scalloped edge. Work these in your chosen leaf color. Make 7 large leaves in the main sizes/colors: 2 rust orange, 2 burgundy, 2 deep red, 1 mustard for variety.
Round 1 :
With chosen leaf color, mr, 8 sc in mr, pull to close (8)
Round 2 :
Inc in each st around (8 inc) -> 16 sc (16)
Round 3 :
(1 sc, inc) x 8 -> (8x) 24 sc (24)
Round 4 :
(2 sc, inc) x 8 -> 32 sc (32)
Round 5 :
(3 sc, inc) x 8 -> 40 sc (40)
Info :
Rounds 1-5 create a flat circular base. Tight tension keeps a dense base so the raised ribs stand out clearly. Place a removable marker at the start of each round to help count later rounds when working spokes.
Round 6 :
1 sc in each st around (40)
Round 7 :
*Ch4, skip next 4 sts, sl st into next st* repeat around creating 8 evenly spaced spoke spaces. If your spacing is off, adjust by making some chain-3s or chain-5s so you end with 8 loops. (40)
Info :
These chain loops will be worked into to form the leaf ribs. If you ended with a slightly different number than 8 loops, you can still proceed but keep the number of spokes even for symmetry (8 spokes is recommended).
Round 8 :
Work into each chain loop around as follows: attach yarn in loop, (ch2, 3 tr, ch2, sl st) to form a raised petal base for each spoke. Repeat into each of 8 loops (creates 8 raised petal anchors). Overall stitch count on main body remains visually 40 but with 8 raised petal anchors.
Round 9 :
Return to base: 1 sc in each st across the body (40)
Info :
Now we will create raised ribs by working fpdc and post stitches along spokes. Work each rib by anchoring into the petal center and then working extended front post stitches back to the center, producing a ridge.
Round 10 :
For each spoke: working from petal center towards ring: *sl st to petal center, ch1, 1 sc, ch1, fpdc around 3rd round st below to form first ridge* repeat into each petal center (8 ridges formed). Finish round with 1 sc in each remaining st across to tidy edges (40)
Round 11 :
1 sc in each st around (40)
Info :
Ridges should be visible as raised lines radiating from center. If ridges look loose, frog back and work fpdc closer into the base stitches to tighten. The ridges will be defined further with elongated stitches in the following rounds.
Round 12 :
Along each ridge: Working along the ridge line from center to petal tip, make (ch2, 1 hdc in each of next 3 chain spaces along ridge, 1 dc in top) to extend the vein. Repeat for each of 8 ridges. After finishing veins, complete the round with 1 sc in remaining base stitches to total visually (40)
Round 13 :
1 sc around (40)
Round 14 :
Form lobe shapes between ribs: *In space between two adjacent ribs make (sc, hdc, 3 dc, hdc, sc) to form a pointed lobe.* Repeat around creating 8 lobes. Fasten off and weave ends in. (Count-wise you will have 8 lobe anchors but main round remains 40 foundation sts)
Info :
At this stage the leaf has eight lobes. Block each leaf gently pinning points to shape. While still damp, arrange points to match maple leaf outline and let dry for crisp shaping before joining to background.
Round 15 (Edge Detailing) :
Re-join yarn at any lobe tip, ch1, sc evenly around working (sc, ch1, sc) at tip peaks to create small picot-like points along edges. Aim for 48 finishing points around; adjust spacing so points fall evenly at lobe edges. (48)
Round 16 :
Surface vein: Using contrasting slightly darker tone or same yarn, work a surface crochet line starting at center and following each ridge to lobes. Attach yarn at center with sl st, then surface slip st (or surface sc) along each ridge outward creating a raised central vein effect. Repeat for all 8 ridges. Fasten off and weave in ends.
Round 17 :
Finish by trimming any stray loops, steam-block the leaf and pin points for a crisp shape. Make 7 leaves total in chosen colors. (No stitch count change)
Info :
Large leaves are purposely worked slightly denser in the center to allow the raised ribs and lobes to hold shape when laid flat. Blocking is essential for consistent shape across motifs.
— Medium Maple Leaf Motif (Make 5) :
Info :
Medium leaves follow the same structure as large leaves but with fewer base rounds to produce a proportionally smaller motif. Make 5 medium leaves in olive green and rust shades to add variety.
Round 1 :
mr, 6 sc in mr (6)
Round 2 :
Inc in each st around -> 12 sc (12)
Round 3 :
(1 sc, inc) x 6 -> 18 sc (18)
Round 4 :
(2 sc, inc) x 6 -> 24 sc (24)
Round 5 :
1 sc around (24)
Round 6 :
Ch3 loops to create 6 spoke spaces: *Ch3, sk next 3 sts, sl st in next st* repeat around (24)
Round 7 :
Work 3 tr in each chain loop to build petal anchors (24)
Round 8 :
1 sc around to tidy (24)
Round 9 :
Create ribs: Work fpdc anchors outward into each petal center to create 6 raised lines. Then return to base with sc in remaining sts (24)
Round 10 :
Between ribs form small lobes with (sc, hdc, 3 dc, hdc, sc) into each valley. Fasten off and weave in ends (24)
Info :
Medium leaves should be blocked to match large leaves height proportionally. Use pins to mark points so leaves are consistent when joining.
— Small Accent Leaf Motif (Make 6) :
Info :
Small leaves are quick motifs used to fill negative spaces. They are worked in 8-10 rounds and do not include heavy texture but have a small central ridge. Colors: mustard and small accents in deep russet.
Round 1 :
mr, 6 sc in mr (6)
Round 2 :
Inc in each st (6 inc) -> 12 sc (12)
Round 3 :
(1 sc, inc) x 6 -> 18 sc (18)
Round 4 :
1 sc around (18)
Round 5 :
Form small pointed lobes: *(sc, hdc, 3 dc, hdc, sc) in each of 6 segment spaces.* Fasten off (18)
Info :
Small leaves require light blocking only. These fill gaps around larger leaves for a cohesive composition.
— Background Lacy Trellis Motifs and Join-As-You-Go :
Info :
The cream background is made from a repeating lacy motif that interlocks between leaves. You will make a set of rectangular lacy modules sized to fit around the trunk and leaves then join using join-as-you-go (JAYG) so motifs are connected as you work. The lacy motif is simple: a small 8-round square/diamond worked in rounds with chain spaces so leaves can be sewn on top and stems can be laid into chain channels.
Background Motif Round 1 :
With cream yarn, ch6, sl st to form ring, ch3 (counts as dc), 11 dc into ring, sl st to top of ch3 (12 dc)
Round 2 :
Ch2, 1 hdc in same st, *ch2, skip next dc, 1 hdc in next dc* repeat around to create 12 chain spaces. Join with sl st to first hdc (12 hdc + chain spaces)
Round 3 :
Ch1, sc in same st, (ch3, sc) in each ch2 space around to form an airy lattice (12 sc anchors and 12 ch-3 spaces)
Round 4 :
Ch2, dc in each sc and in each ch3 space (work 2 dc in ch spaces) continuing around for a denser lattice (approx 36 dc)
Round 5 :
Ch1, sc evenly around to neaten edges (36 sc)
Info :
Make enough background motifs to fill negative space between leaves and trunk. Number required will depend on layout. Plan placement by pinning leaves and trunk onto blocking mat with background motifs placed around them to visualize joins.
Join-As-You-Go Technique :
When working the final round of a background motif, instead of completing the round separately, join to adjacent motifs with sl st into corresponding ch-3 spaces on the neighbor. This creates a continuous lattice without visible seams. Use this technique to integrate background modules under and between leaves.
Info :
For a shaped tree outline, some background motifs will be partial; create full motifs and trim by cutting away last few rounds and neatening edge with sc. Alternatively, work partial motifs by stopping joining stitches to achieve curved outline.
— Attaching Leaves to Background :
Info :
Attach leaves after blocking. Use mattress stitch or whip stitch with matching cream for invisible joins around edges, then use surface crochet or embroidery with stem-color yarn to create the visible veins that appear to continue from trunk onto leaf stems. Pin leaves in position before sewing and check symmetry.
Step 1 :
Lay trunk and background in desired composition. Place large leaves first: position counts visually — two near the base, three middle and two near the crown. Pin each leaf center to the background at 3 points (center and two lower lobes).
Step 2 :
Sew leaf centers using long brown tail or matching leaf color with a yarn needle. Use small whip stitches around the inner circle of the leaf (rounds 1-6 area) catching only the cream background motif at each stitch to make the connection subtle. Secure tightly and weave in end.
Info :
Add small stitches along the veins where leaf meets trunk to create a continuous stem look: use stem-color yarn to surface-crochet one or two lines from trunk into leaf center, mimicking the photo's effect of stem continuation.
— Decorative Surface Stems and Veining :
Round/Step 1 :
With brown yarn, insert a yarn needle at the trunk base and come up at the spot where a leaf stem should start. Use a backstitch or embroidered couching to lay a thin cord to the leaf center, then secure with small stitches. Repeat for all main stems.
Info :
For pronounced raised veins, use a short length of double-strand yarn and couch it into place by sewing over it with matching thread. For delicate veins, a single strand with surface slip stitch works beautifully.
— Final Scalloped Border and Edge Finishing :
Round 1 :
With cream yarn and trunk/leaf assembly laid flat, attach yarn at an outer edge point and work 1 sc around the entire outer perimeter to even out jagged joins. Work slowly to keep stitches even. (Edge count varies with layout)
Round 2 :
Sc evenly around, placing additional sc in corners/points to keep runner flat. When rounding a narrow point place (sc, ch1, sc) to give a small picot support. Fasten off at completion.
Round 3 (Scalloped Edge) :
Re-join cream yarn at any sc, *skip 2 sc, (5 dc in next sc), skip 2 sc, sl st in next sc* repeat around to form a regular scallop. Adjust spacing by adding or subtracting skipped sc to maintain evenly sized scallops. Fasten off and weave in ends.
Info :
If certain scallops fall on leaf points, soften by substituting (3 dc) instead of 5 to keep the edge balanced. Block again lightly after completing border to ensure all points lay flat.
— Blocking and Finishing :
Info :
Pin the entire runner on a blocking mat, paying attention to leaf points and scallops. Spray lightly with steam or water and let dry completely. This final block will even stitches and set the shape permanently.
Finishing Steps :
Trim all stray ends, reinforce sewn joins with hidden stitches if needed, and optionally add a small non-slip pad underneath when placing on a table. Your runner is ready for display.
Info :
Care instructions: Hand wash cold with gentle detergent and lay flat to dry. Cotton may shrink slightly on first wash; re-block if necessary.
Completing this autumnal tree runner is such a satisfying project — each textured leaf and ribbed trunk adds character and handmade charm. The rich fall palette lays beautifully against the creamy lacy ground, making this piece a cozy centrepiece for your table or mantle. I hope this pattern inspires you to make a seasonal heirloom that will be enjoyed for years. 🍁🧶