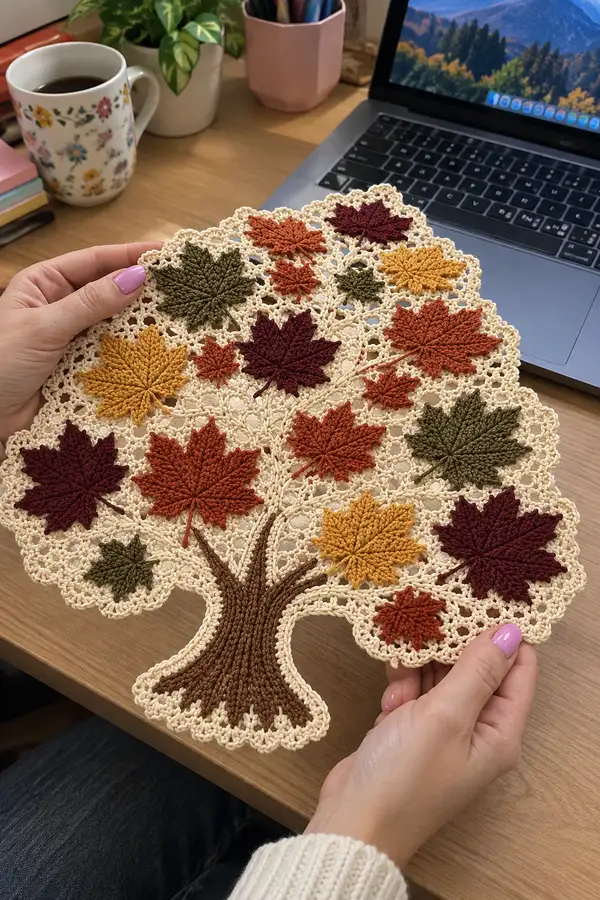
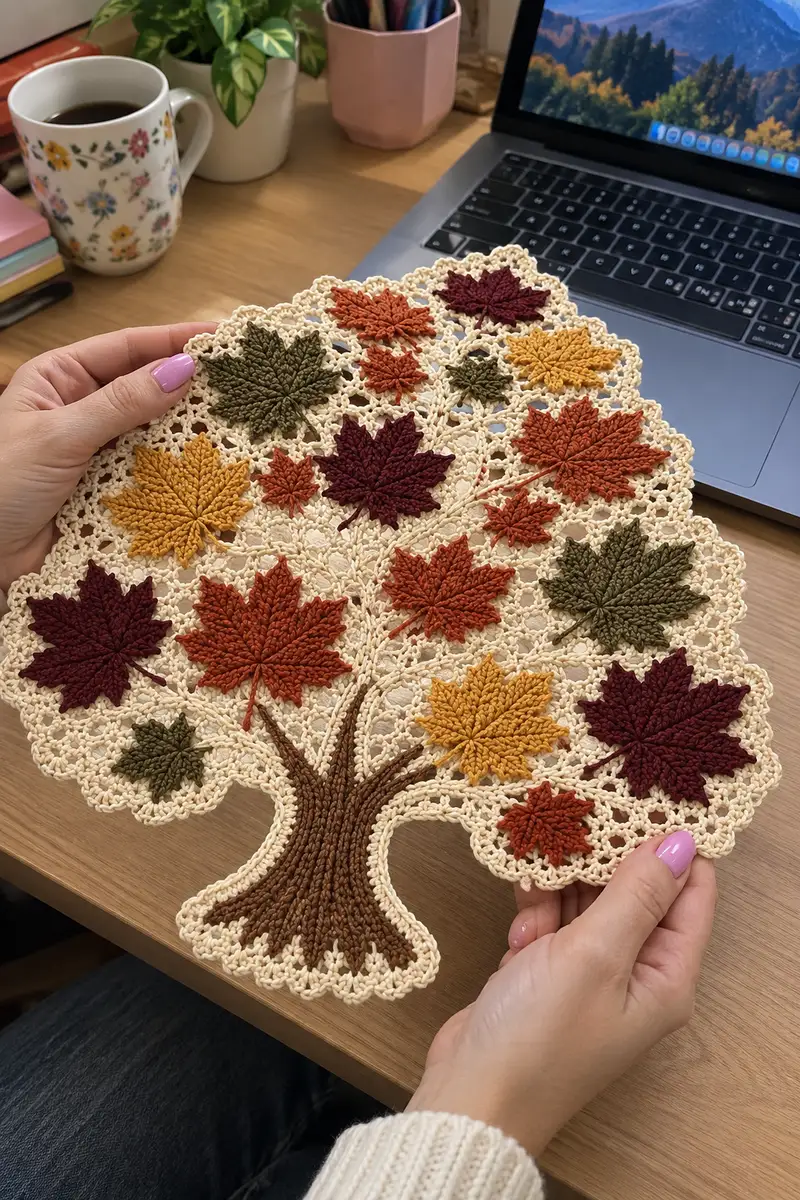
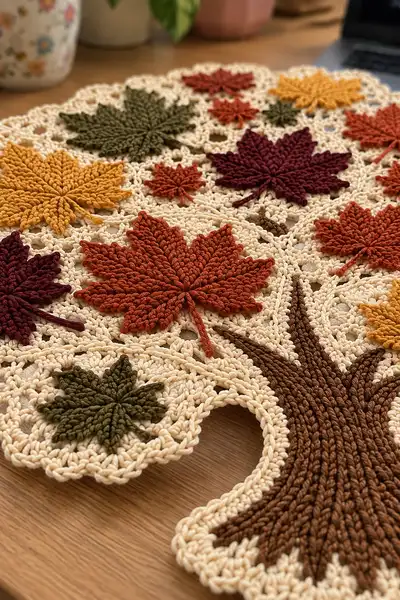
A delicate, lacy tree-shaped doily with raised crochet maple leaves in warm autumn tones. This decorative panel features a ribbed trunk in rich brown, a cream lacy canopy, and layered dimensional leaves in burgundy, rust, mustard and olive. Perfect for table decor, a wall hanging or seasonal accent, the pattern uses textured post stitches and overlay leaf motifs to create a tactile, eye-catching result.
Progress Tracker
0% Complete
— Notes :
Info :
This pattern is worked in multiple flat pieces: trunk panel, lacy canopy, and many separate leaves of three sizes which are appliqued on top. Work pieces as described, block them to shape, then arrange and sew leaves to the canopy. All stitch counts are given for the sizes shown; adjust hook size if your fabric is too loose or dense. The pattern is worked in rows and rounds depending on the piece; when a round/row uses post stitches to create texture, the instruction will specify it. Use consistent tension and block pieces before assembly for best results.
— Trunk (worked flat in rounds to create an oval panel) :
Round 1 :
Ch 10, join with sl st to form a ring (10)
Round 2 :
Ch1, 1 sc in each ch around, join with sl st (10)
Round 3 :
Ch2 (counts as hdc), 1 hdc in each st around, join (10)
Round 4 :
Ch1, sc in first st, 2 sc in next st, 1 sc in next st, 2 sc in next st, 1 sc in next, 2 sc in next, 1 sc in remaining (increase evenly along one side to form oval) (14)
Round 5 :
Ch2, hdc across 14 sts, join (14)
Round 6 :
Ch1, sc in each st (14)
Round 7 :
Ch2, fpdc around next st, *bpdc around next, fpdc around next*, rep across to end, join. Work alternating fpdc and bpdc to start ribbing (14)
Info :
Begin creating the vertical bark ribs via alternating fpdc and bpdc. Keep tension slightly firm to make ribs pop. Place a marker at the first stitch of each round to track rows without losing position.
Round 8 :
Ch2, fpdc in each fpdc and bpdc in each bpdc around (14)
Round 9 :
Ch2, continue alternating fpdc and bpdc to 14 rounds of texture total (14)
Round 10-14 :
Ch2, continue fpdc/bpdc ribbing (14)
Info :
After about 7-10 rows of ribbing you will have a narrow trunk start. We now widen the trunk base with short increases on both sides to create the flared trunk foot.
Round 15 :
Ch1, sc in next st, inc, sc x6, inc, sc x (remaining) to keep oval proportions (16)
Round 16 :
Ch2, fpdc/bpdc in pattern across (16)
Round 17 :
Ch1, sc in each st (16)
Round 18 :
Ch2, fpdc in first two, *bpdc next two, fpdc next two* rep across (16)
Round 19 :
Ch1, sc across (16)
Round 20 :
Ch2, (1 hdc, 1 inc) across to begin forming the splayed root base: (hdc, inc) x8 (24)
Round 21 :
Ch2, hdc around (24)
Round 22 :
Ch1, sc in each st (24)
Round 23 :
Ch2, *fpdc next, bpdc next* continue for three rounds to form strong vertical ribbing on the upper trunk (24)
Round 24-26 :
Repeat Round 23 to deepen rib texture (24)
Info :
Fasten off leaving a long tail for sewing. Block flat and gently curve edges inward where trunk will meet canopy. We will attach the trunk to the canopy along the perimeter created in the canopy rounds; having the trunk slightly narrower at the top helps create a natural join.
— Canopy Lace Background (worked in rounds outward to form an approximate semi-oval canopy) :
Round 1 :
mr, ch3 (counts as dc), 11 dc in ring, join (12)
Round 2 :
Ch3, 1 dc in same st, 2 dc in each st around (24)
Round 3 :
Ch3, (1 dc, ch2, 2 dc) in next st, *sk 1 st, (2 dc, ch2, 2 dc) in next* rep around to create first lacy shell round (12 shells)
Round 4 :
Ch1, sc in top of ch3, *ch5, sc in center ch2 of next shell* rep around, join (12 ch-5 loops)
Info :
This canopy uses a repeating shell-and-chain motif to produce open lacy areas that let layered leaves show through. Work loosely but not so loose that the canopy flops.
Round 5 :
Ch3, dc 3 in each ch-5 space (4 dc clusters), join (48 dc clusters total counted as 12 shell groups of 4)
Round 6 :
Ch1, sc around cluster bases, *ch7, sc between clusters* rep around to expand lace (12 ch7 loops)
Round 7 :
Ch3, (dc, ch2, dc) in each ch7 loop center, creating larger shell clusters; join (12 bigger shells)
Round 8 :
Ch1, sc around to anchor shells, sc x3 between shells, ch3 across the top edges to bridge open spaces (counts vary as you shape canopy)
Round 9 :
Ch3, 2 dc in next 3 stitches, ch3, sk 2, *(2 dc in next 3 stitches), ch3* rep around to form scalloped lattice (count dependent on shaping but keep even repeats)
Info :
At this stage begin shaping the canopy silhouette: where you want inward curves near the trunk, omit a shell; where you want outward bulges, add extra dc clusters. Sketching the canopy outline on paper helps guide increases and decreases.
Round 10 :
Ch1, sc in each st and in chain spaces to close gaps while maintaining lace, aim for a count that's a multiple of 6 for even scallops (approx 72 sc)
Round 11-14 :
Repeat rounds 5-10 sequences expanding outward: create ch9 loops on outer expansions, fill with shell clusters in the next round. Each expansion adds approx 12 shells (counts vary with shaping). Maintain symmetry across the center line of the trunk.
Round 15 :
Info : Change to cream yarn if not already using it. Carry unused yarn inside if you plan color carrying or join fresh yarn at the outer edge for a crisp color change.
Round 16 :
Ch1, sc around to anchor outer shells, *sc in outer shell, ch5, sc in next shell* rep to create a dense row for leaf sewing to anchor later (approx 96 sts)
Round 17 :
Ch3, work 2 dc in each ch5 space to create a firm scalloped lattice (approx 96 dc clusters)
Round 18 :
Ch1, sc across and in each stitch space. Where the canopy has an inward notch to house the trunk, reduce the number of shells by skipping a shell group and sc across to narrow the opening. Aim to create a trunk opening 8-10 sts wide at top center.
Round 19-22 :
Continue alternating shell expansion rounds with anchoring sc rounds to build canopy height and width. Add one extra expansion (ch11 loops filled with shells) at rounds 20-21 for the broad top of the canopy. Maintain balance left-right (counts will be between 100-140 sts depending on exact shaping).
Info :
Stop expanding when the canopy reaches desired size; the sample is approximately 11-12 inches wide. Block the canopy flat and shape gently; the scalloped outer edge will be finished with a decorative picot round.
Round 23 :
Ch1, sc in each st around, join (sc count equal to previous total)
Round 24 :
Ch3, *dc, ch2, dc* in every 8th stitch to form small outer scallops (adjust spacing to have 20-24 outer scallops)
Round 25 :
Ch1, sc around to tidy the edge, then sl st to start. Prepare to attach trunk: place trunk top into trunk opening and pin in place evenly across the seam area.
Info :
Leave long tails on both canopy and trunk for sewing. Blocking before sewing means edges lie flat and match. If your trunk top is slightly narrower than canopy opening, use a few additional sc on trunk top to widen or add small gathers when sewing.
— Large Maple Leaf (Make 6 in large size; this section gives full 18-round construction) :
Round 1 :
mr, ch3 (counts as dc), 11 dc in ring, join (12)
Round 2 :
Ch3, dc in same st, (ch2, sk 1, 2 dc) x5, ch2, join to create 6 petal anchor points (24 dc plus chains)
Round 3 :
Ch1, sc in first dc, *ch5, sc in center of next petal ch2*, rep to form 6 ch-5 loops around (6 ch-5 loops)
Round 4 :
Switch to overlay technique: Join yarn at base of a ch5 loop. Work 1 sc in base, *(ch2, tr, ch2, sl st) in next loop center to create tip foundation*, repeat for each loop to make six leaf lobes
Round 5 :
Info : We will build ribs using front post dtr and tr stitches worked into chain spaces to create raised veins. Use taller post stitches to emulate prominent leaf vein.
Round 6 :
At the first lobe: ch1, sc across to center of lobe, ch3, dtr in center of lobe, ch3, sc to base. Repeat for each lobe. After 6 lobes you will have primary raised veins. Count to ensure symmetry across lobes (keep 6 main veins)
Round 7 :
Ch1, work 2 sc in base between lobes, then in each lobe work (sc, hdc, tr) into side spaces to flesh out lobe shape. Repeat around to create fuller lobes (stitches per lobe will be 6-8 depending on tension)
Round 8 :
Info : To create pointed lobes, work decreases at each side: at the outermost point of each lobe work (tr, dec) to sharpen the tip. Maintaining counts across each lobe will keep the leaf even.
Round 9 :
Work a round of sc around the entire leaf to tidy edges and measure width. Aim for each large leaf to finish approx 3.5-4 inches tip-to-tip. Count should be consistent across leaves (approx 72 sc total around leaf)
Round 10 :
Ch1, sc in next 3 sts, then make a short stem: ch12, sl st back along chain to create a cord stem, secure to base with sc. Repeat for each leaf. Fasten off and weave in ends. For the raised ribbing detail, use surface slip stitch or duplicate stitch with matching yarn color to reinforce veins from center outwards.
Round 11-18 :
Info : For more pronounced rib texture, work additional passes of front post tr and surface slip stitches outlining each vein. You can add a second, shallower vein between main ribs by working smaller fpdc stitches (3-4 mm shorter) between larger ribs. Fasten off after finishing details and block leaves flat using pins.
— Medium Maple Leaf (Make 6) :
Round 1 :
mr, ch3, 8 dc in ring, join (9)
Round 2 :
Ch1, sc in same, *ch4, sc in next space* around to form 6 small loops (6 ch-4 loops)
Round 3 :
Join yarn, in each ch-4 loop work (sc, hdc, tr, hdc, sc) to form a small pointed lobe. Repeat six times (stitches per lobe approx 5)
Round 4 :
Ch1, sc around entire leaf to tidy edges. Create a stem by ch8 and sl st back along chain, secure at base with sc.
Round 5 :
Info : Enhance veins by working one line of surface slip stitch from base to tip on each lobe. Use a slightly darker shade for subtle contrast if desired.
Round 6-14 :
Work additional embellishing rows if you want deeper texture: alternate small fpdc rows around base to thicken the center. Fasten off and block flat.
— Small Maple Leaf (Make 8-10) :
Round 1 :
mr, ch2, 6 dc in ring, join (6)
Round 2 :
Ch1, sc in each dc, then ch6 for a tiny stem and sl st back, fasten off (6)
Round 3 :
Info : Small leaves are quick embellishments to fill gaps. You can make them in less than five minutes each; add a surface slip-stitch vein to suggest detail.
— Leaf Veins and Raised Texture (Surface and post-stitch details) :
Round 1 :
Info : For prominent raised veins use a two-pass method. First pass: using a length of yarn, work a row of front post trebles (or dtrs) along the planned vein from base to tip, anchoring at the base with sl st. Second pass: outline the main vein edges with surface slip stitch or duplicate stitch to accentuate the ridge.
Round 2 :
To make a central vein: insert hook under corresponding post stitches from previous round and pull up loop, then work slip stitches along the surface to the tip. Pull tension snugly but not so tight that the leaf warps.
Info :
Blocking after adding veins helps them set in place; pin the leaf to shape and use a light steam or mist of water to set the texture.
— Decorative Outer Edge Scallop (Canopy Border Finish) :
Round 1 :
Join cream at outermost edge, ch1, sc across to flatten edge (count will match outer sc count)
Round 2 :
Ch4, skip 2, sl st in next st to make picot-style scallops, *ch4, skip 2, sl st* rep around to create delicate loops (approx 24 loops)
Round 3 :
Ch1, sc in each picot loop and sc between picots, then sl st to finish. Fasten off and weave in ends.
Info :
Edge scallops add a finished look and provide a tidy place to mount the piece if framing. Block scallop points with pins evenly spaced for a consistent look.
— Assembly & Applique (Attaching leaves and trunk to canopy) :
Round 1 :
Info : Arrange leaves on the blocked canopy before sewing. Use pins to place large leaves first, then tuck medium and small leaves in gaps. The sample photo shows 6 large, 6 medium and 8 small leaves. Aim for asymmetric natural placement but balanced mass left-right.
Round 2 :
Sew trunk to canopy by placing trunk top into canopy opening and using whip stitch with matching brown. Use the long tails left earlier. Stitch through both layers every 3-4 stitches to create a flat secure seam.
Round 3 :
Attach leaves: Sew each leaf by stitching at the base with matching yarn and a yarn needle. Use invisible ladder stitch or small whip stitches along the leaf base. For large leaves also make 2-3 stitches through the central vein to anchor them flat.
Round 4 :
Info : If you want some leaves slightly lifted, stitch only at the base, leaving edges free. For fully flat applique sew around outer edges with tiny stitches so leaves sit flush with canopy.
Round 5 :
Embroider small stems from base of leaves into the canopy using brown yarn and back stitch technique to mimic twigs. Secure ends on the reverse and weave in.
Round 6 :
Final tidying: weave in all remaining ends on the back of the canopy, trim excess yarn close to surface, and press gently with steam if using cotton yarn to set shape. Optionally attach a hanging loop at the top center by making a short cord and sewing it to the back.
Info :
For a framed wall hanging place a piece of felt behind the canopy for extra stability and stitch through both layers along perimeter before framing. For table use, consider spray starching lightly for body and stability (test on scrap first).
This autumn maple tree doily brings handcrafted warmth to any table or wall—perfect for seasonal decor and thoughtful gifts. The combination of delicate lacework, dimensional leaves and textured trunk creates a piece that is both decorative and tactile. Block, assemble, and enjoy the satisfaction of seeing each leaf come together into a balanced composition. 🧶🍁 Display it proudly or gift to someone who loves handmade seasonal touches. Happy stitching! 🍂