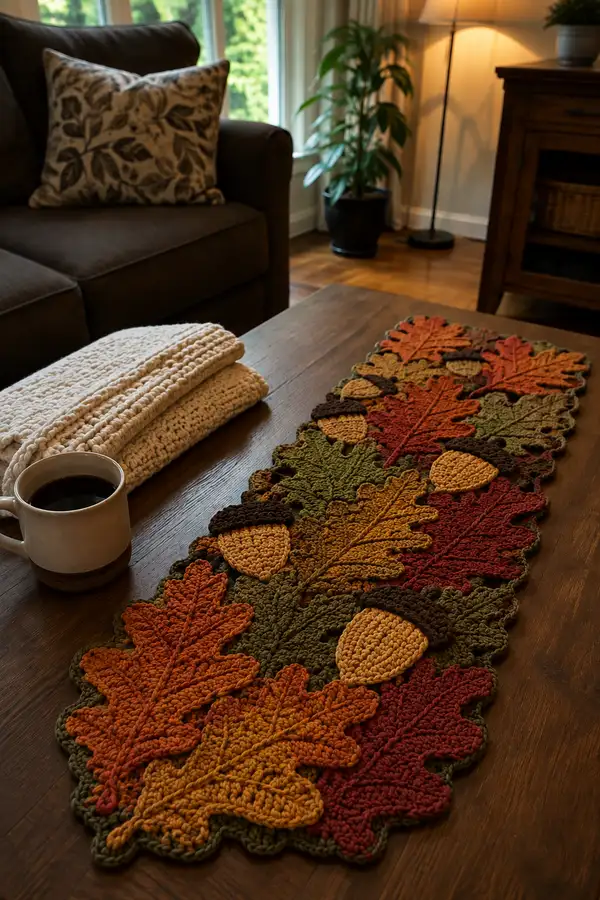
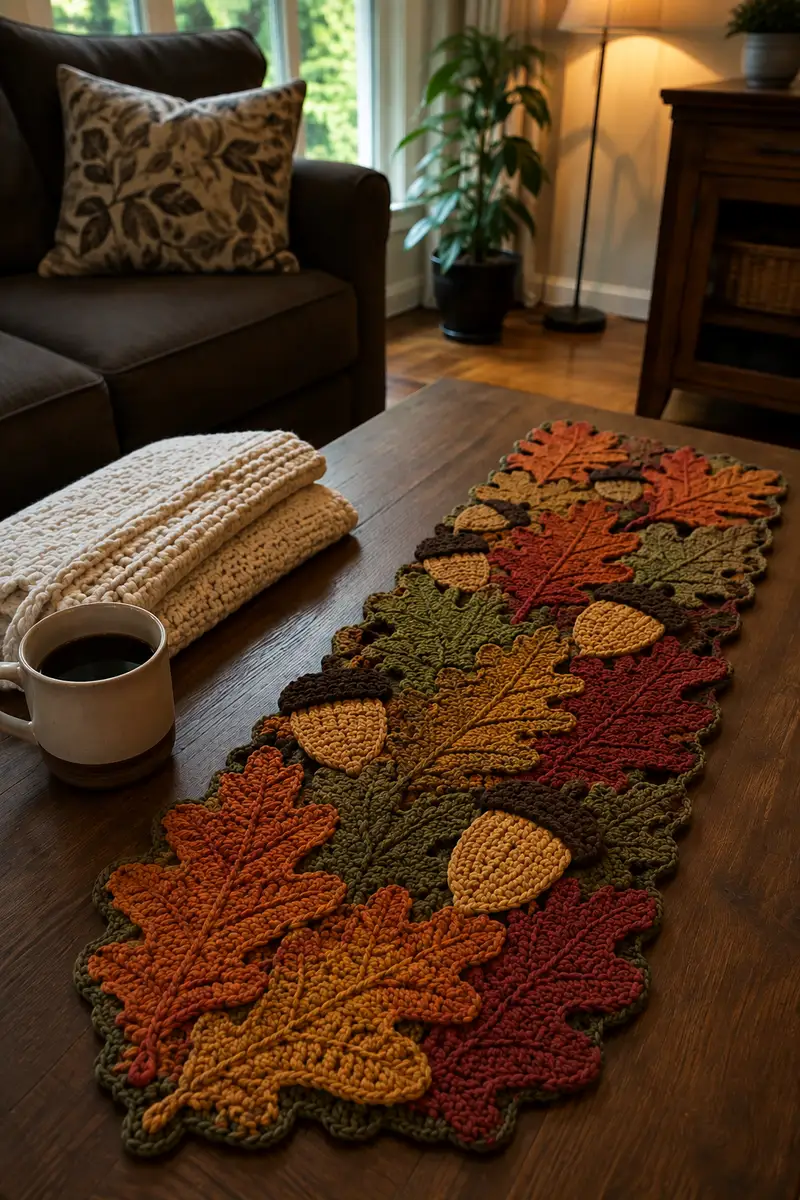
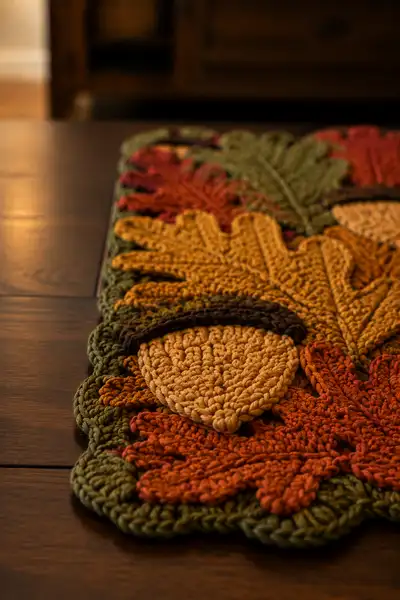
A rich, textured table runner made of layered crochet oak leaves and plush acorns in warm fall hues. This runner features oversized oak leaves with raised center veins, clustered acorns with textured caps, and a scalloped leafy border that joins motifs into a long, elegant centerpiece. Colors shown: deep forest green, mustard gold, burnt orange, rust red, and chocolate brown for accents. Perfect to dress a dining table or console for autumn.
Progress Tracker
0% Complete
— Materials & Gauge :
Info :
Gauge is not critical for layout but for reference: 14 sc and 16 rows = 4" using 5.0mm hook. Use yarn and hook combination that produces firm stitches so tiny gaps do not show stuffing or tabletop beneath. The runner in the photo measures approximately 12" wide and 48" long assembled; adjust number of motifs to lengthen or shorten.
— Notes & Techniques :
Info :
This design is modular: make multiple leaves in varying sizes and a series of acorns then join on a deep green background base. Leaves are worked flat in rows, using post stitches for a raised vein and strategic increases/decreases to create lobes. Acorn nut is worked in rounds for a subtle three-dimensional profile; cap is tufted with fpdc clusters for texture. Block leaves and pin to shape before assembly.
— Large Oak Leaf (Make 4 - burnt orange) :
Round 1 :
Ch 28. Sc in 2nd ch from hook and across to end (27)
Round 2 :
Ch1, turn, sc in each st across (27)
Round 3 :
Ch1, turn, 3 sc, inc, 7 sc, inc, 7 sc, inc, 3 sc (30) - increase at three evenly spaced points to start gentle widening
Round 4 :
Ch1, turn, sc across (30)
Round 5 :
Ch1, turn, (4 sc, inc) x 6 (36) - add gentle shaping toward lobed silhouette
Round 6 :
Ch1, turn, sc across (36)
Round 7 :
Ch1, turn, (5 sc, inc) x 6 (42)
Info :
Start thinking of lobe shaping: increase rounds add width, subsequent even rounds balance. Keep tension consistent; if one side looks wider, check beginning-of-row stitch placement and adjust by moving marker.
Round 8 :
Ch1, turn, sc across (42)
Round 9 :
Ch1, turn, 2 sc, (2 sc, dec) x 6, 2 sc (36) - begin shaping inward to create joined lobes (36)
Round 10 :
Ch1, turn, sc across (36)
Round 11 :
Ch1, turn, (3 sc, dec) x 6 (30)
Info :
At the top half of the leaf we will start forming defined lobes: use increases and decreases to create 'fingers'. On subsequent rounds, place increases at the lobe tips and decreases at the valley stitches to sculpt each rounded lobe.
Round 12 :
Ch1, turn, sc across (30)
Round 13 :
Ch1, turn, sc 4, inc, sc 5, inc, sc 5, inc, sc 4 (33)
Round 14 :
Ch1, turn, sc across (33)
Round 15 :
Ch1, turn, (2 sc, inc) x 11 (44)
Round 16 :
Ch1, turn, sc across (44)
Round 17 :
Ch1, turn, sc 6, dec, sc 10, dec, sc 10, dec, sc 5 (38)
Info :
Work the following rounds with attention to the right and left edges — these will become the lobes. Use stitch markers to mark the valley points (where lobes separate) so you increase and decrease consistently on both sides.
Round 18 :
Ch1, turn, sc across (38)
Round 19 :
Ch1, turn, (1 sc, inc) x 19 (57) - this round expands the lobe tips creating pronounced leaf tips (57)
Round 20 :
Ch1, turn, sc across (57)
Round 21 :
Ch1, turn, 6 sc, dec, sc 12, dec, sc 12, dec, sc 5 (50)
Info :
Now we will add the center vein using surface post stitches and a returning stem. This gives the leaf visual depth. Work the center vein on the RS after you complete shaping; it will be done as a final pass of post stitches in the center column.
Round 22 :
Ch1, turn, sc across (50)
Round 23 :
Ch1, turn, (3 sc, dec) x 10, sc 2 (40)
Round 24 :
Ch1, turn, sc across (40)
Round 25 :
Ch1, turn, (2 sc, dec) x 10 (30)
Round 26 :
Ch1, turn, sc across (30)
Round 27 :
Ch1, turn, (1 sc, dec) x 10 (20)
Round 28 :
Ch1, turn, sc across (20)
Round 29 :
Ch1, turn, dec around to point shape: (dec) x 10 (10)
Round 30 :
Fasten off leaving long tail for weaving. Block leaf flat, stretching gently into pointed lobes and pin to desired shape.
Info :
Surface Center Vein: With RS facing, join yarn at base of leaf and work a line of fpdc along center column using post stitches: slip to center row, *fpdc around corresponding stitch directly up the leaf*, repeat to tip. Return on WS with a row of sc as a raised ridge or single crochet back down to create a strong spine. Use a slightly smaller hook if the posts are loose.
— Medium Oak Leaf (Make 4 - mustard gold) :
Round 1 :
Ch 22. Sc in 2nd ch from hook and across (21)
Round 2 :
Ch1, turn, sc across (21)
Round 3 :
Ch1, turn, 2 sc, inc, 5 sc, inc, 5 sc, inc, 2 sc (24)
Round 4 :
Ch1, turn, sc across (24)
Round 5 :
Ch1, turn, (3 sc, inc) x 6 (30)
Round 6 :
Ch1, turn, sc across (30)
Round 7 :
Ch1, turn, (4 sc, inc) x 6 (36)
Info :
Add lobes by planning 3 to 4 valley points and increasing at the tips. Use stitch markers at these valley points for symmetry when repeating motifs.
Round 8 :
Ch1, turn, sc across (36)
Round 9 :
Ch1, turn, (3 sc, dec) x 8 (28)
Round 10 :
Ch1, turn, sc across (28)
Round 11 :
Ch1, turn, (2 sc, dec) x 7 (21)
Round 12 :
Ch1, turn, sc across (21)
Round 13 :
Ch1, turn, (1 sc, dec) x 7 (14)
Round 14 :
Ch1, turn, sc across (14)
Round 15 :
Ch1, turn, dec around (7)
Round 16 :
Fasten off leaving tail for weaving. Block and add center vein: join yarn at leaf base and work a column of bpdc / fpdc alternating to create narrow raised center; catch into rows in a straight line.
Info :
For medium leaves, use fewer increases so the lobes appear balanced near large leaves; arrange them overlapping to give layered depth on the runner.
— Small Oak Leaf (Make 6 - rust red) :
Round 1 :
Ch 18. Sc in 2nd ch from hook and across (17)
Round 2 :
Ch1, turn, sc across (17)
Round 3 :
Ch1, turn, sc 5, inc, sc 5, inc, sc 5 (19)
Round 4 :
Ch1, turn, sc across (19)
Round 5 :
Ch1, turn, (3 sc, inc) x 4, sc 3 (23)
Round 6 :
Ch1, turn, sc across (23)
Round 7 :
Ch1, turn, (3 sc, dec) x 4, sc 3 (19)
Round 8 :
Ch1, turn, sc across (19)
Round 9 :
Ch1, turn, (2 sc, dec) x 4, sc 3 (15)
Round 10 :
Ch1, turn, sc across (15)
Round 11 :
Ch1, turn, (1 sc, dec) x 5 (10)
Round 12 :
Ch1, turn, dec around (5)
Round 13 :
Fasten off leaving tail. Block small leaf and add a subtle center vein with sc or a narrow column of fpdc, as in larger leaves. Arrange as filler around acorns.
Info :
Small leaves create variety and fill gaps; make several and tuck them under large leaves for a natural-looking cluster.
— Acorn Nut (Make 6 - tan/beige) :
Round 1 :
Using 4.0mm hook and tan yarn, 6 sc in magic ring (6)
Round 3 :
(1 sc, inc) x 6 (18)
Round 4 :
(2 sc, inc) x 6 (24)
Round 5 :
1 sc in each st (24)
Round 6 :
(3 sc, inc) x 6 (30)
Round 7 :
1 sc in each st (30)
Round 8 :
(3 sc, dec) x 6 (24)
Info :
Start stuffing lightly with polyfil at this stage to create a gently rounded profile; avoid overstuffing as the nut should remain relatively flat to sit under the cap.
Round 9 :
(2 sc, dec) x 6 (18)
Round 10 :
(1 sc, dec) x 6 (12)
Round 12 :
Fasten off leaving long tail for sewing. Weave in tail partly, leaving remainder to stitch nut to runner. Block gently to flatten slightly into teardrop shape (pin tip slightly) so it nestles naturally under the cap.
— Acorn Cap (Make 6 - chocolate brown) :
Round 1 :
Make 6 sc in magic ring (6)
Round 3 :
(1 sc, inc) x 6 (18)
Round 4 :
(2 sc, inc) x 6 (24)
Round 5 :
1 sc in each st (24)
Round 6 :
Switch to fpdc clustering for texture: *fpdc around next st, yarn over and pull through twice to make a tall ridge, repeat 2 more times in same st to create a cluster*, sl st to next stitch, rep around to create tufted cap (approx 8 clusters depending on spacing)
Info :
Use front post double crochet clusters to simulate the rough texture of a real acorn cap. If clusters are dense, cap will become stiff and domed; this is desirable to rest on nut piece.
Round 7 :
Ch1, sl st around edge to neaten (24) - leave long tail for sewing
Round 8 :
Optionally work an extra outer round of sc in BLO to create a turned rim: 1 sc in each st BLO (24)
Round 9 :
Fasten off leaving tail. Position cap over nut and sew with mattress stitch, catching both pieces securely. Slightly shape with blocking if necessary.
— Background Base Panel (Make 1 - deep forest green) :
Round 1 :
Ch 90. This base chain will give initial width; you can adjust length of chain to match table runner length (for 12" width use 90 ch as reference)
Round 2 :
Row 1 (RS): sc in 2nd ch from hook and across to end (89)
Round 3 :
Ch1, turn, sc across (89)
Round 4 :
Ch1, turn, sc across (89)
Round 5 :
Change to BLO: ch1, turn, 1 sc in each st BLO (89)
Info :
Work 6-8 even rows for a firm base to stitch motifs on. You can alternatively create two narrower base panels and join them later for a longer runner. Ensure the base is slightly smaller than the overall assembled motif width so motifs overlap edges to create leafy border effect.
Round 6 :
Ch1, turn, sc across (89)
Round 7 :
Repeat Round 6 for a total of 10 even rows (89 each)
Round 8 :
Fasten off. Lay base flat and arrange leaf and acorn motifs in desired composition, leaving small overlapping areas to stitch together.
— Joining Motifs (Assembly Preparation) :
Info :
Arrange motifs on the base panel: layer large leaves alternating directions, tuck small leaves under edges, and position acorns centered along the length. Use pins to hold positions. Leave about 1/2" overlap between motifs so joins are sturdy and seams hidden. Take photos of layout before sewing to replicate if needed.
Round 1 :
Using matching green yarn and tapestry needle, sew motifs to base with whip stitch along overlapping edges. Work in small segments (6-8 stitches) and flatten motifs as you go to avoid bunching.
Round 2 :
Sew seams between motifs: where two leaves overlap, use mattress stitch to create near-invisible joins. For acorn attachments, sew the cap to the nut first, then tack the assembled acorn to the runner at 3 or 4 anchor points to maintain shape.
Info :
When joining, try to hide the joining stitches within the textured veins or along the underside of lobes. If a seam area looks thin, place a small scrap of green yarn underneath and stitch through both layers to thicken and secure the join.
— Decorative Surface Veins & Texture (All Leaves) :
Round 1 :
With leaf RS facing, join yarn at base of leaf center. Using fpdc, work a continuous column up the center: *fpdc around next row's central stitch*, repeat to tip. This raises a visible vein.
Round 2 :
Return down the center on the WS with sc in back loops only to create a neat ridge below the raised fpdc. If desired, add diagonal veins by working sl st or embroidery-style sc from center vein to each lobe valley.
Info :
Surface slip stitch veins: use a smaller hook to keep stitches snug. For a dynamic look, use a slightly darker shade of the leaf color for veins or the same color for subtle texture.
— Leaf Edge Scallops & Runner Border :
Round 1 :
Once all motifs are joined, work a continuous border around the runner edge in deep forest green. Join yarn at any outer edge and sc evenly around, placing 3 sc in tight corners or lobes to maintain smooth scallop. Maintain stitch count so border lies flat.
Round 2 :
Ch1, sc in same st, *sk 1, (dc, sc, dc) in next st* to create small scallops around outer lobes. Repeat around entire runner. Join with sl st to first sc.
Round 3 :
Working in same color, add a final round of puff stitch edging for dimension: *ch1, in next scallop space work (hdc, puff, hdc), sl st to next sc*, repeat to finish.
Info :
Placement of scallops: focus scallops around outermost leaf edges for a flowing organic outline. If your runner wants more structure, work an extra even row of sc in BLO before scallops to create a firm ridge to attach the decorative scallops to.
— Final Finishing & Blocking :
Round 1 :
Weave in all tails, trimming close. Steam-block the entire runner on blocking mats: mist lightly, pin each lobe and acorn into position and allow to dry fully. Blocking evens stitches and sets the outline of leaves and scallops.
Round 2 :
If any motifs feel loose after blocking, tack them down from the back with small whip stitches through the base panel to anchor without visible stitching on the RS.
Info :
Care: hand wash gently in cool water and lay flat to dry. Avoid heavy machine agitation which can distort the textured stitches and separate seams.
Finishing this runner is such a satisfying project—watching the leaves and acorns come together creates an instant autumn centerpiece! The textured veins and scalloped border give a handmade, heirloom quality, while the modular construction lets you customize length and color palette. Gather your favorite warm yarns, make a pot of tea, and enjoy stitching this cozy seasonal accent. 🧶🍁