🧶 Beautiful ✨ Detailed 💝 Adorable

Autumn Pumpkin Table Runner Pattern

Autumn Pumpkin Table Runner Pattern
4.3★ Rating
8-10 Hours Time Needed
4.1K Made This
✂️

Intermediate Level

Ideal for those with basic crochet experience, featuring slightly more advanced stitches and techniques to expand your skills.

⏱️

All-Day Adventure

Requires 8-10 hours, ideal for a full day of immersive crocheting.

🍂

Autumn Vibes

Earthy tones with cozy textures inspired by falling leaves and the rich, warm colors of harvest season.

🧶 Jump to Pattern ↓

About This Autumn Pumpkin Table Runner Pattern

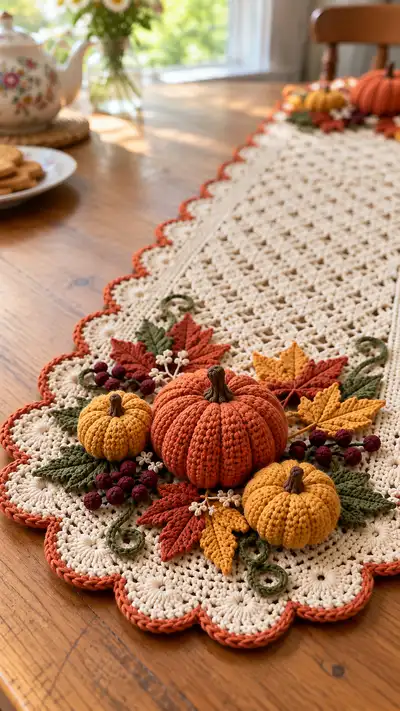
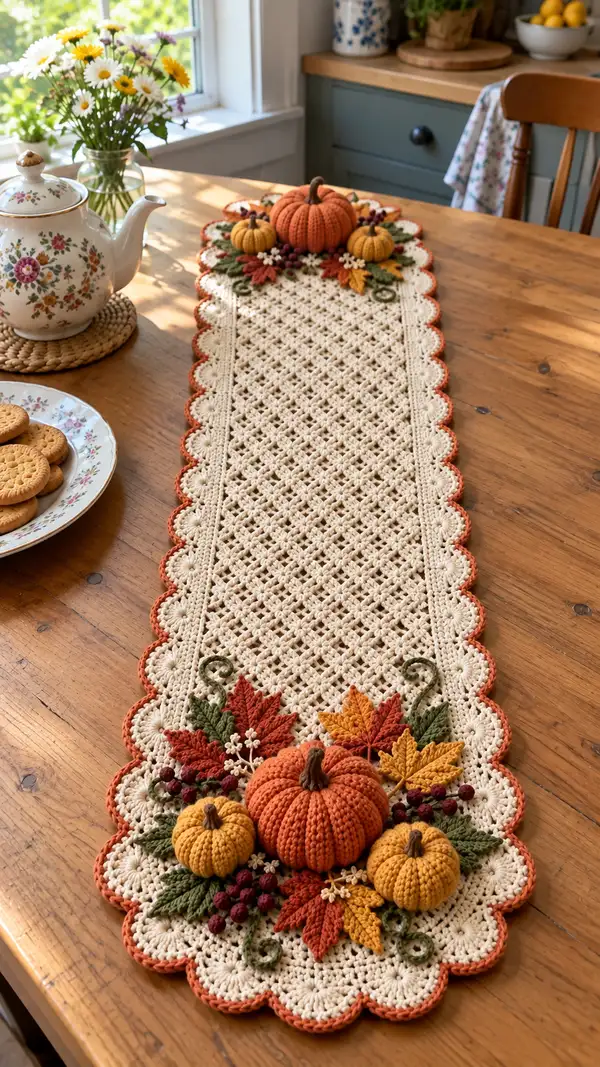
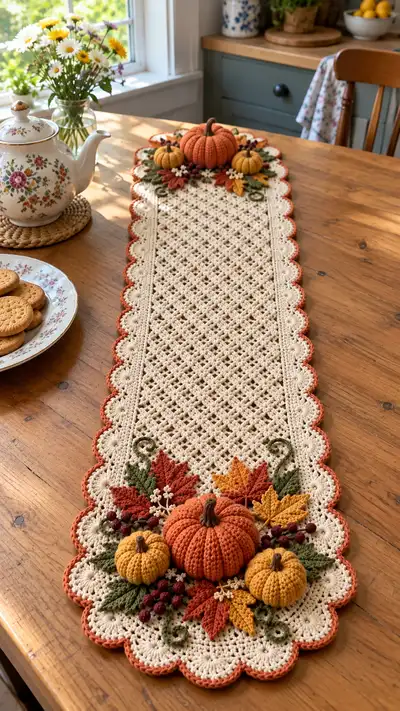
This Autumn Pumpkin Table Runner pattern combines a delicate lattice center worked in cream cotton with a warm rust scalloped border and three-dimensional pumpkin decor. The runner measures approximately 12" wide by 40" long (finished) and is decorated with one large pumpkin, two small pumpkins, layered leaves in gold, rust and olive, curled vines and tiny berry clusters for a natural harvest arrangement. Each element is crocheted separately and sewn onto the runner for a layered, dimensional display.
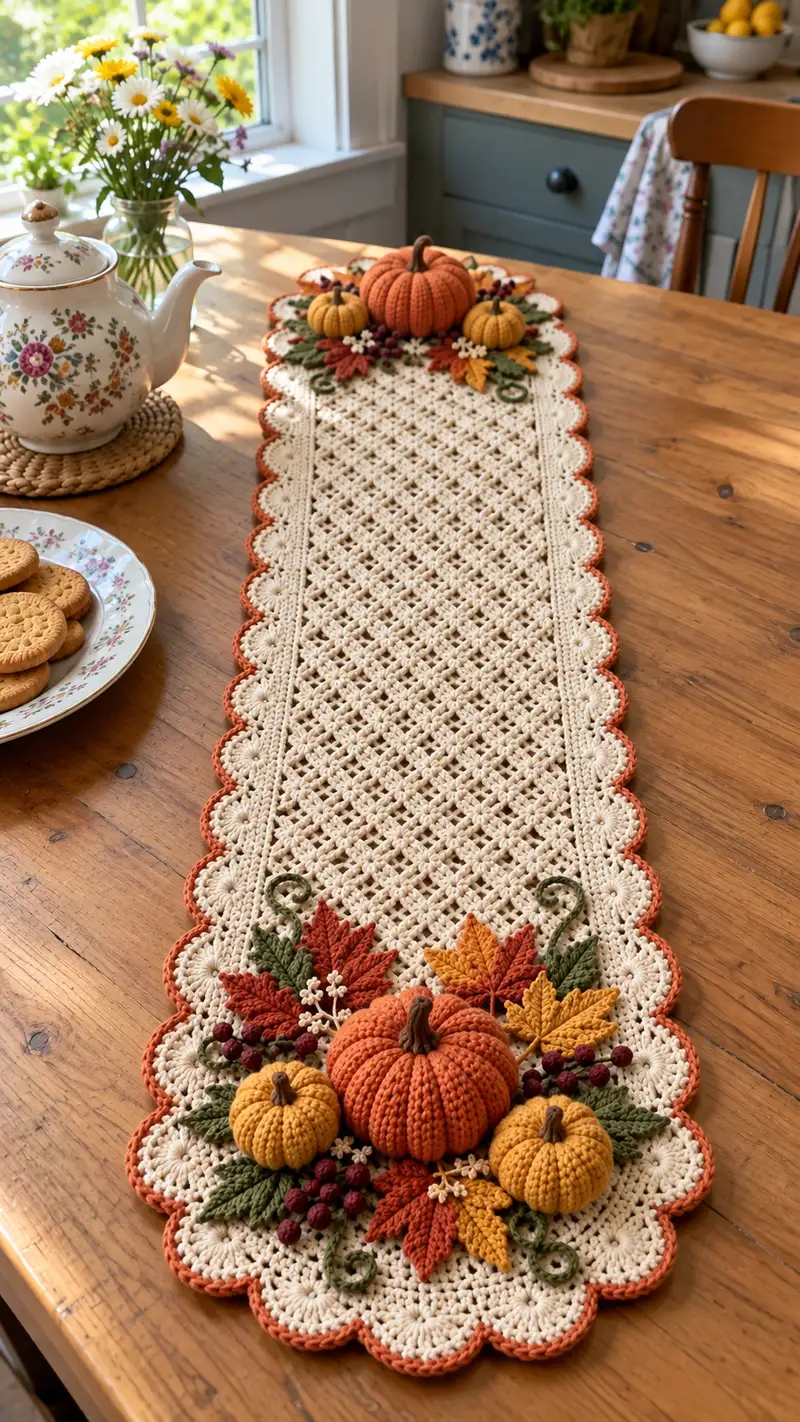
Autumn Pumpkin Table Runner Pattern crochet pattern - detailed view of completed project

The main runner uses a repeating cluster/lattice stitch to create a textured openwork that lays flat and dresses a table beautifully. The pumpkins are worked amigurumi-style with deep ribs created by post stitches for realistic shaping.

Why You'll Love This Autumn Pumpkin Table Runner Pattern

I love this pattern because it captures the warmth of autumn in both texture and color; the lattice background is airy yet sturdy and the stuffed pumpkins bring a charming, handmade harvest centerpiece to the table. I also enjoy how the layered leaves and berries allow for creativity—you can change colors to match your home, and the separate motifs make assembly fun and satisfying to arrange.

Autumn Pumpkin Table Runner Pattern step 1 - construction progress Autumn Pumpkin Table Runner Pattern step 2 - assembly progress Autumn Pumpkin Table Runner Pattern step 3 - details and accessories Autumn Pumpkin Table Runner Pattern step 4 - final assembly and finishing

Switch Things Up

I absolutely love the flexibility of this runner — you can easily switch colors to create modern neutrals, classic harvest tones, or bright autumn primaries. For a farmhouse look use muted rusts and deep olive; for a more traditional display use bright pumpkin orange and gold.

I often customize the motif placement: try a symmetrical pumpkin cluster at both ends or repeat a smaller pumpkin motif along the center for a runner that stretches the full table. You can also skip heavy embellishments and add only a few leaves for a minimalist look. Swap cotton for a soft acrylic to get a more drapey runner or use linen-blend yarn for a rustic texture.

If you want a smaller tabletop accent, scale down by using DK yarn with a 3.5mm hook and halving the foundation chain. Alternatively, make matching napkin rings from leftover yarn by crocheting tiny pumpkins and leaves for a coordinated set — I think that looks so charming at a fall dinner table.

Common Mistakes & How to Fix Them

✗ Skipping stitch markers at the beginning of each row causes drifting edges and makes the lattice pattern harder to track; always mark your first stitch. ✗ Working too loosely will create a floppy runner and cause motifs to sit unevenly; use recommended hook size or one size smaller for firmer stitches. ✗ Waiting to stuff pumpkins until the very end makes reaching the interior difficult; stuff gradually during decreases to achieve even shaping. ✗ Not blocking the runner base after finishing can leave it slightly wavy; steam or wet-block flat for best presentation. ✗ Using different yarn weights for motifs without adjusting hook size changes their scale; keep motifs proportional to the runner by matching yarn weight and hook. ✗ Sewing pumpkins down through thick layers without extra yarn can cause sagging; use a strong upholstery yarn or doubled thread when attaching heavy motifs.
Autumn Pumpkin Table Runner Pattern

A warm, textured table runner perfect for fall gatherings featuring a lacy lattice center, scalloped rust edge, and three-dimensional pumpkins, leaves, berries and vines. Worked in worsted weight cotton for a crisp drape, this runner is decorated with stuffed pumpkin motifs and layered autumn leaves for a cozy centerpiece. The pattern includes step-by-step instructions for the runner base, scalloped border, pumpkins (large and small), stems, leaves, berries and assembly notes to create a polished seasonal display.

Intermediate 8-10 Hours

Materials Needed for Autumn Pumpkin Table Runner Pattern

— Main Fabric

  • 01
    Worsted weight cotton yarn (#4) approximately 250g in Cream (main runner color)
  • 02
    120-150g in Rust/Orange (accent border and large pumpkin color)
  • 03
    60-80g in Mustard/Gold (two small pumpkins and leaves)
  • 04
    80-100g in Olive/Forest Green (leaves and vines)
  • 05
    Small amounts (10-20g each) in Burgundy (berries), Brown (stems), and Off-White (tiny flower centers)

— Tools Required

  • 01
    4.0mm (G) crochet hook for main work
  • 02
    3.5mm (E) crochet hook for tighter motifs and pumpkins (optional)
  • 03
    Yarn needle for sewing and weaving ends
  • 04
    Polyester fiberfill stuffing for pumpkins and berries
  • 05
    Stitch markers (several)
  • 06
    Scissors
  • 07
    Pins for layout and assembly
  • 08
    Optional: small amounts of craft wire for poseable vines
  • 09
    Optional: fabric glue for securing tiny pieces before sewing

Progress Tracker

0% Complete

— Runner Base (Lattice Center) :

Materials :

Worsted weight cotton in Cream, 4.0mm hook. Finished runner approximately 12" x 40" — foundation chain multiple of 6 +5. Here we work foundation ch 101 (96+5) to produce a runner about 12" wide; make longer or shorter by adding or subtracting multiples of 6.

Row 1 :

Ch 101, sc in 2nd ch from hook and in each ch across (100 sc). Turn. (100)

Row 2 :

Ch 3 (counts as dc), skip first st, *ch1, dc in next st* rep to last st, dc in last st. Turn. (maintains 100 dc spaces with ch-1 gaps)

Info :

The lattice pattern is worked over a 6-st repeat. Keep a stitch marker at row ends. Gauge note: row height will be taller when using dc; adjust hook if you desire tighter mesh.

Row 3 :

Ch1, sc in first dc, *ch3, sk next dc, sc in next dc* rep across ending with sc in last dc. Turn. (100 sc positions and 3-ch arches)

Row 4 :

Ch 1, sc in first sc, *into ch-3 sp work (sc, ch2, sc)* rep across into each ch-3 sp; sc in final sc. Turn. (forms small arches)

Row 5 :

Ch3, dc in first sc (or into ch-2 sp), *ch1, dc into next sc* rep across, dc in final sc. Turn. (100 dc with ch-1 gaps)

Row 6 :

Repeat Row 3 (ch1, sc in first dc, *ch3 sk dc sc in next dc*). Turn.

Info :

These six rows form the basic lattice module. Count rows carefully and keep even tension so the runner lays flat. Block lightly after finishing to even out mesh.

Row 7-40 :

Repeat Rows 1-6 sequence 6 times (36 rows total) to build length. After Row 40 you will have a long lattice panel approximately 40" depending on tension and yarn. Maintain pattern repeat: Rows 1-6 = lattice module; repeat modules until desired length is achieved. (100 sts across maintained)

Info :

If you want a longer runner work additional lattice modules (each module adds approximately 6 rows). Keep both ends matching by finishing with a full module at both short ends.

Row 41 :

Ch1, sc evenly across the top of the last row (100 sc). This prepares the edge for the border. Turn.

Info :

Fasten off and press or block this panel flat. Measure width to ensure even scalloped edging; adjust number of sc around if necessary to divide evenly for scallops (we use groups of 6-10 sts per scallop).

— Scalloped Border :

Round 1 :

With Rust color, attach yarn to any outer edge st with sl st. Ch1, sc evenly around entire runner edge working 2 sc in corner spots to maintain flatness. Count stitches; for our 100-st sides, aim to place approximately 104 sc each long side and appropriate counts across ends to maintain an even scallop repeat. Slip stitch to join. (even sc all around)

Info :

Distribute sc evenly so scallops sit evenly. If your counts differ slightly, add or skip up to 4 sc across long sides to make total stitches divisible by scallop repeat (we aim for repeats of 8 across long sides).

Round 2 :

Ch3 (counts as dc), *sk 1 sc, work 7 dc into next sc (shell), sk 1 sc, sl st into next sc* rep around to form shells. Slip stitch to join. This forms initial scallop shells. Adjust shell size to match your counts; our pattern uses 7-dc shells for full rounded scallops.

Round 3 :

Switch to Rust if not already, ch1, sl st into center of each shell from previous round, then work 5 sc into the center of each shell to define scallop, slip stitch between scallops to anchor. Fasten off and weave ends. (scalloped edge complete)

Info :

If you prefer a double border, work one additional round of sc in BLO before starting shells to create a ridge between lace and scallops.

— Large Pumpkin (Make 1) :

Materials :

Worsted weight cotton in Rust, small amount brown for stem, 3.5mm hook, fiberfill, tapestry needle.

Round 1 :

In Rust, mr, 6 sc in mr (6)

Round 2 :

Inc x6 (12)

Round 3 :

(1 sc, inc) x6 (18)

Round 4 :

(2 sc, inc) x6 (24)

Round 5 :

(3 sc, inc) x6 (30)

Round 6 :

(4 sc, inc) x6 (36)

Round 7 :

(5 sc, inc) x6 (42)

Round 8 :

(6 sc, inc) x6 (48)

Info :

We create a rounded base and then build height. These increases shape the lower half. Place a marker at start of each round. After Round 8 you should have 48 sts which will be the running count for the next even rounds to form the pumpkin ribs.

Round 9-16 :

1 sc in each st (48) — work evenly for 8 rounds to build height (Rounds 9-16). Use consistent tension to keep shape neat.

Info :

To create ribs, we will work alternating rounds of sc and front-post half double crochets (fpHdc) to define deep ridges. Place safety pin markers every 6 stitches if you prefer to visually divide ribs into eight sections.

Round 17 :

Ch1, *fpHdc around corresponding st from previous round, sc next st* rep around (48) — this begins rib definition.

Round 18 :

1 sc in each st (48)

Round 19 :

Repeat Round 17 (fpHdc, sc) to deepen ribs (48)

Round 20-22 :

1 sc in each st (48) — work 3 rounds to build pumpkin height and allow ribs to stand out.

Info :

Begin stuffing after Round 20. Use small amounts of fiberfill, pushing into each rib area to fill deeply between post stitches. Continue stuffing as you work decreases so pumpkin keeps an even rounded shape.

Round 23 :

(6 sc, dec) x6 (42)

Round 24 :

(5 sc, dec) x6 (36)

Round 25 :

(4 sc, dec) x6 (30)

Round 26 :

(3 sc, dec) x6 (24)

Round 27 :

(2 sc, dec) x6 (18)

Round 28 :

(1 sc, dec) x6 (12)

Info :

Continue stuffing firmly as you reduce. The pumpkin should be plump but not overstuffed as you will add a stem which will sit in the top hole.

Round 29 :

6 dec (6)

Round 30 :

Fasten off leaving long tail. Use tapestry needle to close hole by weaving yarn through front loops around opening and pull tight. Secure firmly and weave end inside pumpkin.

Round 31 :

Optional: Using a length of strong yarn or upholstery thread, pass the yarn through the center of the pumpkin from bottom to top several times, pulling taut and knotting at the top to create deep segmented ribs (8 segments). Tie securely and weave ends inside. This gives a classic pumpkin segment look.

Info :

For realistic ribs, wrap a long piece of yarn around the outside of the pumpkin crossing at the top and bottom, pulling gently but evenly for visible grooves. Anchor ends inside with a knot and weave in.

Round 32 (Stem) :

Make stem in Brown: mr, 6 sc in mr (6). Rnd2: 1 sc in each st (6) for 3 rounds to build height, then sl st into next st and leave long tail for attaching. Stuff lightly if desired and sew into top center of pumpkin. Optionally, work a few hdc in spiral to create tapered look.

Info :

Twist and bend the stem slightly for character. Use a dab of fabric glue at base before sewing for extra stability if pumpkins will be handled frequently.

— Small Pumpkin (Make 2) :

Round 1 :

In Mustard (or gold), mr, 6 sc in mr (6)

Round 2 :

Inc x6 (12)

Round 3 :

(1 sc, inc) x6 (18)

Round 4 :

(2 sc, inc) x6 (24)

Round 5-8 :

1 sc in each st (24) to build height (Rounds 5-8)

Info :

Small pumpkins are shorter than the large one — keep even rounds fewer. Begin ribbed texture by working fpHdc rounds as with large pumpkin after Round 6 if you want deeper ribs.

Round 9 :

(3 sc, dec) x6 (18)

Round 10 :

(1 sc, dec) x6 (12)

Round 11 :

6 dec (6)

Round 12 :

Fasten off leaving tail, close hole with needle and weave in. Stuff firmly but not overfull. Repeat for second small pumpkin.

Round 13 (Stem) :

Make stem in Brown: mr, 6 sc in mr, work 2-3 rounds sc, fasten off leaving tail to sew. Twist a small bit and sew into top center of each small pumpkin.

— Leaves (Make 8: 3 Olive, 3 Rust, 2 Gold) :

Leaf Pattern A (Maple-style, larger) :

Works well for the larger layered leaves under pumpkins. Use 3.5mm hook. Start with ch 12.

Round 1 :

Sc in 2nd ch from hook, hdc in next, dc in next, tr in next 2, dc in next, hdc in next, sc in next, sl st in last ch — now work along the other side of chain: sc in next, hdc, dc, tr2, dc, hdc, sc, sl st to join. Fasten off. (creates pointed maple-like leaf)

Info :

To add veining, use surface slip stitches with contrasting color over leaf center. Make 8 total leaves: 3 olive, 3 rust, 2 gold. Size may be adjusted by increasing chain length to 14 or 16 for larger leaves.

Leaf Pattern B (Serrated long leaf) :

Ch 10. Sc in 2nd ch, *dc in next, (hdc, sc, hdc) in next ch to make a serration* rep along chain, then mirror back along other side of chain with same serrations. Fasten off. (slender leaf good for layering)

Info :

Stiffen leaves lightly with spray starch if you prefer them to lay flat; otherwise leave soft for a natural curl. Shape leaves with fingers before blocking for a lifelike look.

— Vines & Tendrils (Make 4) :

Vine 1 :

With Olive, ch 40 (or desired length). Row: sc in 2nd ch from hook and each across, leave long tail. Curl ends into spirals by wrapping vine around pencil, steam lightly or stitch into spiral and secure with a few stitches so spiral holds. Repeat for 3-4 vines to place under leaves.

Info :

Optional: insert a thin craft wire inside the chain by running it along and stitching through every 6-8 sts to create poseable vines. Fold wire ends and wrap with yarn to prevent sharp tips.

— Berries (Make 24 small berries) :

Berry (Tiny sphere) :

With Burgundy, mr, 6 sc in mr (6). Rnd2: inc x6 (12). Rnd3: 1 sc in each st (12). Rnd4: (1 sc, dec) x4 (8). Rnd5: dec x4 (4). Rnd6: Fasten off leaving tail, stuff lightly and close. Weave in end. These make small clustered berries to tuck under leaves. Make 24 or as desired in clusters of 6-8 per pumpkin group.

Info :

To make berries extra secure before attaching, place a dab of fabric glue in center and press together, then sew group to runner with strong thread.

— Tiny Flowers (Make 12) :

Flower :

With Off-White, ch 2, 6 sc into 2nd ch from hook (6). Rnd2: (ch3, sl st into next sc) x6 to create 6 petals. Fasten off and leave tail for sewing. Add small French knot with brown thread to center if desired. Make 12 and distribute among leaves.

Info :

Flowers are decorative accents; sew them flat onto leaf clusters or tuck under pumpkins. Alternate placement across both ends of runner for symmetrical design.

— Assembly Preparation :

Info :

Layout all motifs on runner to achieve desired composition. A typical arrangement places the large pumpkin at one end with two smaller pumpkins flanking it and assorted leaves, berries and vines layered beneath. Pin pieces in place before sewing to ensure spacing and balance.

— Attaching Pumpkins & Motifs :

Step 1 :

Position large pumpkin at center of end scallop. Using long tail and tapestry needle, sew base of pumpkin to runner by inserting needle through the underside of runner and up through pumpkin base at several points around bottom, making sure to pass through lattice holes for secure anchoring. Use doubled yarn for strength.

Info :

Sew through lattice spaces and multiple times around pumpkin base to prevent it from wobbling. For heavier pumpkins use upholstery or doubled cotton yarn.

Step 2 :

Sew small pumpkins to either side of large pumpkin using same method. Tuck small stems under large pumpkin base slightly for overlapping, sewing through pumpkin underside and runner several times for a secure mount.

Step 3 :

Sew leaves into place in layers: start with largest leaves first (olive), then layer rust and gold leaves. Secure tips and base of each leaf with a few small stitches. Arrange leaves to fan out naturally and overlap slightly.

Step 4 :

Sew berry clusters on top of leaves by grouping 6-8 berries and stitching through their centers to anchor to runner at varying heights for dimension. Add flowers last, stitching through centers onto leaves or directly onto runner.

Info :

Take time to pin and reposition pieces until composition is balanced. Sew loosely at first, check placement, then reinforce stitches. Hide knots and ends inside pumpkin bodies or under leaf layers.

— Finishing Touches :

Step 1 :

Weave in all ends and trim close. Use stitch marker to identify any loose areas and reinforce with extra stitches as needed. Lightly steam-block runner one more time to flatten scallops and open lattice.

Step 2 :

Optional: sew a few invisible hand-stitches through pumpkin bases and runner to anchor them further. Add small beads or metallic thread highlights to berry clusters if desired for a festive sparkle.

Info :

For shipping or gifting, detach pumpkins and leave them as separate motifs wrapped together to prevent crushing during transport. Reattach at destination following assembly steps.

— Care & Blocking :

Info :

Hand wash gently in lukewarm water with mild soap. Reshape and lay flat to dry. Re-block scallops and lattice while damp. Avoid machine washing to preserve shape of pumpkins and embellishments.

Assembly Instructions

  • Attach the large pumpkin to the runner by placing it over a lattice opening at the end scallop. Pin and sew the pumpkin base to the runner using long, strong yarn through multiple lattice holes (approximately 10-12 stitches around the base) to distribute weight evenly.
  • Position the two small pumpkins on either side of the large pumpkin, slightly overlapping leaves. Sew each small pumpkin with 6-8 secure passes through the base and runner, reinforcing with doubled yarn where needed.
  • Layer leaves underneath pumpkins: place largest leaves first (olive), then rust and gold leaves. Pin in place and sew each leaf with 3-6 small stitches at the base and an extra stitch at the tip for security.
  • Arrange berry clusters and tiny flowers last, sewing berries individually or in small groups to the runner and leaves. Use short stitches through berry centers and anchor behind a leaf if possible to hide knots.
  • Add curled vines by tacking them at 2-3 points along their length to keep the spiral shape; secure with tiny stitches under leaves or behind pumpkins so they remain subtle but stable.
  • Weave in and trim all yarn tails, then lightly steam-block the entire runner, shaping the scallops. Double-check all attachments and add reinforcement stitches where any motif feels loose.

Important Notes

  • 💡Use stitch markers consistently at the beginning of each row to avoid counting errors and maintain proper shaping
  • 💡Stuff pumpkins gradually as you work rather than waiting until the end to ensure even shape and easier final closure
  • 💡Block the runner base after finishing to even out the lattice pattern and make the scalloped border lie flat
  • 💡For heavier motifs, sew with doubled yarn or upholstery thread and pass through multiple lattice holes to prevent sagging
  • 💡When adding surface details like veins on leaves, keep stitches small and consistent for a neat finished look
  • 💡Pin all pieces in position before final sewing to ensure proper placement and symmetry
  • 💡For a crisp finish use cotton yarn; acrylic will be softer and drapier but may not show scallops as sharply
  • 💡If attaching heavy embellishments, consider adding felt circles beneath each base on underside of runner to distribute stress

This Autumn Pumpkin Table Runner brings cozy fall charm to any table with its delicate lattice center and dimensional pumpkin decor. Each stitch layers into a warm harvest vignette you'll be proud to display. Gather the yarns, enjoy the therapeutic repeating motifs, and create a seasonal centerpiece that sparks smiles. 🧶🍁 Happy crocheting and enjoy arranging your handmade autumn display! 🎃

You ask,

we answer.

FAQs

What is the finished size of this table runner?

Using the specified yarn and foundation chain of 101 and the given repeats, the finished runner measures approximately 12 inches wide by 40 inches long. Adjust foundation chain multiples of 6 to alter width and add lattice modules to change length.

Can I use different yarn weights for this pattern?

Yes, but switching yarn weight will proportionally change the finished size and drape. If you choose a lighter sport or DK weight, use a smaller hook and consider working more repeats to reach desired length. Heavier yarns will produce a thicker, denser runner.

Do I need to stuff the pumpkins before attaching them?

Yes. Stuff pumpkins firmly enough to maintain shape but not so much they push out stitches. Stuff gradually while finishing decreases to ensure you can reach corners; final stuffing just before closing gives the best results.

How many pumpkins and leaves should I make?

The sample uses one large pumpkin, two small pumpkins, eight leaves (three olive, three rust, two gold), several vines, about 24 berries and 12 tiny flowers. You can reduce or expand elements to suit your taste.

How do I prevent the runner from curling at edges?

Blocking is key. Pin the runner flat and mist with water or steam gently until dry. The scalloped border may need slight stretching when pinned to shape evenly.

Can I make the pumpkins removable?

Yes. Sew a couple of small buttons on underside of pumpkins and matching loop stitches on runner, or simply do not sew pumpkins permanently—use a few hidden stitches that can be cut to detach later.

What amount of stuffing is required?

For the three pumpkins and berries approximately 40-80 grams of polyester fiberfill should be sufficient depending on how firmly you stuff. Small berries use minimal stuffing while the large pumpkin uses the bulk of it.

How do I keep the scalloped edge even around corners?

Distribute increases along corners (2 sc in corner spaces) to avoid puckering. Count shell repeats before starting to ensure a divisible number for shells; adjust sc spacing slightly if needed.