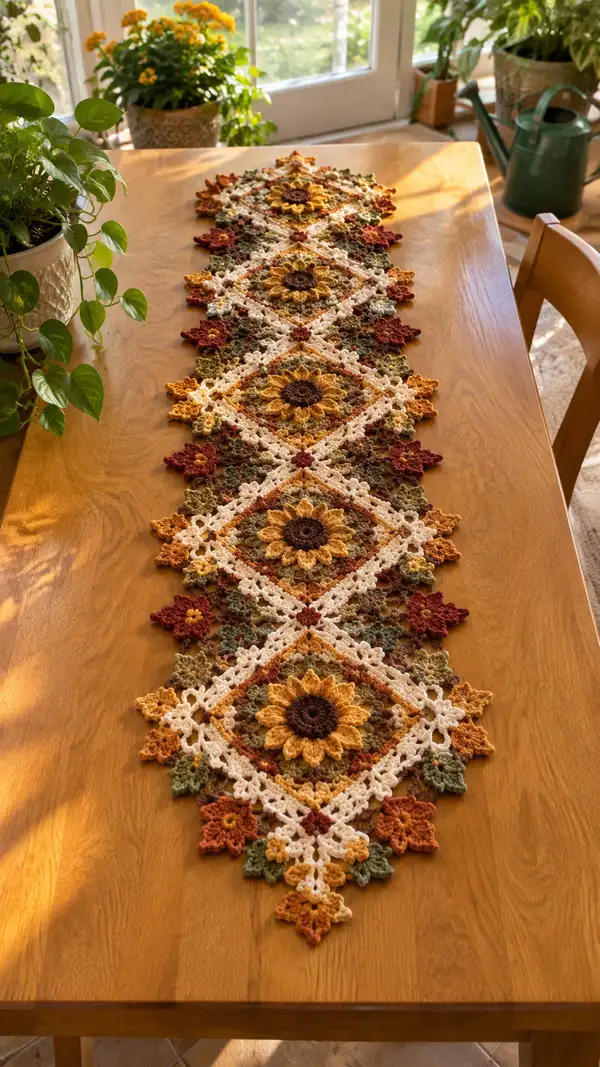
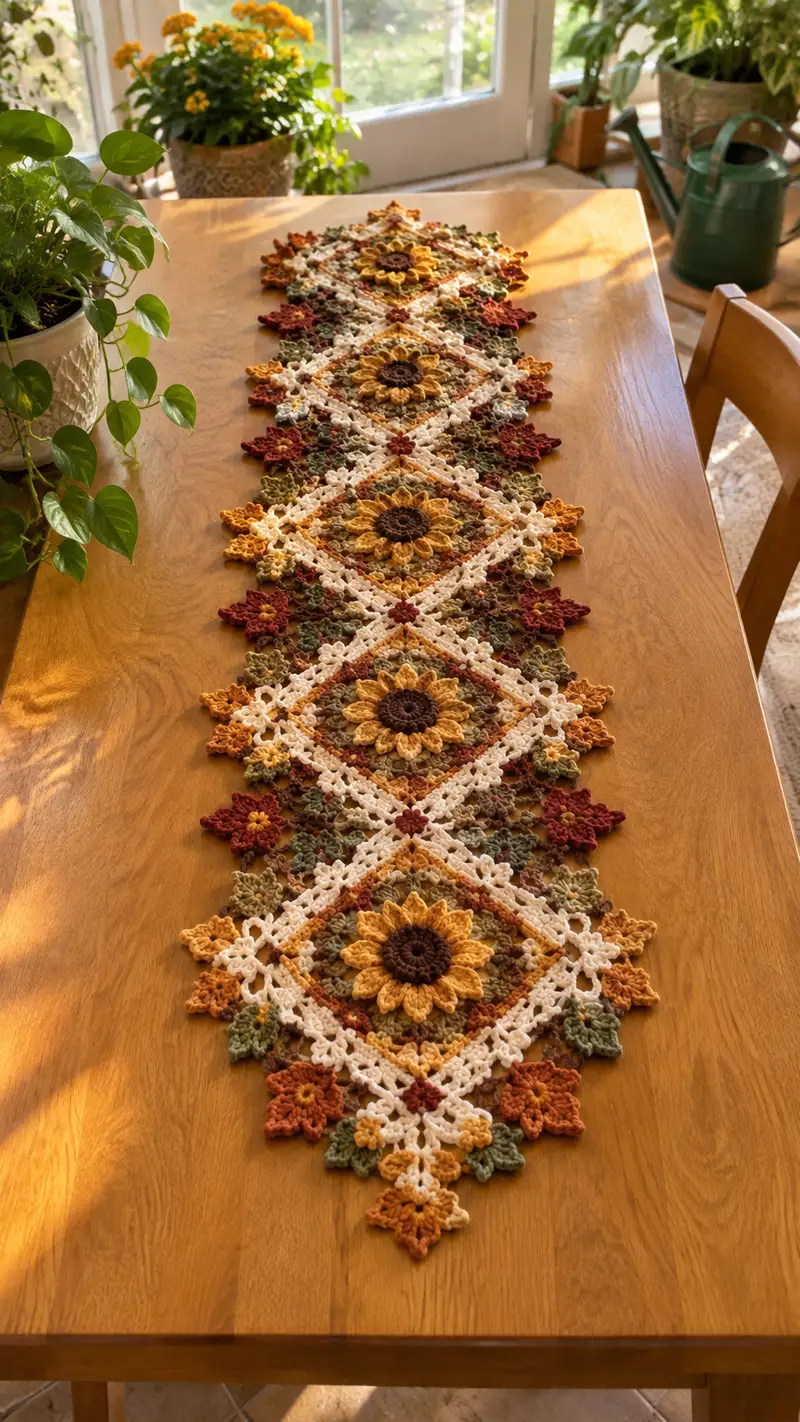
Create a warm, long table runner made from linked sunflower medallions and delicate floral connectors. This design features raised sunflower centers, layered petals and a lacy diamond frame in autumn tones—mustard, rust, olive and cream—perfect for seasonal decor. The runner is built from repeating medallion motifs joined with small floral clusters and finished with a scalloped edge for a handcrafted heirloom look. Suitable for crocheters comfortable with texture work, color changes and join-as-you-go techniques.
Progress Tracker
0% Complete
— Overview :
Info :
This pattern builds the Autumn Sunflower Medallion Table Runner by creating large sunflower medallions (make 5 for the pictured length), smaller floral connector motifs and join-as-you-go rounds, then finishing with a decorative scalloped edge. Work motifs in worsted weight yarn and 3.5mm hook unless noted. Maintain consistent tension. Each sunflower medallion is made as a centered round medallion, followed by square/diamond framing rounds to create the lacy diamond look.
— Finished Size & Gauge :
Info :
Finished runner as pictured measures approximately 60" (152 cm) long by 12" (30 cm) wide when using worsted yarn and 3.5mm hook. Gauge is flexible for decorative runners; a 10cm x 10cm swatch in pattern stitches should be roughly 16 sc x 18 rows if matching fabric density. Length will vary with number of motifs—make more or fewer medallions to suit your table.
— Motif Breakdown :
Info :
Each large sunflower medallion is written in rounds (Rounds 1-36). Surrounding diamond frame and filler rounds (Rounds 37-56) transform the circle into a square/diamond shape. Small flower/leaf connectors (Rounds 57-74) are worked separately and used in join-as-you-go (Rounds 75-92). Final border and scallop edging (Rounds 93-120) create the finished edge. Read Info notes at each section carefully for color changes and placement.
— Sunflower Medallion (Make 5) :
Round 1 :
mr, 6 sc in magic ring (6)
Round 2 :
inc in each st around (12)
Round 3 :
(1 sc, inc) x 6 (18)
Round 4 :
(2 sc, inc) x 6 (24)
Round 5 :
(3 sc, inc) x 6 (30)
Round 6 :
(4 sc, inc) x 6 (36)
Info :
Use dark brown yarn for the sunflower center up to Round 6. Keep stitches tight here for a firm, slightly recessed center. Change color at the end of Round 6 to a slightly lighter brown or tan if you want a ringed center look.
Round 7 :
(5 sc, inc) x 6 (42)
Round 8 :
(6 sc, inc) x 6 (48)
Round 9-11 :
1 sc in each st around (48)
Info :
Rounds 9-11 build a stable base for petals. Count your stitches and place a stitch marker at the start of Round 9 to help divide for petal placement. We will place 12 petals; 48 base sts ÷ 12 = 4 base sts per petal. Use markers every 4 stitches if helpful.
Round 12 :
Change to mustard/gold for petals. 1 sc in each st around (48)
Round 13 :
*Ch 1, in next 4 sts work: [1 sc in first st, 1 hdc in next st, 3 dc in next st, 1 hdc in next st, 1 sc in next st]—this creates one petal cluster; sl st into next st to anchor; rep from * around to make 12 petals. (Petals are worked into designated 4-st segments; base stitch count remains 48)
Info :
When making petals, work in the round without increasing base stitch count—the petals are worked as surface clusters anchored to the base. Maintain consistent tension so petals sit up from the center. If you prefer deeper petals, use the 3.0mm hook for the petal round only.
Round 14 :
1 sc around, working through back loop of petal anchors where possible to create separation between petals (48)
Round 15 :
FLO: 1 sc in each st FLO (48)
Round 16 :
*Slip to the base between petals and ch 2, sk 1, sc into next base st to create small picot connectors; rep around (48)
Info :
These small connectors give a scalloped inner outline that will sit nicely inside the diamond frame later. Keep these rounds tidy—fasten off petal color if you plan to use a highlight color on the outer petal tips.
Round 17 :
Change to a light gold (optional) for petal highlights. 1 sc in each st (48)
Round 18 :
Work a decorative round: *(ch3, sl st into same st) to make small loops over each 4-base segment; sl st into next base st; rep around (48 loops, 48 sl st anchors)
Round 19 :
Return to mustard/gold: 1 sc in each st (48)
Round 20 :
(2 sc, inc) x 12 (60)
Info :
Round 20 begins to widen the medallion to prepare for the diamond framing. The increases are placed evenly; after Round 20 you will have 60 stitches. Mark the start stitch and every 15 stitches to aid corner placements later when converting into a diamond.
Round 21 :
1 sc in each st around (60)
Round 22 :
(4 sc, inc) x 12 (72)
Round 23 :
1 sc in each st around (72)
Round 24 :
(5 sc, inc) x 12 (84)
Round 25 :
1 sc in each st around (84)
Info :
By Round 25 you have a broad circular base. We're now ready to define the diamond corners: mark four points at quarter intervals—count 21 stitches between markers for even spacing (84 ÷ 4 = 21).
Round 26 :
Work to create corner spaces: *sc in next 10 sts, (ch 3, sk 1, sc) into next st to create corner eyelet*; rep 4 times around (maintain 84 sc anchors between corners)
Round 27 :
1 sc around working into both loops and through ch-3 spaces as follows: in each ch-3 space work (sc, ch 3, sc) to form a defined corner; sc in each regular st around (total anchors remain 84 plus 4 new ch-3 corners)
Round 28 :
Change to cream/ivory for diamond frame. 1 sc in each st and 3 sc in each ch-3 corner to stabilize (count 84 + 8 = 92 anchors including corner reinforcement)
Info :
The diamond frame uses a lighter color to create contrast between sunflowers. Work Round 28 evenly and keep an eye on corner shaping. If your stitch count differs slightly, maintain four evenly spaced corners.
Round 29 :
1 sc in each st (92)
Round 30 :
Work 1 sc in FLO around to create a slight ridge for the decorative lattice (92)
Round 31 :
Begin lattice effect: *ch 5, sk 4, sc in next 4 sts; rep around, making loops between sections (92 base anchors remain)
Round 32 :
Work into ch-5 loops: (sc, ch 3, sc) in each loop to create diamond eyelets around the center (92 anchors)
Round 33 :
1 sc in each st around, working extra sc in corner ch-3 spaces to keep diamond definition (92)
Info :
At this point you have converted the sunflower medallion into a diamond-friendly medallion with defined corners and lattice spaces for joining. Fasten off cream if you will switch to accent motifs next.
Round 34 :
Change to accent rust color: 1 sc in each st (92)
Round 35 :
Decorative star placement: *Work a 5-puff cluster into every 23rd st to create tiny outward blossoms at four points around the diamond; sc between clusters to maintain base stitch count (92 anchors)
Round 36 :
Fasten off accent color. Weave in ends and lightly block each medallion to hold the diamond shape before joining to others.
— Small Floral Connector Motifs (Make 8-12 as needed) :
Round 1 :
mr, 6 sc in magic ring (6)
Round 2 :
inc in each st (12)
Round 3 :
(1 sc, inc) x 6 (18)
Round 4 :
Change to rust: 1 sc around (18)
Round 5 :
Petal round: *Ch 3, 3 dc in same st, ch 3, sl st in next st; rep around to create 6 petals (anchors remain 18)
Round 6 :
Switch to olive green for leaf accents: In the spaces between petals, work (sc, ch2, sc) to form small leaf loops (anchors unchanged)
Round 7 :
Fasten off and block lightly. These small motifs are used in the join-as-you-go process at the corners and midpoints between large diamonds.
Info :
Make more or fewer small connector motifs depending on runner length. These are decorative and also functional in stabilizing joins between medallions. Use the same cream color for the small motif outlines if you want them to read as part of the lacy frame.
— Join-as-you-go Assembly and Joining Rounds :
Info :
Arrange medallions in a linear sequence (5 medallions pictured). Place small floral connectors at each touching corner and midpoint as shown. We'll join medallions using a combination of slip-stitch joins and single crochet seams worked into open lattice spaces made around Round 31-33 of each medallion. Use cream yarn for a visible lacy join.
Round 37 :
With right sides facing, align two medallions so diamonds touch at corner ch-3 spaces. Join cream yarn in corner ch-3 of medallion A and ch 1, sc in corner ch-3 of medallion B to join; continue sc evenly across adjoining lattice spaces (no change to medallion stitch counts; joining stitches are worked through both layers)
Round 38 :
Once adjacent medallions are joined at one corner, work around the connecting region adding small sc bridges in ch-5 loops: join by working (sc, ch 2, sc) through both motifs' loop spaces. Secure with slip stitch at the end.
Round 39 :
Attach small floral connectors by working sc through the connector's outer edge and into the adjacent medallion's lattice loops, making 2-3 secure stitches per connector point; repeat for each connector position.
Info :
Use pins to hold motifs in place before joining. Work slowly and stitch-by-stitch so the pattern lines of the lattice match. Leave long tails for weaving in and secure with several stitches for durability.
Round 40 :
After joining medallion pairs, work a unifying round in cream over the joined seams: 1 sc in each visible stitch across joins to tidy edges. This creates a continuous-looking lattice along the runner's center line.
Round 41 :
Work sc around each internal join to stabilize and prevent twisting; use 2 sc in tight corner areas and maintain 1 sc across straight edges (visual anchor only; count will vary per runner)
Round 42 :
Change to olive green to accent leaf clusters along the join: in select lattice loops, work (sc, ch3, sc) creating small leaf loops to echo foliage between sunflowers.
Round 43 :
Return to cream and work 1 sc in each outer anchor stitch along runner sides to prepare for decorative border rounds.
Info :
At this stage test-lay the runner on your table to check spacing and that motifs lie flat. If any medallion puffs or sits higher, lightly steam-block that medallion or add a few blocking pins to flatten before final border. This ensures uniform positioning for the edging rounds.
— Decorative Border & Edge Rounds :
Round 44 :
Change to tan/gold for border: 1 sc evenly around entire runner edge working into both layers where joins exist. Space increases at outer corners to keep edge flat—work (sc, ch1, sc) at each pointy corner to maintain diamond points.
Round 45 :
1 sc in each st around (count will be total edge anchors; maintain even spacing)
Round 46 :
Work a lacy open round: *ch 3, sk 2, sc in next st; rep around creating airy loops for the scallop base (anchors unchanged)
Round 47 :
In each ch-3 loop, work (sc, hdc, 3 dc, hdc, sc) to form a medium scallop; fasten off tan color (scallop unit per loop)
Round 48 :
Change to cream and work 1 sc between scallops to tidy joins and form a continuous edge (anchors equal number of scallops)
Info :
The scallop round provides the runner's finished look. If your scallops flare or curl, adjust by working fewer dc or adding an extra sc at the base to tighten. Blocking after scallop round will set the shape permanently.
Round 49 :
Work small decorative points at diamond tips: *At each diamond outer tip, work 5 sc in consecutive stitches to create a small triangular point; sc evenly between points* (this will emphasize the diamond shape)
Round 50 :
Change to rust for tiny flower highlights: Work a 3-dc popcorn in every other scallop center to add texture and autumn color (popcorns are decorative and do not change base stitch counts)
Round 51 :
Sc around to secure popcorns and tidy back loops (anchors unchanged)
Info :
If preferred, substitute puff stitches for popcorns for a flatter finish. Keep popcorns at regular intervals for an even rhythm along the runner edge.
Round 52 :
Optional: Add small olive leaves between scallops by working (sl st, ch 2, 3 sc in loop, ch 2, sl st) in cream anchor stitches to add a foliage edge.
Round 53 :
Return to cream and work a finishing round of slip stitches around all edges, making sure scallops and points are secured and the runner lays flat.
Round 54 :
Fasten off and weave in all ends. Trim excess yarn tails and use blocking pins to shape final scallops and diamond points. Allow to dry fully before use.
Info :
Final blocking ensures the runner keeps a crisp diamond geometry and scalloped edge. Use a light steam or wet-blocking method suitable for worsted acrylic or natural fibers—follow yarn manufacturer's instructions.
— Alternate: Single Large Motif Edging (Optional Detailed Rounds) :
Round 55 :
If you prefer more ornate medallion surrounds, work additional rounds: (3 sc, inc) x 23 to expand outer ring (counts adjusted to maintain symmetry; example result 92 → 115 anchors depending on increases)
Round 56 :
Work alternating BLO and FLO rounds for texture: 1 sc BLO next round, 1 sc FLO next round, repeat twice to create ridges for an antique look.
Info :
These extra rounds are optional and increase runner width. If adding them to all medallions, check overall runner width and table fit before proceeding with multiple medallions.
— Finishing Touches and Blocking :
Round 57 :
Weave in all ends with yarn needle, using duplicate stitch method for secure ends. Trim close to fabric.
Round 58 :
Lay runner flat on blocking mat, pin each diamond corner and each scallop evenly. Gently spritz with water or use steam to set shape. Allow to dry completely before removing pins.
Info :
Blocking evens tension and shapes the runner. For natural fibers like wool or cotton, use wet-blocking and reshape gently; for acrylic lower heat steam briefly and let cool pinned. Avoid over-stretching diamonds—aim for a balanced, slightly taught layout.
— Care Instructions :
Round 59 :
Handwash gently in cool water or spot clean. Lay flat to dry to preserve shape. Avoid tumble drying to protect scallops and petals.
Info :
Use a lightweight pressing cloth if you must iron—press on low with steam. Store flat or gently rolled to prevent sharp creases in the scallops.
This Autumn Sunflower Medallion Table Runner combines sculptural sunflowers, lacy diamond frames and delicate border scallops to create a cozy seasonal centerpiece. Each medallion is a small collaboration of texture, color and careful shaping—perfect for table displays or as a thoughtful handmade gift. The join-as-you-go approach keeps finishing tidy and helps motifs lie flat together. Enjoy the rhythmic meditation of making sunflowers and blossoms unite into a warm, autumnal runner. 🧶🍁🌻