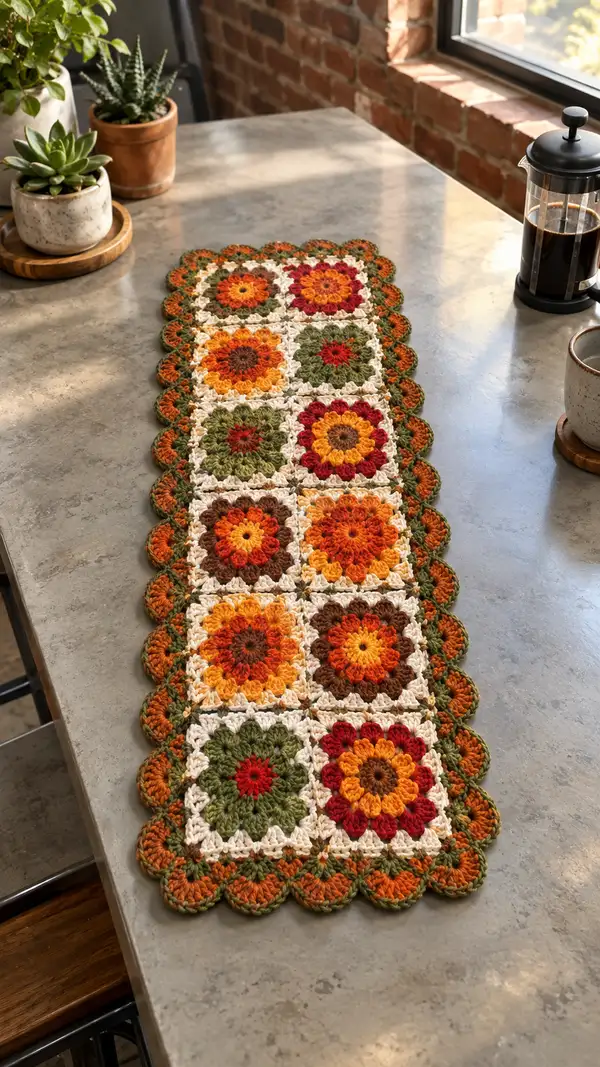
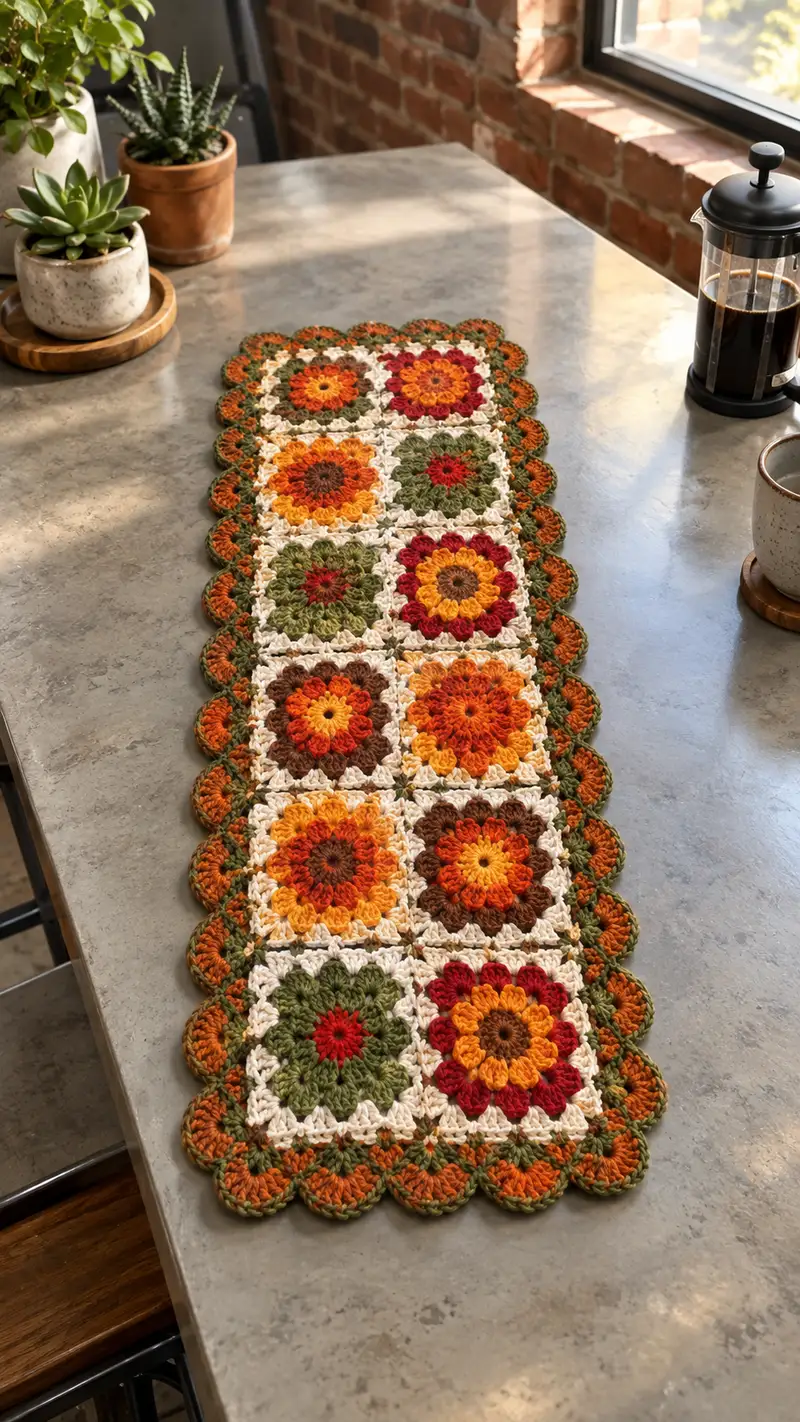
Create a warm, autumn-inspired table runner made from sunflower-style granny squares. This runner features 10 floral motif squares joined with a crisp cream join and finished with a scalloped autumnal border in olive, rust, and pumpkin hues. The finished piece brings cozy, harvest-season color to a hallway table, buffet, or kitchen island and is built square-by-square for easy customization.
Progress Tracker
0% Complete
— Notes and Prep :
Info :
This pattern builds 10 identical sunflower-style granny squares (2 across x 5 down) and joins them with a cream join-as-you-go method. Each motif is worked in rounds with color changes for petals and backgrounds, then joined with a clean cream square round. Final border is worked all around as multiple rounds to create layered scallops. Make a gauge swatch before beginning: your motif finished square should be approximately 10.5cm/4.1in across after blocking with the specified hook and yarn; adjust hook size if needed.
Info :
Puff stitch technique used: wrap yarn around hook twice (yo twice), insert in indicated stitch, pull up a loop, yo and pull up through loop again two more times to have 7 loops on hook, yo and pull through all loops, ch1 to close puff. For a tighter puff, use three wraps and ensure loops are even. Alternate puff instructions below will say 'puff' with the configured number of wraps.
— Motif (Make 10 identical squares) :
Round 1 :
With Color 1 (chocolate brown) make a magic ring, ch3 (counts as dc), 11 dc into ring. Join with sl st to top of ch3. (12)
Info :
Pull ring tight. This round creates the central disk of the sunflower. Use a stitch marker on the first dc (ch3 counts) to mark round starts if you prefer.
Round 2 :
Change to Color 2 (mustard golden). Join with sl st to any dc, ch1 (does not count), *puff stitch in next dc, ch1; rep from * around into each dc for a total of 12 puff clusters separated by ch1. Join with sl st to first puff top. (12 puffs, 12 ch-1 spaces)
Info :
Each puff will become a petal. Keep puff height consistent. If you prefer smaller petals, use 2-wrap puffs; for plumper petals, use 3-wrap puffs. Place a marker in the first puff to help orient later rounds.
Round 3 :
Change to Color 3 (pumpkin orange). Work: sl st into next ch-1 space, *(ch2, 3 dc in same ch-1 space, ch2, sl st in next puff top)*; rep from * around into each ch-1 space to create 12 petal clusters that sit between puff centers. Join with sl st. (12 clusters)
Info :
This round builds the visible sunflower petal ring. Keep tension consistent so petals sit evenly around the center. If your petals flare outward, try a slightly smaller hook or tighter tension in petal rounds.
Round 4 :
Remain with Color 3. Working behind the petal round (into the base stitches), ch1, then *1 sc between each petal cluster (work into the dc directly between clusters)* 12 times for a tidy base, join with sl st. (12 sc)
Info :
This small sc round stabilizes the petal base and provides anchor points for the next round that will transform the round motif into a square-ish granny shape.
Round 5 :
Change to Color 4 (rust red). Join in any sc of Round 4, ch3 (counts as dc), (2 dc in same st), *skip next sc, (3 dc in next sc)* repeat around to make 4 groups that will serve as corners and 8 groups that will be side groups totaling 12 groups. Join with sl st. (36 dc arranged in 12 groups)
Info :
We are preparing clustered groups to form the first square shaping. Groups will be used to create chain corners in the next square round. If you find your motif getting too large, check that your petal round isn't pulling stitches wide — tighten your puff closures slightly.
Round 6 :
Change to Color 5 (cream). Working in the back loops only of the dc groups from Round 5, ch3 (counts as dc), 2 dc in same st, ch2, *3 dc in next group, ch2; rep from * around placing ch2 at four roughly equal intervals to form four corner ch-2 spaces. Join with sl st. (12 groups made into larger clusters; ch-2 corners x4)
Info :
Switching to cream here frames the flower and creates the square round that will be the visible seam when joining squares. Work the ch-2 corners evenly: place them after every third group approximately so your square corners line up geometrically.
Round 7 :
With Color 5 (cream), ch3 (counts as dc), in each dc group work 2 dc, into each corner ch-2 work (3 dc, ch2, 3 dc). Repeat around. Join with sl st. Count should be (3 dc groups x 12 groups = 36 dc) plus corners structured as (3 dc, ch2, 3 dc) x4; the round sits as an even square frame. (36 + corner structure)
Info :
This round is the square framing round — keep a close eye on corners. The ch-2 corner spaces give the square its structure; if your corners pull tight, switch to ch3 corners next time. For this runner ch2 corners give a crisp, but not exaggerated corner.
Round 8 :
With Color 5 (cream), ch1, sc evenly around making 2 sc in each 3-dc cluster top and 3 sc in each corner ch-2 space (worked as sc, ch2, sc across the corner), join with sl st. After joining you will have an even edge ready for the join-as-you-go method. (Approx 60 sc depending on exact grouping)
Info :
This sc round provides a flat edge and is where squares will be joined together. Count your sc: you want a consistent number across all motifs. If one motif differs, adjust by adding a sc in a side group evenly to match others.
Round 9 :
Optional decorative round: Change to Color 6 (olive green). *ch3, skip 1 sc, sl st in next sc* across to create small arches between side groups, placing (ch3, sl st) across corners as well. Join with sl st. This is ornamental and can be skipped for a cleaner look. (Approx 20 arches)
Info :
Work this decorative arch round only if you want a softer join line. Otherwise leave motifs as-is and proceed to final blocking then join.
Round 10 :
Fasten off color, leaving 20-25cm tail for weaving in. Block each square gently to 10.5cm/4.1in after completing all motif rounds. Make 10 motifs in your chosen colorway variations according to the photo palette so you have a pleasing alternating layout.
Info :
At this point you should have 10 identical framed sunflower squares. Lay them out in a 2 x 5 arrangement so you can balance color placements and transitions before joining. Blocking will make edges even and joining easier.
— Join-As-You-Go (JAYG) Rows (Join squares into a 2 x 5 runner) :
Info :
We join motifs using a join-as-you-go cream round so the seams are nearly invisible from the front. Work on the final sc edge round of each square as you join it to its neighbor(s). Start with the bottom-left square as Motif A. You will join horizontally first to make two long strips of 5 motifs, then join those strips together down the center seam. Use Color 5 (cream) for joins for a crisp contrast to the petals.
Join Round 1 :
Place Motif B (to the right of Motif A) with right sides facing up. Join in the corner sc of Motif B with cream: sl st into corner sc, *ch1, sl st into next sc of Motif B, then sl st into corresponding sc of Motif A (align counts)*; rep across the side matching 1 sl st in each sc across both squares until corner. At corner do sl st through both corner sc. Fasten off and weave. This joins two motifs with a neat slip-stitch seam. (Number of sl st equal to sc count across side)
Info :
Keep seam tension consistent: don't pull too tight or leave the join loose. If you need a stronger seam, instead of sl st use hdc or 1 sc through both layers. Join only one side at a time to keep squares aligned.
Join Round 2 :
Repeat Join Round 1 to attach the rest of the row: join Motif C to Motif B, Motif D to C, etc., forming a long strip of 5 motifs (right-to-left or left-to-right depending on orientation). Make a second strip with the remaining 5 motifs in the same manner. Each horizontal join uses the cream sc edge as the joining base. (4 joins per strip)
Info :
When joining the second strip, mirror the color arrangement to create a balanced runner. Use pins to hold motifs in place as you join to prevent shifting while slip-stitching.
Join Round 3 :
Stack both 5-motif strips side-by-side with right sides up. Using the same JAYG technique, align edges and slip stitch through both corresponding sc of each strip along the long side to join them into a two-column runner. Begin at one end and work across to the other. Fasten off and weave ends. (5 joins across the length)
Info :
After joining both strips you should have a complete 2 x 5 runner. Check alignment: squares should sit square and edges should be flush. If not, gently block after joining then adjust borders accordingly.
Join Round 4 :
Optional reinforcement: With cream, work a round of sc around the entire runner through both layers at seams only (work sc through seam joins and sc along free edges) to tidy internal seams and give added stability. Work approx 1 sc per existing sc around the perimeter. Join with sl st and fasten off. (Perimeter sc approx 220-260 depending on counts)
Info :
This reinforcement round hides minor mismatches and reinforces joins so the runner holds its shape on a busy table. Leave a few long tails for weaving in along the seam lines.
— Outer Border Base Rounds :
Round 1 :
With Color 5 (cream), attach in any corner sc of the joined runner, ch1, sc evenly along the outside perimeter working 1 sc in each sc along the edges and 3 sc in each corner to keep corners flat. Join with sl st. (Approx 220-260 sc; adjust to match your motif counts)
Info :
This sc round evens the perimeter and provides a neat foundation for the layered scalloped border. Count your stitches along long sides and short sides; record counts so scallops line up evenly.
Round 2 :
Change to Color 6 (olive). Ch3 (counts as dc), *skip 1 sc, 2 dc in next sc, ch1* repeat across, and in corners work (2 dc, ch2, 2 dc) to maintain corner shape. Join with sl st. This creates a rhythmic foundation for the shell scallops. (Approx 110-130 double crochet groups)
Info :
Adjust repeat frequency (skip 1 sc or skip 2 sc) so that you have a multiple of the scallop repeat required by the next round. Aim for an even number of shells around the long sides so shell edges meet cleanly at corners.
Round 3 :
With Color 6 (olive), ch1, sc in same st, *ch3, skip ch-1 space, sc in next dc group top* continue around producing even ch-3 arches over the dc groups. Join. (Number of arcs equals number of dc groups)
Info :
These arcs mark scallop centers and make the next rounds easier to work. Adjust ch-3 to ch2 or ch4 depending on how deep you want the scallop to sit.
— Scallop Border and Layered Edging (Detailed rounds) :
Round 1 :
Change to Color 2 (pumpkin). Work into each ch-3 arch: (sc, hdc, 3 dc, hdc, sc) to make a medium scallop shell. At corners work (sc, hdc, 4 dc, hdc, sc) to create a slightly larger corner scallop. Join with sl st. (Shell count equals number of arches)
Info :
Keep shells consistent: count the number of loops on each dc and make sure each shell uses identical stitch numbers. Corners get an extra dc for a smooth sweep around the corner edge.
Round 2 :
Change to Color 4 (rust red). Into each shell work: sl st to center dc of shell, ch3, 5 dc in same center dc, ch3, sl st back to center dc (this creates a tighter decorative puffed scallop on top of previous scallop). Join. (Number of decorative shells = shell count)
Info :
This round gives a layered 'petal' look and echoes the sunflower motifs. If you prefer subtler border, omit this round and proceed to the outer-most round in olive.
Round 3 :
Change to Color 6 (olive). Working behind the decorative shells, ch1, sc evenly between each decorative shell, placing 2 sc at corners for stability. Join with sl st. (Approx same sc count as previous sc round)
Info :
This sc round stabilizes the layered shells and gives a clean base for the final round which will meld pumpkin and olive for the antique edge look.
Round 4 :
Change to Color 2 (pumpkin) and work the final scallop trim: Into every other sc, make (sc, ch2, (3 dc, ch2) twice, sc) creating fuller scallops spaced evenly. In corners work (sc, ch3, (3 dc, ch3) twice, sc) to fill the corner. Join and fasten off leaving a 25cm tail for weaving. (Final scallop count half of previous shell count due to 'every-other' spacing)
Info :
The final scallop gives the runner a bold outer edge similar to the photo. Work tightly in the last join to prevent scallops from curling upward. If scallops flare, adjust by reducing ch-2 to ch-1 in the scallop arch.
Round 5 :
Optional round for multi-color braided edge: With Color 6 (olive), sl st into the back loops of the final scallop stitch and work a round of crab stitch (reverse sc) around the entire perimeter for a neat twisted edge. Join and fasten off. Weave in all ends through the back of the scallops to hide them. (Perimeter stitches approx 120-140 depending on scallop count)
Info :
The crab stitch round gives a finished, slightly raised rope look to the edge; it also secures scallops firmly. Use matching yarn color to keep it subtle or contrasting to accent.
— Alternate Border Variation (Optional) :
Info :
If you want more vintage layering similar to the photo's multi-hued scallop, you can add an additional round between Round 2 and 3 above using a blended yarn (plaid/variegated in pumpkin/olive) to create a mottled scallop effect. Work (sc, ch1) in the spaces between shells and then follow with a shallow shell round in blended yarn.
Round 1 :
With blended yarn, work 1 sc between each decorative shell and 3 sc in each corner. Join and fasten off. This subtle round adds visual depth and is a great place to incorporate leftover scraps in a consistent tone. (Stitch count matches shell count)
Info :
Blended yarns or holding two strands together (e.g., olive + pumpkin) can give a braided appearance on scallops similar to the runner photo. This is optional but highly recommended if you have leftover yarn to coordinate colors.
— Final Finishing & Blocking :
Info :
After all rounds and trims are complete, weave in ends using a yarn needle: weave each tail under at least 5-6 stitches in multiple directions to ensure they stay secure. Clip close. Lightly steam block the entire runner on a flat surface: pin scallops gently and allow to dry to set shape. Avoid heavy wet blocking if using acrylic yarn; instead use steam and a pressing cloth.
Round 1 :
Final inspection: check seam tension, scallop symmetry, and that all motifs sit flat. If any motifs pucker, unpick small seam sections and re-stitch with even tension. Add weight inside scallops if you want them to sit flatter by gluing a very small disk of recycled batting inside with fabric glue (optional).
Info :
You may choose to back the runner with a fabric strip for added durability for daily use; trim fabric slightly smaller than runner and whipstitch to the back using matching thread. This is optional and recommended for heavy-use tables.
— Layout Variations & Size Adjustments :
Info :
To make the runner longer add additional rows of motifs. For a wider runner make 3 columns of motifs instead of 2; adjust border scallops to have an even shell repeat by recalculating arcs per side. Each additional motif adds approx 10.5cm/4.1in in the length direction after blocking.
Round 1 :
Tip for balancing colors: alternate motif colorways every other square vertically so warm tones and greens alternate, producing a quilted visual rhythm similar to the photographed runner. Lay out squares on the floor and photograph your arrangement to ensure visual balance before joining.
Info :
If you want a single-color runner, use cream for all framing rounds and choose two accent colors for petals only; this simplifies joining and gives a modern look.
Completing this Autumn Sunflower Table Runner is such a satisfying project — from the plump sunflower motifs to the layered scalloped edge it feels like creating a little heirloom. The warm palette and textured petals bring cozy, harvest vibes to any table. Enjoy the process of color placement and the soothing repetition of making each square; the final blocking and scallop trim truly make everything pop. 🧶🍂✨