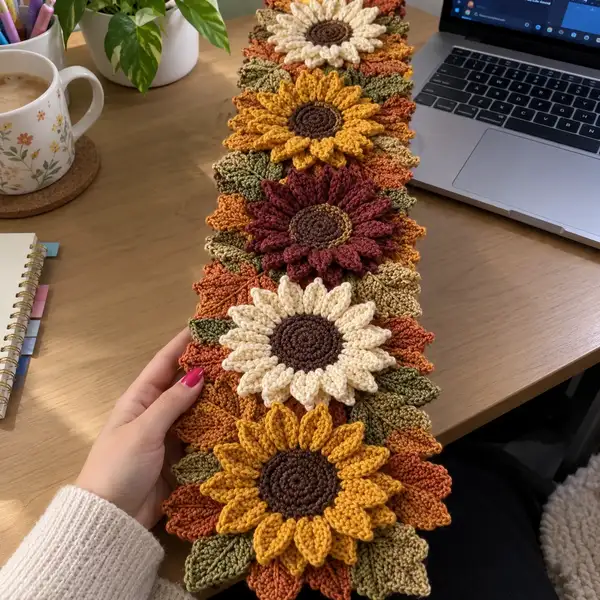
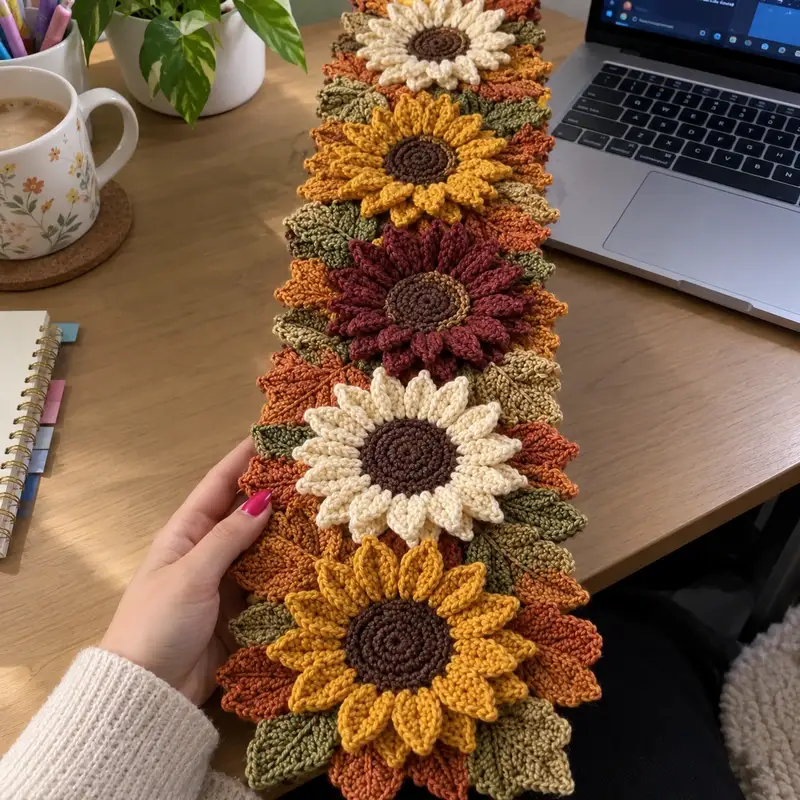
Create a warm, textured table runner made from repeating 3D sunflower motifs and layered leaves. This pattern uses worsted-weight yarn in autumn hues to produce richly detailed centers, sculpted petals and textured leaves that join into a long runner. Each motif is stitched to create a raised sunflower with two petal layers and leafy background elements for a cozy seasonal centerpiece.
Progress Tracker
0% Complete
— Sunflower Center (Make 1 center per motif) :
Round 1 :
6 sc in magic ring (6)
Round 3 :
(1 sc, 1 inc) x 6 (18)
Round 4 :
(2 sc, 1 inc) x 6 (24)
Round 5 :
(3 sc, 1 inc) x 6 (30)
Info :
Use dark brown yarn. Keep stitches tight so the center sits slightly raised; switch to a smaller hook (3.0mm) if your fabric is loose
Round 6 :
(4 sc, 1 inc) x 6 (36)
Round 7 :
(5 sc, 1 inc) x 6 (42)
Round 8 :
(6 sc, 1 inc) x 6 (48)
Round 9 :
1 sc in each st (48)
Info :
Now work continuous rounds in spiral without joining to create a flat disc. Count carefully: this disc forms the base for petal placement. You may place a stitch marker at round start to track increases
Round 10 :
1 sc in each st (48)
Round 11 :
1 sc in next 3 sts, 1 hdc in next st, 1 sc in next 3 sts (48) - decorative row to add texture
Round 12 :
1 sc in each st (48)
Round 13 :
1 sc in next 2 sts, (sc2tog) in next 2 sts, 1 sc in next 2 sts, repeat around (36)
Info :
Fasten off leaving a 20cm tail for sewing center to petal base if you prefer to assemble centers separately; alternatively join petal yarn directly to center for a continuous motif
— Petal Foundation Round (Place petals) :
Round 1 :
Join main petal color to the front loop of any st on the outer edge of the center disc. *Ch 1, sl st in same st to create a small anchor*, rep around to place 12 evenly spaced anchor points (12 anchors)
Info :
Count your anchors: we will create 12 larger petals, so space anchors roughly every 4 center stitches (48 outer stitches / 12 = 4). Use pins if needed to mark placement
Round 2 :
Working into each anchor: (ch 4, 1 dc, 1 tr, 1 dc, ch 4, sl st in next anchor) x 12 — petals are formed by tall stitches anchored in the center edge (no change to base stitch count)
Round 3 :
Turn each petal into a fuller shape: *working behind each petal, sl st to the base of the petal, ch 1, 3 hdc across the base, sl st to secure* repeat for all petals (12 petals)
Info :
These initial petals form the front-most petal layer. Keep tension even and do not pull too tight; petals should stand up from the center.
Round 4 :
In the spaces between petals (visible as gaps behind each petal), join contrast petal yarn and work: *ch 1, (fpdc, dc, fpdc) across gap to create a short petal base*, repeat between each main petal (12 small gaps) to prepare for second petal layer
Round 5 :
Working into each small gap area: ch 3, (2 dc, tr, 2 dc) in same gap area, ch 3, sl st into next gap (12 secondary petals created)
Info :
By alternating tall petals and shorter secondary petals you create a fuller sunflower. Keep petals consistent: if your center has 12 anchor points, you should finish with 12 tall and 12 short petals.
Round 6 :
Secure both petal layers by working a round of sc across the base loops only: 1 sc in each base stitch around, working into the loops that join the petal bases (48 sc total around base in terms of base stitch units)
Round 7 :
1 sc in each st (48)
Round 8 :
1 sc in each st (48) - tidy round to ensure a neat junction between center and petals
— Petal Sculpting and Texture (Layered petals) :
Round 1 :
To sculpt the tall petal edges: working into the front loops of the tall petal bases only, *sc in next 2 FLO, hdc in next FLO, dc in next FLO, hdc in next FLO, sc in next 2 FLO* — repeat across each tall petal (this builds the outer petal ridge)
Round 2 :
Repeat round 1 to bulk the petal and create ridges. After this round petals should feel two rows thick and stand away from the center (no stitch count change - petals are decorative)
Info :
If you want sharper petals, use BLO for round 1 to create a distinct ridge. Keep yarn color consistent across petal rounds for a unified look.
Round 3 :
Work a second, lower petal shaping into the shorter secondary petals using FLO: *sc in each short petal FLO across the top, then 1 sl st to anchor between petals* repeat (12 short petals)
Round 4 :
Edge each tall petal with a row of reverse single crochet (crab stitch) worked along the outermost edge of the petal to give a firm border: work reverse sc across each tall petal edge (work evenly, stitch count is decorative)
Round 5 :
Optional highlight: with a lighter shade, work slip stitch lightly along the petal peaks to accentuate texture, joining and fastening off after finishing the round
Info :
Fasten off petals. We now have a fully formed sunflower head: spiral center + two-layer petals with sculpted edges. Set aside and work leaf/background motifs next.
— Leaf/Background Motif (Make multiple for each sunflower) :
Round 1 :
With leaf-color yarn (olive or variegated), 6 sc in magic ring (6)
Round 3 :
(1 sc, 1 inc) x 6 (18)
Round 4 :
(2 sc, 1 inc) x 6 (24)
Info :
This little disc becomes the textured base for leaf lobes. Make 4 leaf motifs per flower cluster to form the layered background seen in the photo.
Round 5 :
1 sc in each st (24)
Round 6 :
Work petal-like lobes around the disc: *(ch 4, 1 dc in same st, ch 4, sl st in 3rd st from base) in next 6 sts* creating 6 lobes (6 lobes)
Round 7 :
Working into the lobe bases, make leaf shaping: into each lobe base work (sc, hdc, 2 dc, hdc, sc) to form a rounded leaf lobe (6 lobes)
Round 8 :
Edge each lobe with FLO single crochet to create a raised ridge: 1 sc FLO across each lobe edge (decorative)
Round 9 :
Fasten off leaving tail for sewing. Make 4 leaf/background motifs and block lightly to shape lobes before joining.
Info :
Vary colors slightly between motifs (mustard, rust, tan) and alternate placement to mimic photographed variegation. Block motifs by pinning lobes flat on a blocking mat and misting lightly or pinning overnight.
— Large Leaf Unit (Make 2 per motif cluster) :
Round 1 :
ch 6, join with sl st to form ring, ch 1 (6)
Round 2 :
Work around ring: (1 sc in next ch, 1 hdc in next ch, 2 dc in next ch, 1 hdc in next ch, 1 sc in next ch) repeat to form full leaf (6 leaf segments)
Round 3 :
Working on the right side of leaf, make a pointed leaf: sl st to base, ch 1, sc 2, hdc 2, dc 3, hdc 2, sc2, sl st to tip to shape, fasten off (decorative shaping)
Info :
Work leaves in alternating colors and slightly steam-block to maintain point shape. These larger leaves are placed around petals to create the layered backdrop.
— Motif Assembly (Sunflower + Leaves + Background) :
Info :
Place sunflower center with petals on top of four leaf/background motifs and two large leaf units: position leaves beneath the petal layer so lobes peek out. Pin pieces in place before sewing.
Round 1 :
Using long tail from center, sew center to center of petal base with ladder stitch or whip stitch; then use additional tails to stitch petal base to the underlying leaf/background motifs at evenly spaced points (12 attachment points) ensuring petals sit on top
Info :
Sew through both petal base and the top loops of the background motifs. Use small, neat stitches to avoid visible sewing on the right side. Secure and weave in ends inside the motif where possible.
Round 2 :
After securing center, attach the larger pointed leaves around the outer base by whip-stitching through the leaf bases and the motif underside every 4 stitches to anchor them flat (6 anchoring points around motif)
Info :
Turn motif over and check for evenness. Add a few extra stitches to any leaf that lifts too much to keep a pleasing silhouette like the photograph.
— Joining Motifs into Runner (Join-As-You-Go or Sew-As-You-Go) :
Info :
You can join motifs by sewing them edge-to-edge or by a join-as-you-go slip-stitch seam along the underlying background motifs. The photographed runner shows slight overlap so motifs are staggered and slightly overlapping on alternating rows.
Round 1 :
Position two completed sunflower motifs side-by-side. On the first motif, identify 4 leaf lobes that will meet the neighboring motif. With contrasting yarn and a slip-stitch, work through both motif edges: sl st into edge loop of motif A, sl st into edge loop of motif B, repeat across 4 contact points to join (join along leaf edges)
Round 2 :
Continue joining additional motifs in a single long strip: align motif centers so petals alternate in orientation (this creates visual variety). Join each motif to its neighbor through 4-6 points depending on motif overlap.
Info :
When joining, keep tension loose enough to allow the runner to lie flat but firm enough that motifs do not gap. Pin heavily and count stitches to ensure even joins. For a very secure join, add a second row of sc across the join on the runner's reverse.
Round 3 :
Once long strip formed, inspect the underside join and add small backstitches where needed to keep the seam invisible on the right side. Fasten off and weave tails neatly.
— Border & Edging (After Joining Full Runner) :
Round 1 :
With main background color, join yarn at one edge of runner underside. Work 1 sc evenly around entire runner edge, working 3 sc in corners or where lobes create larger gaps. Keep stitch count consistent by spacing scs evenly (approx 1 sc per visible motif stitch unit)
Round 2 :
Work 1 hdc in each sc around to build a small ridge (this evens the edge and adds structure)
Round 3 :
Scalloped edge: *skip 1 st, in next st work (5 dc), skip 1 st, sl st in next st* repeat around forming a gentle scallop; where petals protrude, adjust by working extra sl sts to anchor scallop neatly
Info :
Use a hook one size smaller for edging to create a tidy finish. The scallop should not overpower petals — keep it delicate and even.
Round 4 :
Optional: add a reverse single crochet (crab stitch) along the very outer edge for a rope-like finish, working reverse sc along the tops of scallops (decorative)
Round 5 :
Fasten off and weave in all ends neatly on the underside of the runner. Block runner lightly, pin motifs into position if needed to smooth out any curl.
— Finishing Touches & Optional Variations :
Info :
Optional embroidery: add a few French knots in the sunflower center with a lighter brown to mimic seed texture. Add tiny beads at petal bases for sparkle if desired. For a longer runner, simply make more motifs and join them in the same pattern.
Info :
To create a single trivet you can stop after making one motif and add a 3-4 round border of sc and scallops. For a table runner of pictured length (6-8 motifs), repeat motif creation and join as outlined above.
Info :
Care instructions: block gently and hand wash in cool water. Lay flat to dry to maintain shape. Avoid agitation in the wash to protect petal texture.
This sunflower runner brings a touch of handmade autumn warmth to any table — each 3D petal and textured leaf adds personality and charm. The modular motif construction makes it easy to adjust length or create individual trivets. Enjoy every stitch of this cozy project and share it proudly! 🍂🌻🧶