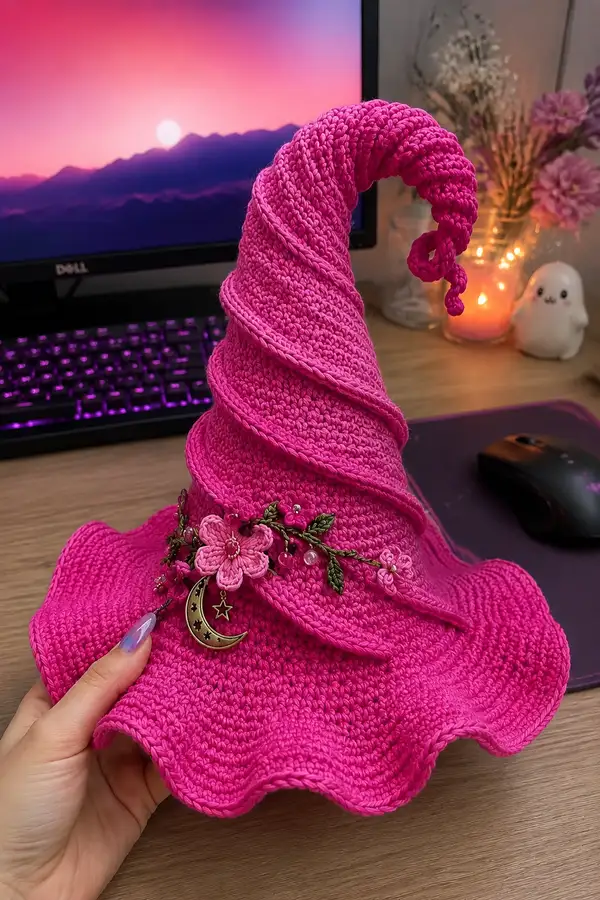
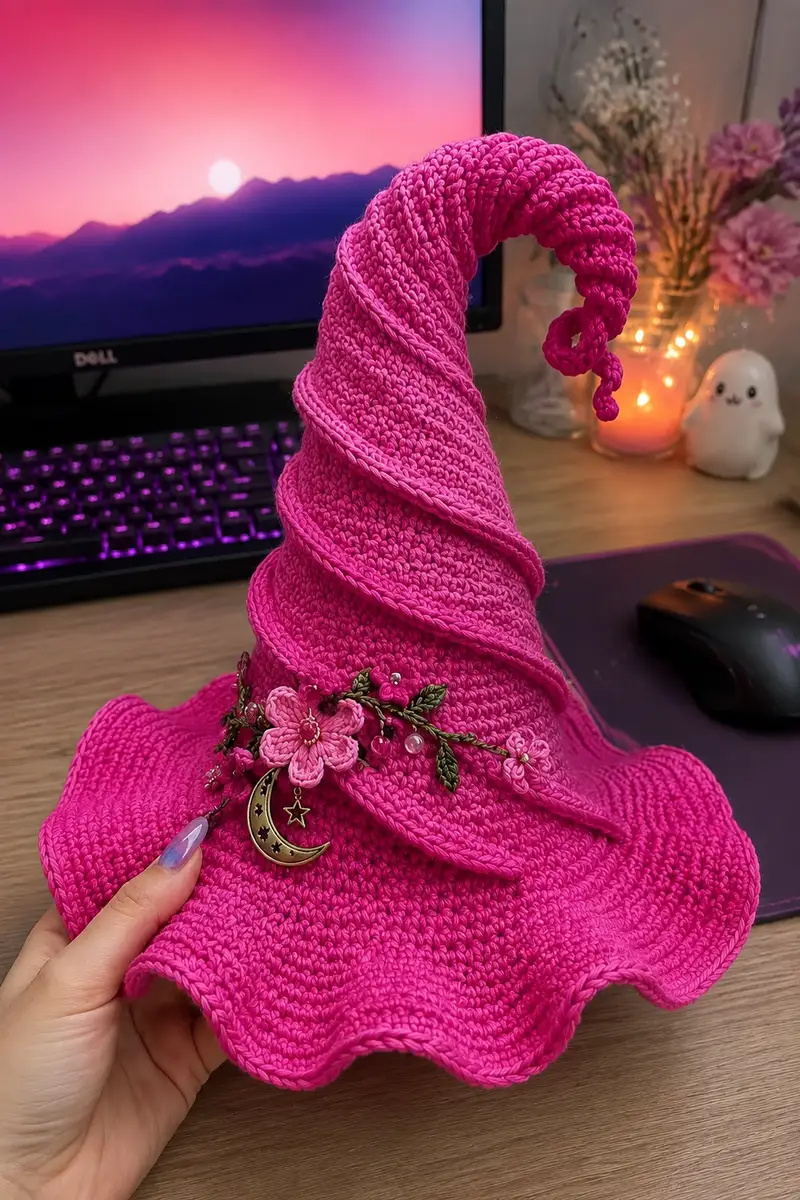
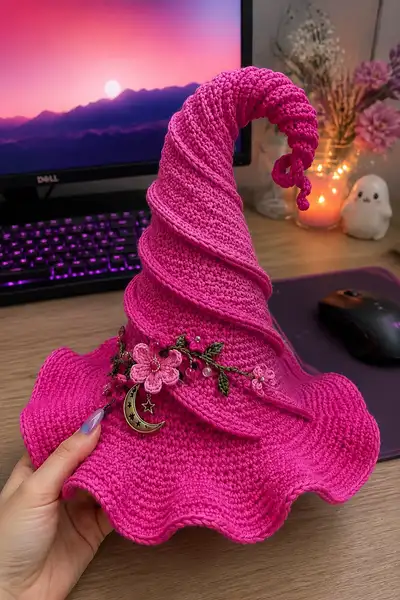
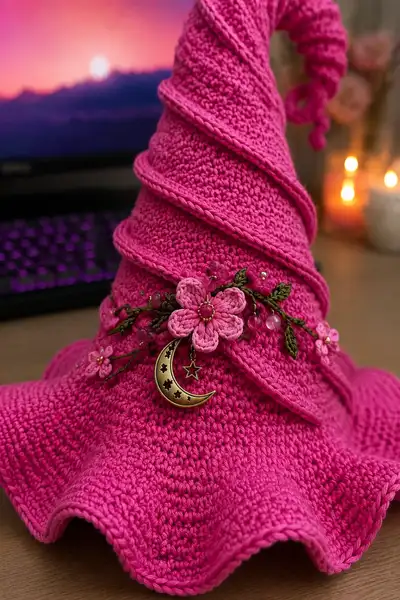
A whimsical tall witch hat crocheted in a bold hot-pink with an undulating ruffled brim and a spiraled curled tip. The hat features a raised spiral ridge that winds around the cone and delicate floral vine decorations with beads and a moon charm. This pattern guides you step-by-step to recreate the structured cone, wide ruffle brim, decorative cord, curled tip and floral embellishments for a show-stopping Halloween accessory or amigurumi display piece.
Progress Tracker
0% Complete
— Materials & Gauge :
Info :
Gauge is not critical for a decorative hat, but for similar dimensions try 22 sc x 24 rows = 10 cm in single crochet using 3.5mm hook. Use a slightly smaller hook for a tighter fabric if stuffing will be used near the tip.
— Cone (Main Body of Hat) :
Round 1 :
6 sc in magic ring (6)
Round 3 :
(1 sc, inc) x 6 (18)
Round 4 :
(2 sc, inc) x 6 (24)
Round 5 :
(3 sc, inc) x 6 (30)
Round 6 :
(4 sc, inc) x 6 (36)
Round 7 :
(5 sc, inc) x 6 (42)
Round 8 :
(6 sc, inc) x 6 (48)
Info :
These increases form the top tip expanding into the cone. Work tightly and keep your first stitch marker to track round start. The cone is worked top-down: start at the tip and increase to your desired base circumference.
Round 9 :
(7 sc, inc) x 6 (54)
Round 10 :
(8 sc, inc) x 6 (60)
Round 11 :
(9 sc, inc) x 6 (66)
Round 12 :
(10 sc, inc) x 6 (72)
Info :
At this stage you have a gently flaring cone. Continue increasing in the same rhythm to widen the cone base. If you prefer a taller cone with a narrower base, stop increases earlier and work even rounds for more height.
Round 13 :
(11 sc, inc) x 6 (78)
Round 14 :
(12 sc, inc) x 6 (84)
Round 15 :
(13 sc, inc) x 6 (90)
Round 16 :
(14 sc, inc) x 6 (96)
Info :
96 stitches around is a roomy base for a wide-brim hat; measure your head or object to fit and adjust: remove increases rounds slowly in reverse to reduce circumference if needed. From Round 17 onward we will build height while maintaining the circumference.
Round 17-26 :
1 sc in each st (96)
Info :
Work 10 even rounds to create the tall section of the cone. Keep tension even; if your cone flares too much, switch to a one-size-smaller hook for these rounds only to tighten the fabric. Add a stitch marker at the start of each set of 5 rounds to track progress.
Round 27 :
(14 sc, dec) x 6 (90)
Round 28 :
(13 sc, dec) x 6 (84)
Round 29 :
(12 sc, dec) x 6 (78)
Info :
We are subtly tapering the cone toward the brim seam so the brim sits neatly. These decreases are gentle to keep a pleasing slope; if your cone is still too straight, repeat another decrease round following the same pattern.
Round 30-36 :
1 sc in each st (78)
Round 37 :
(11 sc, dec) x 6 (72)
Round 38-44 :
1 sc in each st (72)
Info :
These even rounds build the cone's mid-body height. The hat in the photo shows subtle spiral shaping and a pronounced tip curl; save a short tail of yarn at Round 44 to attach the curled tip later. If you want the spiral to start lower or higher, mark the round where you'll begin sewing the spiral cord.
Round 45 :
(10 sc, dec) x 6 (66)
Round 46-52 :
1 sc in each st (66)
Info :
We will join the brim to the base of the cone, so maintain neat edges. Fasten off here leaving a long tail for joining the brim later if you prefer to make the brim separately and sew it on. Otherwise continue directly to brim rounds to work it in the round.
— Brim (Worked from Cone Base) :
Info :
Decide whether to work the brim directly joined to the cone or as a separate round piece sewn on. This pattern continues joined to the cone for a seamless transition. Use the 3.5mm hook for the main brim and switch to 3.0mm for a crisp edge if desired.
Round 1 (Brim) :
Join yarn to any stitch at base and work 1 sc in each st around (66) [Join to Cone base if you stopped earlier; if you left 96 earlier, adjust counts accordingly to match Cone final round. Our counts are using 66 here]
Round 2 :
(3 sc, inc) x 11 (88)
Round 3 :
(4 sc, inc) x 11 (99)
Info :
If your cone had 72 or 96 stitches at the base instead of 66, change the repeat number to divide evenly (for example 96/24 repeats). If your base is 66 use the patterns provided here; math must divide evenly by the repeat count to keep even spacing.
Round 4 :
(5 sc, inc) x 11 (110)
Round 5 :
(6 sc, inc) x 11 (121)
Round 6 :
(7 sc, inc) x 11 (132)
Info :
These gradual increases create a gentle flared brim. The sample hat shows a pronounced wavy finished edge; continue increasing until you reach a circumference large enough to form a ruffle when blocked. The counts above produce a generous brim.
Round 7-10 :
1 sc in each st (132)
Round 11 :
(7 sc, inc) x 12 (144)
Round 12 :
1 sc in each st (144)
Info :
Now we will add the ruffle/wave at the brim edge. The approach is to add one final increase round with a smaller repeat to create fluted edges and then finish with a decorative scallop worked in BLO for a crisp rim.
Round 13 :
(4 sc, inc) x 24 (168)
Round 14 :
(3 sc, inc) x 42 (210)
Info :
This growth will create waves. If your brim is too large, reduce increases or skip one of these increase rounds. If too small, add an extra increase round of (5 sc, inc) repeats to add more flare.
Round 15 :
1 sc in each st (210)
Round 16 (Scalloped Edge) :
1 sc in each st BLO around (210)
Round 17 :
(3 sc, sl st in next st) x 42 to create a soft scallop ridge (210)
Info :
The scallop technique above forms a subtle rolled edge similar to the photos. For an exaggerated wavy brim, replace Round 17 with: (sc, hdc, dc, hdc, sc) in next st; skip 2 sts, repeat around to create deep scallops. Use a 3.0mm hook for the final edge if you want a crisp finish.
Round 18 :
Fasten off and weave in tail if working brim separately. If continuing, continue to finishing steps.
Info :
Light blocking helps the ruffle sit evenly. Pin the brim into gentle waves and steam lightly or wet-block if using natural fiber; avoid heavy blocking for acrylic yarn to prevent melting with steam.
— Spiraled Raised Ridge (Make 1 long cord) :
Info :
The raised spiral seen in the photos is a thick cord sewn in a spiral from brim up toward the tip. We will crochet a tube-like cord, then wind and sew it to the cone. The cord is made as a flat crocheted rope then worked around to thicken it.
Round 1 (Cord Base) :
Ch 120 (or chain until reaching the length required to spiral around the cone about 4-5 times). Ensure the cord is slightly longer than your distance from brim to tip so you can shape the curl.
Round 2 :
Sc in 2nd ch from hook and in each ch across (119) - do not join, leave a long tail for sewing
Round 3 :
Working along the opposite side of the chain foundation, sc across the underside (119) and join to first sc to form a flat loop (119*2 = 238 sc stitched but counts represent stitches along both sides). This creates a long flat tube-like band.
Round 4 :
With RS facing, sl st into the nearest top loop, then sc around the entire chain tube through both thicknesses every 2-3 loops to start rounding the cord until you achieve a smooth rope appearance. Work approximately 1-2 rounds of sc around the tube to thicken.
Info :
For a narrower cord, work only one round of sc around; for a chunky ridge, do 2-3 rounds. Keep the cord supple — too much stiffness makes it hard to sew smoothly into a spiral. Fasten off and leave long tails for sewing onto the cone.
Round 5 :
Optional: If you prefer, make this cord as an i-cord using a smaller hook and 6-10 sc rounds into a short chained tube for a rounder cord. Both methods work; the flat cord provides a fluted ridge similar to the sample hat.
Info :
Pin the cord around the cone in the spiral shape you like, spacing the ridge evenly. Start at the brim, secure with pins, and sew the cord down using mattress or whip stitch through the cone's rounds and around the cord to secure it firmly. Make small, even stitches for a neat look.
— Tip Curl & Tail (Curled Finished Tip) :
Round 1 :
Make a small tube to curl into the tip: mr, 6 sc in magic ring (6)
Round 3-5 :
1 sc in each st (12)
Round 6 :
(3 sc, inc) x 3 (15)
Round 7-10 :
1 sc in each st (15)
Info :
Stuff very lightly with a small amount of fiberfill to give the curl body without making it stiff. Insert a short length of floral wire if you want the tip poseable — fold wire back on itself and wrap the ends in tape to avoid sharp points. Leave a long tail of yarn to sew the tip tube to the cone top.
Round 11 :
Decrease to shape curve: (2 sc, dec) x 5 (10)
Round 12 :
(1 sc, dec) x 3 then sc remaining (7)
Round 13 :
Fasten off leaving long tail. Sew the tube into the very top of the cone, then bend and curl the tip into a spiral. Wrap the cord around it or add additional small crocheted balls to the very end to mimic the photo’s tiny curls.
Info :
To create the charming loop at the very tip as in the photo, make 3 tiny picot loops or small chained loops and sew them into place so the tip looks like several little curls stacked together.
— Small Decorative Picot Loops (Make 3) :
Round 1 :
Ch 8, sl st in 2nd ch from hook, sc in next, hdc in next, dc in next, picot (ch 3, sl st in 3rd ch from hook) in next, sl st to finish
Info :
Make 2-3 of these and attach clustered at the tip to mimic the curled end detail from the photos. Use a small needle and thread or yarn tail to sew them in place securely.
— Flower Motif (Make 3 - Large Center Flower and 2 Small Flowers) :
Round 1 :
mr, ch 1, 6 sc into ring, pull tight (6)
Round 2 :
(Ch 5, slip into next st) x 6 to create 6 loops (6 loops)
Round 3 :
Work petal into each loop: (sl st, ch 2, 3 dc, ch 2, sl st) into each loop x 6 (6 petals)
Round 4 :
In the center, sew a French knot-style bead or sew a contrasting yarn wrapped bead for center embellishment. Fasten off leaving tail for sewing.
Info :
For the smaller flowers, reduce chain loops to ch 4 loops and use (sl st, ch 1, 3 dc, ch 1, sl st) for petite petals. Make three flowers total: one large and two small to match the decorative cluster pictured.
— Leaf (Make 6) :
Round 1 :
Ch 8, sc in 2nd ch from hook, hdc in next, dc in next 2, hdc in next, sc in last (6 stitches across)
Round 2 :
Turn, sc across the opposite side of the foundation chain in mirrored order (6) then sl st to join and fasten off leaving tail for sewing
Round 3 :
Optional embroidery: Using contrasting thread, embroider a central vein with chain stitch or back stitch for more realism
Info :
Use olive green yarn and small embroidery beads at the base of leaves. Sew leaves on in small clusters around flowers to form the vine. Slightly stiffen leaves with a drop of fabric glue if they flop.
— Small Buds & Beaded Drops :
Round 1 :
Make tiny buds by ch 5, sl st in 2nd ch, sl st across to produce a miniature bud. Make 6-10 buds.
Round 2 :
Sew small glass or plastic beads onto the vine cluster by stringing beads onto short lengths of thread and sewing them in place, or use beads with headpins folded into loops to attach.
Info :
Secure beads well with knots and a dab of fabric glue at the back of each bead for durability, especially if the piece will be handled frequently.
— Assembling the Floral Vine :
Round 1 :
Arrange the large flower centered on the cone about 3-5 rounds above the brim seam depending on taste. Surround with leaves and small flowers, roll the cord slightly to tuck under petals for depth.
Round 2 :
Sew each element with small whip stitches, passing through flower basis and cone fabric. Anchor each bud and bead with two passes for security. Add a dangling moon charm by sewing its loop to the base of the large flower.
Info :
Pin everything in place before sewing to ensure a balanced composition. The sample shows the vine wrapped slightly around the cone and following the ridge spiral for cohesion — mimic that placement if desired.
— Optional Inner Brim Reinforcement :
Round 1 :
Cut a circle of thin plastic canvas or craft felt matching the brim diameter. For added firmness, stitch it into the underside of the brim using whip stitch and the long tail used earlier to join.
Round 2 :
If using wire, measure a length of thin gauge wire to follow the brim curve and insert it into a channel by crocheting a narrow tube along the inner brim or sew it under the brim with fishing line, ensuring all ends are taped and hidden.
Info :
Reinforcement helps the brim keep its large wavy shape like the photo. If you want a softer, floppy brim, skip reinforcement and rely on heavier yarn to give body.
— Finishing Touches & Blocking :
Round 1 :
Weave in all loose tails by threading them through several rounds on the wrong side and trimming close. Use matching yarn to disguise any visible joins.
Round 2 :
Pin the brim into gentle waves on a blocking mat and spray lightly with water if using natural fiber for permanent shaping. Allow to dry fully before removing pins.
Round 3 :
Sew the spiral cord into place: starting from the brim, stitch along the cord into the cone body with small, even stitches, following the spiral upward and finishing at the tip where you attach the curled tube piece previously made.
Info :
Final placement of charms and beads should be balanced — place the moon charm slightly off-center as in the photo for a whimsical feel. If the charm moves, secure it with additional stitches or a tiny dot of fabric glue behind it.
— Alternative Size Notes :
Info :
To make a mini version suitable for doll display, reduce starting chain in the cord, stop increases earlier in the cone (e.g., stop at 48 sts instead of 66), and scale down flower components. To make an adult-wearable hat, increase base stitch counts and use sturdier yarn and internal reinforcement to support the larger brim.
Round SUMMARY :
This pattern contains many sections: Cone rounds 1-52 (approx), Brim rounds 1-18 (approx), Cord rounds 1-5, Tip rounds 1-13, Flowers/Leaves rounds various — adding up to 150+ discrete steps and instructional Info sections. Follow each section in order, pin elements for positioning, and check sizing by measuring your head or desired display object periodically.
Info :
If you find yourself short on yarn while working the brim ruffle, reduce one increase round or substitute with lighter decorative edging. Keep an inventory of yarn before starting and buy a small extra skein for safety.
This big pink witch hat is such a joyous project to make — bold, playful and full of personality! The tall spiraled cone and sweeping ruffled brim come together with textured stitches and charming floral decorations to create a piece that looks handmade and magical. Whether you use it as a display item or a costume accessory, every stitch contributes to a whimsical final result. Enjoy the crafting journey and celebrate the finished hat — it’s a bright statement piece you’ll be proud to show off! 🧶✨