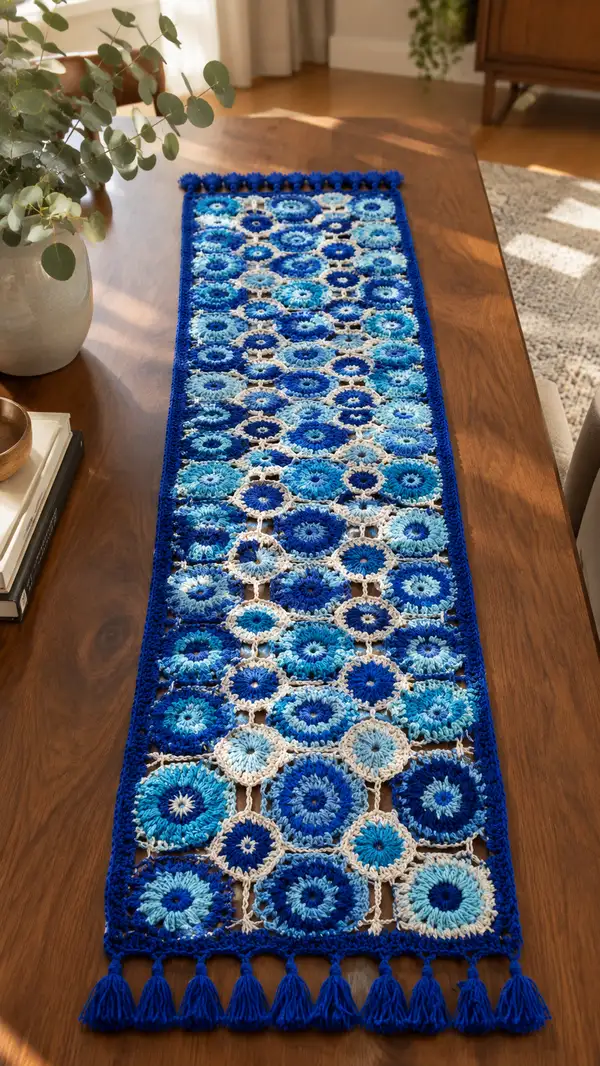
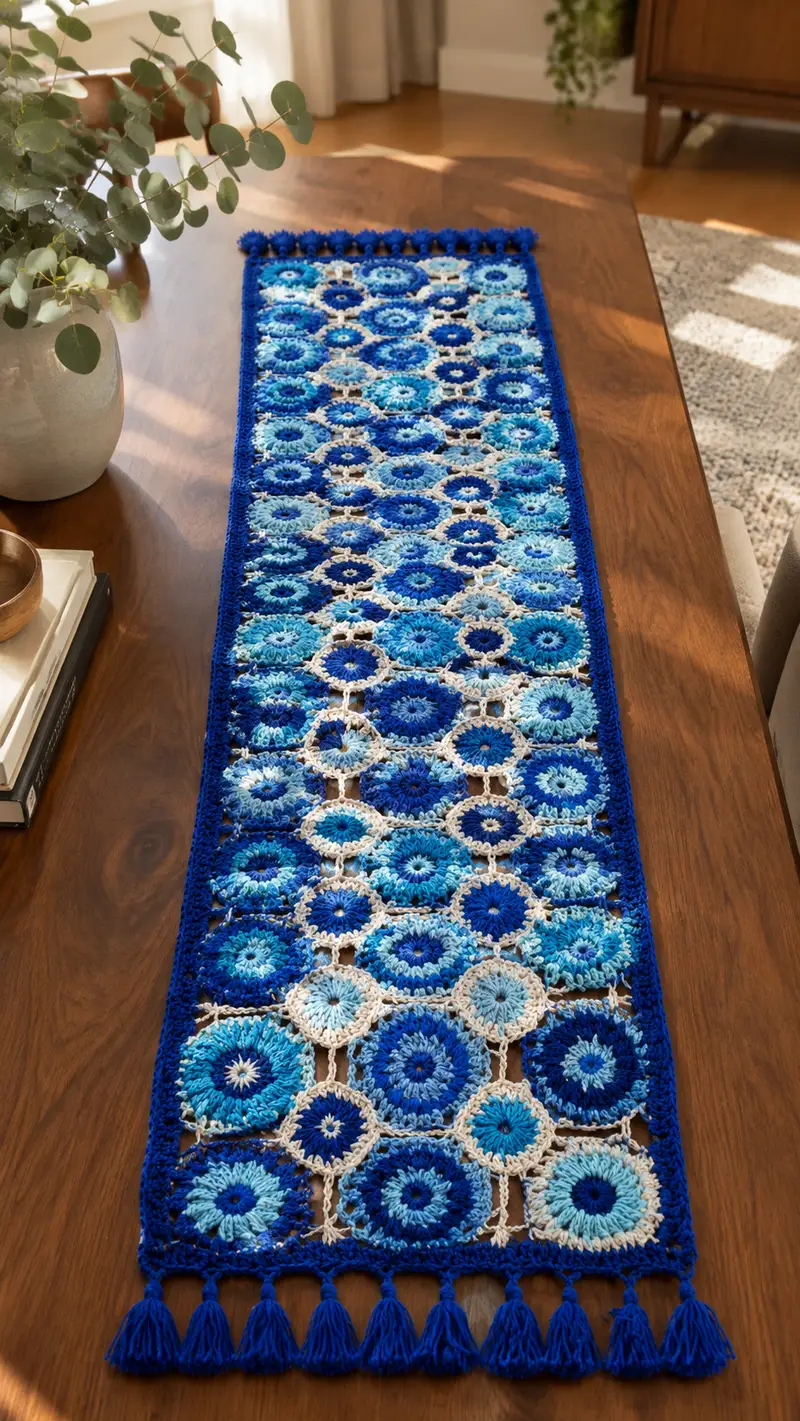
A stunning table runner made from sunburst-style circular motifs in a gradient of ocean blues, joined with a soft cream lattice and finished with a deep blue border and tassels. This runner creates a bold yet delicate centerpiece with textured puff clusters and open join spaces that let the tabletop glow through. Perfect for a dining table, console, or sideboard to add a handcrafted coastal accent to your home.
Progress Tracker
0% Complete
— Large Sunburst Motif :
Round 1 :
Make a magic ring, ch3 (counts as dc), work 11 dc into the ring. Join with sl st to top of ch3. (12)
Round 2 :
Ch3 (counts as dc), inc (2 dc) in each st around. Join with sl st to top of ch3. (24)
Round 3 :
Ch3, *1 dc in next st, 1 inc in next st*; rep from * to * around. Join with sl st to top of ch3. (36)
Round 4 :
Ch3, *1 dc in next 2 sts, 1 inc in next st*; rep around. Join. (48)
Info :
Rounds 1-4 build a flat circle. Keep tension even and check that the motif lays flat on a surface. If curling occurs, add one more increase round with (3 dc, inc) x12 to reach 60, or if ruffling occurs, drop back to the 48 count and check gauge.
Round 5 :
Switch to puff stitch round to create rays. Working in each dc around: *yo, insert hook into next st, pull up loop, yo, insert into same st, pull up loop, yo, insert into same st, pull up loop (you have 7 loops), yo and draw through all loops, ch1 to close puff* — rep in each st around. Join with sl st into top of first puff. (48 puffs)
Info :
Make puff stitches snug but not too tight; keep the final ch1 consistent to form even spacing between puffs. Use the same color for this round as the motif's main shade or alternate for visual contrast.
Round 6 :
Ch1, sc in top of each puff (worked into the ch1 that closed each puff) around. Join with sl st. (48 sc)
Round 7 :
Ch3, *skip next sc, (3 dc, ch2, 3 dc) in next sc (creates a shell), skip next sc, 1 dc in next sc*; rep around aligning shells evenly across the motif. Join. (12 shells + 12 dc = 48 main units)
Round 8 :
Working into ch2 spaces of shells: sl st into ch2 sp, ch3, (2 dc, ch2, 3 dc) in same ch2 sp to create larger petals; sl st to next ch2 sp and rep. Join. (12 larger petal clusters)
Info :
If you prefer a more lacy motif, in this round replace (2 dc, ch2, 3 dc) with (3 dc, ch3, 3 dc). Keep track of petal counts to ensure motifs will join evenly later.
Round 9 :
Ch1, sc in each st and in each ch2 space around to create a consistent edge row for joining. Join. (count will be 48 sc, matching prior units)
Round 10 :
Ch3, *1 dc in next 3 sc, ch1, skip 1 sc*; rep around creating small chain loops between groups of 3 dc to form connector points. Join. (12 groups of 3 dc and 12 ch1 loops)
Info :
These ch1 loops are used to join motifs (join-as-you-go) with the cream yarn. Mark them with a removable stitch marker so you can consistently connect the motifs later.
Round 11 :
Using contrast color (optional), ch1 and sc in each st around to tidy the edge, working 1 sc in each dc group and 1 sc in each ch loop. Join. (48 sc)
Round 12 :
Fasten off leaving a 20cm tail for weaving. Block each motif lightly if desired to open petals and ensure uniformity. Make required number of motifs: for the runner in the photo, make 56 large motifs (arranged 8 columns x 7 rows in staggered layout). Adjust motif count to desired runner length and width.
Info :
To create the subtle gradient shown, swap between three blue shades regularly while making motifs: light blue, medium turquoise-blue, and deep ocean blue. Alternate placements so color appears random but balanced across the runner.
— Small Connector Motif :
Round 1 :
Make a magic ring, ch2 (counts as hdc), 7 hdc in ring. Join. (8)
Round 2 :
Ch2, inc in each st around (2 hdc in each) to double. Join. (16)
Round 3 :
Ch3, *1 dc in next st, 1 inc in next st*; rep to end. Join. (24)
Round 4 :
Ch1, sc in each st around to form a neat small round edge. Join. (24 sc)
Info :
These small connector motifs are used where four large motifs meet to create the small cream diamond connecting units in the photo. Work these in cream to provide a delicate highlight between blue rounds.
Round 5 :
Ch4, sl st into every 3rd sc around to create 6 small chain loops (spaced evenly). Fasten off leaving a long tail for joining. Make one connector for each four-motif intersection in your layout (for the sample layout, make 42 connectors).
Info :
Count your intersections carefully: each connector holds the corners of four adjoining large motifs. Arrange motifs on a flat surface first to ensure you make the correct number of connectors before joining.
— Joining Motifs (Join-As-You-Go & Sew) :
Info :
Arrange all motifs on a flat surface in desired layout (photo uses 8 across by 7 down, staggered). Begin joining motifs row by row using the cream yarn and the ch1 loops made in Round 10 of the large motif. For strongest join, use sc into ch1 loop of motif A, then into ch1 loop of motif B, working a small bridge of sc-ch1-sc to connect. The following rounds describe a consistent approach to connect motifs and place small connectors.
Round 1 :
Start with the first motif at a corner. Attach cream yarn to the outer sc of motif edge with a sl st, ch1, sc in next st to position at the ch1 join loop. When you reach the ch1 loop from Round 10, sc into that loop, ch1, sl st into the corresponding ch1 loop of adjacent motif, ch1, sc back into the next sc of the original motif. This creates a small chain bridge connecting the pair.
Round 2 :
Continue connecting adjacent motifs along the row, repeating sc–ch1–sl st into the neighboring motif's ch1 loop and then sc to return. Keep tension even so bridges sit flat and the motifs remain flush. Work across the entire first row.
Info :
Use pins or small clips to hold motifs in place as you join to ensure edges line up. Keep the cream join yarn on the visible side as shown in the photo to form the delicate lattice effect.
Round 3 :
When the first row is complete, join the second row of motifs beneath, aligning so each second-row motif connects to two motifs above and one to its side. Use the same sc–ch1–sl st technique and work in a left-to-right or right-to-left direction consistently for even joins.
Round 4 :
At intersections where four large motifs meet, position a small connector motif (made earlier) and join each of its six small chain loops by sl st to the four surrounding large motif ch1 loops and two diagonal ch loop positions, or use sc bridges to secure. Weave in connector tails as you go.
Round 5 :
Continue row-by-row until entire panel is joined. For staggered layout, offset each row slightly so motifs nestle in the gaps between motifs above — the ch1 chain bridges accommodate this geometry and keep the lattice open.
Info :
Take breaks to step back and check that rows are straight and that motifs are not twisting. If a row looks skewed, unfasten the last few joins and realign before continuing.
Round 6 :
Once all large motifs are joined into a single panel, check for gaps and sew in any loose joins using contrasting cream yarn for a consistent finish. Fasten off and weave in all tails securely on the wrong side where possible.
Round 7 :
If any motifs float or sit proud, reinforce join bridges by working a second row of sc over the existing bridge (sc in same stitches) to stabilize. This will slightly narrow the opening but increase durability.
Round 8 :
Trim excess yarn from connectors but leave long enough tails to weave into the back of the work. Block the joined panel to flatten and set the motif edges before beginning the border.
Info :
When blocking, pin motifs so that each motif retains a circular shape and the lattice spaces are even. Allow to dry fully before edging to prevent distortion during border work.
— Border & Edging :
Round 1 :
Attach deep royal blue yarn to any outer sc along the perimeter with a sl st. Ch1 and work 1 sc in each sc around the entire panel, working 3 sc in each corner gap to maintain shape. Join with sl st. (Perimeter stitch count will vary based on motif count; typical runner uses approx. 320-360 sc depending on layout.)
Info :
Working a tight single crochet round evens the perimeter and prepares the panel for multiple decorative rounds. Count stitches across one straight edge and multiply by number of edges to confirm approximate totals.
Round 2 :
Ch3 (counts as dc), 1 dc in next st, *skip next st, (3 dc in next st) in a shell pattern*; along straight edges alternate 1 dc between shells so shells are spaced evenly. Join. (creates scalloped shell rhythm)
Round 3 :
Ch1, sc in each st around working 3 sc in each shell peak and 1 sc in each dc between shells. Join. This evens the scallops and creates a firm base for the next decorative round.
Info :
If the scallops appear too pronounced, reduce shell size to (2 dc, ch1, 2 dc); if they are too shallow, increase to (4 dc, ch2, 4 dc). Keep the symmetry consistent around the perimeter.
Round 4 :
Working in BLO: Ch3, 1 dc BLO in next 3 sts, *ch2, skip 2, dc BLO in next 4*; rep around to create a raised ridge and slight openwork. Join.
Round 5 :
Ch1, sc in each st and ch2 sp around, placing 3 sc in each corner to maintain shape. Join. (this stabilizes border and accumulates approx. 360 sc)
Info :
Working in BLO gives the border a defined inner ridge that frames the motifs. Maintain even tension to ensure the runner remains flat.
Round 6 :
Decorative picot round: Ch3, *sc in next 3 sts, ch3, sl st into first chain to form picot, sc in next 3 sts, dc in next 2 sts*; rep around. Join. This creates small loops that visually mirror the interior motif petals.
Round 7 :
Ch1, sc in each st around to tidy picots and secure them. Join. Fasten off leaving a tail for a neat finish. Weave tails through the back of the border and trim.
Round 8 :
If desired for extra weight or symmetry, add one more round of (1 sc, ch1) across the long edges to refine border width or add small tassel anchors spaced evenly (see tassel section). Join and fasten off.
Info :
Measure your runner after edging: if the runner measures slightly narrower or wider than intended, add or remove a shell repeat in Round 2 to adjust width in 1-2 cm increments without altering overall shape dramatically.
— Tassels :
Round 1 :
Prepare 14 tassels (7 for each short end) using deep royal blue yarn. For each tassel, wind yarn around a 6cm card or your fingers 30 times to get full tassels approximately 4-5cm long once tied and trimmed.
Round 2 :
Cut yarn at one end of card to create strands, then tie the folded end tightly with a 20cm length of yarn to form the tassel head. Trim ends evenly.
Round 3 :
Space tassel attachment points across the short edge evenly: for a short edge of the runner that spans 8 motifs, place tassels centered at each motif and between motif centers to create 7 evenly spaced tassels. Use the picot round or sc round anchors to secure.
Round 4 :
Attach each tassel by threading the long tail through the base of the edge and tying securely on the wrong side with a double knot. Weave the knot tail through the body of the runner then trim closely to hide.
Info :
Make all tassels then trim them together to ensure uniform length. Brush tassels lightly with a small comb if you want a fuller, fluffier look.
Round 5 :
Optional weighted tassels: insert a small bead inside the tassel head before knotting to help the runner hang neatly over the table edge. Ensure beads have no sharp edges and are secured with glue if needed.
— Finishing & Blocking :
Round 1 :
Weave in all ends on the wrong side using your tapestry needle. Take care to follow the direction of stitches to keep the front tidy. Secure ends with a few back-and-forth passes before trimming.
Round 2 :
Block the finished runner on a flat surface: gently wet-block or steam-block, pinning motifs and border to shape. Smooth motifs so petals are round and lattice spaces are even. Let dry fully before removing pins.
Info :
If your yarn has a tendency to relax, a light starch spray can add extra structure after blocking — test on a scrap first to ensure it does not alter color or sheen.
Round 3 :
Final inspection: check every join, resecure any loose connectors, and ensure tassels are even on both ends. Store flat or rolled to avoid folding lines across motifs.
Round 4 :
Enjoy your runner; consider making a coordinating placemat or centerpiece motif for a matching set.
Info :
For a longer runner, add extra motif rows; for a table runner of a different width, add or remove motifs per row and adjust border shells accordingly. The join method adapts easily to changes in layout.
Completing this runner is a deeply satisfying project — watching the sunburst circles multiply and come together into a long, luminous panel is pure joy! The rich blues and crisp cream lattice create a modern coastal feel that instantly updates your table. Adding tassels gives the runner personality and movement that catches the eye. 🧶✨ Whether you’re gifting or keeping this piece, each stitch reflects time well spent and handmade love. Enjoy styling it on your table and sharing your creation! 🌊