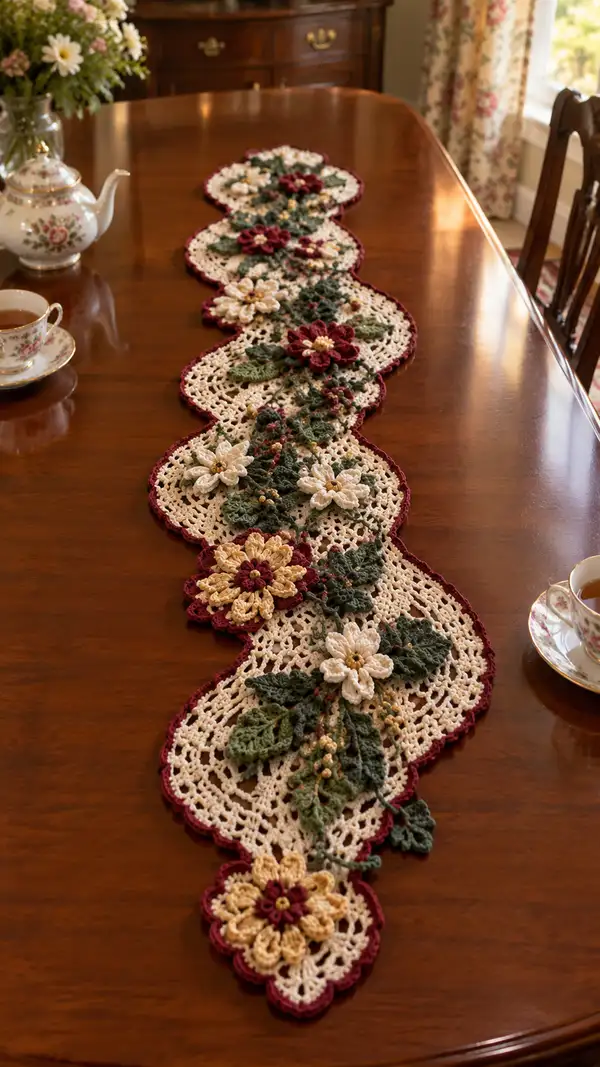
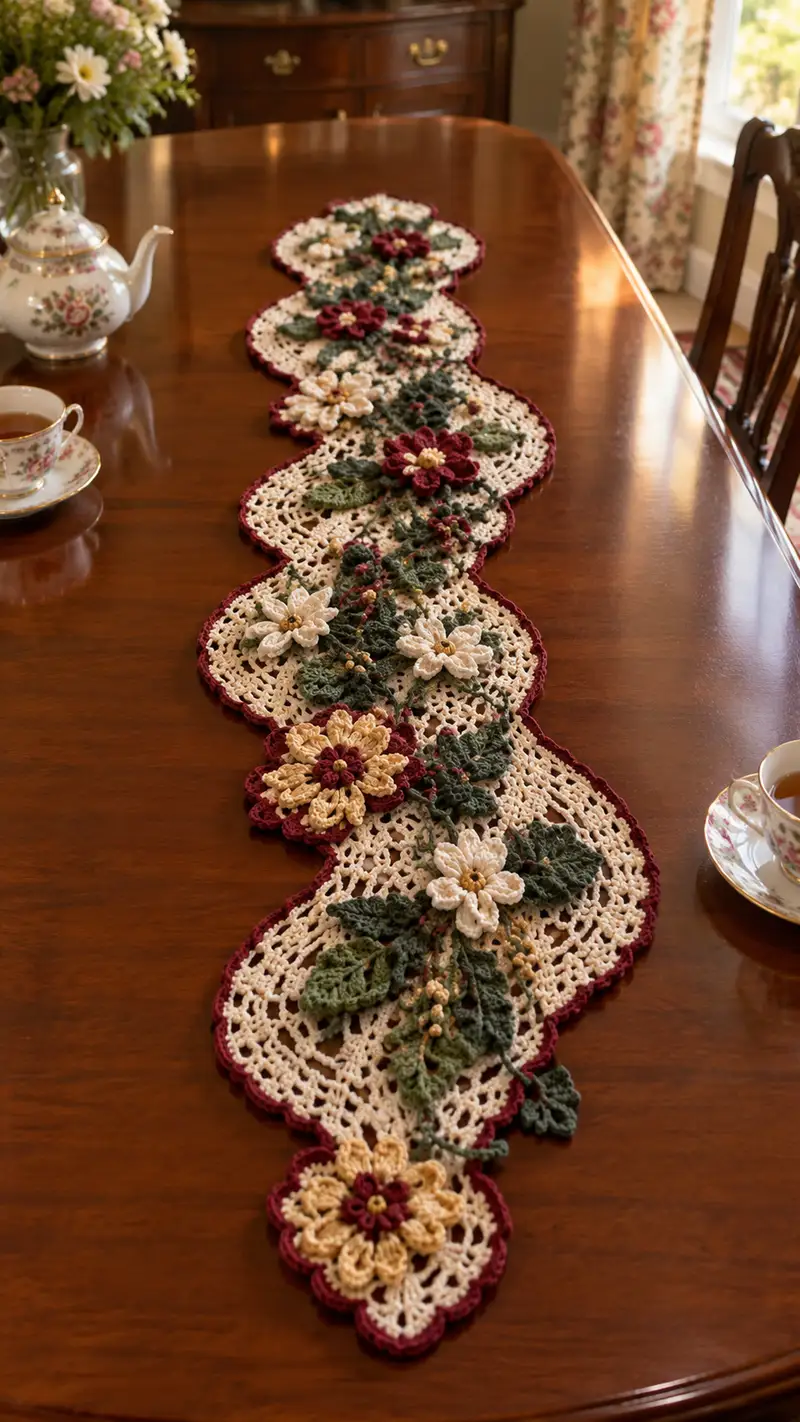
A vintage-inspired burgundy and cream crochet table runner featuring layered 3D flowers, leafy vines and a delicate lacy background. This elegant runner is made from modular scalloped motifs joined by a lacy mesh, then embellished with raised flowers and leaves in deep burgundy, golden cream and forest green. The finished piece brings an heirloom feel to a dining table, perfect for tea settings or special occasions.
Progress Tracker
0% Complete
— Overview :
Info :
This runner is built from repeating scalloped oval motifs (called 'motif' below). Make 6 motifs for a standard dining runner length; adjust number to fit your table. Each motif is worked in rounds to a lacy oval; embellishments (large flower, small flower, leaf clusters, berry buds) are crocheted separately and sewn on. Finally join motifs with a lacy joining round and finish with a scalloped burgundy border. Use cream for base rounds, burgundy for large flower petals and outer edging, forest green for leaves, golden for secondary petals and berries. Work motifs flat in the round.
— Base Motif (Make 6-8) :
Round 1 :
MR, ch1, 8 sc into magic ring. Pull tight and sl st to first sc to close (8)
Round 2 :
Inc in each st around (16)
Round 3 :
(1 sc, inc) x8 (24)
Round 4 :
(2 sc, inc) x8 (32)
Round 5 :
(3 sc, inc) x8 (40)
Info :
Rounds 1-5 create a firm small oval center. Keep tension consistent. Place a marker at the start of Round 6 to track the lacy filet beginning.
Round 6 :
Ch4 (counts as tr), tr in same st, *ch3, sk 2 sts, 2 tr in next st* rep around to form an openwork oval; sl st to top of starting ch4. Adjust last rep to maintain even spacing (approx 20 ch-3 spaces)
Round 7 :
Ch3, dc in same st, *ch3, dc in next tr cluster, ch3, dc in next tr cluster* around; sl st to top ch3 (keeps open lattice) (approx 40 dc, 20 ch-3 sps)
Round 8 :
Ch1, sc in next dc, *ch3, sk next ch-3 sp, sc in next 2 dc* repeat around; sl st to first sc (maintain oval shape)
Info :
Work Rounds 6-9 loosely for lacy texture. You may prefer a 3.25mm hook here for a more open fabric; test one motif first.
Round 9 :
Ch4, tr in same st, *ch3, tr in next sc, ch3, tr in next sc, tr in next sc* rep around maintaining oval curvature; sl st to top ch4
Round 10 :
Ch1, sc in each tr and in each ch3 sp where specified to even out edges: (approx 80 sc total) sl st to join
Round 11 :
Ch3, dc in each st around working 2 dc into curved end stitches to maintain oval (maintain total around 88-96 dc depending on shaping)
Round 12 :
Ch1, sc in each st around; at each end of oval work (sc, ch3, sc) to create slight scallop shaping—this will be the motif edge for joining later (sc count will be even across whole motif)
Info :
At the end of Round 12, block each motif lightly to flatten and stabilize shape. Make all motifs identically before embellishing. A light steam and pinning to an oval template is helpful.
Round 13 :
Ch2, hdc in same st, *ch2, sk 1, hdc in next 2 sts* around; sl st to join. This creates a decorative mesh ready for sewing on flowers and leaves (approx 90 hdc placements)
Round 14 :
Ch1, sc evenly around working 3 sc in the rounded end scallops to emphasize edge (final motif size approximately 10-11 inches long by 5-6 inches wide depending on gauge)
Info :
Leave a long tail at the end of Round 14 for joining motifs later or change color to work an accent join round. We will add embellishments once all motifs are made.
— Large Layered Flower (Make 6) :
Round 1 :
With burgundy, MR, ch2, 10 hdc into MR; sl st to top of ch2 (10)
Round 2 :
Ch1, 2 sc in each st around (20)
Round 3 :
Ch3, *sk next st, in next st work (5 dc cluster/puff made as 5 partial dc loops then draw through and sl st to close) to form first petal; sl st in next st* rep around to create 10 petals. Fasten off burgundy. (10 petals)
Info :
For the 5-dc puff: Yarn over, insert, pull up loop 5 times (5 partial loops), yarn over and pull through all loops, ch1 to secure. Keep petals evenly tensioned so they flair outward neatly.
Round 4 :
Change to golden yarn; attach in between petals, ch3, work 7 dc into the space between petals to create a larger outer petal, sl st to base. Repeat between each burgundy petal to form outer layer (10 large golden petals)
Round 5 :
Ch1, sc around both bases of petals to secure layers, working 2 sc in the valley between each petal to shape (approx 40 sc)
Round 6 :
With burgundy, work a small ring of sc in the flower center: MR, ch1, 6 sc, sl st to join; pull tail through and sew to center of layered petals for depth. Fasten off and weave in ends.
Info :
Stitch the flower to motif so that the large flower center sits over the center of the oval motif’s broad end. Secure with small neat stitches through the flower base and margin of motif. Consider using a slightly strong yarn needle and matching thread for durability.
— Small Daisy Flower (Make 8) :
Round 1 :
With cream/golden, MR, ch2, 8 hdc into MR; sl st (8)
Round 2 :
Ch3, *in next st work (3 dc cluster / puff), sl st in next st* repeat around to make 8 small petals; sl st to join
Round 3 :
Fasten off, add a small bead or a cluster of 6 tiny sc in burgundy in the center for contrast; sew to motif in groups between leaves
Info :
Small daisies are intended to be decorative fillers between large flowers. Vary their orientation slightly for a natural look.
— Leaves (Make 24 or as desired) :
Leaf Round 1 :
With forest green, ch12. Row 1: sc in 2nd ch from hook and next 4 ch (5 sc), 3 sc in next ch (turning point), sc in next 5 ch, 3 sc in last ch to create pointed tip; turn to work along other side: sc in next 5 ch, 2 sc in last ch (leaf base). Fasten off leaving tail for sewing. (approx 14-16 sc)
Leaf Round 2 :
Using same green, attach at leaf base, ch1, sc around the entire leaf working: sc, hdc, dc for curved body and 2 dc at point for definition, then dc to other side, hdc, sc. Add a central vein with a line of surface slip stitches in contrasting green-darker shade if desired.
Info :
Make leaves in two sizes by changing initial chain to ch9 for small leaves or ch14 for larger leaves. Blend placement for a natural vine effect. Block slightly to shape crease.
— Berry Bud Cluster (Make many small clusters) :
Round 1 :
With golden, ch4, join to form small ring, ch1, 6 sc into ring. Fasten off but leave tail. Make 3-6 small beads by sewing on small sc clusters to form berry bunches.
Round 2 :
Sew clusters onto narrow vine pieces later to add depth. For extra detail, add a single french knot bead or a sewn-on seed bead to the berry cluster centers.
Info :
Make a variety of berry cluster sizes (2-6 berries) to scatter naturally along vines. Stitch clusters with long tails so you can anchor them into place on motifs.
— Narrow Vine and Tendrils (Make connecting vines for each motif pair) :
Round 1 :
With forest green, ch60 (or desired length between two motif centers), sl st back along chain with sl st in each ch to make a flat cord; leave long tail at each end for sewing. For thicker vine, use 3.0mm hook and work 2 rows of sc along chain.
Round 2 :
Optional: With burgundy or golden, embroider tiny french knots or small alternating sc dots along cord to mimic berries or tendril buds.
Info :
These vines will be used to arrange flowers and leaves along the runner. Make a supply of varying lengths so you can place them in curved swags across motifs to simulate natural overgrowth.
— Joining Motifs (Create runner length by joining motifs end-to-end) :
Info :
Lay out motifs in order and pin on flat surface. Decide the orientation of flowers and leaves prior to sewing to ensure a flowing vine from one end to the other. Use blocking to keep motifs uniform.
Joining Round 1 :
With cream, align two motif scalloped ends together. Using whip stitch or mattress stitch with the long tail from Round 14, join corresponding sc of scalloped edges through both motifs so the seam is flat. Join across the small scallop points where you worked 3 sc clusters.
Joining Round 2 :
After two motifs are joined, weave a vine between their central open mesh spaces by sewing the chain cord across the under-surface and anchoring with small invisible stitches at each motif's internal hdc mesh round (Round 13). Repeat until all motifs are joined in a line.
Info :
Spacing should be even. For 6 motifs, center of runner will lie at motif 3-4 junction. Keep joins flexible by avoiding overly tight stitches—this helps the entire runner drape on a table.
— Attaching Flowers, Leaves and Berries :
Info :
Pin large flower centers to the broad end of each motif (where the oval bulges). Pin small daisies, leaves and berry clusters along vines and in valleys between petals. Aim for a balanced composition: large flowers spaced evenly, smaller flowers and leaves filling gaps.
Attachment Step 1 :
Sew large layered flower base to the motif using a yarn needle and the flower’s long tail. Stitch through the flower base and the motif’s hdc mesh (Round 13) with consistent small stitches to keep the flower secure but neat on the surface.
Attachment Step 2 :
Sew leaf bases under and around flowers, anchoring leaf stems into mesh with hidden stitches. Attach berry clusters along vines with the long tails and add a few tiny stitches to secure the centers so they do not flip up.
Info :
For a dimensional effect, tack the base of petals while leaving petal tips slightly free so they lift. This gives shadow and depth like the photographed runner.
— Border / Final Scalloped Edging :
Info :
Once motifs are joined and embellished, work a continuous edging around the entire runner in burgundy to frame the piece. The edging should follow the scalloped outline of motif edges and smooth out transition points between motif ends.
Round 1 :
With burgundy, attach at one outer scallop point, ch1, sc evenly around the outer edge of the runner, working 3 sc in each rounded scallop and 1 sc along straight mesh parts. Place small picots around tight points to emphasize shape. (Count depends on finished runner length; ensure symmetrical counts on each motif side)
Round 2 :
Ch3, *skip 1 sc, 7 dc in next sc to create a large scallop, skip 1 sc, sl st in next sc*, repeat around to create pronounced scallops over each motif end. At motif-to-motif junctions, work 5 dc for a smaller scallop to maintain rhythm.
Round 3 :
Ch1, sc in each dc around, working a picot on every other scallop: (sc, ch3, sl st in 3rd ch) to make delicate points. Fasten off and weave in ends along the back of the runner.
Info :
Blocking the whole runner after edging is essential. Wet block gently and pin the outer scallops to open the lace and give a smooth finish. Let dry flat.
— Finishing Touches and Optional Embellishments :
Info :
Add a few strategically placed seed beads in the centers of small daisies for sparkle. For a matte antique look use small wooden beads or tiny pearl beads. If you like a softer look, use a small bit of matching fabric glue under the bead to prevent migration. Add embroidered veins to leaves with darker green for definition.
Care :
Hand wash cold with mild detergent. Reshape and dry flat. Avoid wringing or tumble drying to protect delicate petals and beads.
— Notes on Gauge and Sizing :
Info :
Gauge will affect final runner size. With worsted yarn and a 3.5mm hook each motif should measure roughly 10-11 inches long by 5-6 inches wide. Adjust hook and yarn weight for larger or smaller motifs. The sample pictured uses 6 motifs to reach approximately 60-68 inches in finished length.
— Stitch Count Summary (Reference) :
Info :
Base motif Rounds 1-5: 8 → 16 → 24 → 32 → 40 total stitches at Round 5 center; Lace rounds expand stitch count but maintain proportional growth. Flower centers: 6-10 hdc base then petal clusters creating 10 petals in primary flower. Leaves: 9-14 ch foundation scale to create small and large leaves. Edge counts vary by runner length and motif joins—always stitch symmetrically.
— Troubleshooting And Tips :
Info :
If motifs cup, block flat and rework last edge round more loosely. If petals slump, add a small starch spray or sew a weight hidden to the flower base. Test a single motif fully finished to refine tension and placement before committing to all motifs.
Completing this runner is such a rewarding creative journey—every scallop and layered petal adds to the heirloom look! Enjoy the meditative rhythm of repeating motifs, then the fun of arranging flowers and leaves until the composition sings. The finished runner will make your table feel warm and lovingly handmade. 🧶🌸