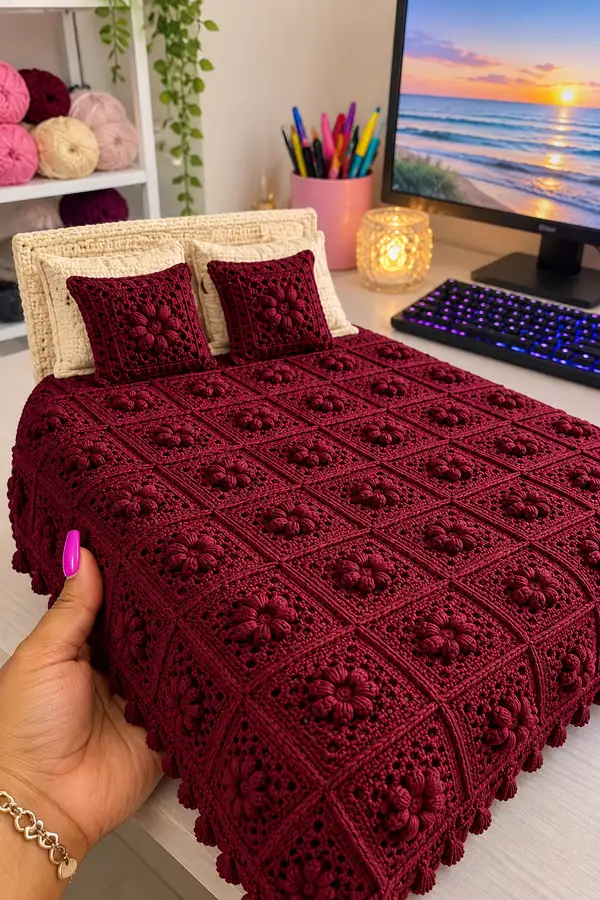
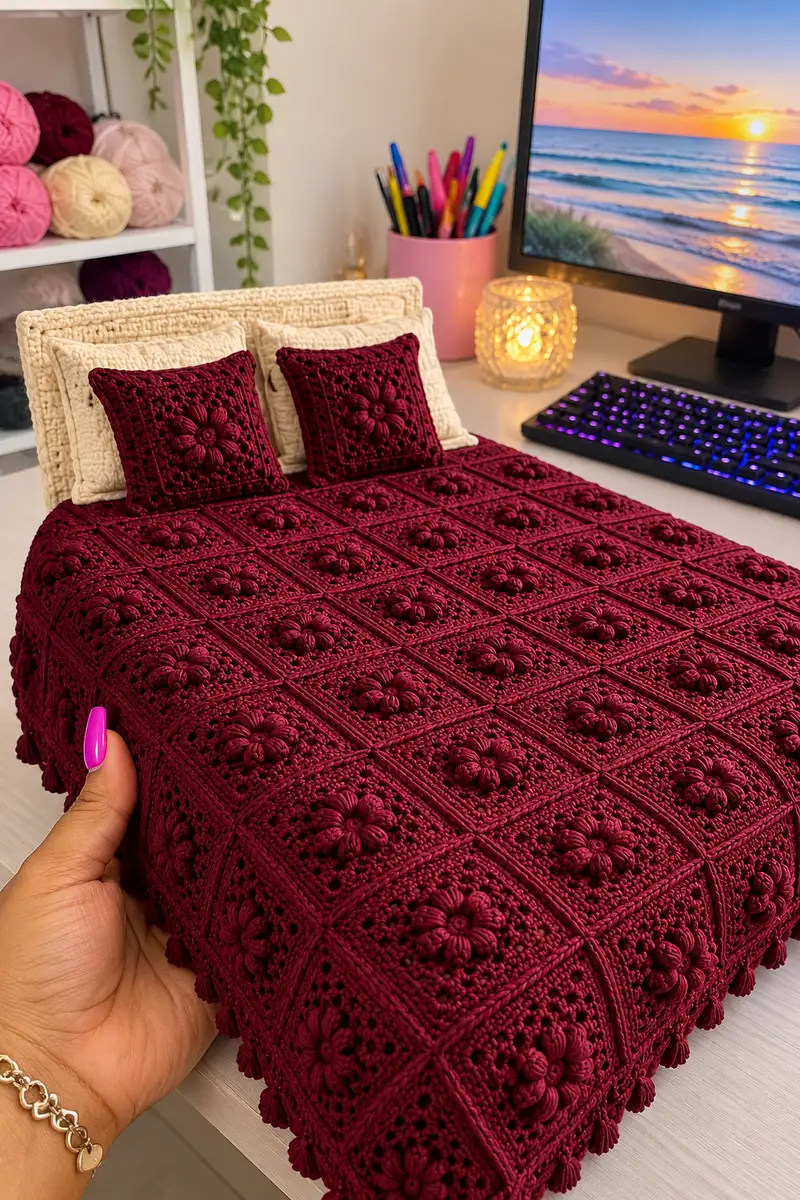
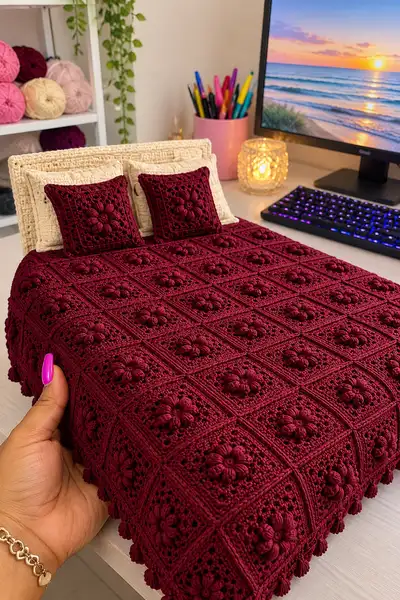
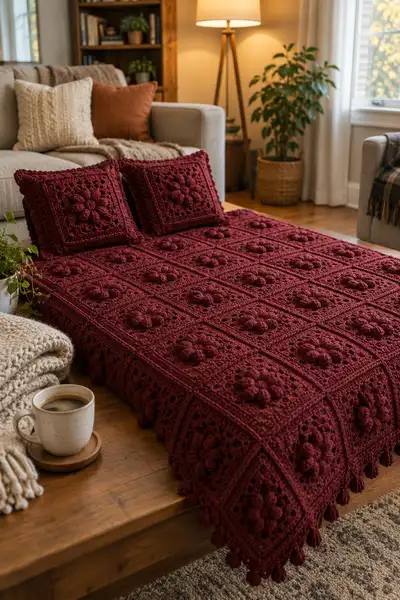
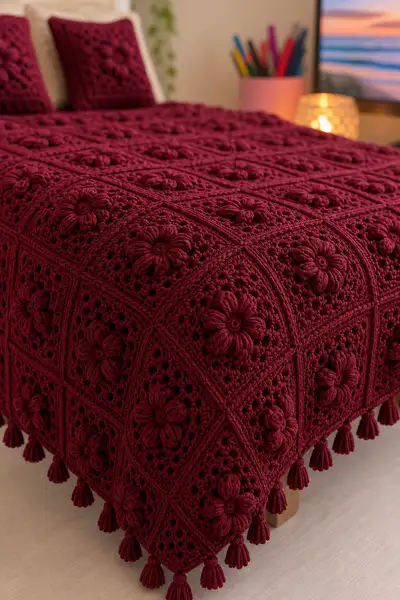
Luxurious burgundy bedspread worked from textured floral granny squares joined together and finished with a deep textured border and tassels. Each square features a raised 8‑petal puff flower seated on a densely textured square background. The finished spread shown is worked in a rich deep burgundy with matching tassels and two matching pillow shams for a coordinated look.
Progress Tracker
0% Complete
— Motif (Floral Center and Petals) :
Round 1 :
Make a magic ring. Ch1, 8 sc in magic ring. Pull ring closed. (8)
Round 2 :
Ch2 (counts as hdc), 1 hdc in same st, *ch2, skip next st, 2 hdc in next st; rep from * around to create 8 little ch2 arches. Join with sl st to top of first ch2. (16 hdc, 8 ch2 sps)
Info :
This round creates base arches for the petals to attach into. Keep tension even; these arches set petal spacing (8 petals total).
Round 3 :
Join with yarn into the first ch2 arch. In each ch2 arch work: *(5-loop puff, ch1) — to form a petal—, sl st into same arch to secure (see note below).* Repeat into each ch2 arch for 8 puff petals total. After last petal, sl st to base to close. (8 large puff petals)
Info :
5-loop puff: yo, insert hook, pull up loop; yo, insert, pull up loop; repeat until 5 loops collected; yo and pull through all loops; ch1 to secure. Keep each puff slightly elongated and consistent.
Round 4 :
Ch1, sc in same st, *ch3, sc in center between next two puff petals (into base stitch or space), ch3, sc around the back of the next puff (behind petal) to anchor; rep from * around. Join with sl st. This creates 8 ch3 picot corners around the flower. (16 sc equivalents, 8 ch3 loops)
Round 5 :
Ch1, sc in each sc and into each ch3 loop: (sc, ch2, 3 dc) into each ch3 loop to begin square shaping — work a small shell in each arch to start turning the motif square. Continue evenly placing sc between shells. Join with sl st. (Counts vary locally but work evenly to keep 8 shells)
Info :
The aim of rounds 4–6 is to form a stable circular-to-squared transition. Make stitches evenly so petals sit centered in the motif square.
Round 6 :
Ch2, 1 hdc in same st and in each sc around until you reach a shell; in shell work (2 dc, ch2, 2 dc) to make a small corner; continue hdc between shells. Join. (8 corners forming square shaping)
Round 7 :
Ch1, sc in each hdc around until ch2 corner space: work (sc, ch3, sc) in corner space; continue sc between corner spaces. Join. This round defines the four corner ch3 spaces that will shape the square more clearly.
Round 8 :
Ch3 (counts as dc), 2 dc in same st, *sk next 2 sts, 3 dc in next st (creates textured groups), into corner ch3 space work (2 dc, ch3, 2 dc), rep from * around. Join to top of initial ch3. (You should have 4 corner blocks and groups between.)
Info :
At this stage petals are set and corner shaping begins. Keep stitch counts even on each side so that later rounds grow squarely rather than becoming round.
Round 9 :
Ch1, sc in each st and in each dc group top, but in each side group work *(3 dc, ch1, 3 dc) in the center stitch of the previous group to subtly increase side width; in corner ch3 spaces work (sc, ch5, sc) to enlarge corner. Join. (Corner ch5 now ready for next rounds)
Round 10 :
Ch2, hdc in each st around, placing (2 hdc, ch2, 2 hdc) into each corner ch5 space (work in the center of the 5-ch), join. (This row smooths the texture and increases square dimensions evenly.)
Info :
If your petals feel too flat, gently tug on the puff loops to round them out and shape them before continuing. Do not pull so hard as to distort the surrounding stitches.
Round 11 :
Ch1, sc in each st around. At this round look for even stitch count along each edge: each side should have the same number of sc between corners. Join with sl st. (Even sc count per side ensures neat squares later)
Round 12 :
Change to BLO (back loops only) for a textured ridge: Ch2, 1 hdc BLO in each st around, placing (hdc, ch2, hdc) BLO into corner stitch(s) to keep corners defined. Join. (Square begins to show raised frame)
Round 13 :
Ch1, sc in each st BLO around to lock the ridge; in corner spaces work (sc, ch3, sc). Join. (This completes a framed ridge that will be accentuated in the next rounds.)
Info :
BLO rounds are used to create the raised frame around the motif that mimics the look in the photo. Maintain even tension and consistent loop height to keep the ridge uniform across all squares.
Round 14 :
Ch3 (counts as dc), in each side work *dc in next 3 sts, (dc, ch1, dc) in corner ch3; rep around, join. This rounds the square further and creates a subtle lacy textured background around the flower center.
Round 15 :
Ch1, sc in each st and in each ch1 sp around. Place an additional sc into the center top of each puff petal to anchor the petal and make petals pop slightly more. Join. (This provides a stronger foundation for later border rounds.)
Round 16 :
Ch2, hdc in each st around until corner ch1 spaces: in each corner work (2 hdc, ch2, 2 hdc). Join. (Count for the full round should be divisible by 4 for even side distribution.)
Round 17 :
Ch1, sc in each st, but in the center of each side work (3 dc cluster in next st, ch1) to create a subtle raised diamond on each side. Continue evenly and join. (Counts will vary with clusters; keep same number of repetitions per side.)
Info :
From Round 12 onward, you may choose to change to a slightly larger hook for border rounds if you want a softer drape; however, keep the same hook for all squares to ensure identical sizes.
Round 18 :
Ch3, dc in each st across each side; in corners work (2 dc, ch3, 2 dc). Join. This adds height and readies the square for the outer textured rounds that frame each square.
Round 19 :
Ch1, sc in each st and in corner ch3 spaces (sc, ch3, sc). After joining, fasten off and weave in end. Block square to measurement: target finished square size approximately 8–9 inches (20–23 cm) depending on yarn and tension. (One completed floral square)
Info :
Make a sample square first and block it flat to measure exact size. This allows you to calculate how many squares you'll need for desired bed dimensions. Keep all squares consistent with same blocking method and tension.
— Square Expansion Rounds (If you prefer larger squares) :
Round 20 :
To expand the motif into a larger decorative square, join yarn at any corner. Ch3 (counts as dc), work 2 dc into corner ch3, *dc in each st along side until mid-side, (2 dc, ch2, 2 dc) in next corner, rep from * around. Join. This adds one full dc round of width. (Maintains square corners)
Round 21 :
Ch1, sc in each st around with extra sc in middle of each side group to keep even side counts. Join. (This secures the new dc layer)
Round 22 :
Ch2, 1 hdc in each st around; in each corner work (2 hdc, ch2, 2 hdc). Join. Repeat this pair of rounds (sc round and hdc round) until square reaches desired size. Each pair of rounds increases side by approximately 0.5–0.75 in (1.5–2 cm) depending on yarn and tension.
Info :
If you prefer many smaller squares (as pictured), stop after Round 19; for a larger bedspread using fewer bigger squares, repeat Rounds 20–22 in pairs until each square measures your preferred size.
— Making Multiple Squares :
Round 23 :
Create as many identical squares as necessary for your spread. For a twin/throw you may need ~24–30 squares (6x4 layout); for queen shown in images a layout of 7x9 or 6x8 is common depending on square size — calculate using your blocked square measurement.
Info :
Calculate layout: Bed width ÷ blocked square width = squares across. Bed length ÷ blocked square width = squares down. Allow additional squares for borders/drape if desired.
Round 24 :
Label or stack squares as you make them to maintain a consistent pattern/placement and to avoid subtle shade/tension differences creating a checkerboard look. Keep squares in the same order when joining.
Info :
Washing and blocking a small batch at a time and then continuing will keep the entire set consistent. Use identical blocking pressure for each square.
— Joining Squares (Invisible Whip or Mattress Stitch) :
Round 25 :
Choose join method: invisible whip stitch or join-as-you-go (JAYG). This pattern describes an invisible whip seam for a solid look. Use a length of yarn and a large tapestry needle.
Round 26 :
Place two squares right sides together, aligning edges and corners. Use pins to secure. Run the tapestry needle under the front loop of one square and under the back loop of the facing square, pulling yarn snug but not tight to keep seam flat. Repeat along entire edge. Fasten off and weave ends. (This creates a flat visible frame on the RS.)
Info :
Whip seam is worked through loops near edge to create a subtle ridge. Take your time to make joins uniform in tension for a neat grid across the spread.
Round 27 :
Join squares row by row: join across the first row of squares, then join subsequent rows to the first row, aligning seams so that floral centers form a straight grid both horizontally and vertically. Press joins flat with light steam if needed after completion.
Round 28 :
Alternate method — Join-As-You-Go: Work the final outer round of each square so that on the final round you slip-stitch into the adjacent square’s final round at corner and side points to join. This produces near-invisible joins and avoids sewing at the end.
Info :
When using JAYG, make sure the adjacent square is positioned and pinned; work slowly and count carefully to keep one stitch alignment consistent between squares.
— Main Bedspread Body Rounds (When Joining is Done) :
Round 29 :
After all squares are joined into the full rectangle/size required, work a cleanup round around the entire outer edge: RS facing, join yarn at any seam, ch1, sc evenly around working 3 sc into corner points to make rounded corners. Join with sl st and fasten off. This evens outer edges before border rounds. (Edge sc count depends on total joined perimeter.)
Info :
The cleanup round evens stitch counts and prepares a consistent edge for the repeated border pattern. Count stitches along each side and adjust by adding or skipping an occasional sc to keep corners centered.
Round 30 :
Place a marker at the starting point of the next round. Join yarn with sl st to start the decorative border. Ch3 (counts as dc), work 2 dc in same st, *sk 2 sts, puff cluster in next st (3-loop puff ×3 to form a bobble cluster), sk 2 sts, 3 dc in next st; rep from * around. Join with sl st. This creates alternating elevated bobble clusters and dc groups that echo the motif centers.
Round 31 :
Ch1, sc in each dc and sc around each puff cluster anchor point to neaten. In corners add (sc, ch3, sc) to maintain square corners. Join.
Info :
Border rounds are worked tightly to build weight and body for the bedspread. If you prefer a softer edge, use a slightly larger hook for these rounds; however this may change final dimensions slightly.
Round 32 :
Ch2, 1 hdc in each st around, placing (2 hdc, ch2, 2 hdc) into corners. Join. Repeat this textured pair (sc round + hdc round) two more times to build a 4–6 row border of depth. Each repetition adds stability and a clear frame.
Round 33 :
Ch1, sc in each st around; join and on the final sc of the round slip into the top of a bobble anchor and prepare for next decorative ridge.
Round 34 :
Ch3, 1 dc in next 2 sts, *fpdc (front post double crochet) around the next dc to make a raised column, dc in next 3 sts; rep from * around. Join. This adds a raised rib that frames each square on the perimeter and mirrors the framed look between squares.
Info :
Front post stitches create vertical texture. Ensure you identify the correct st to stitch around; insert hook from front to back to front around the post for fpdc.
Round 35 :
Ch1, sc in each st and in each fpdc ridge top, ensuring neat finishing. Join. Fasten off if you want to start a tassel attachment or continue with decorative edging rows.
Round 36 :
If adding extra body rows for additional weight and length, continue repeating rounds of (hdc round, sc round) or (dc round, sc round) until you reach desired dimensions. Keep track of how many extra rows you add on each side to maintain symmetry.
Info :
Measure periodically during added rounds and try the spread on your bed or surface to determine if more rows are needed for drape and fullness.
— Deep Decorative Border (12 Rounds Shown) :
Round 37 :
Join yarn on RS at center of any side. Ch1, sc in same st, sc evenly across until corner; (sc, ch5, sc) in corner; continue around. Join. (Ch5 corner gives extra depth for tassel placement)
Round 38 :
Ch3, dc in each st across; in corner ch5 work (2 dc, ch5, 2 dc). Join. (This begins the tall border body.)
Round 39 :
Ch1, sc in each st around; in corner ch5 work (sc, ch5, sc). Join. (This secures the taller corner loop.)
Round 40 :
Ch2, hdc in each st around, placing (2 hdc, ch3, 2 hdc) into corner ch5 center. Join.
Round 41 :
Ch1, sc in each st around; in each side center work a puff cluster every 8–10 sts to echo motif bumps around the edge (work 3-loop puff, ch1 to secure). Join.
Info :
Spacing of decorative puffs is aesthetic. Mark positions with small clips before working the round so distribution is symmetrical on all four sides.
Round 42 :
Ch3, dc in each st around; in corners work (2 dc, ch3, 2 dc). Join. Repeat Rounds 39–42 one more time to create a thick framed edge (total border depth now 6 rows plus foundation rows).
Round 43 :
Ch1, sc in each st around to tidy the edge. Join. This gives a nice platform for the tassel loops where you will attach tassels later.
Round 44 :
Optional cable-look ridge: Ch2, work 1 hdc in each st around but working fpdc around every 6th st and bpdc (back post double crochet) around the next to create a subtle alternating ridge pattern. Join.
Info :
These post stitch rounds are optional but give the visual heavy texture seen in the photographs. They also help the tassels to hang neatly from a firm edge.
Round 45 :
Ch1, sc in each st and finish by weaving all ends. Lightly block the entire bedspread when complete to allow border to settle and tassels to hang evenly.
— Tassels (Edge and Corners) :
Round 46 :
Prepare tassels: Decide placement spacing — in the pictured spread tassels are placed at each corner and every second square junction along the border (approx every 4–6 inches). Make tassels roughly 3–4 in (7.5–10 cm) long for medium drape, plus knot and head.
Round 47 :
To make one tassel: Wrap yarn around a 3.5–4 in (9–10 cm) card 18–22 times depending on desired thickness. Slide yarn bundle off, tie a 6 in (15 cm) length of yarn tightly around the bundle near one end to form the tassel head, fold, and wrap another length of yarn around the top ½ inch to secure and make the tassel neck. Trim ends evenly.
Round 48 :
Attach tassels: Using the tail left from the tassel head, thread through the edge stitch previously created at the border (or through a ch loop), pull through, and tie or sew down on the WS with a couple of secure stitches. For extra security, sew the head also to the border inside with a few tight stitches before hiding ends.
Info :
Make a sample tassel and attach it to test weight and spacing before making all tassels. Tassel weight affects how the border sits and drapes over the bed edge.
Round 49 :
For corner tassels, make a slightly larger or doubled tassel (wrap more yarn) and position exactly at corner center to balance the outer look. Add one extra tassel at each corner for a full boutique look as in the images.
Round 50 :
After attaching all tassels, comb tassel strands lightly to neaten and trim to a uniform length. Steam lightly from a distance if necessary to flatten any twists, taking care not to scorch yarn if using synthetic fibers.
— Pillow Shams (2 matching pillow covers) :
Round 51 :
Each sham is made from 4 floral squares joined 2x2 and edged with a deep border to make a pillow front. Make four squares identical to the bedspread squares, block them to the same size as the bedspread squares.
Round 52 :
Join four squares into a block using invisible whip stitch aligning floral centers symmetrically. After joining, work the same border sequence used for the bedspread but reduce the border rounds to 6–8 rounds so the sham sits well over a pillow insert.
Round 53 :
Back panel: Make a simple rectangle of hdc rows to match the sham size for an envelope back, or make a second identical square block if you prefer a fully patterned back. For envelope back, make two pieces that overlap by approx 4 inches when seamed.
Round 54 :
Assemble sham by sewing back panels to front using mattress stitch or whip seam leaving overlap for pillow insertion. Work a finishing sc round around the full sham to tidy the edge and anchor seams. Add small tassels at each corner to echo main spread if desired.
Info :
For pillow inserts choose a size slightly larger than the cover (by 1–2 inches) for a plump look. Stuff pillows and close any open seams securely.
— Finishing, Blocking and Care :
Round 55 :
Weave in all loose ends using a yarn needle. For thick yarns, weave each tail through 6–10 stitches to secure. Trim tails close to work to reduce bulk under the border.
Round 56 :
Blocking: Lay the bedspread flat on blocking mats or a clean towel. Using pins, gently shape each square to identical dimensions and allow to dry. For cotton-blend yarns, a light steam or wet-blocking followed by air-drying gives best results. Avoid overstretching the motifs.
Round 57 :
Maintenance: Spot wash when possible; for full laundering use a gentle machine cycle in cold water or hand wash. Reshape and dry flat. Avoid tumble drying to preserve tassel shape and puff texture.
Info :
Label your care instructions when gifting so recipients know how to preserve the texture and color of the bedspread. Cotton and cotton-blend yarns may soften with time but keep their defined puff texture if cared for gently.
— Tips, Color & Customization Notes :
Round 58 :
Color changes: For a two-tone effect change color for round 12 or 13 of the square to create a framed contrast. To carry yarn inside squares, carry loosely across WS or crochet over ends for a tidy finish.
Round 59 :
Adjusting size: To make a throw instead of full bedspread, reduce square count to desired layout (for instance 4x6 for a large throw). To enlarge, repeat outer expansion rounds evenly to keep square proportions.
Round 60 :
Yarn substitute: Use any comparable weight yarn keeping gauge similar; natural fibers give good drape while acrylics give durability and easier washing. Test one or two squares before committing to a large-yardage purchase.
Info :
When substituting yarn look at the recommended hook size and make a gauge swatch of one square to calculate final yardage needs and adjust hook sizes accordingly.
— Expanded Technical Rounds (Detailed Stitch-by-Stitch for a Single Square Expansion to Ensure Mathematical Consistency) :
Round 61 :
Starting from Round 19 square (which had a stable count per side), ch1, sc evenly around. For consistency mark the first sc and count total around; this establishes the number for future hdc rounds. Example count: 84 sc around (divide by 4 = 21 sc per side).
Round 62 :
Ch2, hdc in same st and in each of the 84 sc across = 84 hdc. In corners ensure the counts align: in corner spaces work (2 hdc, ch2, 2 hdc) which will increase the total by 4 hdc + 2 ch spaces distributed equally. After corners this round total becomes 92 hdc (example with corner additions) — always recount at the end.
Round 63 :
Ch1, sc in each hdc around. If Round 62 resulted in 92 hdc total, this round will be 92 sc. Join and mark the start. Keep marker in place for subsequent rounds to keep orientation consistent. (92)
Round 64 :
Ch3, 1 dc in next 10 sts, place (2 dc, ch2, 2 dc) into the corner ch2 space, continue with dc across next 10 sts; repeat per side. With 92 sts, each side would have 23 sts; after placing corner increases the formula balances each side evenly.
Info :
This explicit counting example helps you maintain equal side stitch distribution when expanding squares. Always divide the total st count by 4 to get per-side counts and place corner sets centrally.
Round 65 :
Ch1, sc in each st across to tidy edge (example 100 sc if previous increases added consistent 2 hdc per corner etc). Join and proceed with textured rounds or stop to block if you prefer the size achieved.
Round 66 :
Optional decorative ridge: Join yarn and work 1 row of fpdc around spaced posts to emphasize squares in the assembled spread. Count and mark every 10th stitch to keep the fpdc evenly spaced across sides.
Info :
When working many squares, keep a small notebook with counts per round for reference so each square matches in stitch counts through all rounds.
— Advanced Joining and Structural Tips :
Round 67 :
If your final spread will be heavily used, consider adding a backing layer: make a large rectangular panel of hdc rows to the same size as the joined squares and whip-stitch to the back for extra warmth and structure. This also hides join seams.
Round 68 :
When adding backing, baste the backing to the RS of the joined squares with large running stitches at 6–8 in intervals, checking alignment, then sew permanently with mattress stitch for a neat finish.
Round 69 :
Edge reinforcement: For long-term wear, after attaching tassels sew through the tassel neck into the border fabric three times and knot to ensure tassels stay attached through use and washing.
Info :
Take care when sewing through thick yarns—use large-eye needles and consider doubling the sewing yarn for reinforcement if the border yarn is particularly slippery or soft.
— Troubleshooting Common Issues :
Round 70 :
If the spread is cupping at the edges, add one or two rows of sc around the outer edge with a slightly smaller hook to draw the edge in. If edges ripple, add additional rounds with increasing stitch counts to smooth the edge.
Round 71 :
If motifs are differing in size, unpick the last few rounds and rework them with consistent tension or block the smaller squares slightly more to match larger ones. This restores a uniform grid without remaking whole squares.
Info :
Make detailed notes about which hook and tension you used for earlier squares. Small changes in hook size often account for subtle differences between batches of squares.
Round 72 :
For color fading concerns, wash a small sample of the yarn with soap and cold water to test colorfastness before committing to the entire project. Some deep burgundy dyes can bleed on first wash.
Round 73 :
After washing and blocking, check all tassel attachments and re‑trim tassels for uniform appearance. Give one final steam and shape the display before placing on bed.
Info :
Final shaping and grooming give the professional, finished look seen in the photos: carefully align grid rows and center the spread on the bed for the best presentation.
This warm, tactile bedspread is more than a blanket — it's a project that becomes a treasured heirloom. The rich burgundy color and raised floral squares create depth and a cozy, inviting atmosphere. Finishing with tassels and a substantial border gives the spread the boutique, handmade look you'll be proud to display. 🧶✨ Whether it becomes a family staple or a thoughtful gift, each square brings you closer to a beautiful completed piece. Happy crocheting and enjoy the slow, satisfying process of creating something special! ❤️