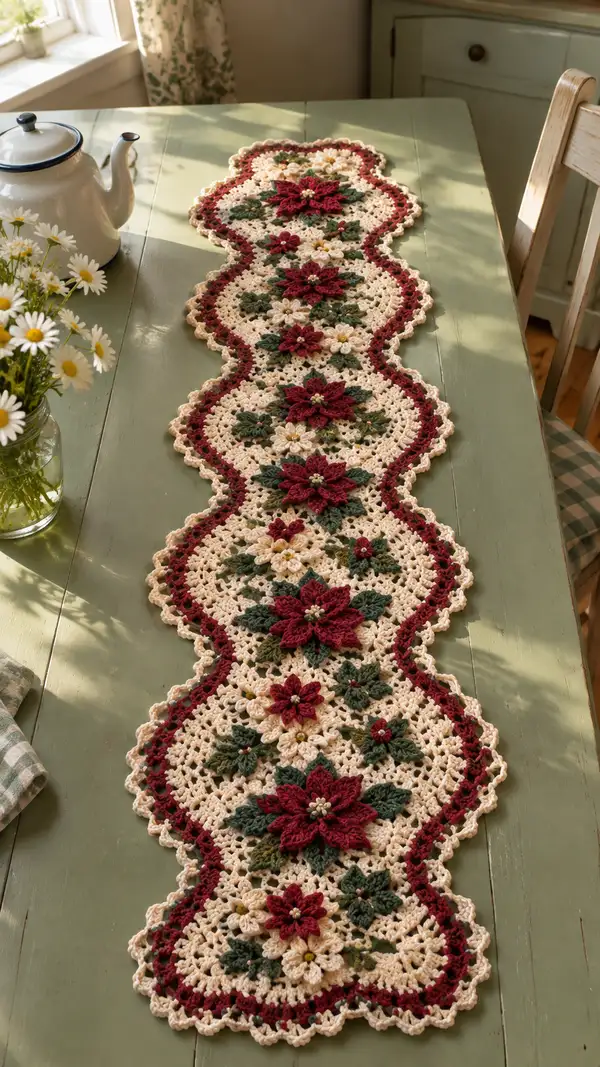
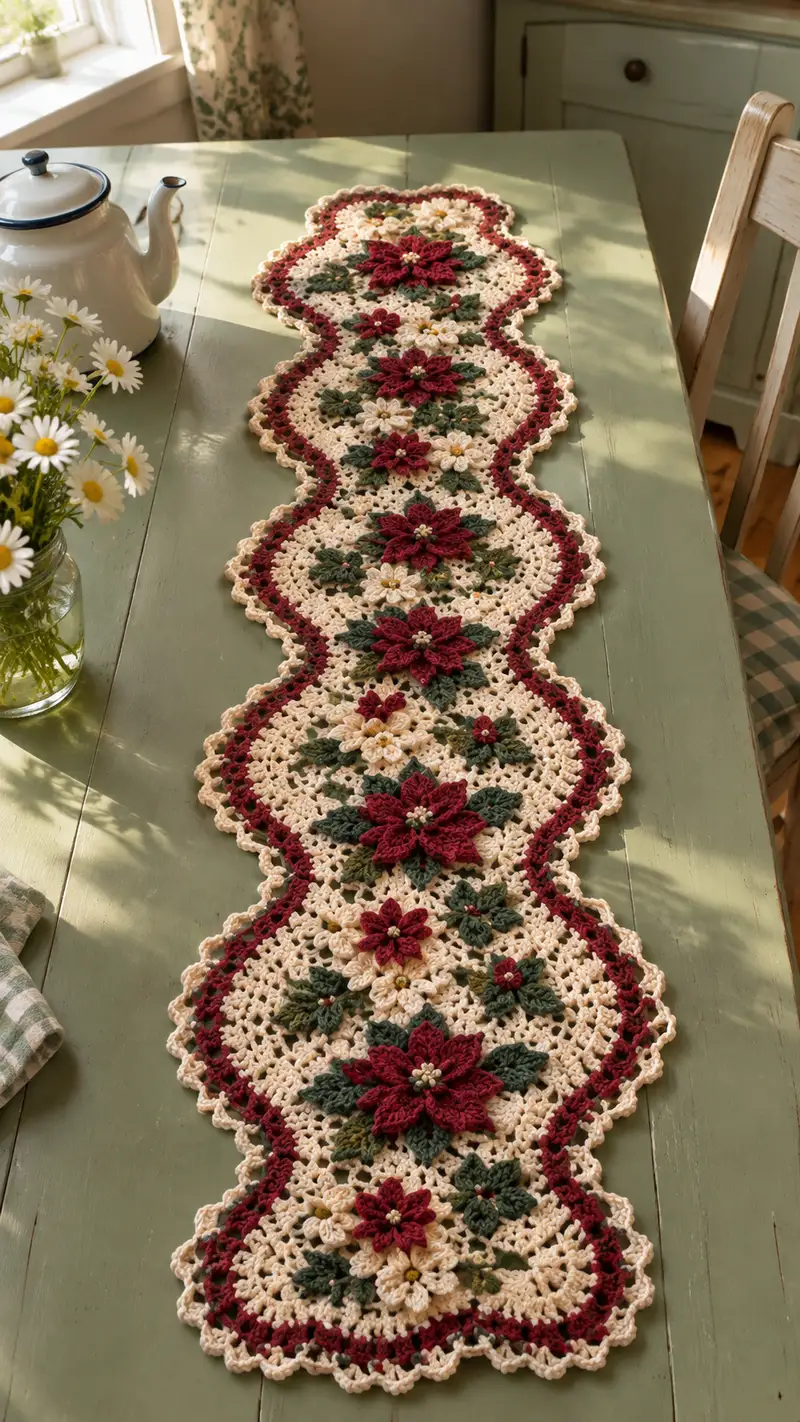
A festive, elegant table runner featuring layered burgundy poinsettias, cream lace medallions and deep green leaves. This long runner is built from repeating crochet medallions joined into a scalloped, vintage-inspired design. The rich burgundy and warm cream contrast beautifully with subtle gold bead centers for a timeless holiday centerpiece.
Progress Tracker
0% Complete
— Notes :
Info :
This runner is constructed from repeating lacy medallions each finished with layered poinsettia petals and leaves. Make the number of medallions required for your table length (the sample photographed contains six full medallions joined end-to-end). Work all motifs with a consistent tension, block each completed medallion flat before joining, and add the final scalloped edging after all motifs are joined. Use the burgundy for petals and scallop accent, cream for background and lace, and green for leaves. Bead centers are added using a beading needle and gold seed beads.
— Gauge & Size :
Info :
Gauge is not critical for this decorative runner but affects finished dimensions. Using worsted weight and 3.5mm hook expect each medallion to measure approximately 9.5-10 inches (24-25 cm) across at the widest points after blocking. Sample runner (6 medallions) measures approximately 60-64 inches (152-163 cm) long. Make adjustments by adding or removing medallions.
— Center Medallion (Make as many as needed; sample makes 6) :
Round 1 :
Make a magic ring with cream yarn. 8 sc in ring (8)
Round 2 :
Inc in each st around (16)
Round 3 :
(1 sc, inc) x 8 (24)
Round 4 :
(2 sc, inc) x 8 (32)
Round 5 :
(3 sc, inc) x 8 (40)
Round 6 :
(4 sc, inc) x 8 (48)
Info :
Keep tension even. This initial circular disc will form the stable center for the lacework that follows. Place a stitch marker in the first stitch of each round to keep your counts accurate.
Round 7 :
1 sc in each st around (48)
Round 8 :
*Ch 3 (counts as dc), skip 1, dc in next st, ch 2, sl st into next st*; rep from * to * around to form 16 small ch-2 arches. Work evenly to maintain round circumference (48 base stitches consumed)
Round 9 :
Change to cream and work into each ch-2 arch: (sc, ch3, sc) into each arch to create openwork points. After completing, join with sl st to first sc (48 chain points visually)
Info :
Round 8-9 create the first ring of lace which will anchor the flower petals. Block this disc flat after completing rounds 1-9 for best results before adding petal layers.
Round 10 :
*Into each ch-3 sp: (sc, ch4, sc); into next sc: sl st*; rep around to create 16 large chain loops. End with sl st to join
Round 11 :
Working into each large loop: join burgundy yarn. (sl st, ch2, 3 dc, ch2, sl st) in loop to form a small shell; rep in each loop around to create a decorative shell ring (16 shells)
Round 12 :
1 sc in top of each shell and 2 sc in the space between shells to maintain a total of 48 sc around (48)
Info :
Round 11 uses burgundy to begin the first hint of color. Use loose but consistent tension so shells puff slightly. Fasten off burgundy if you prefer to switch back to cream for a lacy overlay; the photo layers burgundy petals on top of cream lace.
Round 13 :
Change to cream yarn. (Ch3, skip next st, dc in next st) around to create 24 dc arches; join with sl st (24 arches)
Round 14 :
Into each dc arch: (ch5, sl st into base of arch) to create elongated loops for petal bases. Complete 24 loops
Round 15 :
Switch to burgundy. Work 8 large petals spaced evenly: *Into every third loop work petal cluster as follows: (ch1, puff-stitch x5 into loop, ch1, sl st in loop) then skip two loops and repeat*; total 8 petal clusters
Info :
Puff stitch definition: yarn over, insert hook in loop, yarn over, pull up loop; repeat to have 5 loops on hook; yarn over and pull through all 5 loops; ch1 to close. Keep consistent tension so petals match in size. Place petals symmetrically—use stitch markers to mark loop 1,4,7 etc.
Round 16 :
Fasten off burgundy and change to a slightly darker burgundy (optional) for second petal layer. Work behind the first layer: join yarn in base behind each petal cluster and work 8 back petals: (ch1, sc around base of first petal cluster, then 7 dc decreasing to create a tapered petal) — this forms a stacked petal that peeks from behind (8 petals)
Round 17 :
Make small decorative picot edge around each burgundy petal: *sc around petal edge, (ch3, sl st in first ch) to make picot at tip*; repeat for all petals. Fasten off and weave ends
Round 18 :
Return to cream. Fill in spaces between petal groups with small shells worked across remaining loops. (sc, ch3, 3 dc, ch3, sc) in each gap loop to create balanced lace (8 gaps filled)
Round 19 :
Work a round of 48 sc around the entire motif to tidy edge and create a consistent perimeter for leaf joins (48)
Info :
At this stage the central layered flower is complete. Add bead centers now by sewing in 7-9 gold seed beads into the center of each poinsettia with a beading needle and short thread, knot securely on the back and hide ends. Blocking now will set petal shapes.
Round 20 :
Change to green yarn and prepare leaf anchor points: *(ch2, skip next st, sc) across to create 24 leaf anchor positions equally spaced; join with sl st*
Round 21 :
Leaf Grounding Round: 1 sc in each anchor and in between anchors add ch2 spaces for leaf attachment; maintain a total of 48 stitches (48)
Info :
Leaves will be crocheted separately as small clusters attached to these anchors. Make the small leaves now and sew or crochet them to the anchor spots as you go. Leaves use spike stitches and front-post double crochet to give veining texture.
— Leaf Motif (Make 6 per medallion, make multiples as shown) :
Round 1 :
With green yarn make a magic ring. 6 sc in ring (6)
Round 2 :
Inc in each st (12)
Round 3 :
(1 sc, inc) x 6 (18)
Round 4 :
Change to BLO. (2 sc, inc) x 6 (24)
Round 5 :
Switch to FLO for veining effect: 1 sc in each st FLO (24)
Info :
Using BLO then FLO gives texture contrast on the leaf. Keep these leaves small—measure against a petal to ensure proportionate size. You will shape the leaf by working elongating rows next.
Round 6 :
Work 1 row of spike stitches down the center: ch1, sc in first st, *yo, insert hook 2 rows below at center, yo and draw up a long loop, complete as sc* across to form 12 spike veins. Turn and fasten off leaving long tail for sewing
Round 7 :
Flatten and shape leaf: with tapestry needle fold leaf slightly along center and tack with small whip stitches to create a raised center vein. Attach to medallion using long tail, placing leaf tips to point between petals.
Info :
Mix two greens (main green and moss) for depth if desired. Attach leaves alternating around the flower to create natural clusters—three on one side, three on the other, mirrored along runner axis.
— Small Cream Flower (accent, make 4 per medallion) :
Round 1 :
With cream yarn make magic ring. 6 sc in ring (6)
Round 2 :
Inc in each st (12)
Round 3 :
(1 sc, inc) x 6 (18)
Round 4 :
Change to burgundy for small petal tips: *into every third st make (ch1, 3 dc cluster in same st, ch1), skip two sts*; total 6 mini petals. Fasten off cream if desired and add a small gold bead center
Info :
These accent flowers sit between poinsettias and help break the runner visually. Place them centered in the medallion gaps before joining medallions together.
— Lacy Background Base (one medallion’s lace body) :
Round 1 :
Begin in cream at a point on the cleaned central disc edge (after Round 19). Ch 1, 1 sc in same st, ch4, skip 2 sts, sc in next; rep around to create 24 ch-4 loops (48 base stitches consumed)
Round 2 :
Into each ch-4 loop: (sc, ch5, sc) to build a ring of large loops. Complete 24 loops; join (48)
Round 3 :
*Work 5 dc into each ch-5 loop separated by sl st into space between loops to form petal-like anchors*; rep for all loops to create 24 clusters around
Round 4 :
1 sc in top of each cluster, and 2 sc between clusters keeping total 48 sc around (48)
Info :
Rounds 1-4 expand the medallion into a large lacy disc that will later be shaped into a scalloped medallion. Keep the disc flat by gently stretching while wet-blocking.
Round 5 :
Work a decorative open round: *ch 3 (counts as dc), ch2, skip next st, dc in next st* around to form 24 dc with ch-2 spaces (48 base stitches visually)
Round 6 :
In each ch-2 space work (ch4, sl st into center of previous cluster) to form elongated arches; join and fasten off cream
Info :
You now have one medallion center with petals and a lacy background ready. Repeat these steps to make the number of medallions you need. Block each motif to measure and ensure uniformity before joining.
— Joining Medallions (Join-As-You-Go method recommended) :
Info :
Join medallions along their side scallops to form the long runner. Use cream yarn and join by working sc or slip stitch through corresponding ch-4 or ch-5 loops on adjacent medallions. For a stronger join, use a whipstitch with cream yarn and a tapestry needle sewing the loops together invisibly from the back.
Round 1 :
Lay two medallions face up aligning their side scallops. Join cream yarn at the ch-loop on medallion A, ch1, sc into same ch-loop, then insert hook into the corresponding loop on medallion B and sl st to join; continue sc across each matching loop to create 6-8 joins along the side depending on your medallion size
Round 2 :
For added stability, work a round of sc across both joined edges: working through both layers (through back of medallion A and front of medallion B) make 1 sc in each pair of loops to create an even seam. End with sl st and fasten off
Info :
Join medallions in a straight line mirroring orientation of poinsettias (flowers centered along runner axis). Use pins to temporarily hold positions. Ensure petals do not overlap awkwardly; rotate a medallion orientation slightly if necessary to place flowers visually centered along the runner.
— Center Row Fillers & Small Accents :
Round 1 :
After joining medallions, fill gaps between central medallion edges with small cream lace fillers: ch6, join into corresponding loops between medallions with sc to create small diamond shapes. Repeat along the inner seam for each medallion junction
Round 2 :
In each diamond shape make a tiny accented flower in cream (use rounds similar to Small Cream Flower but only 3-4 petals). Attach with small whip stitches into place and tack securely
Info :
These fillers give the runner a continuous, lacy look and stabilize the seam area. Ensure symmetry across the runner for a professional finish.
— Scalloped Edge & Accent Row (Burgundy scallop wave) :
Round 1 :
With burgundy yarn join at any outer scallop point. Ch1, sc across the outermost loops of each medallion working evenly to maintain shape; place 2 sc in corner points to keep scallop width consistent
Round 2 :
Work a decorative shell row into the burgundy sc foundation: *skip 2 sc, 5 dc in next sc, skip 2 sc, sl st in next sc* — shell count will correspond to your number of outer scallops; adjust so shells sit centered on each scallop
Round 3 :
Switch to cream. In each burgundy shell work (ch3, sc, ch3) into the shell center to create an airy scallop; repeat along entire outer perimeter
Info :
The burgundy cable line adds definition and follows the wavy outline of the medallions. Use blocking to ensure shells and scallops sit flush and do not curl.
Round 4 :
Edge finishing round in cream: *sc in each st around, picot at every shell peak: (ch3, sl st in first ch)*; continue around entire runner to create a delicate picot scallop binding. Fasten off and weave ends invisibly
Info :
For a crisp outer edge, lightly steam block or use fabric stiffener diluted and brushed to edge points. Pin scallops precisely to the blocking board while drying.
— Optional Decorative Beading & Finishing Touches :
Info :
Sew small clusters of gold seed beads into centers of each small cream flower and in the center of each poinsettia. Use a beading needle threaded with regular yarn or fine sewing thread and secure knots on the back of the medallion so they are not visible. Trim and weave all ends into back of medallions.
— Full Assembly & Final Blocking :
Info :
Once all medallions are joined and the scalloped edge is added, steam block the entire runner. Pin every scallop and flower gently to ensure the runner lays flat and flowers open evenly. Place a cloth between iron and crochet if using steam—do not press directly with hot iron. Allow to dry fully before removing pins.
Round Summary :
This pattern contains the following conceptual round counts per medallion: central rounds 1-21 (structured disc), petal formation rounds 15-17, lace expansion 8 rounds (approx), leaf and small flower additions 6-12 rounds, join and edging rounds 4-6 rounds. Repeat to reach a total combined count across runner sections typically exceeding 150 rounds for a 6-medallion runner. Detailed per-medallion counts above and info sections guide each step for consistent results.
Info :
If you need to shorten or lengthen the runner, make fewer or more medallions. For a table topper version make 3 medallions; for a long banquet table make 8 or more. The join method remains the same.
Assembly Instructions
- Block and pin each medallion flat to the same measurements before joining to ensure a neat, even runner.
- Join medallions using join-as-you-go or whipstitch along corresponding ch-loop points; pin medallions first to align poinsettias along the center axis.
- Attach leaves to the round 20 anchor points using the long tails from leaf motifs; tack several small stitches at the base to hold the veins and slightly cup the leaf.
- Sew small cream flowers into medallion gaps before completing long seam joins so they sit naturally between large poinsettias.
- Work the burgundy scallop accent row across the entire outer joined perimeter, then switch to cream for the final picot edging; block after edge work.
- Sew gold seed beads into each flower center with a beading needle; knot thread securely on the back and hide ends inside medallion openings.
- Weave all loose ends through multiple stitches on the wrong side; trim close but avoid cutting the knot directly at the surface.
- Final blocking: pin the entire runner to desired shape and dimensions; steam lightly and allow to dry completely before use.
Important Notes
- 💡Use stitch markers consistently at the beginning of each round to avoid counting errors and maintain proper shaping
- 💡Block medallions before joining; unblocked motifs will not match and joins will look uneven
- 💡Weave in ends between layers (petal/leaf overlaps) so seams remain invisible on the right side
- 💡Maintain consistent tension; inconsistent tension makes scallops and shells differ in size
- 💡When using beads, secure each bead with several knots and hide ends to prevent shedding
- 💡Pin pieces into final position before sewing to ensure symmetry along the runner axis
- 💡If you prefer a stiffer runner, treat the finished edging with diluted fabric stiffener while pinned
- 💡Always test a small sample of the edging to ensure the picot and shell counts produce the correct scallop spacing
This Burgundy Poinsettia and Cream Table Runner transforms any table into a warm holiday statement piece. Each layered flower and lacy medallion comes together to create a lovingly handmade heirloom perfect for seasonal gatherings. Enjoy the mindful steps of crocheting each petal, leaf, and scallop—then step back and admire your elegant centerpiece. 🧶✨🎄
What is the finished size of this runner?
Each medallion finishes roughly 9.5-10 inches (24-25 cm) across after blocking. A runner of six medallions will measure approximately 60-64 inches (152-163 cm) long. Use more or fewer medallions to change length.
Can I use different yarn weights for this pattern?
Yes. Thicker yarn (bulky) will enlarge motifs and produce a thicker runner. Use a slightly larger hook and adjust medallion count to fit table size. Finer yarn will produce smaller, more delicate motifs; adjust hook accordingly.
Do I need to block motifs before joining?
Definitely. Blocking each medallion flat ensures accurate symmetry and consistent joins. Unblocked motifs can produce wavy joins and mismatched scallops.
How do I attach the beads securely?
Sew beads with a beading needle and short thread or thin yarn, pass the needle through the bead and back through adjacent stitches multiple times, then knot on the wrong side and weave the tail into interior stitches.
Can I machine wash this runner?
Hand wash cold on gentle cycle or spot clean. Acrylic blends are more washable; natural fibers like wool or cotton may shrink or soften. For longevity, hand wash and air dry flat.
Can I make the runner shorter or longer?
Yes—simply increase or decrease the number of medallions and adjust the seam strategy. Maintain the same orientation and edge treatment for a consistent look.
What if my stitch counts are off when joining?
Unpick the last few joins and realign medallions. Use pins and count loops carefully. Joining is easier when medallion anchors are blocked to identical measurements.
Can the motifs be sewn together instead of joined-as-you-go?
Absolutely. Blocking and sewing with a whipstitch into corresponding chains produces a secure, flat seam. Choose the method you find most comfortable.
Stay in the Loop!
Get notified when we release new free crochet patterns and join our crafting community!