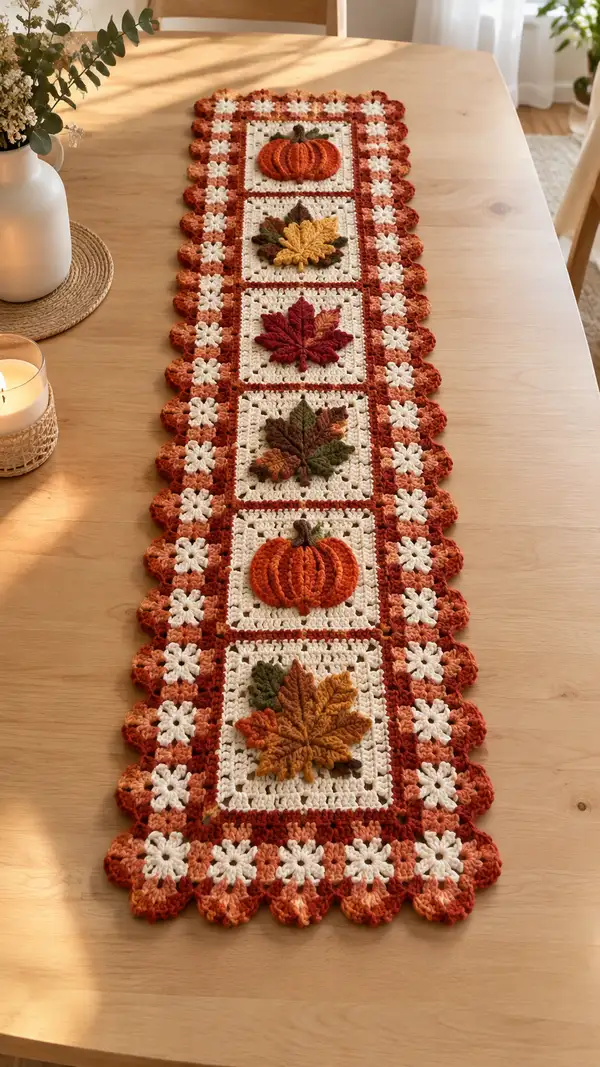
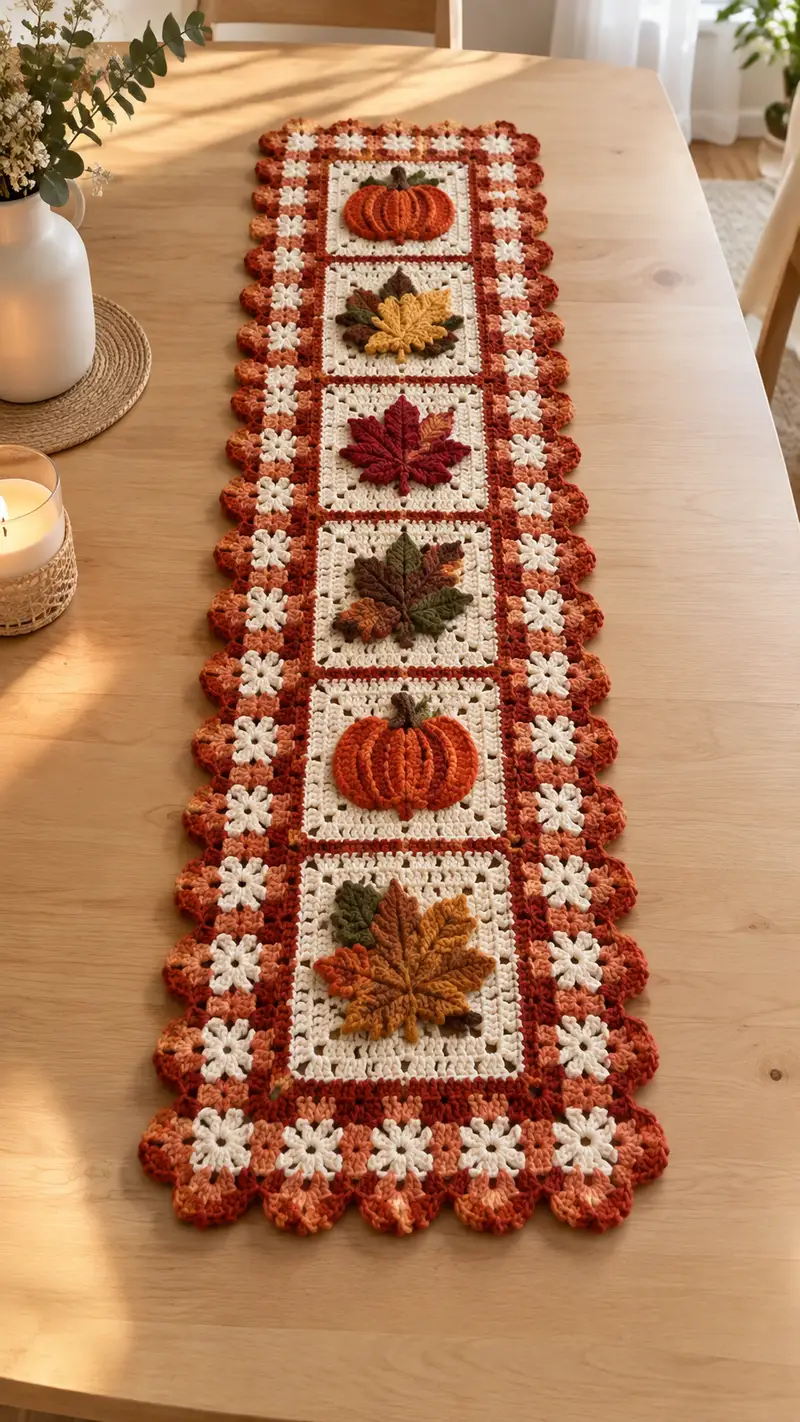
Bring cozy autumn charm to your table with this burnt orange and cream table runner featuring textured pumpkin and leaf applique9s. Five framed squares showcase 3D pumpkins and layered leaves in warm fall tones, connected by delicate daisy motifs and finished with a scalloped floral edge. Designed to sit beautifully on a dining table or console, this runner combines crochet motifs, applique9 techniques, and a classic granny-style join for a seasonal centerpiece.
Progress Tracker
0% Complete
— Overview :
Info :
This pattern is modular: you will make five framed cream squares (each 14cm/5.5in square finished), three leaf applique9s and two pumpkin applique9s as shown in the image. Squares are joined with rust sashing strips and small daisy motifs between them, then an outer scalloped floral border is worked around the entire runner. All stitches use US terms. Gauge is not critical but use consistent tension so squares match.
Info :
Suggested finished dimensions: approximately 12-14 inches (30-36 cm) wide and 48-54 inches (122-137 cm) long depending on blocking. Adjust by adding/removing border rows or changing yarn weight.
— Cream Framed Square (Make 5) :
Round 1 :
With cream yarn, make a magic ring. Ch3 (counts as dc), 2 dc into ring, ch2, (3 dc, ch2) x3. Join with sl st to top of ch3. (12 dc, 4 ch-2 corners)
Round 2 :
Sl st into next 2 sts to reach corner ch-2 sp. Ch3, (2 dc, ch2, 3 dc) in same corner sp, *3 dc in next side between corner clusters, move to next corner and (3 dc, ch2, 3 dc)*. Repeat * to * for all corners. Join to top of ch3. This forms 3-dc clusters on sides and corners with ch2 corner spaces. (28 dc, 4 ch-2 corners)
Round 3 :
Ch3, 2 dc in the same st, ch1, (3 dc) into each side gap across, ch1 between side clusters, in each corner work (3 dc, ch2, 3 dc). Join. (Cluster structure: each side has 5 clusters separated by ch1; total dc approximately 44)
Info :
Round 3 begins to square up the motif. Keep tension even and measure diagonals if concerned; adjust tension slightly to keep edges straight. Use stitch marker to mark first cluster if desired.
Round 4 :
Ch3, 2 dc in same st, ch1, (3 dc in next ch1 sp) x across each side making 3-dc clusters separated by ch1; in each corner work (3 dc, ch2, 3 dc). Join. This round increases the number of clusters per side creating a larger square. (Approximately 60 dc, 4 ch-2 corners)
Round 5 :
Ch3, dc in next 2 sts, (ch1, skip 1 st) across a little to create a lacy frame: In each ch1 side space work (3 dc) and ch1 between these groups; corners as before (3 dc, ch2, 3 dc). Join. (Square remains with 4 corners and increased side clusters; approx 72 dc)
Info :
At the end of Round 5 your cream square should measure approximately 4.5-5 inches across (unblocked). Block gently to square up if necessary for accurate assembly.
Round 6 :
Ch1, sc evenly around into dc stitches and ch-1 spaces placing 3 sc into each corner ch-2 for a neat framed edge. Join with sl st to first sc. (Count will be the number of stitches placed; this creates a solid sc border to receive sashing.)
Round 7 :
Ch2, hdc around in each sc to create a slightly raised inner frame. Work 2 hdc in corner scs to maintain square corners. Join. (This adds body to the frame and evens out edges.)
Info :
Leave a long tail after Round 7 for seaming to the rust sashing if you prefer to sew; alternatively work join-as-you-go later. Repeat for all five squares. Label each square at least 'S1' to 'S5' to plan applique9 placement.
— Pumpkin Applique9 (Make 2 pumpkins) :
Info :
Pumpkins are worked in rounds to create a 3D ridged shape with front-post/raised ribs, then a small stem is added. Use burnt orange yarn for the pumpkin body and dark brown for the stem. Work with a slightly smaller hook (3.5mm) if you prefer tighter shaping, especially for ribbing.
Round 1 :
With orange, ch2, 6 sc in second ch from hook. (6)
Round 2 :
Inc in each st around. (12)
Round 3 :
(1 sc, inc) x6. (18)
Round 4 :
(2 sc, inc) x6. (24)
Round 5 :
(3 sc, inc) x6. (30)
Info :
These rounds form a flat disc base for the pumpkin. The number of increases creates the diameter; keep rounds flat by maintaining consistent tension.
Round 6 :
Work 1 sc in each st around (30). Join. This begins the body walls.
Round 7 :
Switch to front-post technique: Ch2 (does not count as st), *fpdc around next st, 1 sc in next st* repeat around. With 30 sts, you will have 15 fpdc and 15 sc alternations. Join. (30 working positions)
Round 8 :
Ch2, *1 sc in next fpdc (worked into top loops), fpdc around next sc* repeat around to create raised rib effect alternating into previous round. Join. (30)
Round 9 :
1 sc in each st around to even out (30). Join. Continue alternating rib rounds and sc rounds for texture.
Round 10-14 :
Repeat Rounds 7-9 pattern twice more (3 profile rib repeats total). You will have 5 rounds of ribbing interspersed with even rounds, building pumpkin height. (Maintain 30 sts.)
Info :
Start very light stuffing through an opening as you build the ribs — you want the pumpkin slightly filled to keep ribs raised but not overstuffed. Use small pieces of fiberfill to reach inner areas.
Round 15 :
(4 sc, dec) x5. (25)
Round 16 :
(3 sc, dec) x5. (20)
Round 17 :
(2 sc, dec) x5. (15)
Round 18 :
(1 sc, dec) x5. (10)
Round 19 :
Dec x5 (5). Fasten off leaving long tail. Finish stuffing so the pumpkin is plump but not firm. Thread tail and run through front loops only around the top opening, pull to close and secure inside. Shape ribs with fingers and a blunt needle to refine grooves.
Stalk :
With dark brown, ch4, sl st to form a little tube: ch4, sl st to first ch to make ring. Round 1: 6 sc in ring. Round 2: sc in each st (6). Fasten off leaving tail. Sew to pumpkin top; optionally add a couple of green leaves (tiny leaf instructions below) tucked under stem.
Info :
To enhance 3D ribs, run a length of matching yarn from top to bottom, wrapping around the pumpkin and stitching through the bottom center to create defined segments (invisible stitch technique). This is optional but gives sculpted pumpkin look as in the image.
— Maple Leaf Applique9 (Large, Make 2) :
Info :
These are layered maple leaves worked flat with textured ridges using front post and back post techniques. Use variegated yarn or change colors between rounds for a realistic fall color. Work with 3.5mm hook for sharper detail.
Base Chain & Center :
Ch7. Row 1: sc in 2nd ch from hook, sc in next 4, 3 sc in last ch; continue on opposite side of foundation chain working sc in next 4, sc in last ch (turning) — total about 14 sc; join to form a small oval base. This creates a short central stem for starting shape.
Round 1 :
Ch3 (counts as dc), working around the oval foundation, work shells to form a five-lobed leaf outline: *2 dc, ch1, 2 dc* across curve, placing clusters to form points. Join. (Approximately 20-24 dc clusters around)
Round 2 :
Work into petal points to shape lobes: In each point work (tr, dc, ch1, dc, tr) to elongate the tip. In valleys between points work (sc, ch2, sc) to form indentations. Join. This shapes a multi-lobed maple silhouette.
Info :
Maple leaf edges are jagged: you will shape points with tall st (tr) and create valleys with chain spaces. Keep symmetry by counting stitches and matching each lobe repeat.
Round 3 :
Turn leaf to WS and work fpdc along center vein: Attach yarn at base, ch2, work fpdc along center of leaf length (about 6-8 fpdc). Fasten off. On RS, work decorative surface slip stitch veins: using contrasting color, embroider 5-7 veins from center to edges using long stitches and tapestry needle that follow leaf lobes.
Round 4 :
Edging: With same color as leaf, sc evenly around, placing 3 sc in each tip point and 1 sc in valleys. Join and fasten off leaving long tail for sewing. Block lightly to flatten but maintain a little texture.
Info :
For layered look, make a smaller leaf in a contrasting color (repeat above with fewer chains) and sew it centrally on top of the larger leaf to produce depth as seen in the image.
— Small Cluster Leaf (Make 1 or more) :
Round 1 :
Ch5, sl st to form ring. Ch2, 6 hdc into ring, join. (6)
Round 2 :
Ch3, 2 dc in next st, ch1, skip 1 st, *3 dc in next st, ch1* repeat to end. Join. This creates three small lobes. Fasten off and sew under a larger maple leaf if desired to simulate overlapping leaves.
Info :
These tiny leaves add visual variety and help anchor applique9s to the square without overwhelming the center.
— Oak/Cluster Leaf Applique (Make 2) :
Round 1 :
Ch6, sl st to form ring. Ch2, 8 hdc into ring. Join. (8)
Round 2 :
Ch3, dc in next 2 sts, (ch1, skip 1 st, dc in next 3) around to form lobed silhouette. Join. This yields 3 slightly longer lobes, good for clustered oak look.
Round 3 :
Work sc edge around, placing 3 sc in each lobe tip. Fasten off. Add surface embroidery for veins using darker color yarn with long stitches.
Info :
Mix variegated yarns (golden, olive, rust) for realistic multi-tonal leaves like those pictured. Needle felt or brush edges lightly if using blended fibers for softer transitions.
— Small Daisy Flower Motif (Make many to join squares) :
Round 1 :
With cream, magic ring, ch1, 8 sc in ring. Join. (8)
Round 2 :
Ch2, (2 dc, ch2, 2 dc) in each sc around to create 8 petals in corners. Join to top of ch2. (8 petals)
Round 3 :
Ch1, sc around in top of each petal to tidy and create small connecting edge. Fasten off leaving tail for join. Each daisy will measure about 1.25-1.5 inches across depending on tension.
Info :
These daisies serve as the connecting motifs between framed squares — you will make enough to create columns of daisies along both sides and rows between squares. Count and lay out pieces before assembly.
— Joining Squares and Daisies (Join-As-You-Go Variation) :
Info :
There are two approaches: seam with mattress stitch or join-as-you-go (JAYG). The instructions below use JAYG when working the rust sashing round so motifs are connected with minimal sewing. Plan layout: Squares stacked vertically in this order from top to bottom as shown in photo: Pumpkin, Layered Leaf (gold), Red maple leaf, Brown-green cluster leaf, Pumpkin. Between each square horizontally there is rust sashing and vertical columns of daisies forming the lateral border.
Round 1 (Sashing on One Square) :
With rust yarn, attach at center of one side (midpoint) of the cream square. Ch3 (counts as dc), dc evenly along side across top of sc frame: work dc into each sc and ch-1 space across until corner. In corner work (3 dc, ch2, 3 dc) to turn corner. Continue along next side if doing continuous sashing. Work until you have a full rust framed round around one square, leaving spaces for daisies. Join to first ch3. (Stitch count varies with frame.)
Info :
To join two squares vertically: when you reach the side that meets another finished square, stop after working half the side, join with sl st into the opposite square's matching sc to join, then continue working around your active square. Alternatively, use mattress stitch along the sc round for a neater invisible seam.
Round 2 :
After framing squares with rust, arrange daisies in columns: join daisies between squares by slip-stitching the edge of each daisy to rust sashing: position one daisy in each ch-1 gap along border and join with sl st through top of daisy and through the rust border. Continue until both sides of the runner have a neat row of daisies between squares. Use pins to hold daisies in place before joining.
Info :
Take care to maintain equal spacing; measure each side and divide by number of daisies to get uniform intervals. The runner pictured uses 14 daisies per long side total (including corner daisies); adjust to your length.
— Scalloped Floral Edge (Outer Border) :
Info :
The outer scalloped floral edge is worked in variegated rust and burnt orange to echo the photo. Work one continuous border round around the outside, attaching to the rust sashing and daisy outer edges. Use stitches to create petal clusters for scallops.
Round 1 :
With variegated rust, attach at a corner. Ch1, sc evenly along outer rust frame and around daisies to create a foundation row. Place 3 sc in each daisy top to anchor it. Join with sl st.
Round 2 (Scallops) :
*Ch3, in next stitch work (5 dc) as a shell, sl st into base to form a scallop; sk 2 sts, then sl st into next, repeat from *. Work evenly around each side and around daisies' outer loops. At corners, work an extra shell to keep scallops even. Join and fasten off when complete.
Round 3 :
Optional: With cream yarn, work small picot trims between shells: attach in base between scallops, ch5, sl st into second ch from hook to make a small decorative chain-picot; secure. Repeat across runner for the highlights seen in the photo where cream dots accent each floral scallop.
Info :
Work shells consistently; if shells gather, add extra sl st to anchor them. If shells are too flat, add an extra dc in the shell center. Keep count of shells per side so they align symmetrically.
— Alternate Flat Border (If you prefer less frill) :
Round 1 :
Sc evenly in rust around whole runner. Round 2: Ch2, hdc around to form a smooth frame. Fasten off.
Info :
This flat border is good for tabletops that will be used daily and need less snagging from scallops.
— Finishing Touches & Embellishment :
Info :
Sew applique9s to centers of cream squares with tapestry needle and matching yarn tails: place the pumpkin(s) in the top and bottom square, and the layered leaves in the interior squares as pictured. Use small whip stitch or invisible mattress stitch and secure firmly. Add a few extra small leaves tucked under larger ones for depth.
Round :
For each applique9, position at the center of square (approximately between the second and fourth round from the inside); pin in place and baste with pins, then sew through the sc frame and the applique9 base using small, evenly-spaced stitches so piece sits flat but retains texture.
Info :
Weave in all yarn ends through several stitches on the WS, then trim close. Block runner gently: mist with water and pin square edges flat on blocking mat, allow to dry overnight for a crisp, even finish.
— Detailed Stitch & Assembly Notes (Tips sprinkled by rounds) :
Info :
1) Always mark the center of each square round with a removable marker while positioning applique9s to ensure they are centered. 2) For pumpkins, wrap extra yarn segments around the body between transfers to define ribs more sharply. 3) For leaf veins, use a tapestry needle and chain-stitched lines or embroidery for a subtle raised effect.
Info :
4) When joining daisies, use a thin yarn tail and small sl st to avoid lumps on the RS. 5) If you choose to sew squares rather than JAYG, use mattress stitch for a nearly invisible join through the sc frame. 6) Keep a layout diagram of your pieces on a table while assembling to reference placement easily.
Info :
7) If runner length is longer than desired, add additional daisy repeats and shell repeats to increase length symmetrically. 8) To shorten, remove one square and its connecting daisies and rework the sides to balance ends.
Info :
9) For machine-washable finish, choose superwash yarns and avoid heavy stuffing in pumpkins; hand wash on gentle cycle recommended.
Completing this burnt orange and cream autumn runner is a rewarding project that fills your home with seasonal charm. Each carefully worked square and applique9 adds texture and color for a cozy, handmade centerpiece. The combination of 3D pumpkins and multicolored leaves creates a warm, layered look that is truly satisfying to assemble. 🌾🍁 I hope you enjoy every stitch and display it proudly on your table all season. Happy crocheting! 🧶