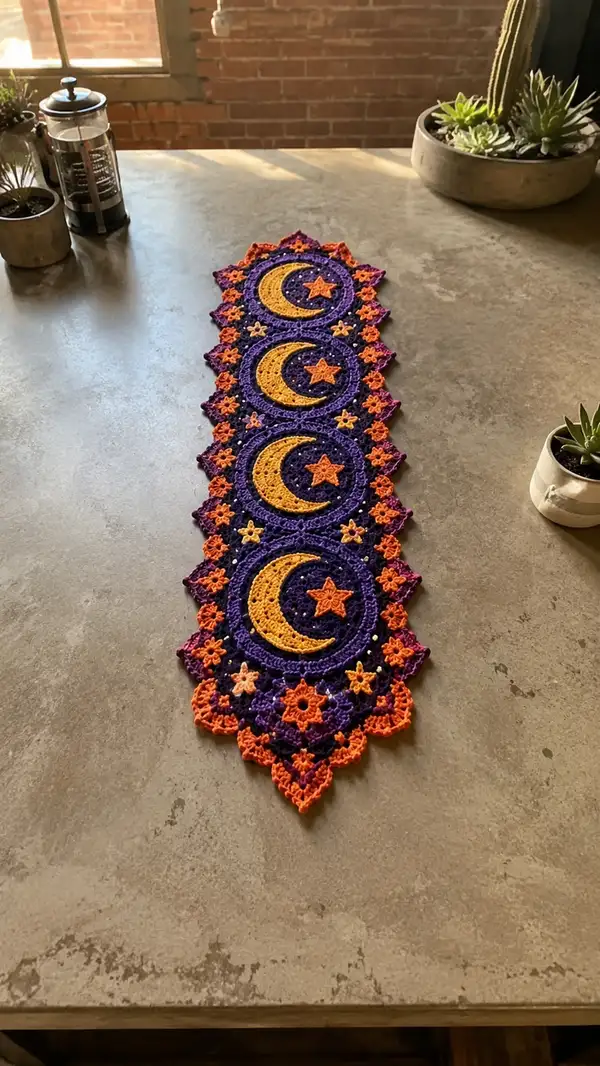
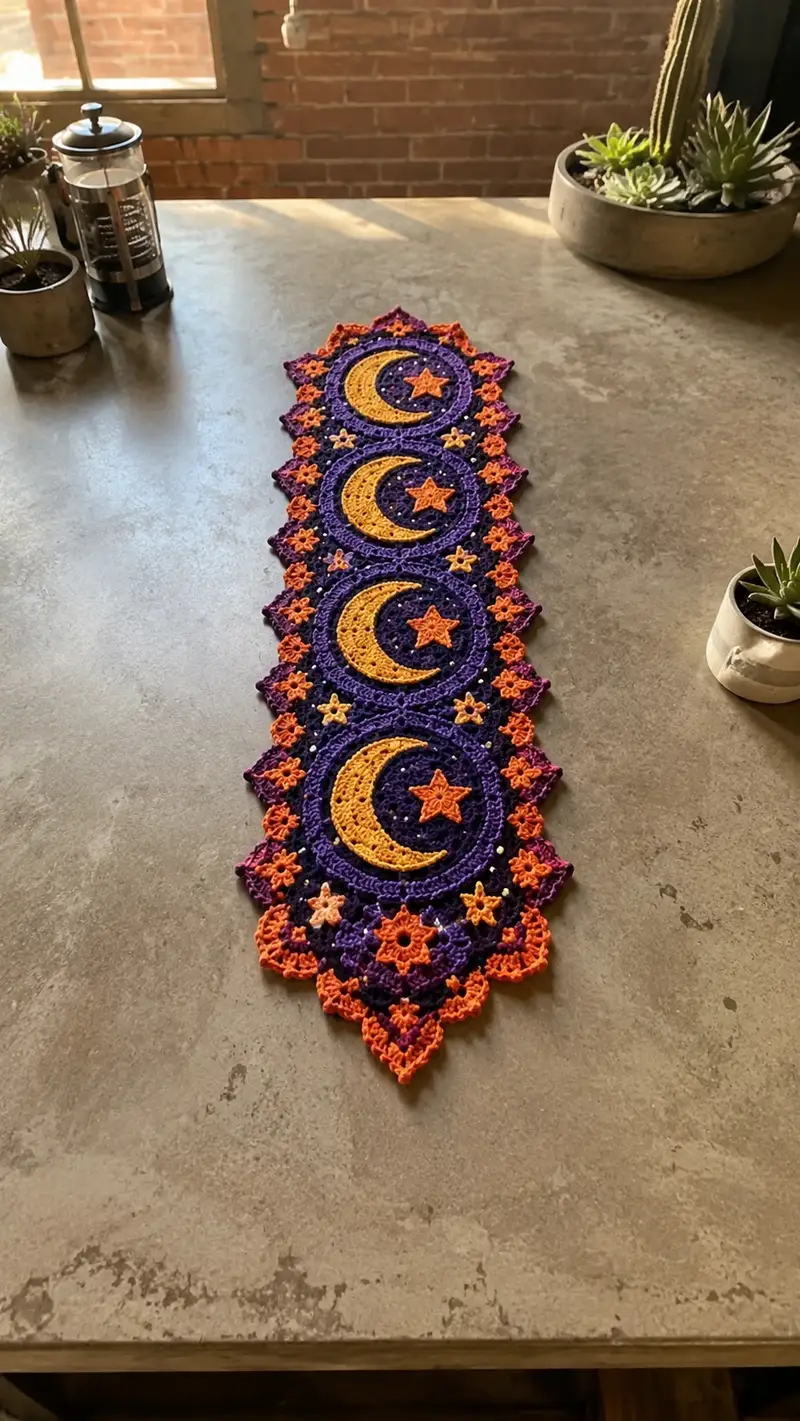
Create a stunning celestial table runner featuring four linked crescent moon medallions surrounded by star appliques and a lacy scalloped border. This pattern uses vivid purple, deep plum, golden yellow and bright orange for a rich, layered look. The runner is made from modular round motifs, crescent and star appliques, joined-as-you-go joins, and a decorative picot scallop edge. Detailed round-by-round instructions and assembly notes make this an enjoyable project for makers who love lace and motif work.
Progress Tracker
0% Complete
— Materials & Gauge :
Info :
Gauge is not critical for this decorative runner, but for consistency each circular medallion should measure approximately 7.5-8.5 inches (19-22 cm) across after blocking when using DK/light-worsted yarn and a 3.5mm hook. If your medallion is larger or smaller, adjust hook size or yarn weight to match desired dimensions. If making the runner exactly as pictured, plan four medallions joined end-to-end totaling roughly 32-36 inches of medallion length plus edging.
— Crescent Medallion (Make 4):
Note :
Work these rounds in the main purple color unless otherwise noted. Each medallion is constructed in continuous rounds to create a dense yet lacy disk with openwork rings that will accept the crescent applique. Use a stitch marker at the first stitch of each round and move it up as you complete the round.
Round 3 :
(1 sc, inc) x 6 (18)
Round 4 :
(2 sc, inc) x 6 (24)
Round 5 :
(3 sc, inc) x 6 (30)
Info :
These first five rounds form a solid center perfect for anchoring the crescent. Keep stitches tight so the center remains firm and not holey when the applique is sewn on.
Round 6 :
(4 sc, inc) x 6 (36)
Round 7 :
(5 sc, inc) x 6 (42)
Round 8 :
(6 sc, inc) x 6 (48)
Round 9 :
1 sc in each st (48)
Round 10 :
1 sc in each st (48)
Info :
Rounds 9–10 build height for the inner ring; place small temporary marker at the right-hand edge of where the crescent will sit so you can align the applique later. This is approximately between stitch counts 12–18 depending on visual placement.
Round 11 :
*ch3 (counts as dc), skip 2 sts, dc in next st, ch2, skip 2 sts, dc in next st* around to create twelve chain arches (48)
Round 12 :
Into each ch2 sp: (sc, hdc, 3 dc, hdc, sc) to form small shell cluster; into each dc from previous round work 1 sc to stabilize (48 shells/48 stabilizing sc)
Round 13 :
*ch4, sk 1 shell, sl st in next shell center to create picoted chain loops* repeat around (creates 12 larger loops) (48 chain loops counted as reference)
Info :
These openwork rounds create a contrast ring that will outline the crescent. Keep picots neat by pulling yarn firmly but not too tight. If you prefer fewer open spaces, ch3 loops can replace ch4 loops.
Round 14 :
Working in the back of the ch4 loops: 1 sc in each loop and 2 sc in every 4th loop to begin gentle outward shaping (total 60 sc)
Round 15 :
(3 sc, inc) x 12 (72)
Round 16 :
1 sc in each st (72)
Info :
Round 14–16 widen the medallion to accept the outer decorative clusters and the final edging. After Round 16 the medallion should be a stable round large enough to frame the crescent applique.
Round 17 :
*ch5, sk 2 sc, picot (ch3 sl st to base), sk 2 sc, sc in next 3 sts* repeat around to create 12 large shell points (72 counted as base reference)
Round 18 :
Into each ch5 sp: (sc, hdc, 4 dc, hdc, sc) to form fuller lacy petals; between petals work 1 sc in base to stabilize (12 petals)
Round 19 :
1 sc around working in back loops only (BLO) to create a defined inner ridge (72)
Round 20 :
Fasten off and weave in tail long enough to anchor and sew on the crescent applique securely. Block medallion flat to measurements.
Info :
Make four identical medallions. Block each medallion to consistent diameter (7.5-8.5 inches) using pins and light steam or soaking. Blocking is essential to ensure seamless joins later.
— Crescent Applique (Make 4 - one per medallion):
Note :
Work crescent shapes in golden yellow. These are worked as a small rounded disk then shaped into a crescent through selective decreases and turning rows to create a curved applique that sits on top of the medallion center.
Round 3 :
(1 sc, inc) x 6 (18)
Round 4 :
(2 sc, inc) x 6 (24)
Info :
These rounds create a tight disk which will later be stretched and shaped into the crescent curve. Keep a long tail for sewing early to position and secure the piece.
Round 5 :
1 sc around (24)
Round 6 :
Change to pattern of partial rounds: sc 8, turn; sc 6, turn; sc 4, turn; sc 3 — these turning rows fold the disk into a crescent curve, weaving the row ends on the wrong side as you go to maintain smooth curve (work without joining) (visual shaping)
Round 7 :
Along outer curve edge, pick up stitches evenly and work 1 sc in each picked up st to create a smooth rim; increase slightly at high points to avoid puckering (estimated 36 sc)
Round 8 :
Work picot trim along outer edge: *sc, ch3, sl st in 1st ch (picot), skip 1 sc, sc* repeat to end (36 with picots)
Info :
Position crescent so the concave side aligns with the inner solid center of the medallion. Pin in place and baste using a long contrasting thread if desired, then sew securely with small whip stitches through the underlying medallion rounds 5–10 area.
— Small Star Applique (Make 8–12):
Note :
Small five-point stars in orange decorate the interstice between medallions and the outer border. Make 2–3 small stars to fit between each pair of medallions and additional stars to fill border points. Adjust quantities based on personal taste.
Round 1 :
Make 5 ch, join with sl st to form a ring (or mr if preferred)
Round 2 :
*(ch6, sl st into the ring) repeat 5 times to create 5 points (5 ch loops)
Round 3 :
Working into each ch6 loop: *sc, hdc, 3 dc, hdc, sc; sl st to base of next loop* repeat around to form 5 points (5 full points)
Round 4 :
Finish with 1 sl st into center, fasten off leaving tail for sewing. Block lightly if needed.
Info :
Sew stars into the medallion gaps using small neat stitches. For a slightly raised star, sew only through the outer rings of the medallion so the star sits slightly above the surface.
— Large Decorative Star (Optional - Make 4):
Round 2 :
(1 sc, inc) x 8 (16)
Round 3 :
*ch8, sl st into base to make 8 loops for points* (8 loops)
Round 4 :
Into each ch8 loop: sc, hdc, 5 dc, hdc, sc; sl st to base (8 points). Fasten off; sew to medallion centers or between medallions as focal points.
Info :
Large stars can be made in contrasting orange for a bold look; place one large star centered at each medallion's inner ring or between medallions as shown in the photo.
— Join-As-You-Go Connector Rounds (Join medallions into a runner):
Info :
Lay out the four blocked medallions in the order you'll join them, with their centers aligned along the runner axis. Work the connector rounds on one medallion, joining to the adjacent medallion when you reach the shared points. This method creates a seamless lace connection that reads as continuous lace rather than sewn seams.
Connector Round 1 :
With medallion A facing you, rejoin main color at the outer rim where neighbor medallion will attach. *Ch6, sl st to corresponding ch6 loop on medallion B to join, ch3, sl st to next join point to create a chain bridge* repeat across 3–4 join points depending on spacing to attach medallion centers (visual alignment)
Connector Round 2 :
Working back into connector chains: 1 sc in each ch, and when at a join point, sl st through both motif loops to lock join; between joins work decorative picot and sc clusters to match surrounding motif texture.
Connector Round 3 :
Reinforce join by working 1 sc around the adjoining bridge and through the outer ring stitches of both medallions where they meet. Aim to have 6–8 secure stitches per join to prevent stretching when the runner is draped.
Info :
If you prefer a more visible seam, place extra chain bridges and star appliques over the joins. If you prefer discreet joins, use matching yarn and tighter stitches when joining.
— Outer Scalloped Border and Pointed Ends:
Note :
Once medallions are joined in a line, work a continuous border around the entire runner edge. Begin at one end and work evenly around, adding extra increases at the points to form the pointed triangular ends as pictured.
Round 1 :
With plum accent color, join at any outer edge stitch and work 1 sc evenly around the entire connected shape, placing (2 sc) in each outer petal base to smooth transitions. Work 1 sc in each base stitch (approx. 420 sc total as a reference; actual count depends on joins and picots)
Info :
Counting now is approximate — this round creates a clean base for the scallops. If your runner feels tight, use a slightly larger hook for the border to ease drape.
Round 2 :
*ch6, sl st into base to form loop; into each ch6: (sc, hdc, 5 dc, hdc, sc) across to form large scallop* repeat around including extra scallops at each medallion join to form the triangular points at both ends (approx. 28 scallops)
Round 3 :
In each large scallop work: 1 sc in first st, *ch3, picot, ch3, sl st in 4th dc to create small layered picots* repeat across scallop to create textured layered edge (keeps counts even)
Round 4 :
Switch to bright orange. Along scallop edges: *sc, ch5, sl st in sc to create a decorative picot loop, sk 2, sc* repeat across creating a more pronounced outer frill (this is the color pop visible in the image)
Round 5 :
Work an accent round in orange: around each outermost ch5 loop work (sc, ch3, sc) to produce small pointed petals; at the very tips of the triangular ends, work extra (sc, ch3, sc) clusters to accent the point.
Info :
These edging rounds create the vivid orange scalloped border seen in the photo. Keep your tension slightly looser on outer rounds to allow the scallops to curve and drape rather than pucker.
Round 6 :
Fasten off and weave in ends. If desired, add tiny accent stars worked in pale yellow or cream into the scallop centers using small whip stitches.
— Optional Embellishments & Beading:
Info :
If you want to mimic the tiny pearl-like accents visible in the photo, use small seed beads or pearl beads sewn onto the medallion outer rings. Thread beads onto a long yarn needle and stitch through the outer ring stitch from the back, knotting securely on the back side.
Bead Placement :
Place beads between the smaller star appliques along the medallion outer ring: aim for 6 beads per medallion spaced evenly for a subtle twinkle.
— Blocking & Finishing :
Info :
Block the entire assembled runner with pins to even out scallops and to ensure medallions lie flat. For a soft, fabric-like drape, pin lightly and allow to dry. For a firm decorative runner, use light spray starch or fabric stiffener and re-pin until dry.
Final Steps :
Weave all tails into the wrong side, trim close. If you added beads, stitch backs securely. Optional: lightly mist runner with diluted fabric stiffener for a more table-ready piece.
— Tips & Troubleshooting (Multiple Infos Across Work) :
Info :
If medallions vary slightly in size after blocking, adjust the join bridges to compensate: add one extra ch3 bridge at the larger medallion's join points and reduce bridges at smaller ones to keep the runner straight.
Info :
To maintain consistent color transitions, carry the unused yarn along the inside of the rounds where possible and catch it with a sc every 6–8 stitches. This reduces ends to weave and keeps color changes tidy.
Info :
When sewing appliques (crescent and stars) to medallions, use small, almost invisible stitches and pull only enough to secure the applique. Over-tightening will distort the underlying rounds.
Info :
If you prefer to make the runner longer, make additional medallions and repeat the join and border sequence; blocking will ensure consistent motif alignment no matter how many medallions you add.
Final Note :
Keep a photos reference or a layout mat as you pin motifs before joining; symmetry and spacing are easiest to correct before any permanent stitches are added.
This celestial table runner brings handcrafted charm to any surface — a beautiful blend of lace, color and motif crochet that looks handmade and museum-ready. Each crescent, star and scallop comes together to create a rhythmic, eye-catching centerpiece that will delight guests and make every table setting special. Whether you display it for seasonal flair or as an everyday accent, this runner celebrates slow craft and thoughtful design. 🧶🌙✨